I bought a 3D printer in February. The thing sat in its box for three weeks because every slicer tutorial I clicked on assumed I already knew what a “process profile” was, what a wipe tower did, and why “pressure advance” was supposed to matter on day one.
Then someone in a Discord told me to just open OrcaSlicer, pick my printer from the wizard, drop a Benchy on the plate, and hit Slice. Fifteen minutes later I had a finished print. So this is the version of the guide I wish I’d found first.
I’m writing this against OrcaSlicer v2.3.2, the current stable build (released March 2025, 13.7k GitHub stars as of May 2026). If you’re on a newer release when you read this, the layout might shift a touch but the workflow below has been steady since v2.0.
Quick context: why OrcaSlicer instead of Bambu Studio or Cura
OrcaSlicer started life as a fork of Bambu Studio, which itself was a fork of PrusaSlicer, which forked from Slic3r. It was built by a developer called SoftFever back in 2023 and is now community-maintained at the OrcaSlicer/OrcaSlicer GitHub repo. The headline reasons people pick it over the alternatives:
- It’s open-source under AGPLv3 and free, with no telemetry tied to any printer brand
- The built-in calibration suite (temp tower, flow rate, pressure advance, retraction, input shaper) is the most complete of any FDM slicer in 2026
- It ships profiles for hundreds of printers including Bambu Lab, Creality, Prusa, Voron, Anycubic, Elegoo, Sovol, Qidi, Flashforge, and Snapmaker
- It works directly with Klipper, OctoPrint, Bambu Cloud, and Mainsail without a plugin
That last point is what hooked me. I’ve got an Ender 3 V3 KE running Klipper and a Bambu A1 Mini, and I really didn’t want two slicers open at the same time.
If you’ve read about OrcaSlicer being “for power users”, that’s mostly a hangover from the early days. The 2.3.x releases simplified the wizard and the default profiles are now genuinely beginner-safe.
Installing it
Grab the installer from the official download page (don’t trust random forks on third-party sites; the 3MF path-traversal fix in v2.3.2 was a real CVE). Windows users get an installer .exe, macOS users get a .dmg, and Linux users get an AppImage or Flatpak. The whole thing is around 200MB.
If you’ve never installed a slicer before: install it like any normal app. The installer doesn’t ask for anything strange, doesn’t bundle toolbars, doesn’t phone home unless you log in to Bambu’s cloud (and that bit is optional).
The first-launch setup wizard
The first time OrcaSlicer opens, you get a four-screen wizard. It takes about ninety seconds.
Region/login. Pick where you live. If you’ve got a Bambu Lab printer and want cloud uploads, sign in here; otherwise just hit Skip. I always skip and use LAN-only.
Printer selection. This is the screen most people get wrong on day one.
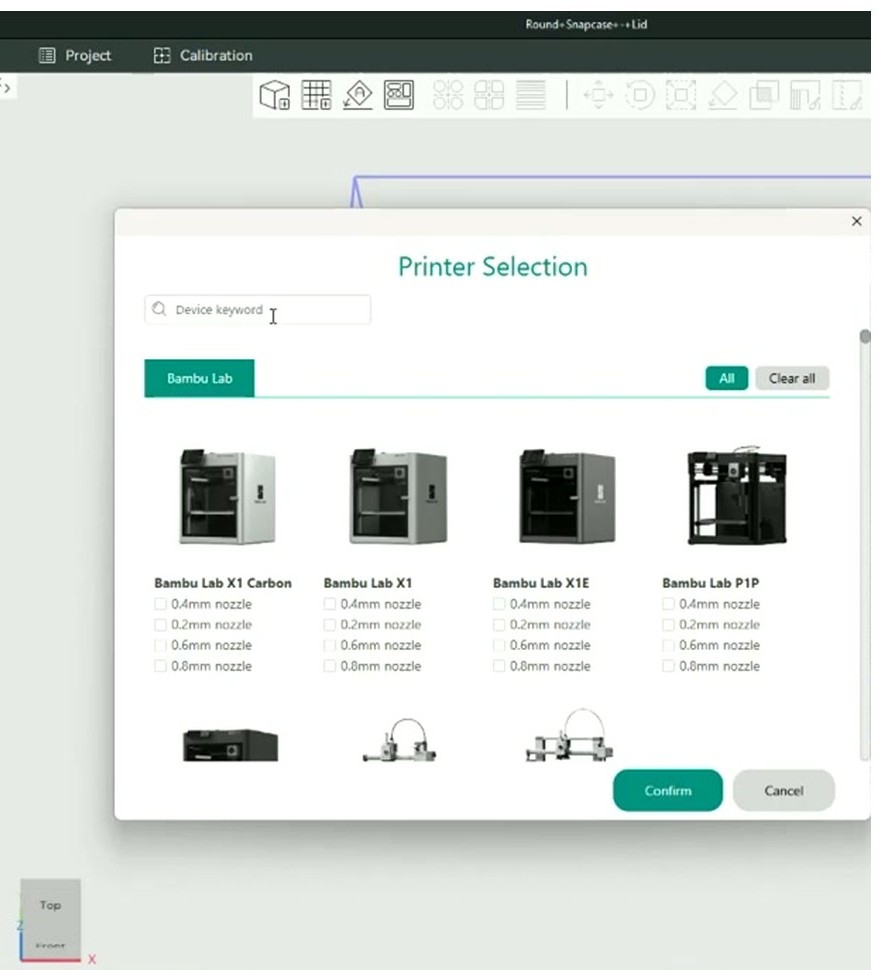
Find your actual printer model. Don’t pick “Custom Printer” or “FDM Generic” out of impatience, those profiles are nearly empty and nothing will print well. The list filters by brand. Tick the nozzle sizes you own (0.4mm is what your printer shipped with unless you’ve been modding). Hit Confirm.
If your printer isn’t listed, OrcaSlicer probably has a clone profile that works. Common examples: most Sovol SV0x printers run fine on the Ender 3 V2 profile, the Kingroon KP3S works on the older Ender 3 profile, and most Klipper-converted printers can use the Voron 0.2 profile as a starting point.
Filament selection. Tick the filaments you actually use. PLA almost always; PETG, ABS, TPU only if you have spools at home. You can add more later from the filament dropdown.
Network setup. Optional and easy to come back to. If you’ve got a Klipper or OctoPrint printer, this is where you’d paste its IP, but you can skip it for now and configure from the Device tab later.
The interface in 90 seconds
The screen splits into five tabs across the top: Prepare, Preview, Device, Project, Calibration. You’ll spend 90% of your time on the first two.
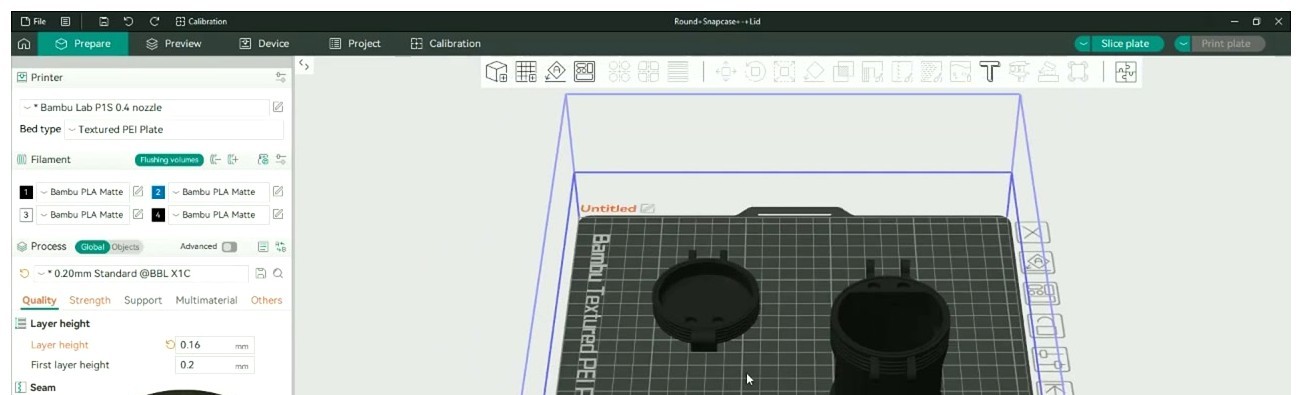
The left side stacks three settings panels:
- Printer: shows your active printer (a Bambu Lab P1S 0.4 nozzle on a Textured PEI Plate in the screenshot above). Don’t fiddle here on day one.
- Filament: which filament loaded in which slot. The four numbered buttons are AMS slots if you’ve got a Bambu Lab AMS attached; on a single-extruder printer it just shows slot 1.
- Process: the print quality preset. The default is “0.20mm Standard @BBL X1C” or whatever your printer shipped with. The five sub-tabs (Quality / Strength / Support / Multimaterial / Others) hide every setting you might ever want.
The right side is the build plate, rendered in 3D. Drag with right-click to rotate the view, scroll to zoom, middle-click to pan. The icons across the top of the plate are the manipulation tools: move, rotate, scale, mirror, paint, cut, support paint, seam paint, and so on.
The Slice plate / Print plate buttons in the top-right are what you’ll hit when you’re done.
Loading your first model
OrcaSlicer ships with a built-in 3DBenchy. Right-click anywhere on the empty plate, pick “Add Handy Model”, and there it is. (If you don’t know what a Benchy is: it’s the standard test boat everyone in the 3D-printing world uses to compare their print quality. Print one, post it on r/3Dprinting, get torn apart by strangers about your stringing. Rite of passage.)
You can also drag-drop any .STL, .3MF, or .OBJ file directly onto the plate. Most files you’ll download from Printables or MakerWorld are already in 3MF format and land with print settings pre-baked.
Arranging and scaling
Once you’ve got something on the plate, the alignment tools matter. Especially if you drag in two or three parts at once.
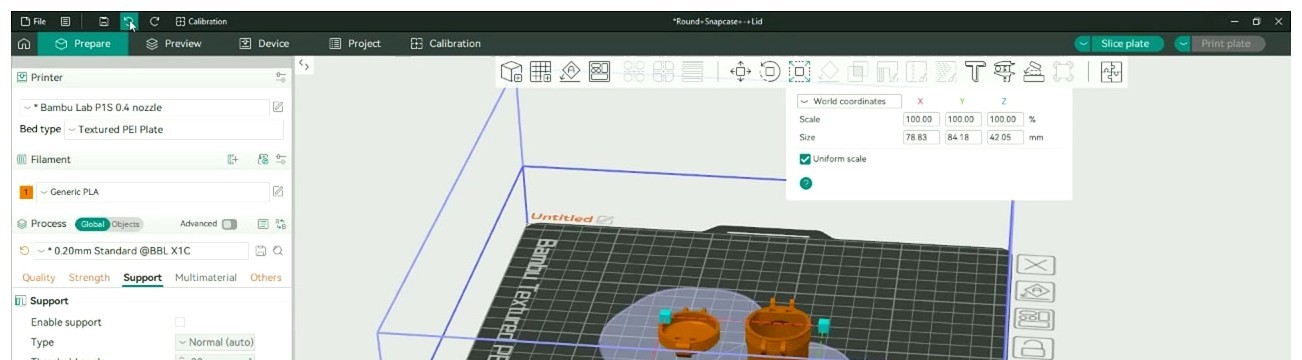
Click any object and the transform popup appears. The Scale row lets you resize uniformly (tick the Uniform scale box) or per-axis. Size shows the exact final dimensions in millimetres so you don’t have to math out percentages.
If your parts overlap or sit too close together, OrcaSlicer pops a red error toast warning about collisions. Hit the auto-arrange button (the icon that looks like four squares being aligned) and the slicer figures out a layout that fits. On a Bambu Textured PEI Plate it’ll respect the corner exclusion zones too.
Two beginner gotchas here:
- Don’t trust auto-arrange to optimise for surface quality. It optimises for fitting, not orientation. If a part has a clear “good face” you want pointing up, rotate it manually first.
- The Print By Object toggle changes the print order. It’s powerful for multi-part plates but it can also make the print head slam into earlier finished parts. Leave it off until you’ve read the warnings.
A safe default settings cheatsheet
You can spend a year tuning these. For your first print, just match these and tweak later:
| Setting | Beginner default |
|---|---|
| Layer height | 0.20mm |
| First layer height | 0.24mm |
| Nozzle temp (PLA) | 210°C (first layer 215°C) |
| Bed temp | 60°C (first layer 65°C) |
| Outer wall speed | 50–80 mm/s on most printers |
| Infill speed | 100–200 mm/s |
| First-layer speed | 20–30 mm/s on a budget printer, 40–50 mm/s on a high-speed printer |
| Cooling fan | 100% after layer 3 |
| Infill | 15% gyroid |
| Supports | Off (turn on later if your model has overhangs steeper than 45°) |
This isn’t optimised for any specific filament brand. It’s the “you will get a usable print” default. After your first successful Benchy, the next thing to do is run OrcaSlicer’s flow rate calibration and pressure advance test, both of which are one-click in the Calibration tab.
Slicing and sending the print
Hit “Slice plate” in the top-right. OrcaSlicer chews through the model and flips you over to the Preview tab.
The slider on the right of the preview lets you scrub layer-by-layer. Look for: cleanly printed first layer, no obvious bridging across gaps, supports actually under the overhangs (not just floating in space), and no weird pink “Travel” lines crossing the model surface (those mean stringing risk).
If the slice looks clean, hit “Print plate”.
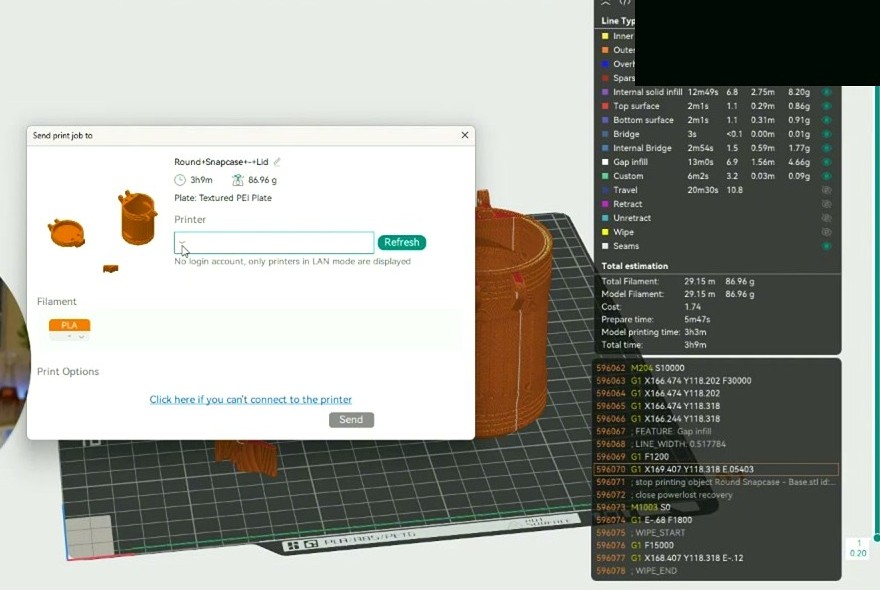
The Send dialog shows the totals: print time, filament weight, and (if you’ve set per-gram cost in your filament profile) total material cost. The panel on the right breaks the time down by feature type, infill, walls, supports, travel, so you can see what the printer’s actually going to spend its hours doing.
If the printer’s already paired in the Device tab, hit Send and walk away. If not, click “Click here if you can’t connect to the printer” and OrcaSlicer drops you into the Device tab to pair via IP, Bambu Cloud, or USB.
For your very first print: stand near the printer for the first ten layers. The first three layers tell you whether the bed adhesion is good. The next seven tell you whether your speed and temperature are sane. After that you can wander off.
What if the first print isn’t perfect?
Honest moment: my first OrcaSlicer print warped on one corner. Took me twenty minutes to figure out my bed wasn’t level (turns out the auto-bed-level mesh on my V3 KE was three months stale). I’ve since fought stringing on PETG, layer shifts on a too-fast travel speed, and one truly awful bird’s-nest where I forgot to load filament. All survivable. All documented.
If your first print isn’t perfect, don’t immediately start changing settings in OrcaSlicer. The fault is usually upstream:
- Bed adhesion fails: re-level, check the first-layer Z-offset, swap to a textured plate if you’re on smooth glass
- Stringing on PLA or PETG: hop to OrcaSlicer’s calibration tab and run the retraction test (it’s two clicks and prints a single tower)
- Layer shift: loose belts, too-aggressive travel speed, or a bumped print
- Crashes mid-slice: outdated GPU drivers (OrcaSlicer needs OpenGL 4.5) or RAM under 8GB; the v2.3.2 release notes mention specific E-core scheduler fixes for Intel 12th-gen and newer chips
For specific symptoms, the OrcaSlicer troubleshooting guide covers the common failure modes with screenshots.
Beginner FAQ
Is OrcaSlicer free?
Yes. OrcaSlicer is open-source under the AGPLv3 license, source code lives on GitHub at OrcaSlicer/OrcaSlicer, and there’s no paywall, no premium tier, no subscription. The maintainer accepts GitHub Sponsors donations but everything is fully usable without donating a penny.
Is OrcaSlicer better than Bambu Studio?
For Bambu Lab printer owners the differences are smaller than they used to be. OrcaSlicer ships more printer profiles (good if you’ve got non-Bambu hardware too), a more complete calibration suite, and faster updates. Bambu Studio integrates tighter with MakerWorld and the AMS RFID system. Lots of Bambu owners run both side by side and use whichever feels right that day.
Can I use OrcaSlicer with my Creality Ender 3?
Yes. All Ender 3 variants (V1, Pro, V2, S1, V3 SE, V3 KE, V3 Plus, V3 Core) have official profiles in the wizard. The V3 KE and K1 series benefit the most because OrcaSlicer’s Klipper integration lets you control the printer directly from the Device tab.
What’s the difference between OrcaSlicer and OrcaSlicer Nightly?
Nightly builds compile after every commit to the main branch. They’ve got the newest features but also the newest bugs. Stable releases (like v2.3.2) ship roughly every three months with everything tested. For your first print, install the stable release.
Does OrcaSlicer work with PrusaSlicer profiles?
Mostly yes. You can import a .ini config from PrusaSlicer through File → Import → Import Configs. Some PrusaSlicer-specific settings (like multi-material seam-painting) won’t translate one-for-one, but printer and filament profiles import cleanly.
Wrap-up
OrcaSlicer in 2026 is genuinely the easiest way to get a first 3D print out the door, regardless of what brand of printer you own. The wizard handles 90% of the setup. The default profiles work. The calibration suite catches most of the issues you’d otherwise spend a month chasing on Reddit.
If you got your first print working from this guide, the very next thing to read is OrcaSlicer’s flow rate calibration walkthrough, that’s the single tweak that’ll improve every future print without you having to learn anything else.