The print was four hours and twelve minutes in when I heard the click. Not the soft tick of a cooling fan ramping up, the harder, drier click of a printhead clipping something it shouldn’t have. I walked over to the printer, looked through the door, and there it was: a tree support branch lying flat on the bed like a knocked-over chess piece, and the nozzle calmly continuing to lay down the next overhang layer over a void that no longer had anything under it. The print was dead. Four hours of PETG, a 0.12 mm layer height, a 70 mm tall figurine, and the only thing I had to show for it was a snapped branch and a slumping chin where the chin used to live.
I’m Jake Holloway. I’ve been printing FDM for more years than I care to date myself with, and I’ve used OrcaSlicer through the 1.x branch, the awkward jump to 2.0, and now the 2.3.x release line that landed in March 2025. Supports are the part of the slicer I argue with most. So this guide pairs every failure mode I’ve actually hit with the exact OrcaSlicer setting name that fixes it, points out where 2.3.x is genuinely better than 2.2 was, and stays honest about the bugs still open against 2.3.2-dev.
The short version: there are paint-on supports, tree and organic supports, and removability levers like Top Z distance and the interface filament selector. Most failures come from one of those three categories being wrong, not from your printer being broken.
Why OrcaSlicer supports fail more than they should
Supports look like one of those features that should be solved by now. Auto-detect the overhangs, drop pillars under them, print the part, snap them off. In practice every step of that sentence is wrong in its own way, and the failures cluster into three patterns that I’ve seen hundreds of times between my own prints and the GitHub issue tracker.
The three failure categories
The first is missed overhangs. You slice, the auto-detection misses something, and somewhere on layer 220 there’s an unsupported lip the slicer didn’t catch. Maybe the angle was exactly at threshold. Maybe the overhang was small enough that “ignore small overhangs” nuked it. Whatever the reason, the print finishes with a sagging tongue of plastic where there should have been a clean edge.
The second is fragile trees. You pick organic or one of the tree styles, the slicer draws beautiful branching pillars in preview, and partway through the print one snaps off or gets bumped over by the nozzle on a travel move. From that moment every layer that depended on the branch is printing into thin air. The classic version of this is reported in issue #11456 against 2.3.2-dev, where the Z-hop fires after the nozzle has already travelled into the support body. I’ve also lived through the issue-#9229 version: a hollow trunk that isn’t strong enough to take a sideways knock.
The third is welded removal. The print finishes, looks great, you pull it off the bed, you try to snap the supports off, and they take a layer of skin with them. Sometimes you can hear the fibers tearing. Sometimes the support won’t come off without pliers, and the down-facing surface ends up looking like a cheese grater. It’s the failure mode users complain about loudest, and the one with the most levers to pull.
If you’re reading because of a specific symptom, jump to the symptom lookup near the end.
Which OrcaSlicer version you’re actually on, and why it matters
Supports changed materially between 2.2 and 2.3.x, and the version you’re running determines what advice applies. OrcaSlicer 2.3.0 stable shipped on 20 March 2025, and 2.3.2 stable followed on 23 March 2025. Both releases sit on top of a foundational support PR that’s worth knowing about by number, because it explains why some of the older troubleshooting articles you’ll find online are now misleading.
That PR is #8212, “Port latest support code from BBS,” merged on 26 February 2025 by Noisyfox. It brought in two big things from upstream Bambu Studio: vertical tree support painting, and an “accurate top z distance for tree support” commit that fixes a long-running gap between the value you typed and the gap that actually got printed. The features shipped in the 2.3.0 release line via PR #8212. Be careful how you read the 2.3.0 stable changelog itself; the final stable release notes don’t list those features by name, just the post-RC bugfixes. That’s a frequent source of confusion when someone reads the changelog and concludes 2.3.0 added nothing for supports.
2.3.2 then added one specific organic-supports change that matters if you’ve ever broken a tree branch mid-print. The 2.3.2 release candidate notes (1 March 2025) describe the change as enabling base infill patterns including rectilinear, rectilinear grid, and honeycomb for organic tree supports, “which were previously hollow-only.” Two explicit limitations: lightning infill is unsupported because it crashes, and double walls remain hollow-only. Both warnings now appear as tooltips. 2.3.2 stable also added a “Hollow base pattern warning” for non-tree supports.
So the first question with any support troubleshooting is which version you’re on. Help, About in OrcaSlicer gives you the build hash. If you’re on 2.2.x, the hollow-tree problem is real. If you’re on 2.3.0 stable, you have vertical tree painting and accurate top Z distance but trees are still hollow. If you’re on 2.3.2 or any 2.3.x nightly past 1 March 2025, you have the infill patterns.
The exact setting names that matter (and where they live)
OrcaSlicer’s support settings are split across four panels: Support, Advanced, Tree, and Filament. Half of the troubleshooting I do for people in forums boils down to “look two tabs to the left, the setting you want is over there.” So before we get into the failure modes, here’s the map.
Support Type vs Support Style
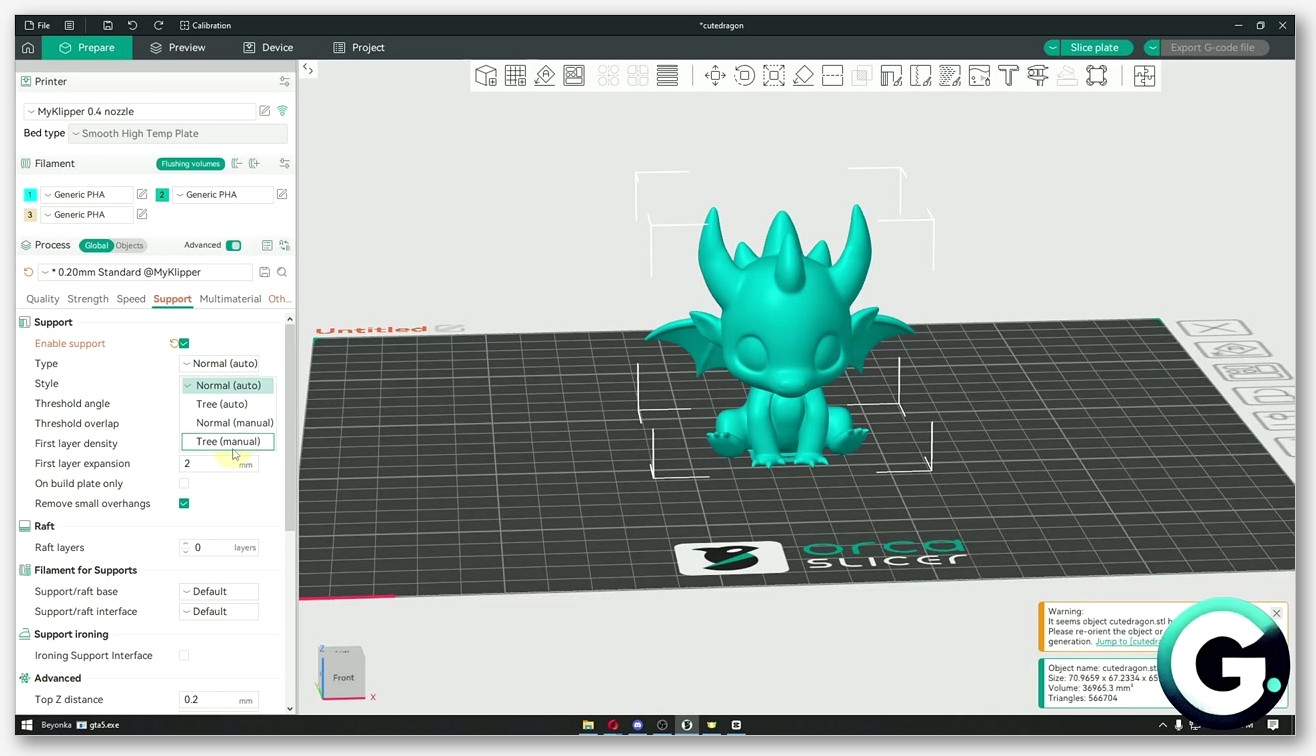
The two top-of-panel dropdowns are Type and Style, and they don’t mean the same thing. Type (internal ID support_type) controls whether supports are generated automatically, manually, or not at all. The options are Normal, Tree, Auto, and Manual. Style (support_style) controls the algorithm that decides how the supports are drawn, and the options are Grid, Snug, Organic, Tree Slim, Tree Strong, and Tree Hybrid.
The reason this trips people up is that Type and Style cross-couple. If you pick Type = Normal and Style = Tree Slim, the slicer still draws a tree, because Style overrides the geometry choice. If you pick Type = Manual, the slicer only generates supports where you’ve painted them, regardless of the Style setting. The mental model I use is: Type answers “where do supports go?”, Style answers “what shape are they?”.
Six Style options is a lot. The cleanest community ranking I’ve seen is from user Marek-Dvorny in OrcaSlicer Discussion #10609, who ranks them by removability and surface quality as Organic first, then Tree Slim, then Tree Strong, then Default (Normal/Grid), and Tree Hybrid last with “poorest contact layer quality.” One user’s opinion in an official Discussion, not the OrcaSlicer team’s position, but it lines up with my experience.
The four removability levers
If supports are tearing skin off your model on removal, you have four direct levers and one indirect one. They all live in the Advanced tab, except Branch Density which lives in Tree.
The first lever is Top Z distance (support_top_z_distance). This is the gap between the top of the support and the bottom of the overhang. Larger value means easier removal but worse down-facing surface quality. Smaller value means cleaner down-facing surface but harder removal, and in extreme cases the support welds to the model. Match it to one layer height as a starting point. If you’re printing at 0.2 mm layers, set it to 0.2 mm; community guides disagree on the “correct” default for this setting (one guide says 0.20 mm at 0.20 mm layers, another claims the slicer default is 0.15 mm), and the OrcaSlicer wiki doesn’t publish a numeric default I could cite cleanly, so I’d rather you pick by your layer height than by a number you read somewhere.
The second lever is Bottom Z distance (support_bottom_z_distance). This one matters when your supports are sitting on top of a model surface rather than directly on the build plate. If you’ve got a multi-tier overhang where supports under the upper overhang land on the model, the bottom Z distance controls the gap on that interface. Most people leave this one alone, but if you’re getting fused supports on internal surfaces, this is the knob.
The third lever is Support/object XY distance (support_object_xy_distance). This is the horizontal gap between the support wall and the vertical face of the model. If you’ve got a tall vertical face right next to where supports are landing, and that face is coming out scarred or shiny, the XY distance is the lever to bump. Too little and the support wall sticks to the model wall as the print rises. Too much and the support won’t actually catch the overhang it’s supposed to support.
The fourth lever is Branch Density (tree_support_top_rate), which is tree-specific. The OrcaSlicer wiki describes it as adjusting “the density of the support structure used to generate the tips of the branches” and notes that higher values improve overhangs but make removal more difficult. This is one of the cleanest tradeoff lines on the wiki, and it’s the one I tweak when a tree print has clean overhangs but the supports are taking forever to peel off. Drop it. You’ll lose a little down-facing quality and gain hours of your life back.
The indirect lever is interface filament. The Filament panel has two selectors: Base (support_filament) and Interface (support_interface_filament). If you’ve got two extruders or an AMS or any multi-material setup, switching the interface to a different material breaks the chemical bond between the support and the model and supports pop off cleanly with finger pressure. More on this in the removal section.
On build plate only
One toggle in the Support panel saves more visible-face surface quality than any other: On build plate only (support_on_build_plate_only). The wiki description is short: “Don’t create support on model surface, only on build plate.” What this means in practice is that supports won’t land on a vertical face of the model and scar it on removal, because they’re not allowed to touch the model surface at all.
The catch is that if you turn this on and your model has an overhang that doesn’t have a build-plate path under it, the slicer can’t support that overhang and you get sag. So this is a toggle that helps when your model geometry has clean vertical sides and overhangs that are reachable from the bed. If you’re printing a figurine with a cape that sticks out from the back, build-plate-only won’t reach the cape and you need supports landing on the back of the figure to catch it. Trade-off case by case.
For our deep dive on tree-specific geometry, including how branch angle and tip diameter interact, see our companion piece on OrcaSlicer tree supports. The settings names in that article are the same ones you’ll see in this section, and the two guides are designed to be read together.
Paint-on supports: when auto-detection isn’t enough
Auto-supports are a heuristic. They look at the threshold angle and the overhang area and they make a decision, and that decision is wrong about 15 percent of the time on the kinds of models I print most. The fix is paint-on supports, which is OrcaSlicer’s manual override layer.
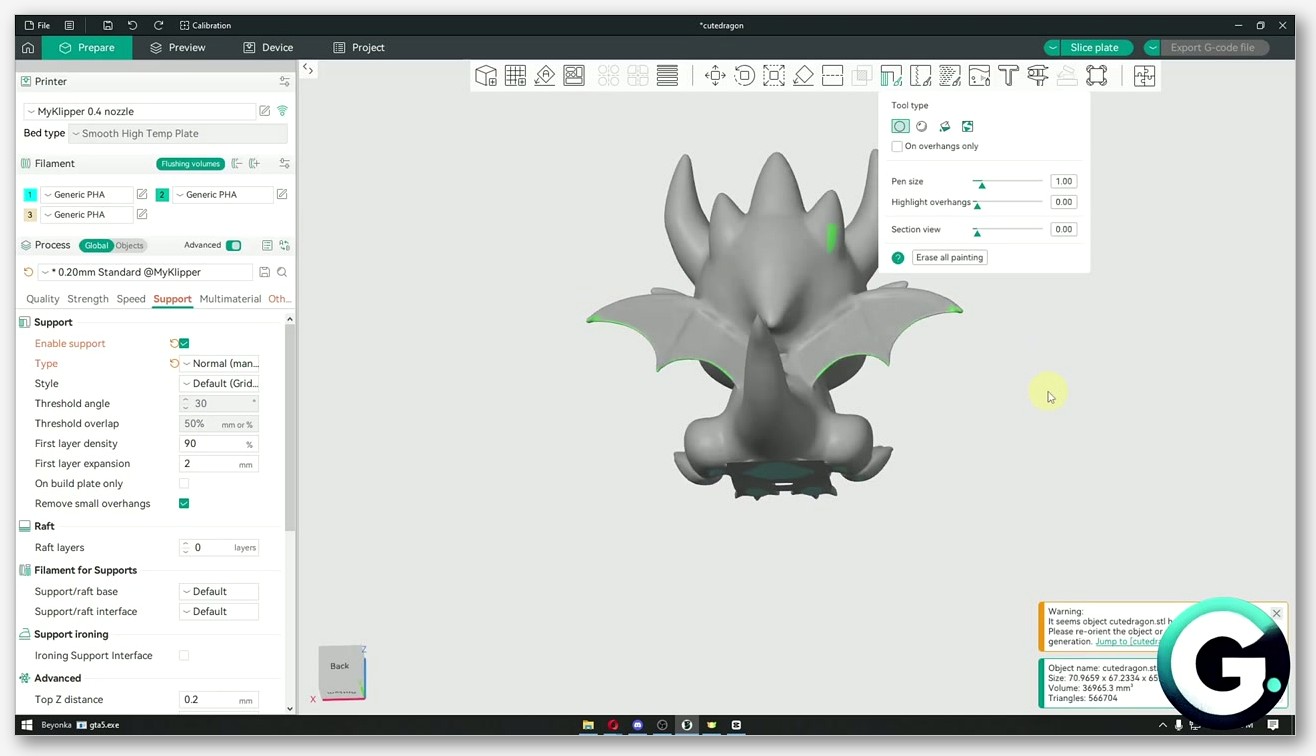
Opening the Support Painting tool
The keyboard shortcut is L. Press it with a model selected, and the Support Painting tool opens with a toolbar on the left side of the screen. The official OrcaSlicer Discussion #7814 confirms both the shortcut and the bidirectional input convention: left mouse button adds support, right mouse button removes or blocks it. That right-click-to-block behavior is the one that throws people new to the tool, because in every other paint UI you’d expect right-click to do something destructive on the current selection. Here it’s the blocker brush.
The toolbar surfaces several brush modes. There’s an Enforce brush, a Block brush, and a Clear brush, plus a smart-fill bucket that fills a connected region in one click. Each of them has a brush size you can adjust. I’d love to give you the exact label text and the smart-fill threshold default, but the OrcaSlicer wiki page on support painting only confirms the high-level description, which is that the tool “allows you to paint areas on your 3D model where you want to add or remove support structures during printing.” So the brush mode labels in your build of OrcaSlicer might differ slightly from what I’d write here. If you want a longer walkthrough of the brush UI in the parallel Color Painting tool (which uses the same toolbar pattern, just for colors), our OrcaSlicer color painting guide covers that workflow step by step.
Vertical tree support painting (new in the 2.3.0 release line)
One of the genuinely useful additions that shipped in the 2.3.0 release line via PR #8212 is vertical tree support painting. Before this, paint-on supports were mostly a flat-overhang tool: you’d paint the underside of a horizontal lip, the slicer would drop a column under it, and that was it. With vertical painting in the tree algorithm, you can paint a vertical face of the model and have the tree branches grow up to it, which gives you a lot more flexibility for models with awkward side-loading geometry like cantilevered arms on a figure.
I’ve used this most on prints where there’s a horizontal overhang the auto-detection catches just fine, but the model also has a thin vertical wall above it that flexes in the breeze of the part-cooling fan and warps before the next layer locks it in. Paint the back of that vertical wall, slice with Tree Slim, and the tree braces it. Print finishes clean.
A workflow that actually works
My paint-on workflow has four steps, in this order. They are not optional. The order matters because each step changes what you can see in the preview, and if you do them out of order you’ll waste time painting things the slicer was already going to support.
Step one, kill auto-supports for the moment. Set Type to Manual. This stops the slicer from generating anything automatically and gives you a clean preview.
Step two, slice once with no supports and walk through every layer in Preview. I mean every layer. Drag the slider from layer one to the top and watch for any layer where the slicer is laying down filament over thin air. Note the layer numbers. This is where you actually need supports, not where you think you need them.
Step three, press L and paint enforcers on those overhangs. Left-click to paint, right-click to clear if you over-painted. Don’t paint the entire underside of the model. Paint only the cantilevered areas you flagged in Preview.
Step four, switch Type back to Auto if you want the slicer to still catch anything you missed, or leave it on Manual if you trust your paint job. Re-slice. Walk through Preview one more time and verify the supports go where your paint marks were.
If you’re doing this for a print that’s also going to need first-layer attention, our first layer problems guide covers the initial-layer-density tradeoffs you’ll hit on a model with raft and painted supports together.
Enforcers, Blockers, and why mixing them on one face is a trap
The two paint modes that matter most are Enforce and Block. Enforce says “put a support here even if auto-detection wouldn’t.” Block says “do not put a support here even if auto-detection wants to.” Used independently, they’re both fine. Used on the same vertical face within a few millimeters of each other, you get a mess.
The reason is that the slicer resolves enforcers and blockers at slice time by sampling the painted volume, and if the two areas overlap in 3D, the resolution depends on the brush radius, the smart-fill threshold, and the order of strokes. I’ve seen people paint a blocker over a region where they previously painted an enforcer, then wonder why the support shows up anyway. The fix is to clear the enforcer first with the Clear brush, then paint the blocker. Don’t trust one mode to override the other on the same face.
The cleaner rule of thumb is: use Enforcers to add supports where auto-detection misses them, and use Blockers only to remove supports on faces where auto-detection is being too aggressive. Mix them on different regions of the model, not on the same region.
Tree and organic supports in 2.3.x
Tree supports are where OrcaSlicer’s settings panel gets dense. There are six Style options that all use the word “tree” or “organic” in some way, and the differences between them are real even if the labels make it sound like marketing. Here’s how I sort them.
Tree Slim vs Tree Strong vs Tree Hybrid vs Organic
Tree Slim uses narrow branches with adaptive thickness. It saves material, prints fast, and works well at layer heights of 0.16 mm and below. It’s also the most likely to snap mid-print if your branches get long and unsupported. If you’re printing tall models with overhangs above 50 mm of tree height, Tree Slim alone gets risky.
Tree Strong uses thicker branches with more conservative angles. It eats more material and prints slower, but the branches don’t fall over. I use Tree Strong on anything taller than about 80 mm where the tree can’t reach the build plate cleanly.
Tree Hybrid is supposed to combine the two: thicker trunks, slimmer tips. In my experience it has the worst removability of the four because the contact layer geometry is messier than either Slim or Strong alone. The Discussion #10609 ranking I mentioned earlier puts Tree Hybrid last for the same reason. Your mileage may vary, but I’d start with Slim or Strong and only fall back to Hybrid if neither is working.
Organic is the newest and, on most prints, the best. It uses a fundamentally different branching algorithm that prioritizes shorter contact-layer dwell time and more precise tip placement. The ranking from Discussion #10609 puts Organic first, and I agree on prints where the model has clean enough geometry for the algorithm to find good branch paths. On prints with weird hollow internal cavities or unreachable overhangs, Organic sometimes generates branches that can’t actually print, and you need to fall back to Tree Slim.
Why organic supports were hollow before 2.3.2
Until 2.3.2 organic supports were hollow inside. The branches were essentially shells of plastic with no internal structure, which made them light and cheap to print but structurally fragile against sideways forces. This is the structural cause behind issue #9229, “Tree Support doesnt have an Infill,” reported on OrcaSlicer 2.31 with a Creality K2 Plus by user QuackenAudio. The report describes “hollow trunk, breaks easily, causes print failures,” and that’s the exact failure mode I hit on my four-hour PETG figurine.
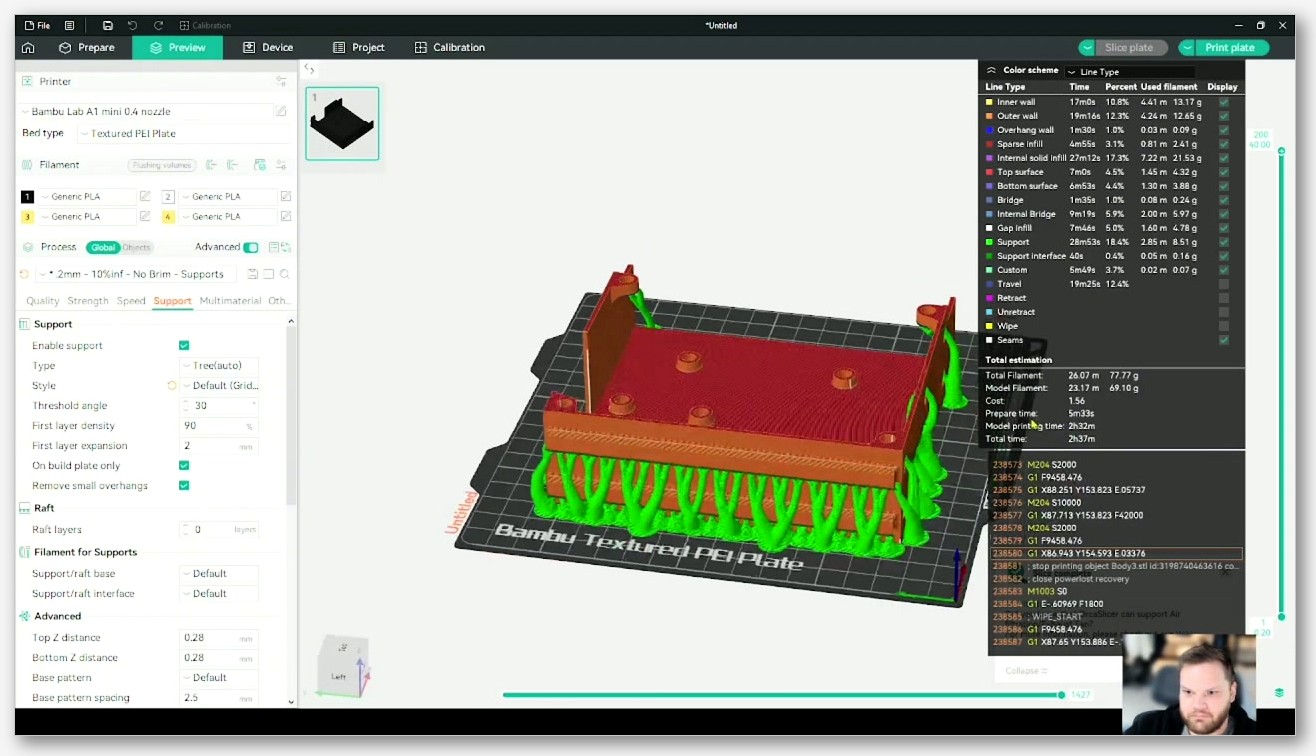
The 2.3.2 release candidate fixes this directly by enabling base infill patterns (rectilinear, rectilinear grid, and honeycomb) for organic tree supports. The verbatim language from the 2.3.2-rc notes is that these patterns “were previously hollow-only.” There’s a tooltip warning that lightning infill is unsupported because it causes crashes, and that double walls remain limited to hollow mode. Both warnings are worth respecting; people who’ve tried to force lightning infill on organic supports in 2.3.2 have hit slicer crashes.
If you’re on 2.3.2 or later and you’re still getting fragile organic branches, the first thing to check is whether you have a base infill pattern set in the Advanced tab. The default in some profiles is still hollow, depending on which printer profile you started from. Pick rectilinear or honeycomb if your branches are tall and you’ve had snapping problems. Honeycomb gives the best strength-to-print-time ratio in my testing.
Branch Diameter, Branch Density, Branch Angle
Three settings decide whether your tree falls over. The wiki names are Branch Diameter (tree_support_branch_diameter and tree_support_branch_diameter_organic), Branch Density (tree_support_top_rate), and Branch Angle (tree_support_branch_angle and tree_support_branch_angle_organic). There’s also Tip Diameter (tree_support_tip_diameter), which the wiki describes as the “branch tip diameter for organic supports,” and Branch Distance (tree_support_branch_distance and the organic variant), which the wiki defines as “the distance between neighboring tree support nodes.”
Branch Diameter is the thickness of the trunk. Thicker means stronger and more material; thinner means lighter and more fragile. Branch Angle is the maximum overhang the slicer will allow a branch to lean at; the wiki says it “determines the maximum overhang angle that the branches of tree support are allowed to make.” Branch Density at the tip is the tradeoff knob I already covered: higher density means better contact-layer coverage and harder removal.
The interaction that gets people in trouble is Branch Diameter and Branch Angle on tall models. If your branch angle is aggressive (say, 45 degrees from vertical) and your diameter is slim, a tall tree leans a long way out from its base, and any sideways force at the top will tip it. Fix: either shrink the branch angle or bump the diameter. I usually bump diameter first because it doesn’t change the tree’s footprint on the bed.
Issue #11456: Z-hop firing late on tree travel moves
One bug that’s worth knowing about because it’s still open against 2.3.2-dev is issue #11456, “Nozzle Tree Support collision, Z Hop not working right.” Reported by PeRFecTxTabZ on 23 November 2025 against build 9510b1a on Windows 11, the description is precise: “The Printer Moves to the Tree Support, without the z hop and ‘crashes’ into the tree support.” The Z-hop fires after the nozzle has already started travelling, which means on tree travel moves the nozzle has time to clip a branch before the hop kicks in.
Workarounds: crank Z-hop to a larger height so even a late hop has clearance, or enable retraction-on-travel more aggressively so the nozzle isn’t dragging molten plastic into the branches. Neither is a fix; both are bandages. The issue is still open. If you’re getting branch knock-overs on multi-part prints, this is the bug to check before blaming your printer.
For travel-related stringing and oozing problems that overlap with this Z-hop bug, our OrcaSlicer stringing and oozing fixes article walks through the retraction and Z-hop tuning side of the same problem, with calibration test patterns you can run to dial in your own values.
Why your supports won’t come off cleanly
Removal pain is the single most common support complaint I see, and it has the largest number of distinct root causes. The good news is that they’re all addressable. The bad news is that you might need to combine three fixes to clear the symptom on a tough print.
Top Z distance is the first lever
If supports are welded to your model, Top Z distance is the lever you reach for first. The setting controls the vertical gap between the top of the support structure and the bottom of the supported overhang. Too small and the support fuses to the overhang’s down-facing surface and you can’t peel it off without taking model material with it. Too large and the down-facing surface comes out rough because the first overhang layer was printing into thin air for half a layer height.
The starting heuristic I use is to match Top Z distance to one layer height. At 0.2 mm layers, set it to 0.2 mm. At 0.12 mm layers, set it to 0.12 mm. Some community guides quote 0.20 mm at 0.20 mm layers as a slicer default; another guide claims the default in OrcaSlicer is 0.15 mm. The OrcaSlicer wiki page I read for this article doesn’t publish a numeric default in the page body, so I’d rather you pick by your layer height than trust an inconsistent third-party number. If you’ve got room to experiment, run two prints with Top Z set to one layer height and to one-and-a-half layer heights, and compare the down-facing surface and the removal effort. Pick whichever balance you prefer.
One thing to watch out for: the gap you typed in is not always the gap that printed. Issue #5917 reports that “Support Top Z Distance is incorrect with Normal (Snug) supports and Thick Bridges enabled,” with a measured “0.4mm distance between support interface and bridge” when 0.2mm was expected. The bug was reported on 2.1.1 by user acarpenter628 on 28 June 2024 and is still open and stale as of this writing. Whether it still reproduces in 2.3.2 isn’t verified, but if you’re using Snug and Thick Bridges together and your gap looks doubled, this is the issue to check.
Bottom Z distance for tall models on rafts
Bottom Z distance gets less attention than the top one because for build-plate supports there’s nothing to gap from (the support sits directly on the bed). But for supports on rafts, or for tiered supports where the bottom of a support sits on top of a model surface, Bottom Z controls the gap to that lower surface. If your raft is welded to your supports and you’re tearing both off as a unit, the bottom gap is too small.
This setting also matters when you’re using support brim widths (tree_support_brim_width) or the auto-brim toggle (tree_support_auto_brim) for additional bed adhesion under tree supports. The brim adds plastic at the base, and if the bottom Z gap is wrong relative to the brim layer count, you can get a gnarly little plate of brim plus support base that’s harder to remove than either alone.
Support/object XY distance and vertical face scarring
Scarring on a vertical face of the model usually means your XY distance is too small. Support/object XY distance (support_object_xy_distance) is the horizontal gap between the support wall and the model wall, and if it’s zero or close to it, the support physically touches the model as the print rises. When you peel it off, the support takes a vertical band of model surface with it.
The wiki also has Support/object first layer gap (support_object_first_layer_gap), which is the analogous setting for the first layer specifically. This one matters when you’re using build-plate-only supports next to a vertical model face: a slightly larger first-layer gap means the support’s first layer doesn’t squish into the model’s first layer and weld the two together at the bed.
The dual-material escape hatch
If you’re on an AMS, a multi-extruder setup, or any kind of dual-material rig, the cleanest fix for welded supports is to print the support interface in a different material. The Filament panel has Base (support_filament) and Interface (support_interface_filament) selectors, and the OrcaSlicer wiki describes Interface as a separate filament selector for the interface layers specifically. The Avoid interface filament for base option keeps the main support body in your primary material and only swaps to the interface filament for the contact layers, which saves material change time.
The material pairing that works best for me is PLA model with PETG interface. The two materials don’t bond chemically, so the support interface releases from the model with finger pressure. A note about that pairing: I’m leaning on the kind of advice you’ll see in the Prusa forum and other community sources that PLA and PETG don’t bond well to each other; I’d cite a specific Prusa forum thread but the cleanest one I had on hand was a years-old discussion and I’d rather hedge than misquote it. The behavior is real in my own prints. The chemistry is genuine.
For prints where you can’t change materials but you can use soluble support, the wiki-listed options are PVA and BVOH for interface only. They dissolve in water (PVA) or warm water (BVOH), which is the cleanest removal you can get short of not needing supports at all. The catch is cost: PVA in particular runs three to four times the price of PLA in my local market, and BVOH is even more.
Material pairings that pop off
Single-extruder setup? No interface filament option, but you can still set yourself up for clean removal. First, surface roughness: wider Interface spacing (support_interface_spacing) means more gaps in the interface mesh and less bonding area. I run mine wider than default on tough prints.
Second, contact layer count. Top interface layers (support_interface_top_layers) and Bottom interface layers (support_interface_bottom_layers) control how many dense layers sit at the contact face. More means cleaner down-facing surface and harder removal. Fewer means rougher surface and easier removal.
Third, retraction. If retraction is too low and you’re stringing on travel moves between model and supports, those strings become little plastic welds you have to cut before peeling. The stringing-and-oozing article I linked earlier covers the calibration setup.
The Snug + Thick Bridges off-by-one
One bug to be aware of, especially if you’re using Normal supports with Snug style: issue #5917 reports that combining Snug supports with Thick Bridges doubles the effective Top Z gap. Reported on 2.1.1, still open and stale as of May 2026, last reproduction not verified against 2.3.2. If you’re seeing a Top Z gap that’s twice what you set, this is the issue to check before you start changing other settings. The workaround is to either disable Thick Bridges or to halve your typed Top Z distance and accept that the actual printed gap will be roughly correct.
A failure-mode-to-fix lookup
If you’re reading because of a specific symptom and you want the shortest path to a fix, this section is for you. Each subsection starts with the symptom and gives the lever to try first.
Supports tear out a layer of skin when you remove them
Root cause: the support is welded to the model. The lever ranking is, in order: bump Top Z distance up by half a layer height; if you’re on multi-material, switch the support interface to a different filament; widen Interface spacing; drop Top interface layers count. Issue #1241 captures this exact symptom from a user who compared OrcaSlicer to Cura and found OrcaSlicer’s tree supports “really thick, and hard to remove” with “way to much material between the support and the print.” The Top Z lever is the one that resolved it for them.
Tree branches snap mid-print
Root cause: branches are too thin, too long, or hollow. The lever ranking is: bump Branch Diameter up; if you’re on 2.3.2 or later, set a base infill pattern (rectilinear, rectilinear grid, or honeycomb) so branches aren’t hollow; if you’re on 2.3.0 or earlier, switch from Organic to Tree Strong as a workaround until you can upgrade. Issue #9229 describes this exact failure on a hollow trunk.
Nozzle crashes into the tree on travel moves
Root cause: Z-hop firing late, or travel paths plotted through support volumes. Try increasing Z-hop height by 0.4 mm to give the late hop some buffer; enable retract-on-layer-change if it’s off; consider enabling avoid crossing perimeters if your travel paths are routing through supports unnecessarily. Issue #11456 is the open bug behind this on 2.3.2-dev.
Supports missing at certain layers
Root cause: regression or interaction with other settings. Issue #10040 reports “Organic tree support and support interface working badly from 2.3.0” where layer 478 has missing supports compared to 2.2.0 with identical settings. The issue is closed as “not planned” / stale. Workaround: if you’re seeing missing supports on a specific layer in 2.3.x and the same model sliced cleanly in 2.2, try switching Style from Organic to Tree Slim. If the layer fills in, you’ve isolated the regression to the Organic algorithm and you can either stay on Tree Slim or downgrade to 2.2 for that print.
Support scars on a visible vertical face
Root cause: supports landing on a model surface that should have stayed clean. The lever is On build plate only (support_on_build_plate_only) if the model geometry allows it. If it doesn’t, bump Support/object XY distance to put more horizontal clearance between the support wall and the model wall. If the scar is on the first layer specifically, the Support/object first layer gap setting is the one to bump.
For warping issues that show up alongside support scarring (especially on tall thin walls near supports), our warping and lifting corners guide covers the bed-adhesion side of the same problem. And if your support brim is itself causing adhesion grief, the bed adhesion problems article walks through the initial-layer-expansion settings in detail.
A 10-minute support sanity check before you hit slice
This is the routine I run before any print that has supports. It takes about ten minutes, costs nothing, and has saved me more failed prints than any other workflow change I’ve made.
Three things to verify in the Process panel
First, check the Support tab. Confirm that Type matches what you intended (Auto for hands-off, Manual if you painted, Tree if you specifically want a tree). Confirm that Style matches the print you’re trying to do (Organic for clean removal on most prints, Tree Strong for tall fragile branches, Normal/Grid only if you’re using a different material for the interface). If you’ve toggled On build plate only on, look at the model and ask yourself whether every overhang has a build-plate-reachable path under it.
Second, check the Advanced tab. Confirm Top Z distance is at one layer height (or wider if you’re optimizing for removal). Confirm Support/object XY distance is at least 0.5 mm if you have vertical model faces near support areas. Check that Base pattern is set to something other than hollow if you’re on 2.3.2 and using organic supports.
Third, check the Filament tab if you’re on a multi-material setup. Confirm Interface filament is pointing at the right slot. I’ve lost prints because I set up dual material correctly and then forgot to actually assign the second filament to the support interface slot. The slicer happily prints the supports in the main material when you do this, and the welding problem you were trying to solve comes right back.
Two things to verify in the Preview
First, drag the layer slider from layer one to the top of the print and watch for supports. Make sure they’re where you expect them and not where you don’t. If you painted Enforcers, confirm the paint produced visible support geometry on the layers where the overhang starts. If you painted Blockers, confirm the supports didn’t generate in the blocked areas.
Second, hover over the supports themselves in the layer view and verify the contact-layer geometry. The interface lines should be clearly visible. If they look smeared into the model surface in Preview, that’s the slicer telling you the Top Z distance is too small. Bump it before you slice for real.
One thing to verify in the gcode .3mf
OrcaSlicer’s gcode .3mf format (the new sliced output extension in the 2.3 line, which packages the gcode with the project metadata) lets you re-open the sliced file and inspect the toolpaths. If you’ve got a print where supports failed last time, open the previous .3mf and step through the support layers in the affected region. Compare to the new .3mf you’re about to send. If you see the same toolpath choices and the same support density, the slicer is going to make the same mistake. Adjust before you commit to another four hours of print time.
Where OrcaSlicer still gets supports wrong
I’ve shipped a lot of praise for 2.3.x in this article and I want to balance it with the bugs that are still open, because pretending the slicer is perfect helps nobody and the user community here is too sharp to fall for it anyway.
Open issues to know about as of May 2026
Issue #11456 (Z-hop late on tree travel moves) is open against 2.3.2-dev. Issue #5917 (Snug + Thick Bridges off-by-one) is open and stale, last reproduced on 2.1.1. Issue #10040 (organic support regression at certain layers) is closed as not planned but the symptom is reproducible by some users. Issue #2073 (tree supports knocked over on multi-part prints) is closed as not planned, but the underlying behavior (z-hop tradeoffs with stringing) is still present and is part of why #11456 is open.
Issue #9229 (hollow tree breaks) is the one 2.3.2 directly addresses, and if you’re on 2.3.2 with a base infill pattern set, you shouldn’t hit this anymore. Issue #1241 (tree removal pain) is older and applies less to current builds, but the underlying tradeoffs it describes (Branch Density vs removability) are permanent features of how tree supports work.
None of these are blockers for using OrcaSlicer. They’re things to know about so you can identify them when they hit and reach for the right workaround. The slicer is the best it’s been; it’s also not magic.
What to watch in the 2.3.2 nightly stream
The 2.3.x nightly stream (which is what the 2.3.2-dev label means in build hashes) is where most of the support work happens between stable releases. If you’re seeing a bug on stable that bothers you, the nightly is worth trying because the fix might already be merged and not yet released. If you’re a hobbyist who needs predictable behavior, stay on stable and let other people find the regressions. Both choices are valid.
The areas I’d watch in nightly between now and the next stable release are the Z-hop timing on travel moves (the underlying issue behind #11456), the Snug + Thick Bridges interaction (the underlying issue behind #5917), and any expansion of the organic base infill options to cover double walls and lightning infill, which are explicitly limited today.
Where to download and which version to pick
OrcaSlicer’s official downloads are at github.com/SoftFever/OrcaSlicer/releases. orcaslicer.net is a third-party content site, not the official orcaslicer.com, and we don’t host the installers. Always pull binaries from the GitHub releases page so you know you’ve got the genuine signed build.
For most hobbyist users, 2.3.2 stable is the version to pick. It has the foundational support code from PR #8212 (vertical tree painting, accurate top Z distance for tree) and the 2.3.2 specific improvement to organic supports (base infill patterns instead of hollow-only), and it’s stable enough for daily use. If you’re on 2.2.x and you’re regularly hitting hollow-tree branch snaps, the upgrade is worth doing this week.
If you’ve got fit-critical prints (mating parts that need a few tenths of a millimeter of accuracy), the support settings interact with dimensional accuracy in ways that aren’t obvious. Our OrcaSlicer tolerance and fit test guide covers the calibration print that lets you measure exactly how much your supports are influencing your fit, and how to compensate for it in the model. That’s the article I’d reach for after this one if you’re trying to print functional parts rather than figurines.
Four hours of failed PETG figurine taught me half of this; the GitHub issue tracker taught me the other half. When the supports do go wrong, you’ll know which lever to reach for first.
Related OrcaSlicer guides
- OrcaSlicer Troubleshooting: Master Index of Every Common Fix
- OrcaSlicer Crashing While Slicing? 8 Fixes for E-Cores, GPU, RAM
- OrcaSlicer Won’t Open or Won’t Launch: Windows, Mac, Linux Fixes
- Elephant Foot in OrcaSlicer: Compensation Done Right (2026 Guide)
- OrcaSlicer Input Shaper Calibration for Klipper (2026 Guide)