
I scrapped a Spider-Man bust last month because I’d left supports on Normal and then spent 90 minutes with a knife and pliers carving them off the back of his head. The model itself printed in four hours. Tree supports would’ve taken twenty minutes to remove and saved me 18g of filament. The slicer’s default isn’t the right default for figurines, and that’s the whole reason this article exists.
OrcaSlicer ships with support_type set to normal(auto). That’s a defensible choice for square mechanical parts and flat overhang shelves, but it’s the wrong choice for almost everything else. If you print figurines, miniatures, busts, organic shapes, or anything tall and narrow with overhangs scattered up the side, the tree and organic styles waste less filament, leave smaller witness marks, and peel off in seconds instead of minutes. They’re also slower to slice, RAM-hungry on large models, and have a real failure mode if your nozzle is too small or your branches are too thin. I’ll cover all of it.
Every default value below was pulled from the OrcaSlicer source (src/libslic3r/PrintConfig.cpp, lines 5853 to 6345 on the main branch). Where the source key has both a classic-tree and an organic variant, I’ll show both because the defaults differ in ways that matter.
Table of contents
- Normal vs Tree vs Organic: what’s actually different
- Where to find tree support settings in OrcaSlicer
- Every tree support setting, explained with defaults
- When to use tree, normal, or organic: decision matrix
- Tuning workflow: a step-by-step first pass
- Common failures and how to fix them
- Soluble supports: PVA, BVOH, and HIPS
- Tree supports plus multi-color printing
- FAQ
- Wrap-up
Normal vs Tree vs Organic: what’s actually different
There are three families. Inside each family there are sub-styles. The dropdown in OrcaSlicer calls them all “support styles”, which doesn’t help when you’re trying to figure out what does what.
Normal supports (Grid and Snug)
Normal supports are what most slicers used for the first decade of FDM printing. They build vertical pillars in a grid (or follow the perimeter snugly) under every overhanging face. They’re dense, predictable, fast to slice, and they hold well during the print because they’re effectively a solid prism of plastic under each overhang.
The trade-off is removal and surface quality. A grid pattern leaves a flat-grid impression on the underside of every supported face. With support_top_z_distance at the default 0.2 mm, the contact layer fuses just enough to the model that you’ll need pliers, a knife, and patience to get it off without scarring. Snug is a little better than Grid for surface finish because the support hugs the perimeter instead of running a uniform pattern, but it’s still a contiguous wall of material against your model.
Normal is the right choice when the geometry is simple, the supported face is hidden, and you want predictable print times.
Classic tree (Slim, Strong, Hybrid)
Classic tree supports grow upward from the bed (or the model surface) like a real tree. The trunk splits into branches, each branch ends in a tip that contacts the overhang only where needed. The point is to use less material, leave smaller marks, and avoid building a useless tower under empty space.
OrcaSlicer’s classic tree comes in three flavors:
- Slim: narrow trunks, low material use, easiest cleanup, fragile under heavy overhangs.
- Strong: fatter trunks, more perimeters per branch, better for big overhangs but slower to slice and harder to remove.
- Hybrid: classic tree under sparse overhangs, normal-grid under flat shelves. Most flexible. A community tester in GitHub Discussion #10609 ranks Hybrid worst on contact-layer quality among the four styles because the grid sections inherit normal’s scarring problem, which matches what I’ve seen on shelf-heavy prints.
Classic tree slices noticeably slower than normal. The branch-routing solver has to figure out where each trunk goes and which model walls to avoid. Strong is the slowest of the three because it carries more perimeters per branch.
Organic supports
Organic is the newest style and it’s now OrcaSlicer’s default when you pick tree(auto). The algorithm came from Thomas Rahm’s improved port of Cura’s tree support, was refined into PrusaSlicer 2.6, and was ported into OrcaSlicer shortly after. As of the current 2.3.x release line, OrcaSlicer keeps expanding the organic path (the 2.3.2 release added rectilinear, grid, and honeycomb base-infill patterns for organic trees, which were previously hollow-only). Branches are shorter, smoother, and circular in cross-section. The solver merges multiple tips into a shared trunk when it can, which is why organic shines on figurines: a face with four separate overhangs (chin, hair, ear, shoulder) gets four tips off one or two trunks instead of four full towers.
Organic uses the least material of any style. Prusa’s own organic-supports page is the canonical write-up and credits the algorithm as an evolution of Thomas Rahm’s improved Cura tree-supports port. Community benchmarks on figurine-style models commonly show organic cutting support material by 30 to 50 percent versus normal grid, with the biggest savings on tall sparse geometry. Print times are typically lower than classic Slim because branches are shorter and fewer perimeters get printed. Removal is the easiest of any style because the tip diameter (default 0.8 mm) is the contact patch.
The downside: it’s RAM-hungry. PrusaSlicer recommends 16 GB or more for large models with organic supports. On 8 GB systems with big plates, the slicer can hang or out-of-memory crash (issues #7507 and #3871 both document this).
The comparison table
| Aspect | Normal Grid | Normal Snug | Tree Slim / Strong / Hybrid | Organic |
|---|---|---|---|---|
| Material use | Highest | High | Medium | Lowest |
| Print time | Medium-high | Medium | Medium | Lower |
| Slice time | Fast | Fast | Slow (Strong slowest) | Slow, RAM-heavy |
| Removal ease | Hardest | Medium | Medium-easy | Easiest |
| Surface scarring | Worst (grid pattern) | Reduced | Small isolated dots | Smallest dots |
| Mid-print stability | Excellent | Good | Variable | Good |
| Best for | Square mechanical parts | Mid-size functional | Tall sparse models | Figurines, default |
Reading the table the lazy way: if you don’t know what you want, pick Organic. If your model is a flat-bottom mechanical bracket with a clean overhang shelf, pick Normal Grid. Don’t pick Hybrid unless you specifically want classic tree under your sparse overhangs and a grid under your shelves and you’re willing to accept worse surface marks.
For more on which print settings fit which model class, the OrcaSlicer Settings Master guide walks through the full Process panel including supports, infill, walls, and quality.
Where to find tree support settings in OrcaSlicer
Process panel on the right. Click the Support tab. Make sure your settings mode is set to Advanced or Developer in the bottom-right of the panel, otherwise most of the tree-specific fields are hidden.
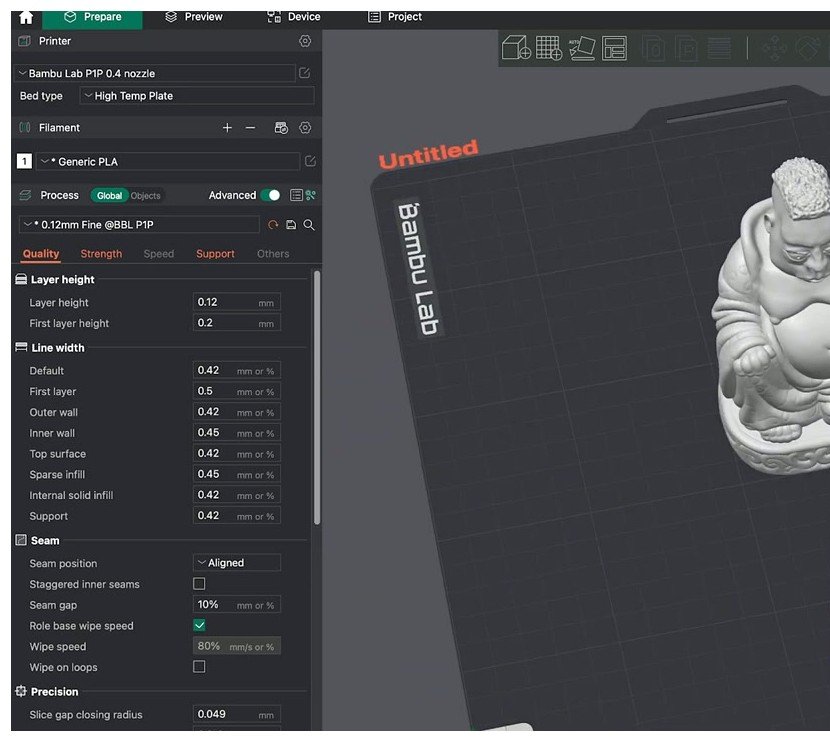
The screenshot above shows my usual setup for assessing whether a model needs tree supports. The Buddha bust is the test piece because it’s got everything: smooth curves, undercuts on the chin, overhangs at the shoulders, and tight detail on the face. If your support style works on a Buddha, it works on most figurines.
Toggle support on first. Then set support_type to tree(auto). The Style dropdown will switch its meaning: when type is normal, “default” means Grid; when type is tree, “default” means Organic. You can also pick a specific style explicitly (Tree Slim, Tree Strong, Tree Hybrid, Organic) which is what I usually do because explicit beats implicit when you’re tuning.
Once you’re in tree mode, an extra block of settings called “Tree supports” or “Organic supports” appears further down the Support tab. Some fields are duplicated between the two: branch angle, branch distance, and branch diameter all have separate config keys for the classic-tree variant and the organic variant. The slicer auto-applies whichever one matches your style.
Every tree support setting, explained with defaults
I’ll group these the same way the panel groups them. Defaults below were pulled from PrintConfig.cpp, line numbers in parentheses if you want to verify against the source.
Top-level support fields (apply to both normal and tree)
| Setting | Internal key | Default | Notes |
|---|---|---|---|
| Type | support_type |
normal(auto) |
Switch to tree(auto) to enable the tree fields below |
| Style | support_style |
default |
“default” picks Grid for normal, Organic for tree |
| Threshold angle | support_threshold_angle |
30° | Overhang angle below which support is generated. PLA tolerates 40°, ABS prefers 30 to 35° |
| Threshold overlap | support_threshold_overlap |
50% | Used when threshold angle is set to zero |
| On build plate only | support_on_build_plate_only |
false | Turn on to forbid supports growing off the model |
| Support critical regions only | support_critical_regions_only |
false | Limits supports to sharp tails and cantilevers only |
| Ignore small overhangs | support_remove_small_overhang |
true | Skip tiny overhangs the printer can bridge anyway |
| Top Z distance | support_top_z_distance |
0.2 mm | Air gap between support top and model. Lower = harder to remove |
| Bottom Z distance | support_bottom_z_distance |
0.2 mm | Air gap when support sits on the model |
| Support / object XY distance | support_object_xy_distance |
0.35 mm | Horizontal gap between support and model wall |
| Support / object first layer gap | support_object_first_layer_gap |
0.2 mm | First-layer XY override |
| Pattern angle | support_angle |
0° | Rotates the underlying support pattern |
| Top interface layers | support_interface_top_layers |
3 layers | How many solid layers between support body and model |
| Bottom interface layers | support_interface_bottom_layers |
0 layers | -1 means “same as top” |
| Top interface spacing | support_interface_spacing |
0.5 mm | Set to 0 explicitly for a fully solid interface |
| Support body filament | support_filament |
0 (current) | Filament index for the support body |
| Support interface filament | support_interface_filament |
0 (current) | Filament index for the interface, useful for soluble PVA |
| Avoid interface filament for body | support_interface_not_for_body |
true | Stops the slicer from printing the entire tower in PVA |
| Independent support layer height | independent_support_layer_height |
true | Allows the support to use its own Z step. Disabled when prime tower is on |
Tree-specific fields
| Setting | Internal key | Default | Notes |
|---|---|---|---|
| Branch angle (classic) | tree_support_branch_angle |
40° (range 0 to 60) | Max angle from vertical the branches may take to avoid the model |
| Branch angle (organic) | tree_support_branch_angle_organic |
40° | Same field, separate organic value. Default is also 40° |
| Preferred branch angle (organic only) | tree_support_angle_slow |
25° (range 10 to 85) | The angle the solver prefers when it doesn’t need to dodge the model. Lower means more vertical and more stable |
| Branch distance (classic) | tree_support_branch_distance |
5.0 mm (range 1 to 10) | Spacing between neighboring branch nodes |
| Branch distance (organic) | tree_support_branch_distance_organic |
1.0 mm | Tighter default for organic so the tips land closer together |
| Branch density (top rate) | tree_support_top_rate |
30% (max 35%) | Density at the branch tips touching the overhang |
| Branch diameter (classic) | tree_support_branch_diameter |
5.0 mm (range 1 to 10) | Initial branch thickness |
| Branch diameter (organic) | tree_support_branch_diameter_organic |
2.0 mm | Thinner default for organic |
| Branch diameter angle | tree_support_branch_diameter_angle |
5° (range 0 to 15) | Taper angle from tip toward base. Zero means uniform thickness |
| Tip diameter (organic) | tree_support_tip_diameter |
0.8 mm (range 0.1 to 100) | Endpoint diameter of organic support branches |
| Auto brim | tree_support_auto_brim |
true | Auto-calculate brim width for tree base |
| Brim width | tree_support_brim_width |
3 mm | Distance from branch to outermost brim line |
| Wall loops | tree_support_wall_count |
0 (auto, range 0 to 2) | Extra perimeters on branches. Slim and Strong use this differently |
| Tree support with infill | tree_support_with_infill |
false | Fills hollow trunks. Off by default in Orca, on in Bambu Studio. Big impact on strength for 0.2 mm nozzles per Issue #6456 |
What stands out from those defaults:
- The classic-tree branch defaults (5 mm distance, 5 mm diameter) are conservative and chunky. The organic defaults (1 mm distance, 2 mm diameter) are tighter and finer because the algorithm can pack more tips per trunk.
- Top rate maxes out at 35%, so if your overhangs are still scarring at 30 you can bump to 35 but you can’t go higher. To get tighter than that you need to add more interface layers or drop top Z distance, both of which trade against removal effort.
- Top Z distance of 0.2 mm matches one full layer at 0.2 mm layer height. If you print at 0.16 or 0.12 layer height the support will still leave a 0.2 mm air gap, which means the bottom of the gap rounds up to the next layer boundary. That’s fine, just be aware.
- “On build plate only” is off by default. Turning it on prevents tree branches from resting on the model, which avoids two known bugs at the cost of more material if your geometry has overhangs that can’t reach the bed.
Style picker decoder
The Style enum from PrintConfig.cpp lines 6157 to 6170, in the same wording the slicer uses internally:
- default “Default (Grid/Organic)” picks Grid when type is normal and Organic when type is tree
- grid normal grid pattern, densest contact, hardest to remove
- snug normal pattern that hugs the perimeter, less material than grid
- organic the new default tree style, smoothest branches
- tree_slim classic tree with thin trunks
- tree_strong classic tree with thick trunks and more perimeters
- tree_hybrid classic tree where it makes sense, normal grid under flat shelves
The slicer’s own tooltip on the Style field reads, verbatim: “For normal support, projecting the supports into a regular grid will create more stable supports (default), while snug support towers will save material and reduce object scarring. For tree support, slim and organic style will merge branches more aggressively and save a lot of material (default organic), while hybrid style will create similar structure to normal support under large flat overhangs.”
When to use tree, normal, or organic: decision matrix
This is the table I wish I’d had three years ago. It maps geometry types to the right style without making you guess.
| Geometry / situation | Pick this | Why |
|---|---|---|
| Tall narrow figurine, side overhangs | Organic | Lowest material, easiest cleanup, knot-merging handles multiple overhang regions on one trunk |
| Square mechanical bracket, flat shelf overhang | Normal Grid | Fast slice, predictable, dense contact holds the shelf perfectly flat |
| Mid-size functional part with mixed overhangs | Normal Snug | Better surface than Grid, similar reliability |
| Miniature with delicate fingers, weapons, ears | Organic plus painted enforcers | Surgical placement, low scarring on fragile features |
| Big print with both flat shelves and tall thin overhangs | Tree Hybrid | Algorithm picks normal under shelves, tree elsewhere. Accept the worse contact quality on the grid sections |
| Print time critical, looks don’t matter | Normal Grid | Fastest slice, fastest first-pass print, predictable timing |
| Many separate overhang islands on one plate | Organic | Branches merge into shared trunks, less material wasted on duplicate towers |
| Multi-color print with AMS or MMU | Organic | You’re already paying material cost for purges and color changes; don’t compound it with normal supports |
| Dual extruder with PVA available | Normal or Organic with PVA interface | Set support_filament 0, support_interface_filament to PVA slot, top_z_distance can drop to 0 |
| 0.2 mm nozzle | Normal | Tree branches are too thin to be reliable at 0.2 nozzle. Issue #6456 is the canonical complaint |
| Very large model, RAM tight (8 GB system) | Tree Slim | Organic can OOM-crash on big plates, classic Slim slices in less memory |
| Tiny precision parts | Normal Snug with dense interface | Better predictability on micro-overhangs |
I want to flag the 0.2 mm nozzle row again because people keep getting bitten by it. If you’ve put a 0.2 nozzle on your printer for fine-detail work and you reach for tree supports out of habit, you’ll get unstable spindly branches that snap during the print. The branch diameter the solver wants is just too thin at that line width. Normal Grid (or Snug) on a 0.2 nozzle is fine. If you absolutely need tree on a 0.2 nozzle, enable tree_support_with_infill, raise the branch diameter to 3 mm or higher, and pray.
If your prints are coming out wrong for reasons other than supports (curling, layer shifts, weak walls), the OrcaSlicer troubleshooting master covers the full diagnostic tree.
Tuning workflow: a step-by-step first pass
Most of the people writing “tree supports are broken” forum posts are running stock defaults on a tall miniature and then asking why the branches toppled at layer 80. The defaults aren’t wrong, but they’re tuned for the median case (small to medium prints, default 0.4 nozzle, PLA). If your model is taller than 80 mm or your filament is anything other than PLA, you’ll want to make a couple of changes before you slice.
The screenshot above is the section where you’ll spend most of your tuning time. Branch distance, diameter, angle, top Z. Get those four right and the rest mostly takes care of itself.
Step-by-step first pass
- Style Organic. This is the right default for almost everything.
- Threshold angle 40° for PLA, 50 to 55° for PETG (it bridges better when stretched), 35 to 40° for ASA and ABS (cooler materials sag more).
- Top Z distance 0.2 mm at 0.2 mm layer height (the default). If your nozzle is fighting the support to release on lift, bump to 0.25.
- Bottom Z distance 0.2 mm (default). Lower it to 0.1 to 0.15 only if branches are detaching from the bed mid-print.
- Branch angle (organic) 40° (default). Don’t touch on the first run.
- Preferred branch angle 25° (default). Don’t touch on the first run.
- Branch distance (organic) 1.0 mm (default). Tight tip spacing means cleaner overhangs. Raise toward 1.5 to 2.0 only if your support print time is eating the model’s print time.
- Branch diameter (organic) 2.0 mm (default). Bump to 3.0 or 4.0 mm if branches topple on a tall print.
- Branch diameter angle 5° (default). Raise to 8 to 10° if the base of the tree is wobbly.
- Tip diameter 0.8 mm (default). Raise to 1.0 or 1.2 mm if tips break before reaching the overhang.
- Branch density (top rate) 30% (default). Push to 35% for fragile overhangs. Never above (the maximum is 35).
- Top interface layers 3 (default).
- Bottom interface layers 0 for trees growing from the bed. Set to 1 or 2 if branches sit on the model.
- Brim width 3 mm (default), auto-brim on (default).
Slice and inspect loop
Slice. Switch to the preview. Walk through the layers from bed to top, watching where the branches go. You’re looking for four things:
- Branches that look spindly or unstable. Increase
tree_support_branch_diameter_organicfrom 2.0 toward 3.0, then 4.0. Or reducetree_support_branch_angle_organicfrom 40 toward 35, then 30 (more vertical means more stable). - Branches leaning into a wall. Reduce branch angle. Or paint a support blocker on that wall.
- A support tip hitting the model in a place you don’t want. Increase
tip_diameterfor tighter clearance from features. Or paint a blocker. Or increase XY distance. - Estimated support print time bigger than the model itself. Reduce
top_ratetoward 20 to 25%. Raisebranch_distance_organictoward 2.0. Raisebranch_diameter_organic(fewer thicker branches print faster than many thin ones).
One more failure mode worth watching: if the sliced support visibly floats above the bed, that’s the upstream solver bug from Issue #7212. Restart the slicer, rotate or move the part by a few millimetres, and check the mesh for non-manifold edges. It usually clears.
Test before committing
I keep a 30 to 40 mm tall test piece (a chess-pawn-sized version of whatever overhang shape I’m worried about) for support tuning. Don’t tune supports on a four-hour print. Slice the test, print it in the same material at the same layer height, evaluate, change one setting at a time, repeat. Tuning multiple settings simultaneously means you can’t tell which one fixed (or broke) what.
If the first layer of your supports is detaching from the bed, that’s almost always a first-layer adhesion issue rather than a support setting. The OrcaSlicer calibration guide covers the bed-level / Z-offset / squish loop you should run before blaming supports.
Common failures and how to fix them
I’ll walk through the ten failure modes I see most often. Each one has a symptom, a likely cause, and the fix that worked for me. None of these are theoretical; every one came from either my own scrap pile or a GitHub issue with a public reproducer.
A. Tree topples mid-print
Symptom: branches snap or fall over partway up. The print head plows through the collapsed branches and leaves a spaghetti mess.
Causes: trunk too thin for the height, branch angle too aggressive, weak first-layer adhesion, draft from the part-cooling fan tipping branches over.
Fixes: raise tree_support_branch_diameter_organic from 2.0 to 3.0 or 4.0 mm. Raise tree_support_branch_diameter_angle from 5° to 8 or 10° (fatter base). Lower tree_support_branch_angle_organic from 40° to 30° (more vertical means more stable). Leave tree_support_auto_brim on. For 0.2 mm nozzles, enable tree_support_with_infill per Issue #6456 and #9229. Raise tree_support_wall_count to 2 for extra perimeters per branch.
B. Tree detaches from build plate
Symptom: a branch breaks off the bed during print and the print head drags it around.
Causes: bottom Z too high, no brim, dirty plate, first-layer gap too tight or too wide.
Fixes: verify auto-brim is on. Check first-layer squish. Lower support_bottom_z_distance toward 0.1 to 0.15 mm. Increase tree_support_brim_width past the 3 mm default. Clean the bed.
C. Support fused to the print, can’t remove
Symptom: support won’t peel. Pulls layers off the model when you try to lever it off.
Causes: top Z too low for the material, print temperature too high, top interface too dense.
Fixes: raise support_top_z_distance from 0.2 to 0.25 mm. Drop print temperature 5 °C (the temperature tower guide covers how to find the right temperature for your specific filament). Check tree_support_top_rate isn’t maxed at 35%. Reduce support_interface_top_layers from 3 to 2. See Issue #1241 for the long version of this problem.
D. Support takes longer than the model
Symptom: the slicer’s estimated print time has supports eating 50% or more of total time.
Causes: too many branches, too thin, support speed too low, branch angle too low.
Fixes: raise tree_support_branch_distance_organic from 1.0 to 1.5 or 2.0 mm. Raise tree_support_branch_diameter_organic. Lower tree_support_top_rate from 30% to 20%. Raise support speed (default is 80 to 150 mm/s on most profiles, push higher if your printer can handle it). Use painted support blockers to remove unneeded supports entirely.
E. Branches scar an outer wall
Symptom: a branch slides up against the model wall and leaves a vertical line scar.
Causes: branch angle too aggressive, XY distance too tight.
Fixes: lower tree_support_branch_angle_organic. Raise support_object_xy_distance from 0.35 to 0.5 mm. Paint a support blocker on the wall.
F. Tree support starts in mid-air
Symptom: in the slicer preview, you see branches floating with nothing beneath them.
Cause: upstream solver bug, Issues #7212 and #9330.
Fixes: re-slice. Check mesh for non-manifold edges. Reposition the part by a few mm. Restart the slicer. This is intermittent, not deterministic.
G. Slim tree under-extruding
Symptom: Slim style branches are visibly under-flowing, gaps between layers, hollow trunks.
Cause: known issue (#257) with Slim style under-flowing on certain geometries. Pressure advance can also factor in if it’s untuned (see the pressure advance guide).
Fixes: switch to Organic. Or enable tree_support_with_infill and increase wall count.
H. Slicer hangs on tree support
Symptom: Orca freezes during slicing, RAM usage climbs, eventually the process crashes or you give up.
Causes: RAM exhaustion, especially with Organic on big models or models with painted supports. Issues #7507 and #3871 both document the RAM exhaustion path.
Fixes: use 16 GB RAM or more. Simplify the mesh (high-poly STLs are the worst offender). Split big plates into batches. Fall back to Tree Slim for that one print.
I. Tree supports ignore bottom interface
Symptom: tree branches resting on the model don’t honor the bottom Z gap or bottom interface layer settings. The branches fuse to the model where they sit.
Cause: known bugs, Issues #6870 and #10763.
Fixes: enable support_on_build_plate_only if the geometry allows. Otherwise reduce support_top_z_distance carefully and test on a small batch. There isn’t a clean workaround for tall models with overhangs that have to land on the model.
J. Critical regions toggle affects organic
Symptom: toggling “support critical regions only” changes Organic behavior even though the option isn’t presented for Organic in the GUI.
Cause: cosmetic UI bug, Issue #10226.
Fix: just be aware. If you’re tuning Organic and your support layout suddenly changes, check whether you toggled this somewhere else.
Soluble supports: PVA, BVOH, and HIPS
Soluble supports are the cleanest possible removal because you don’t actually remove them. You drop the print in water (PVA, BVOH) or solvent (HIPS in d-Limonene) and the support dissolves. The trade-off is cost, hardware, and time.
The materials
- PVA dissolves in warm water (40 to 50 °C). Costs $60 to 100 per kilo (PLA is $20). Hygroscopic, has to be dry-stored or it won’t extrude cleanly. Sticks well to PLA, less reliable with PETG and ABS.
- BVOH (Butenediol Vinyl Alcohol copolymer). Faster water dissolve than PVA, better mechanical and thermal stability, less moisture-sensitive. Even pricier. Best with PLA, PETG, and Nylon.
- HIPS (High Impact Polystyrene). Dissolves in d-Limonene (citrus solvent), not water. Used as soluble support specifically for ABS because both print at similar temperatures and HIPS doesn’t bond to ABS at the interface.
Hardware
Soluble supports need either a multi-material system or a true dual extruder.
- AMS (Bambu X1C, P1S, A1, H2D). Slot PVA or BVOH into one of four AMS slots, assign that slot as
support_interface_filament. Run desiccant in the AMS for PVA. The Bambu AMS guide covers the slot assignment workflow. - MMU (Prusa). Same concept, assign PVA to one of five slots.
- IDEX (BambuLab H2D, Snapmaker, Sovol, Anycubic Kobra 3 Max). True dual extruder with independent heads. Best for PVA because there’s no purging waste. Set top Z distance to 0 mm because PVA dissolves away regardless of contact.
Settings recipe (interface only, the cost-effective approach)
You almost never want the entire support tower in PVA. PVA at $60 to 100 per kilo for the whole tower is a ridiculous expense. Use PVA only for the top interface layers and let the body of the support print in your normal build filament.
support_filament0 (default, uses current build filament for the tower body)support_interface_filamentslot index for PVA or BVOHsupport_interface_not_for_bodytrue (default, critical, keeps the body in PLA)support_top_z_distance0 (when interface is soluble, no air gap needed)support_interface_top_layers2 to 3 (default 3)support_interface_spacing0 (solid interface for cleanest under-surface)- Material profile for PVA: nozzle 200 to 215 °C, bed 60 °C for a PLA build (so PVA layers fuse to PLA layers). Print speeds 25 to 40 mm/s. PVA strings badly so disable retraction-heavy moves where possible. The filament settings guide covers temperature and speed tuning per material.
Cost reality
PVA at $80 per kilo, PLA at $20. Even a small soluble interface costs three to five times more per layer than a regular interface. Use soluble only where mechanical removal is impossible: internal cavities, captured geometry, undercuts you can’t reach with a knife. For everything else, organic supports plus careful Top Z tuning give you 80% of the cleanliness for 5% of the cost.
Limitation: top and bottom interface share one filament setting
OrcaSlicer uses a single support_interface_filament setting that applies to both top and bottom interface layers. There isn’t a built-in way to put only the bottom interface in PVA while keeping the top in normal filament. The community has asked about it (Discussion #5696 is one of several open threads) but there’s no current toggle for it. If you need only one of the two in soluble material, the workaround is to slice twice (once with PVA on, once with it off) and merge the G-code manually, which nobody wants to do.
Tree supports plus multi-color printing
Multi-color FDM has two natural enemies: filament-swap waste and support waste. AMS or MMU prints already pay a material penalty for color changes (purge tower, flushed material). Adding normal supports compounds that penalty by another 30 to 50%. Tree (especially organic) reduces support material 30 to 70% versus normal, which is exactly what a multi-color print wants.
Multi-color models also tend to have many small overhang islands (one color block transitions to another at an overhang boundary). That’s exactly where organic’s knot-merging shines: multiple tip contacts share one trunk, branches don’t redundantly tower under each color block.
Practical recipe for multi-color plus organic:
support_filament0 (current)support_interface_filament0 (current) unless using PVA- Style Organic
- Painted supports on critical features only (press L for the support painter) to keep tree off color-transition zones, where a contact dot would show in the wrong color and ruin the multi-color effect
The OrcaSlicer multi-color guide covers AMS slot assignment, flush volumes, and the purge tower setup that goes alongside any multi-color print.
FAQ
Is organic always better than tree slim?
Almost always, yes. Organic uses less material, slices in similar time on small models, and produces easier removal. The exception is very large models on RAM-constrained systems where organic’s solver runs out of memory. On those, fall back to Slim.
Should I use tree supports on a 0.2 mm nozzle?
Generally no. The branches the solver wants are too thin to be reliable at 0.2 line width. Issue #6456 documents the failure mode in detail. If you must, enable tree_support_with_infill, set branch diameter to 3 mm or higher, and expect failures. Normal Snug on a 0.2 nozzle is the safer choice.
Can I use PVA with organic supports?
Yes. Set support_interface_filament to your PVA slot, leave support_filament at 0 (your build filament), keep support_interface_not_for_body on. Drop support_top_z_distance to 0 because the PVA dissolves regardless. Just be aware that organic plus PVA on a big model can OOM-crash the slicer if you’re on 8 GB RAM.
Why does my slicer hang on organic supports?
Organic is RAM-hungry. PrusaSlicer (where the algorithm originated) recommends 16 GB or more for large models. If you have less, either simplify the mesh, split the plate into batches, or switch to Tree Slim. Issues #7507 and #3871 both document this.
Does the order of painted supports change anything?
Paint order doesn’t matter, but region overlap does. Enforcers (paint with the support enforcer tool) tell the slicer “always support here”. Blockers tell it “never support here”. Blockers win when they overlap an enforcer on the same surface. Paint blockers on cosmetic faces, paint enforcers on overhangs the auto-detection missed.
What’s the default support interface spacing?
The default is 0.5 mm. Set it to 0 explicitly for a fully solid interface (cleanest possible under-surface), or raise it to 1 to 1.5 mm if you’re trying to cut support print time at the cost of marginally rougher overhang bottoms.
Can I mix support styles on one plate?
Yes via per-object settings. Right-click an object, open Object settings, and override the support type/style for just that object. Useful when one part of your plate needs tree and another needs normal.
Why do my organic branches look different on the same model after re-slicing?
The organic solver is partially non-deterministic: the same input mesh with the same settings can produce slightly different branch layouts between slices. This is by design (the solver explores a search space). If you need bit-perfect reproducibility, save the sliced 3MF and reuse it.
Wrap-up
OrcaSlicer’s default normal(auto) support is a defensible choice for square mechanical parts and flat overhang shelves. It’s the wrong choice for figurines, miniatures, busts, organic shapes, and anything tall and narrow. For those, switch to tree(auto) with the Organic style and you’ll cut material use by 30 to 70%, drop removal time from minutes to seconds, and leave smaller witness marks on the underside.
The settings to tune in order: branch diameter (raise if branches topple), branch angle (lower if branches lean into walls), top Z distance (raise if support fuses to the model), top rate (raise to 35% for fragile overhangs, lower to 20 to 25% if support print time runs away). Paint enforcers on overhangs the auto-detect missed, paint blockers on cosmetic faces. Print a 30 to 40 mm test piece before tuning on a four-hour print.
Honest closing notes: tree slices 2 to 5x slower than normal on the same model. Organic can OOM-crash big models on 8 GB systems. Hybrid has the worst contact-layer quality of any tree style. PVA at $80 per kilo is rarely worth it outside captured-cavity geometry. And on a 0.2 mm nozzle, just use normal supports. Pick the right tool for the geometry and you’ll waste a lot less filament than I did on that Spider-Man bust. The seam placement guide, ironing settings guide, and infill patterns guide cover the other three Process tabs you’ll need to dial in alongside supports for a fully tuned profile.
Related OrcaSlicer guides
- OrcaSlicer Settings Master Guide: Every Setting Explained (2026)
- OrcaSlicer for Ender 3 V1, Pro, V2, S1, S1 Pro: Setup Guide
- OrcaSlicer for Flashforge Adventurer 5M, 5M Pro and AD5X: Setup
- OrcaSlicer Keyboard Shortcuts Cheat Sheet (Every Verified Key)
- OrcaSlicer System Requirements: GPU, RAM, OpenGL Explained