I had a roll of Sunlu Silk PETG that was throwing webs across every print like a haunted house. Two hours and one temperature tower later, I was running it at 235 instead of 245 and the strings vanished. That’s the whole pitch for this article. One 90-minute print can save you a week of “why is this filament so bad” frustration.
The thing is, most people either skip the temp tower entirely or do it wrong. They eyeball the surface, pick whatever looks shiniest, and move on. Then they’re confused when their layer adhesion is brittle six months later. I’ve been there. The temp tower isn’t about picking the prettiest block. It’s about picking the lowest temperature that still passes a snap test, and OrcaSlicer’s built-in wizard makes that almost trivial once you know what you’re looking at.
This is a sibling piece to the full Orca calibration guide, so if you haven’t tuned anything yet, start there. If you’re new and don’t have the slicer installed, you can download OrcaSlicer first. Already running 2.3.x? Good, let’s go.
Why temperature matters more than people think
Plastic isn’t binary. It doesn’t go solid to liquid at one neat number. Every thermoplastic has a glass transition temperature (Tg) and a melt zone above that. PLA’s Tg sits around 60°C, its melt zone runs roughly 180 to 220°C. PETG’s Tg is closer to 80°C and it melts cleaner around 230 to 250°C.
Layer adhesion is a chemistry problem, not a “make it hotter” problem. Bottom of the melt zone, polymer chains barely entangle across the layer boundary. You get a part that looks fine but cracks along a layer line when you flex it. Push too hot and you cook the polymer, get heavy stringing, and on Bowden setups you risk heatcreep.
The sweet spot is the lowest temperature that still gives you full layer bonding. The temp tower is just a fast visual way to find it without a tensile tester.
The 30-second version
For people who already know the drill and just want the recipe:
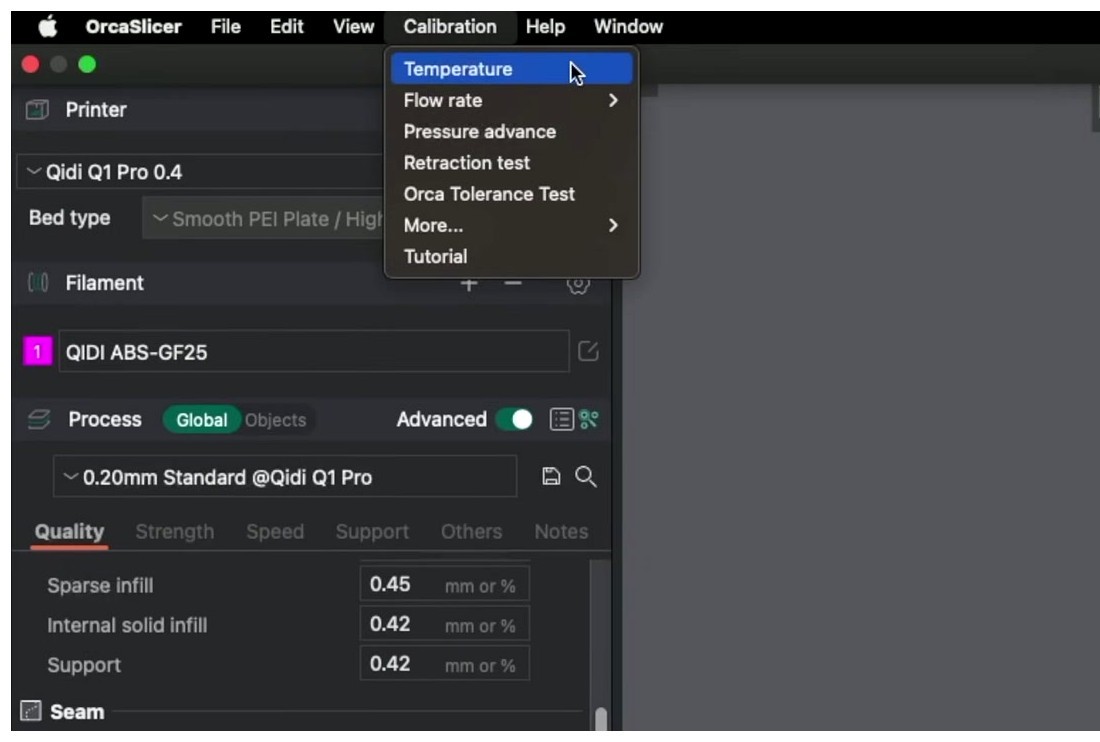
- Open OrcaSlicer. Click Calibration > Temperature.
- Pick your filament family from the dropdown. Keep the default start and end temps unless you have a specific reason.
- Click OK. A new project loads with the tower model on the plate.
- Slice. Print. Roughly 60 to 90 minutes on a 0.4 mm nozzle.
- Snap a block off with pliers. The lowest temperature that still tears across multiple layers (instead of clean-breaking along a layer line) is your answer.
- Save the result to a custom filament profile so the next Orca update doesn’t overwrite it.
That’s it. The rest of this guide is about doing each step correctly, because every single one of those bullets has a way to go wrong, and I’ve seen all of them on the forums.
How OrcaSlicer’s temp tower works under the hood
The tower model itself is a remix of gaaZolee’s “Smart compact temperature calibration tower” from Thingiverse 2729076. OrcaSlicer ships its own version with embossed temperature labels on each block. Each band is roughly 10 mm tall at a 0.20 mm layer height, which works out to about 50 layers per band. The default tower has 8 bands, so you’re looking at 80 mm of vertical print, give or take.
The clever bit is how the temperature actually changes. OrcaSlicer doesn’t pause the print and reheat. It injects an inline M104 S<temp> command at the boundary of each band. M104 is the non-blocking “set hotend temperature” gcode, so the print head keeps moving while the heater chases the new setpoint. That’s intentional. If Orca used M109 (the blocking version that waits for the temp to stabilize), the print head would freeze for 10 to 30 seconds at every band boundary and you’d get a fat heat zit on the seam every 10 mm. Useless.
Two practical consequences of this. First, the temperature lags the band by maybe 5 to 10 layers as the heater swings. The transition isn’t instant. That’s fine, you’ve got 50 layers per band, you’re reading the middle 30 anyway. Second, if your firmware ignores inline M104 commands (this comes up on some heavily-customized Klipper configs and weirdly-flashed Marlin builds), the tower won’t change temperature at all. The fix is to export the sliced gcode, search for “M104” in a text editor, and confirm those commands are actually in there. If they are and the printer’s still ignoring them, your firmware is the problem.
The 5°C step is locked. You can’t change it to 3°C or 10°C, the wizard won’t let you. You can only set start and end. That’s a design choice (5°C is a meaningful difference for most filaments), not a missing feature.
Step-by-step walkthrough (every click)
This works on Windows, macOS, and Linux. The UI is identical. I’m running 2.3.x on a Bambu P1S as the test rig, but the steps are universal.
- Pick the right printer profile. Top right corner, click the printer dropdown. Make sure the nozzle size matches your physical hotend. Default profiles are 0.4 mm, and if you’ve swapped to a 0.6 mm or 0.8 mm hardened nozzle and forgot to switch the profile, your extrusion volumes are wrong and the tower will lie to you. There’s a long forum thread on this exact mistake with PETG on a 0.6 mm P1S, it’s worth a skim if you’ve got a non-default nozzle.
- Pick the right filament profile. Right-side filament slot. Use the actual brand profile if it ships in Orca’s library (Bambu PLA Basic, Polymaker PolyTerra, eSun PLA+, and so on). If your brand isn’t there, pick “Generic PLA” or “Generic PETG” and we’ll override the temp from the tower result later. The bed temp, fan curve, and retraction settings all come from this profile, so don’t run a TPU tower with a PLA profile loaded.
- Open the Calibration menu. Top menu bar, click Calibration. On most builds it sits between Configuration Wizard and Help. Click Temperature.
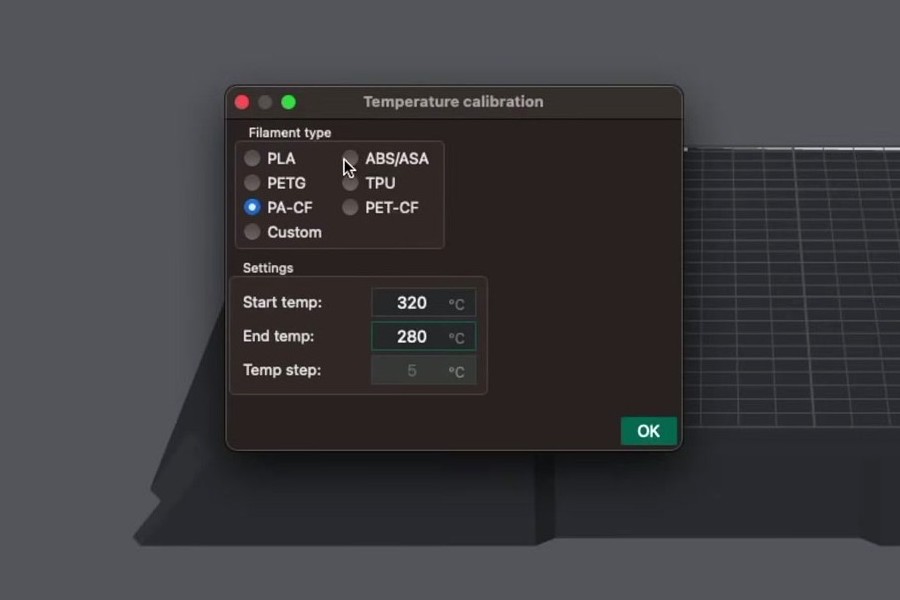
- The dialog opens. You’ll see a filament family dropdown, start temp, end temp, and the fixed 5°C step.
- Set start and end. Use the table in the next section, or just keep defaults. For the cleanest read, keep the total range at 40°C. That gives you 8 bands, which is enough resolution to spot the inflection point. Going narrower (say 220 to 240) sometimes doesn’t print the embossed labels because of issue #10041.
- Click OK. A new untitled project loads with the tower model already on the build plate.
- Verify the slice. Click “Slice plate.” Open the preview, drag the layer slider. You should see the gcode preview pane show
M104commands at each band boundary. If you don’t see them, regenerate the project, your .3mf might be corrupted. - Send to printer. Bambu users can use Send over LAN or cloud. OctoPrint folks use the OrcaSlicer plugin. Everyone else exports the sliced file to SD or USB.
- Print. Run time on a 0.4 mm nozzle is 60 to 90 minutes depending on range. PA CF and PC towers run longer because layer cooling is more conservative.
- Read the tower. See the next section, this is where most people botch it.
- Apply the result. File > New project. Open filament profile settings for the filament you tested. Set “Nozzle temperature initial layer” to your winning temp + 5, and “Nozzle temperature other layers” to your winning temp. Save the profile under a custom name (something like “Polymaker PolyTerra Tuned”). Built-in profiles get overwritten on Orca updates, custom ones don’t.
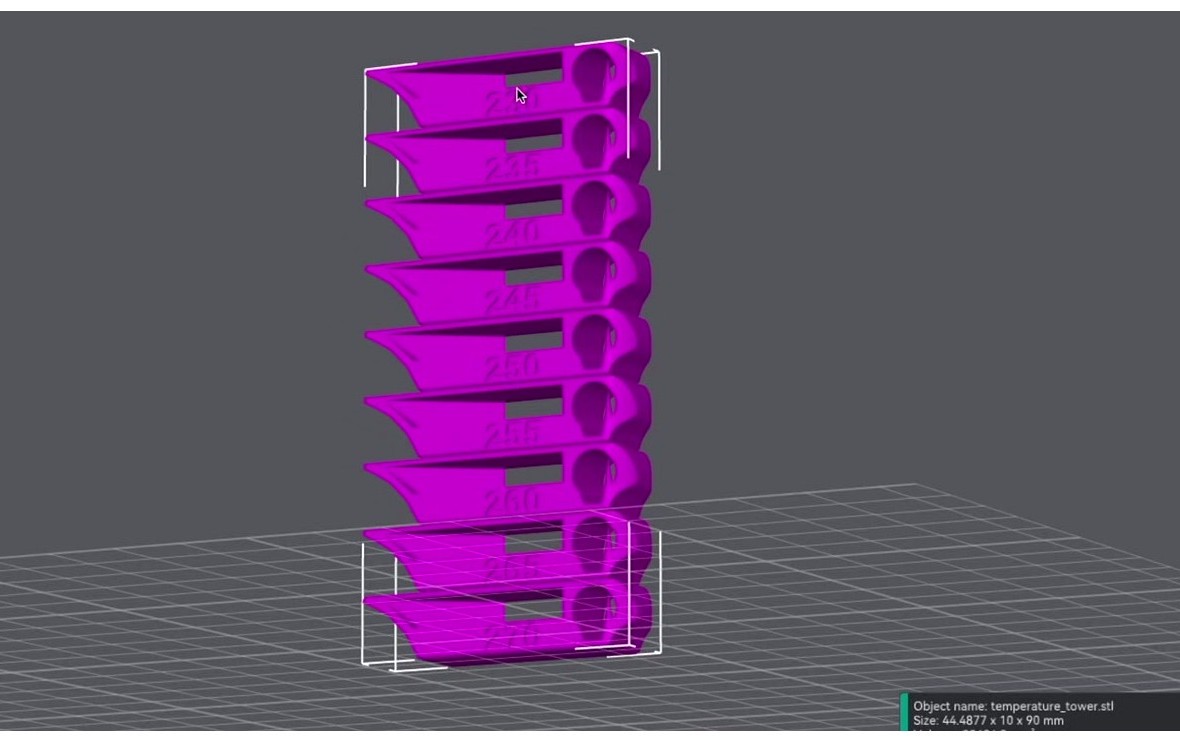
How to read your tower
This is the part nobody covers properly. People look at a tower, point at the smoothest-looking block, and say “that’s the one.” That’s wrong about 40% of the time in my experience. Here’s the actual reading procedure.
Look at four things, in this order:
- Snap test for layer adhesion. This is the only one that matters for structural prints. Take pliers, grip a band, snap it off. If it cleanly breaks along a layer line, that’s a fail. The polymer chains didn’t entangle across the boundary. If the break tears across multiple layers or shows ductile bending, it’s a pass. Snap every band you’re considering. The lowest passing temperature is the winner.
- Stringing. Look at the thin pillars and inside the arches on each band. Strings means too hot for that filament’s retraction settings. But here’s the counterintuitive bit, PETG strings when it’s too COLD too, because cold PETG doesn’t retract cleanly. So if your bottom bands string and your top bands also string, the answer is in the middle, not at one of the ends.
- Bridges and overhangs. The horizontal bridge in the middle of each band is a cooling test. Cold blocks bridge cleanest because the plastic solidifies faster. Overhang corners droop at high temps and stay sharp at low temps. If you care about miniatures or detailed mechanical parts, weight these heavily.
- Surface finish. Lower temps look matte. Higher temps look wet/glossy. The first band where the surface is smooth without being “wet” is your candidate. Don’t pick the glossiest one, that’s just the polymer being over-melted and oozing.
The rule of thumb that works: pick the lowest temperature that still passes the snap test. Lower temp gives you less stringing, sharper overhangs, less heatcreep risk, and shorter cooldown when you swap filaments. The only reason to go higher is if the snap test fails.

Per-material recommended ranges
These are recommended ranges for the tower itself, not the print temp. Start hot at the bottom and end cold at the top, which is how Orca’s wizard prints by default (the wizard descends temperature as the tower rises). If you’ve cross-referenced these with the OrcaSlicer wiki, the entries below extend the wiki for filaments it doesn’t list (PETG, PA-CF, PETG-CF, ABS-CF).
| Material | Tower start (high) | Tower end (low) | Bed (°C) | Watch for at low end | Watch for at high end |
|---|---|---|---|---|---|
| PLA generic | 230 | 190 | 60 | Layer separation, brittle, “skipping” sound | Wet surface, stringing, drooping bridges |
| Silk PLA | 235 | 200 | 55-60 | Loss of metallic sheen | Heavy stringing (silk is oozy) |
| Wood PLA | 225 | 185 | 55-60 | Visible particles unmelted | Burnt streaks, fiber clogs |
| PLA-CF | 240 | 200 | 60 | Layer adhesion failure | Hairs/whiskers, nozzle wear |
| PETG | 255 (cap 250 if PTFE) | 225 | 70-80 | Cracked layers, paradoxical stringing | Webs, glossy oily look, nozzle stick |
| ABS | 270 | 230 | 90-100 | Cracking, warping | Fumes, browning |
| ASA | 270 | 230 | 90-100 | Layer split under finger pressure | Loss of UV resistance |
| TPU 95A | 245 | 210 | 50-60 | “Squeaky” extrusion, gaps | Stringing, blobs |
| PC | 310 | 270 | 100-120 | Severe layer split, brittle | Burnt amber, smoke |
| PA (Nylon 6/12) | 280 | 240 | 90-110 | Pops off bed, layer split | Bubbling (moisture), brown shift |
| PA-CF | 320 | 280 | 90-110 | CF whiskering, layer split | Charring, abrasive surface |
| ABS-CF | 290 | 245 | 100-110 | Tearing across layers | Burnt smell, dimples |
| PETG-CF | 280 | 240 | 75-85 | Stringing dominates | Glossy spotting, fiber fuzz |
| PVA (support) | 220 | 185 | 55-60 | Brittle, won’t bond to model | Charring, won’t dissolve |
One important note. The TPU range here (245 to 210) reflects the corrected defaults. In OrcaSlicer 2.2.0 the TPU temp tower defaults wrongly inherited PA-CF values of 280 to 320°C, which would have damaged the filament. That was issue #7323, and it’s been closed for a while now, but if you’re on an old build, sanity-check the dialog before clicking OK.
Per-printer notes
The tower mechanism is the same on every printer because it’s just inline M104. What differs is how the firmware handles the start sequence, the AMS or tool head behavior, and chamber thermals.
Bambu A1 / A1 mini. Open frame, no enclosure. PLA, PETG, and TPU are the realistic materials. ABS and ASA towers will warp at the corners without an enclosure. Orca’s start gcode runs the auto-bed-level and flow ring before the tower kicks off, so don’t disable those, you’ll skip pre-flight. Lock the AMS to a single slot for the run.
Bambu P1S / X1C. Enclosed, much more flexible. ABS, ASA, PC, and PA all in play. The X1C chamber is heated only passively by the bed, so allow 15 minutes of heat soak before starting a high-temp tower if you want consistent reads. Bambu Studio doesn’t have a built-in temperature tower, full stop. That’s a real Orca advantage and worth keeping in mind compared to Bambu Studio. The AMS picks tools by slot, so if you’ve got six filaments loaded, set the tower job to one slot only or you’ll heat the wrong head.
Creality K1 / K1 Max / K1C. Klipper-based. Inline M104 works fine. Some K1 power users prefer Klipper’s TUNING_TOWER + SET_HEATER_TEMPERATURE macros directly via the console for finer control, but Orca’s wizard is the easier path and it’s plenty accurate. One prerequisite: get input shaper and pressure advance dialed in before the tower, otherwise you’ll read corner artifacts (ringing, ghosting) as if they were temperature problems.
Prusa MK4 / MK4S. Marlin variant (Buddy firmware). Orca needs a community-maintained profile for the MK4, it’s not officially shipped. The MK4 preheats to 170°C aggressively for filament load, so the first band of your tower is slightly delayed because of preheat overshoot. Enable input shaper before running the tower or you’ll mistake ringing for stringing.
Voron 2.4 / Trident. Klipper, fully manual config, your printer.cfg almost certainly accepts standard M104. With a chamber heater the high-temp blocks for PA-CF and PC will print far better than on open machines. Keep the chamber at 60°C for PETG, 80°C for ABS, and 100°C for PC.
Ender 3, V2, Pro. Marlin, classic gcode, Bowden setup. Two cautions. The PTFE liner caps you at around 250°C, so cap your PETG tower at 250°C max, not 260, or you risk off-gassing the PTFE. This is exactly the safety issue raised in issue #1117. Second, Bowden retraction is typically 5 to 6 mm, which can mask stringing differences between bands. If every band looks identical for stringing, drop retraction to 3 mm temporarily for a cleaner read.
Ender 3 V3 / V3 KE / V3 SE. Newer Klipper-based Creality. Behaves like the K1 family. Officially supported in Orca via Creality’s wiki.
Common mistakes I see in the forums
Half my time on r/3Dprinting and the Bambu forum is reading variations of “I did the temp tower and it didn’t work.” About 90% of those threads land on one of these issues.
| Mistake | Why it bites |
|---|---|
| Non-default layer height (0.16 mm, 0.28 mm) on Orca older than 2.3.2 | Temperature changes misalign by one layer; you read the wrong band. Fixed in PR #12269. If you’re on 2.3.1 or earlier, stick to 0.20 mm. |
| Wrong filament profile loaded | Bed temp, fan curve, and retraction all come from that profile. Run a TPU tower with PLA profile selected and you get false stringing because retraction is too aggressive. |
| Cooling fan at 100% across the whole print | Fan freezes the strings before they form webs. Use the filament’s normal fan setting. |
| Wet filament (PETG, Nylon, TPU especially) | Bubbles, hissing, popping. The tower looks bad at every temp. Dry first or you’re testing humidity, not temperature. |
| Bed adhesion failing mid-tower | The tower is tall and skinny, peels easily. Add a brim, clean the plate with IPA, use the manufacturer’s bed temp. Our troubleshooting guide covers the bed prep stack. |
| PID untuned hotend | Temp swings ±5°C around setpoint, so your “best block” is just noise. PID-tune (M303 on Marlin, PID_CALIBRATE on Klipper) BEFORE the tower. |
| AMS or MMU on wrong slot | The wrong slot heats up. Lock the tower to one filament in slot 1. |
| Print speed too high during the tower | High speed amplifies under-extrusion at the cold end. Looks like a temp problem, is actually a flow problem. Use the filament’s normal speed. |
| PETG past 250°C on a Bowden + PTFE liner | PTFE off-gasses above ~260°C. Don’t push it. Issue #1117 was filed for exactly this. |
| Custom start gcode with M109 in it | M109 waits for temp. Freezes the print head and creates a heat zit at every band boundary. Orca uses M104 by default, but check your start gcode if you’ve customized it. |
| Not saving the result to a new profile | OrcaSlicer can overwrite built-in filament profiles on update. Save as “Brand X PLA Tuned” or you’ll lose the work. |
If you’re hitting weird behavior that isn’t on this list, the OrcaSlicer troubleshooting hub has a more general triage flow.
When the wizard breaks
OrcaSlicer’s temp tower has been mostly stable since 2.0, but it’s had a few notable bugs and edge cases worth knowing about.
Issue #12281, the layer height misalignment bug. The temperature change script was hardcoded to a 0.20 mm layer height, so if you sliced at 0.16 or 0.28 the M104 injections fell on the wrong layer and bands were misaligned by roughly one layer. Closed by PR #12269 in April 2026. If you’re on 2.3.2 or later you’re fine. If you’re on anything earlier, just slice at 0.20 mm and move on with your life.
Issue #7323, the TPU defaults bug. In 2.2.0, TPU’s default temp tower range inherited PA-CF values, which meant 280 to 320°C. That would melt and probably scorch most TPUs. Reported October 2024, closed shortly after. The reason I mention it is that it’s a great example of why you should always glance at the dialog before clicking OK. Don’t trust defaults blindly, even from the official wizard.
“Temp tower doesn’t change temperature.” Symptoms: you print a tower, and the hotend stays pinned at one temperature the whole way up. Two root causes. Either the .3mf got corrupted (regenerate from scratch fixes it), or the firmware is silently ignoring inline M104. Sanity check by exporting the sliced gcode and searching for “M104” in a text editor. If those commands are present but your hotend ignores them, your firmware’s the problem, not Orca.
Issue #1117, PETG past PTFE safe limit. The original PETG default tower upper bound went to 260°C, which exceeds the PTFE-liner-safe limit on Bowden setups. Defaults adjusted, but for older Ender 3s and any Capricorn-lined Bowden, cap your PETG tower at 250°C.
Issue #10041, embossed labels too thin. Embossed text can fail to slice on certain temperature combinations. Stick with the full 40°C range for clean labels.
Issue #2420, slicer lockup at 0.15 mm layer height. Edge case, closed-as-not-planned, but supports the general advice: stick with 0.20 mm.
After the tower, what to calibrate next
Temperature is step 1 of a longer chain. The OrcaSlicer wiki suggests this order: Temperature, Volumetric Speed, Pressure Advance, Flow Ratio, Retraction, Tolerance, Cornering, Input Shaping. Why does temperature go first? Because every other calibration is sensitive to temperature. Run a flow ratio calibration at 230°C and a different one at 210°C, you’ll get different flow numbers. Lock temperature first, then everything downstream is stable.
Two siblings to do next, in this order:
- Flow rate calibration. Tunes the volumetric flow so a 0.4 mm extrusion is actually 0.4 mm wide. Two-pass test in Orca. Takes about 30 minutes per filament.
- Pressure Advance calibration. The pattern test or line test that gets your sharp corners and seam quality dialed in. This is where a “good” print becomes a “great” print. Klipper users get pressure advance, Marlin users get linear advance, same idea.
After those three (temp, flow, PA) you’ve covered 90% of what makes a generic filament profile actually work. Retraction and input shaping are nice-to-haves on top.
Frequently asked questions
How do I do a temperature tower in OrcaSlicer?
Click Calibration > Temperature, pick your filament family, keep the default start and end (or use the table above), click OK. A new project loads with the tower on the plate. Slice, print (60 to 90 minutes on a 0.4 mm nozzle), then snap-test the bands and pick the lowest temperature that still tears across layers instead of clean-breaking along a layer line.
What temperature should I print PLA at?
Most generic PLAs land between 200 and 215°C. Start the tower at 230, end at 190. Brand-specific PLAs vary: Bambu PLA Basic likes 220, Polymaker PolyTerra around 205, eSun PLA+ near 210. The tower is the only way to know for sure with a brand you haven’t run before.
What temperature for PETG in OrcaSlicer?
Default tower range is 230 to 250°C. Most PETGs settle around 235 to 245. If you’re on a Bowden printer with a PTFE liner, cap at 250°C because PTFE off-gasses above roughly 260°C. PETG also strings paradoxically at low temperatures, so don’t just pick the coldest band.
Why isn’t my OrcaSlicer temp tower changing temperature?
Two usual culprits: the .3mf got corrupted (regenerate from scratch), or the firmware is ignoring inline M104. Diagnostic: export the sliced gcode, search for “M104.” If those commands are present per band, the slicer did its job and your firmware is the problem.
Can I change the 5°C step in OrcaSlicer’s temp tower?
No, the step is fixed. You can only change start and end. For a different step size you’d have to build it yourself with Klipper’s TUNING_TOWER macro, but the 5°C step is the right call for 99% of cases.
Does OrcaSlicer’s temperature tower work on Bambu A1, P1S, and X1C?
Yes, fully. It’s a real reason Orca users on Bambu hardware stay on Orca, since Bambu Studio doesn’t ship a built-in tower. The A1 is limited to PLA, PETG, and TPU realistically (no enclosure), but the P1S and X1C handle ABS, ASA, PC, and PA fine.
What layer height should I use for a temp tower in Orca?
0.20 mm. The temp change script was hardcoded for 0.20 mm until PR #12269 landed in 2.3.2. Even on current builds, 0.20 mm is the sweet spot for print time and label legibility.
How do I read a temperature tower?
Snap test first. If a band cleanly fractures along a layer line, that temp failed. If it tears across multiple layers, it passed. Then check stringing, bridge, and overhang sharpness. Pick the lowest temperature that passes the snap test.
Does OrcaSlicer temp tower work for TPU?
Yes, but verify the dialog before clicking OK. A 2.2.0 bug (issue #7323) wrongly defaulted TPU to 280 to 320°C, which would damage the filament. Correct range is roughly 210 to 245°C. Closed, but worth a glance on old builds.
Should I do temperature tower or flow rate first?
Temperature first, always. Flow rate is sensitive to temperature, so tune flow at the wrong temp and you’ll redo it. The wiki suggests Temperature, Volumetric Speed, Pressure Advance, Flow Ratio in that order.
Do I need to PID tune before a temp tower?
Yes. If your hotend swings ±5°C around setpoint, “215°C” might be running at 210 or 220 second to second. Run M303 on Marlin or PID_CALIBRATE on Klipper first.
That’s the whole tutorial. The temperature tower is the single highest-leverage 90 minutes you can spend on a new filament, full stop. Run it, snap-test, save the result to a tuned profile, then move on to Pressure Advance calibration and flow rate calibration. Or, if you want the full sequence in one place, head back to the full Orca calibration guide. Print well.
Related OrcaSlicer guides
- The Complete OrcaSlicer Calibration Guide (Order Matters)
- OrcaSlicer Cornering & Junction Deviation Calibration (2026)
- OrcaSlicer Tolerance & Fit Test: Functional Parts (2026 Guide)
- OrcaSlicer VFA Test: Diagnose Vertical Fine Artifacts (2026 Guide)
- OrcaSlicer Settings Not Saving: Diagnose the Profile Reset Bug