Last weekend I pulled a Benchy off the plate that looked like it had been kicked in the bow. Tiny blob on every corner, a smear at the back of the cabin, that classic “soft” appearance where the walls bulge a hair past where they should land. I knew what was wrong before I checked the file, because I’d just swapped to a new spool of PolyTerra and never re-ran pressure advance.
If you’ve seen blobby corners on a Benchy, or pulled-in inside corners on a calibration cube that look like the printer flinched, that’s pressure advance. It’s the calibration that fixes “my prints look 80% there but the corners are off,” and OrcaSlicer ships three ways to dial it in. The trick is knowing which one to use, how to read the result, and how to get the value into the right field so it survives the next print. If you haven’t done the prerequisites yet, our OrcaSlicer calibration guide covers the order: temperature, flow, then PA.
What pressure advance actually does
Here’s the physical thing PA is fighting. Your extruder pushes filament into the hot end. The melt zone has a tiny bit of compressibility (the molten polymer acts like a spring), and the path from gear to nozzle has friction. When the toolhead accelerates, the extruder needs to push harder to keep flow constant, because some of that motion goes into pressurizing the melt instead of squirting plastic out. When the toolhead decelerates near a corner, that pressure is still there, and it keeps oozing for a fraction of a second after the gear stops feeding. That’s your corner blob.
Pressure advance compensates by reducing extrusion ahead of a deceleration and adding extrusion ahead of an acceleration. Klipper invented the modern implementation under that exact name, and the official docs explain it clearly (https://www.klipper3d.org/Pressure_Advance.html). Marlin shipped a similar feature called Linear Advance, with a unitless K factor (https://marlinfw.org/docs/features/lin_advance.html). Bambu firmware does its own version called Flow Dynamics. The names differ, the math differs, the units don’t translate.
What goes wrong without PA: outside corner bulges (the nozzle hesitates, the melt keeps flowing), pulled-in inside corners (pressure hasn’t built up by the time the toolhead is accelerating away), inconsistent extrusion width on small features like logos and text, and that “soft” looking corner on calibration cubes where the part measures correct on calipers but the edges aren’t crisp. If your prints suffer from any of those, the fix isn’t more retraction or hotter temps. It’s PA.
The 90-second version
For people who just want the recipe and want it now:
- Open OrcaSlicer. Top menu, Calibration, Pressure Advance, Pattern.
- Pick Direct Drive or Bowden in the dialog. OrcaSlicer’s default test sweep populates (DDE: 0 to 0.1, step 0.002. Bowden: 0 to 1.0, step 0.02). That’s the slicer’s bracket range, wide enough to cover almost any printer.
- Confirm the filament and process profile on the right. Use the spool you actually print with.
- Click OK. Print the test. 12 to 20 minutes.
- Read the row with the sharpest corners across all four columns. The PA value is labeled at the left.
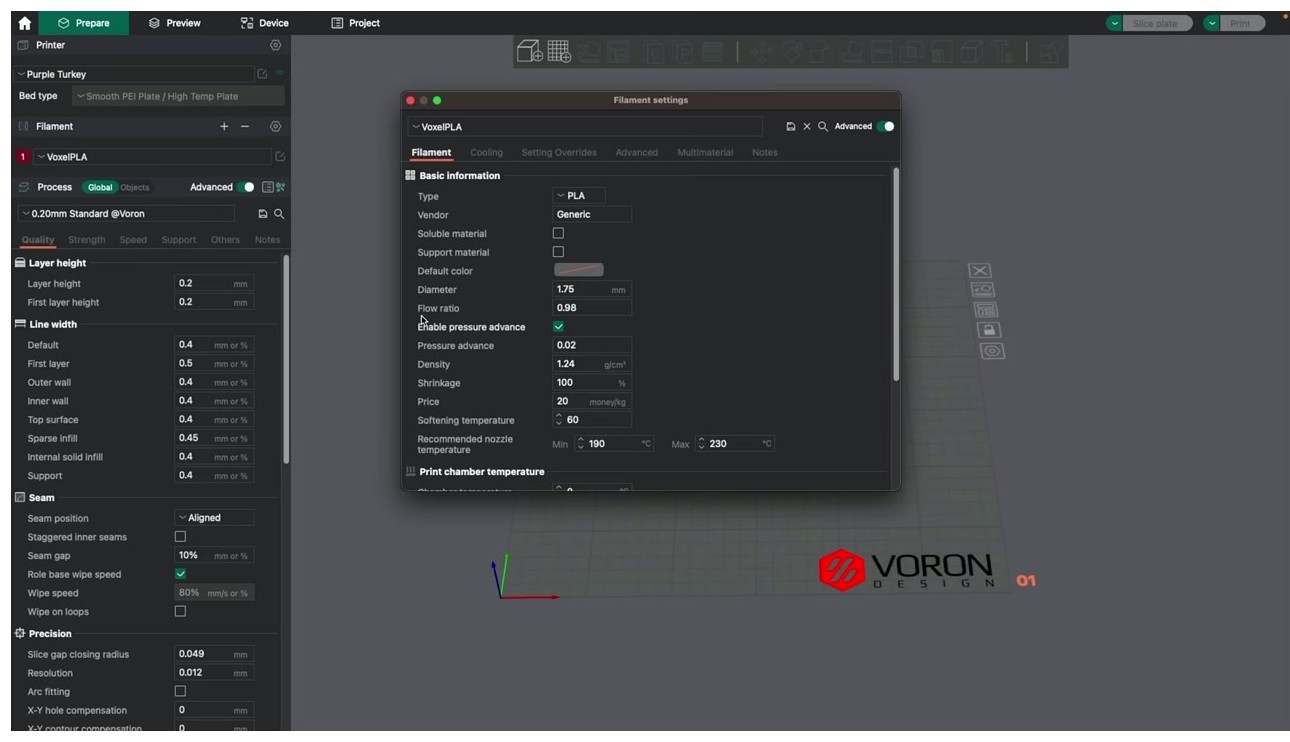
- Filament Settings, Advanced, tick “Enable pressure advance,” type the value, save.
That’s it. Everything below this section is the long version: which method to use when, how to read each test, and the firmware-specific gotchas that bite people who skip the docs.
Klipper PA vs Marlin K vs Bambu Flow Dynamics
This is the section that confuses everyone. Three firmwares, three implementations, three different number ranges, and the values are not interchangeable.
Klipper pressure advance is measured in seconds. It’s roughly “how many seconds of extrusion to advance ahead of the move.” Klipper’s docs cite typical PA values between 0.050 and 1.000 (the high end usually only on Bowden), with a starting FACTOR of 0.005 for direct drive and 0.020 for Bowden (https://www.klipper3d.org/Pressure_Advance.html). OrcaSlicer’s default DDE test sweep runs 0 to 0.1 in 0.002 steps, which is wide enough to bracket nearly every printer. Many 2026 direct-drive printers (K1, Voron, klipperized Sovol) land in the 0.030 to 0.060 zone, which is why Orca’s range starts at 0. Bowden Klipper lives around 0.20 to 0.60.
Marlin Linear Advance uses a unitless K factor, set per print with M900 (https://marlinfw.org/docs/gcode/M900.html). LIN_ADVANCE has to be enabled at firmware compile time, and most stock Creality Marlin builds don’t ship with it on. If M900 errors in the console, your firmware doesn’t support it and you’ll need a custom build (Jyers, Professional Firmware, or hand-rolled Marlin). Once enabled, K values for direct drive on a stock Ender 3 S1 with a Bondtech land around 0.04 to 0.10. Bowden Ender 3 stock, more like 0.20 to 0.80.
Bambu Flow Dynamics is a different beast. The X1C, P1S, P1P, A1, and A1 mini all run an automatic Flow Dynamics calibration before each print by default, and on stock Bambu filaments it’s accurate enough that most people never need to touch PA. The catch: if you calibrate PA in OrcaSlicer for a third-party spool and forget to disable Flow Dynamics in the print dialog, the printer’s auto-cal overwrites your value (https://forum.bambulab.com/t/pressure-advance-and-k-factor-with-orcaslicer/22626). If you’re choosing between slicers, our OrcaSlicer vs Bambu Studio piece compares the PA workflows directly.
Quick reference table:
| Firmware | Feature name | Units | Typical DDE range | Typical Bowden range |
|---|---|---|---|---|
| Klipper | Pressure Advance | Seconds (approx) | 0.030 to 0.060 (community 2026) | 0.20 to 0.60 |
| Marlin (LA enabled) | Linear Advance / K factor | Unitless | 0.04 to 0.10 | 0.20 to 0.80 |
| Bambu firmware | Flow Dynamics | Internal (M900-flavored) | ~0.020 to 0.030 (auto) | n/a (no Bowden Bambus) |
One number 0.04 in Klipper PA is not the same physical compensation as 0.04 in Marlin K. They happen to land in similar zones for some hardware combos but that’s coincidence. Always recalibrate when moving between firmwares.
Line method walkthrough
The Line method is the original PA test. Orca prints parallel lines at increasing PA values, and you eyeball which line is most uniform end to end. Fast (5 to 8 minutes), easiest to set up, most fragile if your first layer isn’t dialed.
Setup, click by click:
- Calibration menu, Pressure Advance, PA Line.
- Pick Direct Drive or Bowden. The dialog populates OrcaSlicer’s default test sweep: DDE is 0 start, 0.1 end, 0.002 step. Bowden is 0 start, 1.0 end, 0.02 step. That’s the slicer’s bracket range, not a typical PA value range.
- Confirm filament profile and process profile on the right side of the slicer. Use your daily-driver filament, not whatever was loaded last.
- Bed clean. PEI wiped with IPA, glue stick or hairspray if your surface needs it. Bed mesh on.
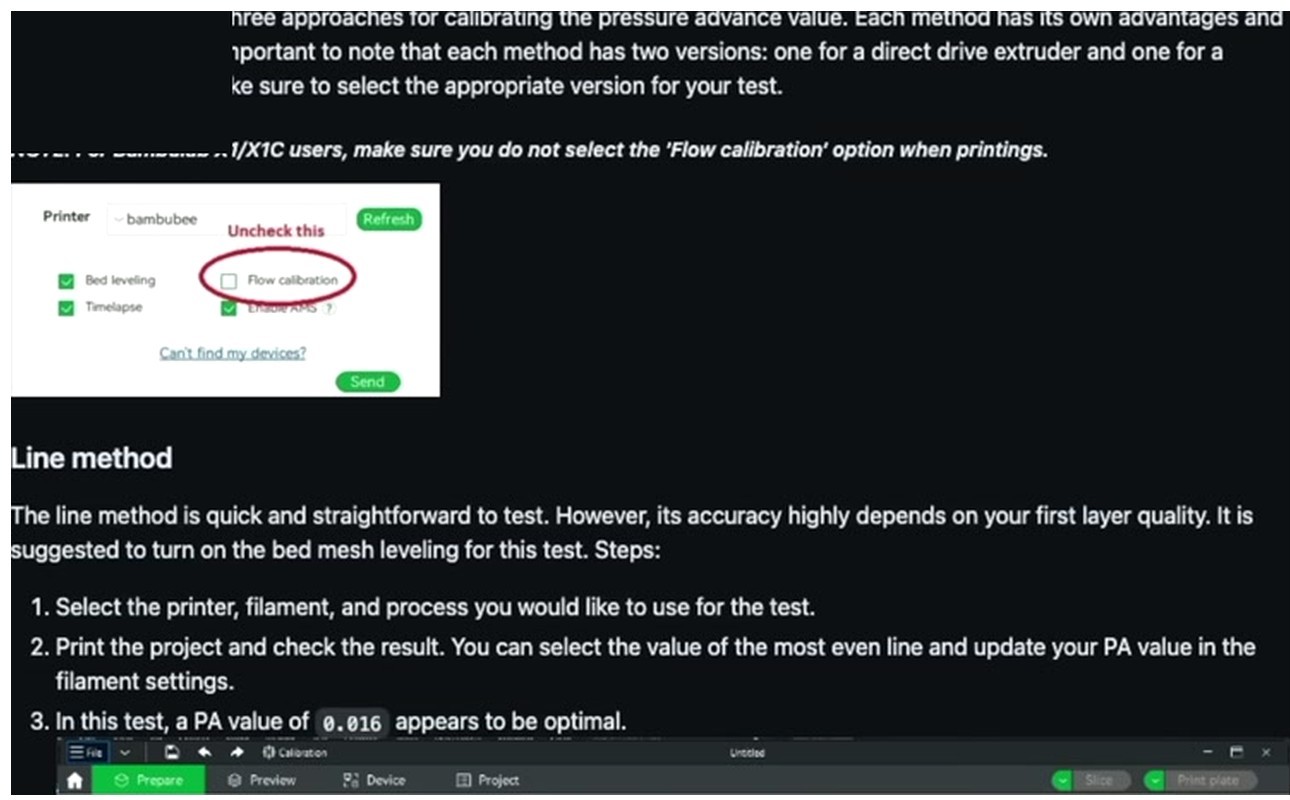
- If you’re on a Bambu, the print dialog will offer to run Flow Dynamics Calibration before printing. Uncheck it. We’re testing PA manually, the auto-cal will fight us.
- Print.
Now the read. You want to look at each line under direct light, ideally with a phone macro lens or a 5x loupe. Run your eye along each line:
- Thin start, full middle: PA too low. The extruder needed to push harder at the start of the line and didn’t.
- Full middle, blobby tail: PA too high. Pressure built up but didn’t get released in time, so it kept oozing.
- Uniform width front to back: winner. Note the PA value labeled next to that line.
Line works best when your first layer is rock-solid. If your bed is slightly off, every line looks rough at the start regardless of PA. That’s why most people switched to Pattern, which is more forgiving. Where Line still beats Pattern: very oozy filaments. PETG-CF, ASA with poor heat soak, soft TPU below 95A. The Pattern test has corners where strings drag across rows and ruin the read. Lines just go forward.
One thing to watch: the SoftFever wiki notes that test speed needs to be high enough to actually exercise PA (https://github.com/SoftFever/OrcaSlicer/wiki/pressure-advance-calib). If your max acceleration is capped low (under 2000 mm/s squared), every line looks identical. Bump accel for the test, then put it back.
Pattern method walkthrough
Pattern is what the OrcaSlicer community settled on as the default in 2026. It’s derived from the Ellis Print Tuning Guide pattern (https://ellis3dp.com/Print-Tuning-Guide/articles/pressure_linear_advance.html), and it solves Line’s biggest weakness: it doesn’t depend on a perfect first layer. The test prints a grid of corner shapes, each row at a different PA value, each column testing different corner directions.
Setup is the same as Line:
- Calibration, Pressure Advance, PA Pattern.
- Direct Drive or Bowden. Same defaults as Line.
- Confirm filament and process. Click OK.
- Print. 12 to 20 minutes.
The read is where Pattern shines. With a phone macro lens or a 5x loupe, look down each column. You’re hunting the row where corners look like a freshly folded paper edge: lines come in clean, hit a 90 degree turn, and leave clean.
- Too low PA: the inside of the corner has a small gap or pulled-in look. The corner cuts inward like a missed turn.
- Too high PA: the corner has a small bump on the outside, sometimes with a faint “spit” of extra material on the inside near the apex.
- Just right: both corner faces meet at a crisp angle with no extra and no missing material.
Look for a row where 4 to 6 corners in a row look clean, not just one. If only one corner per row looks good, you’ve got mechanical variability (loose belts, worn V-wheels) and you should fix that first. The PA value at the left of the winning row is your answer.
Why Pattern usually wins for most setups in 2026: tolerant of marginal first layers, clear “best row” band even on cheap printers, works across PLA, PLA+, PETG, ABS, ASA, and most carbon-filled materials at moderate speeds. The SoftFever wiki recommends it as the default starting point.
Where Pattern struggles: oozy filaments. Also, issue #7568 documents a current bug where the speed setting in the Pattern test is ignored (https://github.com/SoftFever/OrcaSlicer/issues/7568). Don’t waste time tweaking the speed field, just run defaults. Issue #6672 documents that Pattern uses the wrong layer height on non-0.4 mm nozzles (https://github.com/SoftFever/OrcaSlicer/issues/6672), and issue #879 covers Pattern failing entirely on a 0.2 mm nozzle for PLA due to the volumetric speed limit (https://github.com/SoftFever/OrcaSlicer/issues/879). On those nozzles, use Tower or Line.
Tower method walkthrough
Tower is the slowest and most “feel-it-with-your-finger” of the three, but it has one advantage: it tests at real print speeds. If your daily prints run above 120 mm/s and you want to know the PA value at THAT speed, Tower is the most honest answer. Pattern and Line run their own internal speeds.
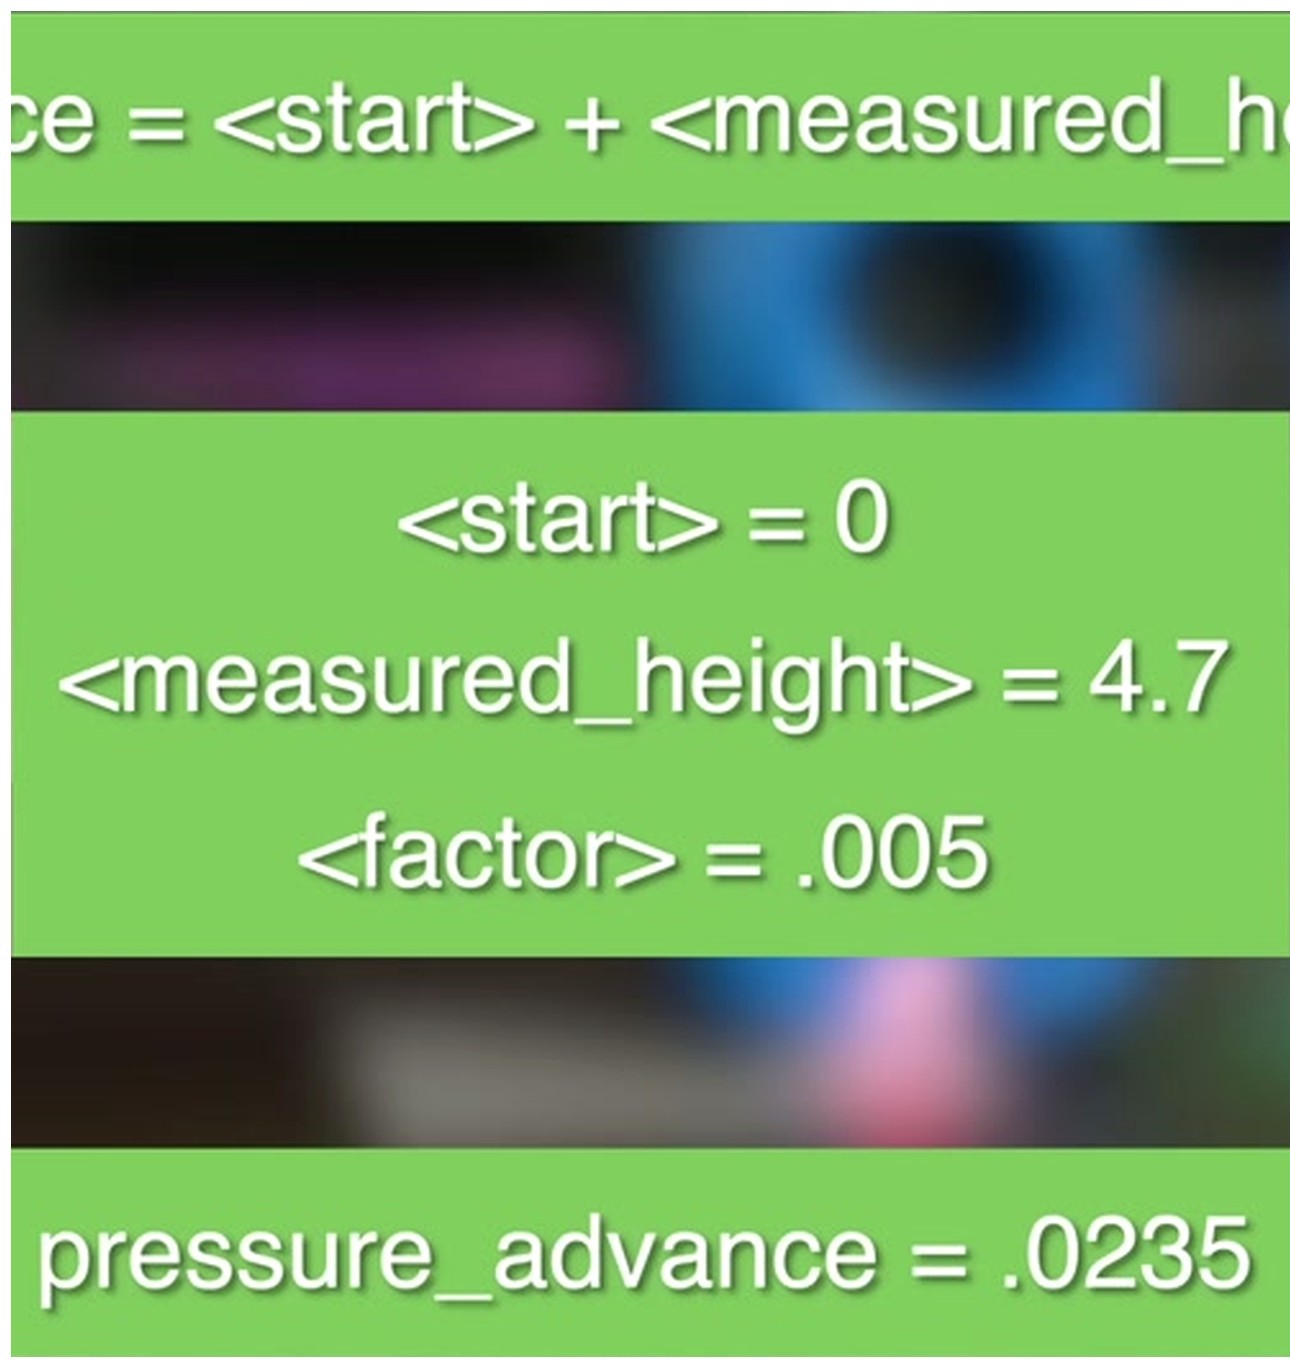
The Tower prints a single open-corner shape, roughly 25 to 30 mm tall. As the tower goes up, OrcaSlicer increases PA layer by layer. You read the height where the corner looks cleanest, then convert height to PA.
The math:
PA = start + (measured_height x factor)
Where the factor is:
- Direct Drive: 0.002 per mm of tower height.
- Bowden: 0.02 per mm of tower height.
Start is usually 0 unless you customized the dialog. So if your default DDE start is 0 and you find the cleanest band at 19 mm of tower height, your PA is 0 + (19 x 0.002) = 0.038. That matches almost exactly with what most P1S users report on Bambu PLA Basic, which is reassuring.
Setup:
- Calibration, Pressure Advance, PA Tower.
- Pick DDE or Bowden. Defaults: 0.002 per mm step (DDE) or 0.02 per mm (Bowden), starting at 0.
- Before slicing, set your outer wall speed in the linked process profile to something realistic for your printer. If you normally print at 200 mm/s, set the test to 200. The whole point of Tower is testing at real speed.
- Click OK, slice, print. 20 to 30 minutes.
The read uses fingertips and good light. Run a fingernail down the vertical corner of the tower from top to bottom. You’ll feel three things:
- A bumpy ridge on the outside corner: PA is too high in that band.
- An inward step or scoop on the inside corner: PA is too low in that band.
- A smooth, glassy section 2 to 4 mm tall where the corner feels clean and there’s no visible seam ridge.
Take the midpoint of that clean section, measure it from the bottom of the tower in mm, and run the formula. Done.
When Tower beats the other two: high-speed printers (above 150 mm/s outer wall), CoreXY machines where you want PA verified at full speed, and any time you’ve changed input shaper settings. Klipper users especially benefit, since they push higher speeds than Marlin users and Pattern’s fixed internal speed sometimes underrepresents the artifact. For Klipper-specific tuning context, our Creality K1 / K1 Max guide covers input-shaper and PA interaction.
How to apply the result
You’ve got a number. Now where does it go?
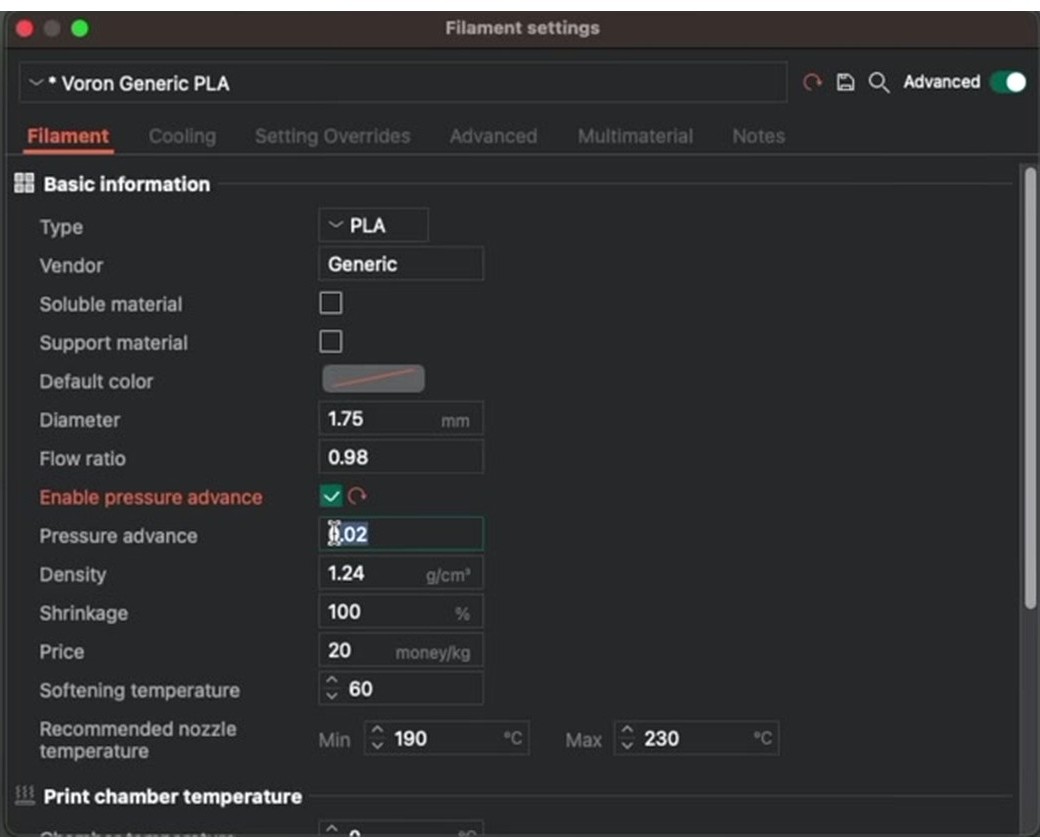
The short answer: filament profile, Advanced tab, Enable pressure advance, type the number, save. That’s it for 90% of users. PA depends on the filament’s melt characteristics far more than on the printer, so it lives in the filament profile, and you should keep one calibrated PA per spool brand and color you use regularly.
The longer answer depends on your firmware:
Klipper: You have two options. Either bake the value into the OrcaSlicer filament profile (which emits a SET_PRESSURE_ADVANCE block in start G-code), or set it permanently in printer.cfg under the [extruder] section. Pick one. If you do both, the start G-code wins and you’ll be confused six months from now wondering why your printer.cfg value is being ignored.
Marlin: Add an M900 K command to the filament’s start G-code. Example: M900 K0.06. Per-filament is the sane workflow, keep your printer’s universal start G-code clean of PA so you can swap filaments without remembering to change it.
Bambu: Save to the filament profile in OrcaSlicer (it emits the M900 with Bambu syntax automatically). Then, critically, at print time UNCHECK “Flow Dynamics Calibration” in the print dialog. If you don’t, the printer runs its own pre-flight cal and overwrites your value.
This is exactly where OrcaSlicer Discussion #2675 helps clarify the “two PA fields” confusion (https://github.com/OrcaSlicer/OrcaSlicer/discussions/2675). The filament profile’s PA value is what gets emitted as M900 in start G-code. The device tab’s K factor is a runtime value. They can disagree, and the filament profile usually wins because it runs in start G-code, after device-tab values have already been applied.
Per-firmware deep dive
Klipper (K1 / K1 Max, Voron, klipperized Sovol, RatRig, FLSun)
Klipper’s PA is the most granular of the three firmwares. The 0.002 step on the Direct Drive default sweep resolves differences Marlin’s K factor would miss, which is part of why dialed-in Klipper prints often have visibly cleaner corners than Marlin prints on the same hardware.
To apply at runtime, in the Klipper console:
SET_PRESSURE_ADVANCE ADVANCE=0.038That’s a runtime override, lost on Klipper restart. To persist, edit printer.cfg under [extruder]:
[extruder]
pressure_advance: 0.038
pressure_advance_smooth_time: 0.040
Then SAVE_CONFIG or restart. smooth_time defaults to 0.040 seconds and most people leave it. If you’ve got a short filament path on a high-flow direct extruder (Sherpa Mini, Galileo 2, Stealthburner with Revo), experiment with dropping smooth_time to 0.020. There’s a Klipper Discourse thread on this (https://klipper.discourse.group/t/pressure-advance-smooth-time-on-direct-extruders-with-short-filament-path/1971). Issue #803 documents a PA bug for FLSun v400 deltas where generated PA blocks were malformed (https://github.com/SoftFever/OrcaSlicer/issues/803), so on deltas or unusual kinematics, sanity-check the generated G-code.
Marlin (Ender 3 V2/Pro/S1, older Creality, generic Marlin 2.x)
Step zero on Marlin: check that LIN_ADVANCE is compiled in. Connect via USB, type M900. If you get back a K value, you’re good. If you get an error, you need a custom firmware build (Jyers, Professional Firmware, or hand-rolled Marlin). Stock Creality firmware on most Ender 3 V2 / Pro / S1 builds does NOT have LIN_ADVANCE on.
OrcaSlicer’s Marlin K range is wider than Klipper’s. Direct drive typically 0 to 1.0 with step 0.05. Bowden Marlin can run 0 to 2.0 step 0.1. Once you’ve found your number, add it to the filament profile’s start G-code:
M900 K0.06Replace 0.06 with your value. Keep PA per-filament, not in the printer’s global start G-code. Every filament is different.
Bambu (A1, A1 mini, P1P, P1S, X1C, X1E, H2D)
Bambu is the trickiest because Flow Dynamics is solid out of the box. On stock Bambu PLA Basic, PETG HF, ABS, and PA-CF spools, Flow Dynamics auto-cal produces a value within ~0.005 of what you’d get manually. For most users on stock filaments, you don’t need to touch PA.
Where you do need to override: third-party filaments Flow Dynamics misreads (sparkly PLA, glow-in-the-dark, some carbon-filled brands), high-flow nozzles (CHT, ObXidian), and custom 0.6 or 0.8 mm nozzle setups. The workflow: run PA Pattern in OrcaSlicer, save the value in the filament profile, then at print time uncheck “Flow Dynamics Calibration” AND “Flow Rate Calibration.” Skip that step and the printer overwrites your value. This is the most common Bambu PA mistake.
Reported stock PA values from Bambu user threads (https://forum.bambulab.com/t/flow-rate-and-pressure-advance-calibration-data-on-multiple-filaments/25065) for sanity checking: Bambu PLA Basic on X1C ~0.020 to 0.025, PETG HF on P1S ~0.030, ABS on X1C ~0.022. If you’re getting wildly different numbers (say 0.08 on Bambu PLA), recheck flow ratio and temperature first.
Common mistakes
Almost every PA frustration thread on Reddit traces back to one of these. I’ve made a few of them myself.
- Calibrating PA before nailing temperature and flow. PA reacts to extrusion pressure. If your flow ratio is off, every PA result is biased and you’ll re-tune later. Run the temperature tower first, then flow rate calibration, then PA.
- Calibrating on a printer with mechanical issues. Loose belts, worn V-wheels, a notchy extruder gear all imitate PA artifacts. Tighten and inspect mechanicals before assuming it’s PA.
- Pattern method on oozy PETG-CF or wet TPU. The strings between corners destroy the read. Use Line method at moderate speed instead.
- Line method at the wrong speed. Under 60 mm/s and the lines all look fine because there’s not enough acceleration to expose PA error. Over 200 mm/s on a stock Ender and you’re testing acceleration limits, not PA.
- Copying Klipper PA values to a Marlin printer. The numbers are not portable. 0.04 in Klipper PA is not 0.04 in Marlin K factor. They happen to be similar in some setups but it’s coincidence, not a rule.
- Copying any PA value to a Bambu firmware printer. Bambu’s Flow Dynamics is its own thing. Either let Flow Dynamics run, or override with OrcaSlicer’s PA cal AND disable Flow Dynamics at print start. Don’t half-do it.
- Forgetting to disable input shaper auto-cal when changing PA. Input shaper and PA influence each other. The OrcaSlicer wiki explicitly lists IS toggling as a re-cal trigger.
- Setting PA in two places. If your start G-code emits M900 K0.04 and your filament profile says PA 0.06, one of them silently wins. Pick the filament profile and leave the printer’s start G-code clean.
- Not retesting after switching filament brands. Hatchbox PLA and Polymaker PolyTerra are both “PLA,” but the optimal PA differs. Test each spool you use regularly.
- Reading the test under bad light. Sharp-corner reads need direct overhead light or a phone flashlight. Soft ambient room light hides the artifacts and you’ll pick the wrong row.
If you’re chasing artifacts that don’t make sense even after PA tuning, our OrcaSlicer troubleshooting master guide covers the broader print-quality decision tree.
Known bugs to watch for
OrcaSlicer is open source, fast-moving, and like any actively-developed slicer it has bugs. The PA calibration feature has a few you should know about before you waste filament chasing a value that’s actually a software glitch.
Issue #7562: PA Calibration rejects values above 0.3. On OrcaSlicer 2.2.0, manually setting a K value above 0.3 in the Manage Result dialog gets rejected, even though the field accepts 0.0 to 1.0 (https://github.com/SoftFever/OrcaSlicer/issues/7562). Bites Bambu A1 users with high-flow filaments. Still open as of 2026; workaround is to edit the filament JSON directly, no fixed version yet.
Issue #6672 (closed-as-not-planned): Pattern uses wrong layer height on non-0.4 mm nozzles. On 0.2 mm or 0.6 mm nozzles, Pattern slices with the default 0.2 mm layer height instead of one appropriate for the nozzle (https://github.com/SoftFever/OrcaSlicer/issues/6672). The derived PA isn’t fully representative. Workaround: use Tower or Line.
Issue #7568 (closed-as-not-planned): Pattern speed setting ignored. Custom outer wall speed in the Pattern test dialog has no effect (https://github.com/SoftFever/OrcaSlicer/issues/7568). The test prints at its internal default. Use Tower if you need a specific speed.
Issue #10938: Adaptive PA not changing PA across flow rates. Adaptive Pressure Advance lets you set multiple PA values for different flow rates. Issue #10938 confirms that in some 2.3.0 builds the adaptive values aren’t applied during print (https://github.com/SoftFever/OrcaSlicer/issues/10938). If you’ve gone deep on Adaptive PA and prints don’t improve, check your version.
After PA, what to calibrate next
Once PA is dialed, next up are retraction and (for Klipper users) input shaper. A well-tuned PA reduces the need for aggressive retraction, but you still need a baseline value matched to your filament. Our retraction test guide covers that next step.
For Klipper users who haven’t tuned input shaper, that’s the other big one. IS and PA influence each other (PA changes acceleration profiles, IS handles ringing from acceleration), so if you change one, re-verify the other. The 2026 community workflow: temperature, flow, PA, input shaper, then re-verify PA. A few hours total, and prints look genuinely better.
Frequently asked questions
What is pressure advance in OrcaSlicer?
Pressure advance is a slicer and firmware feature that compensates for the delay between extruder gear motion and actual filament leaving the nozzle. It reduces extrusion ahead of decelerations (preventing corner blobs) and adds extrusion ahead of accelerations (preventing pulled-in inside corners). OrcaSlicer offers three calibration methods (Line, Pattern, Tower) and writes the calibrated value into your filament profile.
Is pressure advance the same as linear advance?
They solve the same problem but they’re different implementations. Klipper calls it pressure advance (units in seconds; Klipper docs cite typical PA values 0.050 to 1.000, with most 2026 direct-drive setups landing in the 0.030 to 0.060 zone). Marlin calls it linear advance and uses a unitless K factor. Bambu firmware calls its version Flow Dynamics. The numbers don’t translate between firmwares. A Klipper PA of 0.04 is not the same as a Marlin K of 0.04.
What pressure advance value should I use for PLA?
It depends on your firmware and extruder. For direct-drive Klipper printers with stock extruders, most PLA in 2026 community reports lands between 0.030 and 0.050 (Klipper’s official docs cite typical PA values 0.050 to 1.000 with a starting FACTOR of 0.005 for DDE). For direct-drive Marlin with LIN_ADVANCE, K values for PLA typically run 0.04 to 0.08. For Bambu firmware on stock Bambu PLA Basic, the auto-calibrated Flow Dynamics value is usually around 0.020 to 0.025. Always run your own calibration. These ranges are starting points, not final values.
How do I enable pressure advance in OrcaSlicer for Klipper?
Run Calibration, Pressure Advance, Pattern. Print the test, read the row with the sharpest corners. Then either save the value in the OrcaSlicer filament profile under Advanced (Enable pressure advance), or edit your printer.cfg directly under the [extruder] section with pressure_advance: 0.038 (replace 0.038 with your value). Pick one location. Setting both leads to confusion later.
Why is my pressure advance value above 0.3 not saving?
That’s a known bug in OrcaSlicer 2.2.0 (issue #7562) and it’s still open as of 2026. The Manage Result dialog rejects K values above 0.3 even though the field accepts 0.0 to 1.0. Workaround: edit the filament JSON file directly, no fixed version yet.
Should I use Line, Pattern, or Tower in OrcaSlicer?
Pattern is the 2026 community consensus default for most users. It’s faster than Tower, more forgiving than Line, and the corner-read is unambiguous. Use Tower if you print at high speed (above 150 mm/s outer wall) and want to verify PA at production speed. Use Line if you’re printing oozy materials (PETG-CF, soft TPU) where Pattern’s corners get destroyed by stringing.
Does Bambu’s Flow Dynamics override OrcaSlicer’s PA?
Yes, if you leave Flow Dynamics enabled at print time. The printer’s pre-flight Flow Dynamics calibration runs and writes its own value, overwriting whatever OrcaSlicer’s start G-code set. To use OrcaSlicer’s PA on a Bambu, uncheck “Flow Dynamics Calibration” in the print dialog before hitting print.
Do I need to recalibrate PA when I change filament brand?
Yes. PA depends on the filament’s melt characteristics, which differ between brands even for the same material type. Hatchbox PLA, Polymaker PolyTerra, and Bambu PLA Basic will all have different optimal PA values. Recalibrate per spool brand, save the value in the filament profile, and you only do it once per spool.
Why does my PA pattern test fail with a 0.2 mm nozzle?
Two known issues. Issue #6672 documents that Pattern uses the wrong layer height on non-0.4 mm nozzles. Issue #879 documents Pattern failing entirely on 0.2 mm nozzles for PLA because the test exceeds the volumetric speed limit. Workaround: use Tower or Line for small-nozzle calibration, or manually adjust the test profile’s layer height before slicing.
What’s the difference between K factor and pressure advance?
Both refer to the same physical compensation, but K factor is Marlin’s term (unitless, set with M900) and pressure advance is Klipper’s term (in seconds, set with SET_PRESSURE_ADVANCE or in printer.cfg). Within OrcaSlicer’s UI the field is labeled “Pressure advance” regardless of firmware, and Orca emits the appropriate G-code based on your printer profile.
Wrap up
Pressure advance is one of those calibrations that looks intimidating until you do it once. After that it’s a 15-minute step you slot in whenever you add a new spool. Pattern method is the 2026 default for most setups, Tower is the answer for high-speed printers, Line is the fallback for oozy materials. Save the value in the filament profile, and let the slicer handle the rest.
If you haven’t worked through the full calibration order yet, our OrcaSlicer calibration guide covers temperature, flow, PA, retraction, and input shaper in sequence. And if you don’t have OrcaSlicer yet, you can grab the latest build from our download page.
Happy printing. Sharp corners, no blobs.
Related OrcaSlicer guides
- The Complete OrcaSlicer Calibration Guide (Order Matters)
- OrcaSlicer VFA Test: Diagnose Vertical Fine Artifacts (2026 Guide)
- OrcaSlicer PA Line vs PA Pattern vs PA Tower: Which Pressure Advance Test (2026)
- How Often Should You Recalibrate OrcaSlicer? 2026 Maintenance Schedule
- OrcaSlicer Won’t Open or Won’t Launch: Windows, Mac, Linux Fixes