Last Tuesday I sliced a 14-hour benchy farm, ejected the microSD, walked twelve feet to my P1S, and dropped the card on the desk instead of into the slot because I was looking at my phone. I lost ninety seconds and roughly half my dignity hunting for it under a pile of failed support material, and that was the moment I decided I’d never sneakernet another print as long as the slicer could just send the file itself.
If you’ve been running OrcaSlicer 2.3.x for a while but you’re still pulling that card out of the front of a Bambu, a Voron, a Prusa MK4, or a Raspberry Pi taped to the back of an Ender, this guide is the one I wish I’d had when I switched. I’ll walk you through every wireless workflow OrcaSlicer supports, ecosystem by ecosystem, with the actual button labels, the actual ports, and the honest gotchas that the marketing pages skip. By the end you’ll click Slice once, hit one more button, and the printer will start heating up before you’ve finished standing up.
What you’ll find in this guide
- Why sneakernet feels slow once you’ve tried wireless
- OrcaSlicer’s upload UI explained
- Bambu Lab over LAN
- Bambu Lab over Cloud
- Klipper printers via Mainsail or Fluidd
- OctoPrint on a Raspberry Pi
- PrusaLink for MK4, MK4S, Mini+, Core One
- File formats: .gcode, .gcode.3mf, .3mf, .bgcode
- Storage destinations, queues, and post-print behavior
- Troubleshooting wireless upload
- FAQ
Why sneakernet feels slow once you’ve tried wireless
I timed myself last weekend. The card-shuffle dance, from clicking Export G-code to the first servo whine, takes me about eighty seconds on a good run and well over two minutes if I have to scroll through three folders on the printer’s touchscreen to find the file I just exported. It doesn’t sound like much, but I print three or four queued jobs a night and I’m not getting any of those minutes back. The microSD card slot on my P1S has also started to feel sticky after maybe two hundred insert cycles, and I’d rather not test how long the contacts hold up under daily abuse.
The hidden cost is worse than the time, though. When the slicer talks to the printer directly, OrcaSlicer’s Device tab actually does something useful. You get the live camera feed, the temperature graph, the per-print queue, and the ability to pause or cancel from your desk. Yank the card and walk over, and you’re back to driving the printer through its own three-inch touchscreen, which is the bit of the user interface every printer manufacturer cares about least.
The catch is that OrcaSlicer doesn’t run a single magic wireless protocol. It runs four. Bambu Lab printers use MQTT and FTPS over your LAN, with an optional cloud path through Bambu’s own servers. Klipper rigs (Voron, Sovol SV0x, Sonic Pad, unlocked K1, anything running Mainsail or Fluidd) accept files through Moonraker’s OctoPrint-compatible shim. Classic OctoPrint installs on a Pi attached to a Marlin printer use OctoPrint’s REST API. Prusa MK4 family printers and the Mini+ use PrusaLink, which is its own modern REST API with HTTP Digest auth. Each ecosystem has its own button labels in the OrcaSlicer setup dialog, its own file format preferences, and its own gotcha about whether “uploaded” actually means “printing.” Get them confused and you’ll spend an hour wondering why your G-code is sitting on the printer doing nothing.
The rest of this article walks each one end to end. Pick the section that matches your printer and you’ll be wireless in fifteen minutes or less.
OrcaSlicer’s upload UI explained, button by button
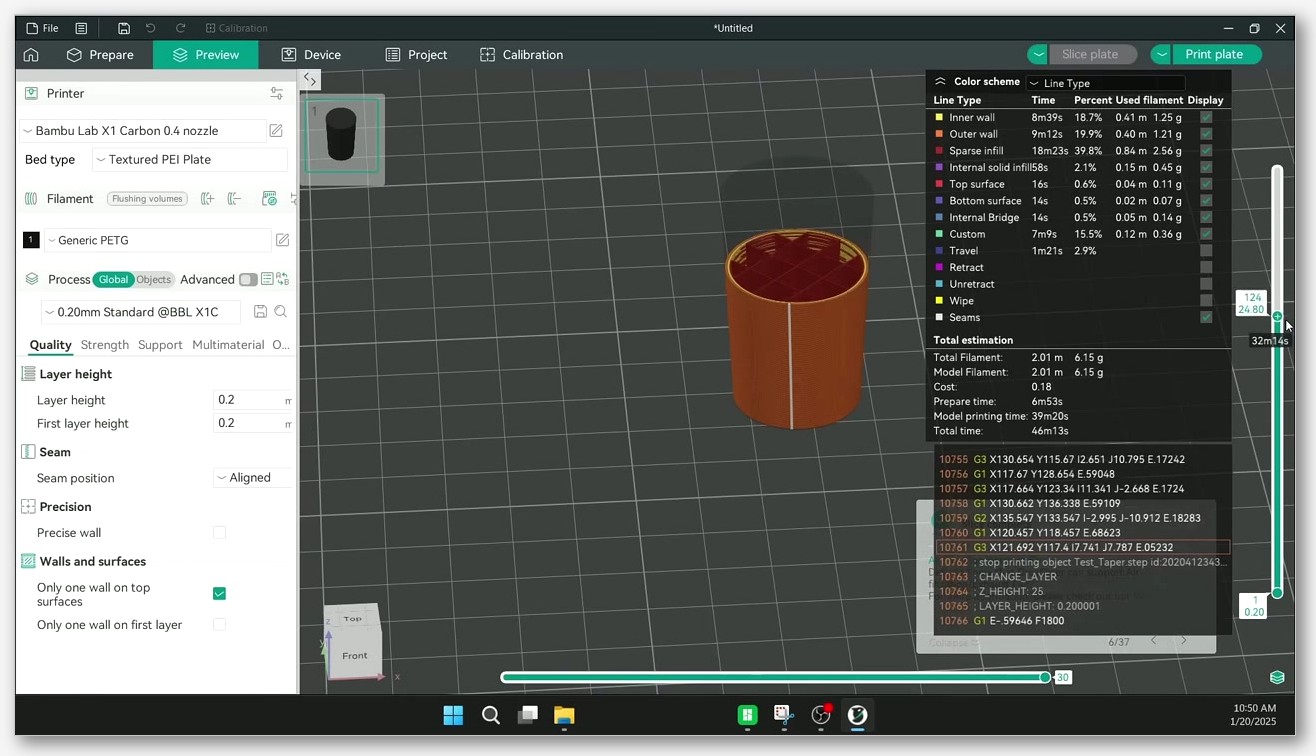
Before we touch any single printer, let’s map out what the slicer is showing you. OrcaSlicer’s main window has four top-level tabs across the top: Prepare, Preview, Device, and Project. You probably live in Prepare. Wireless printing happens in Preview (where the Upload buttons appear after a slice) and Device (where the live connection lives).
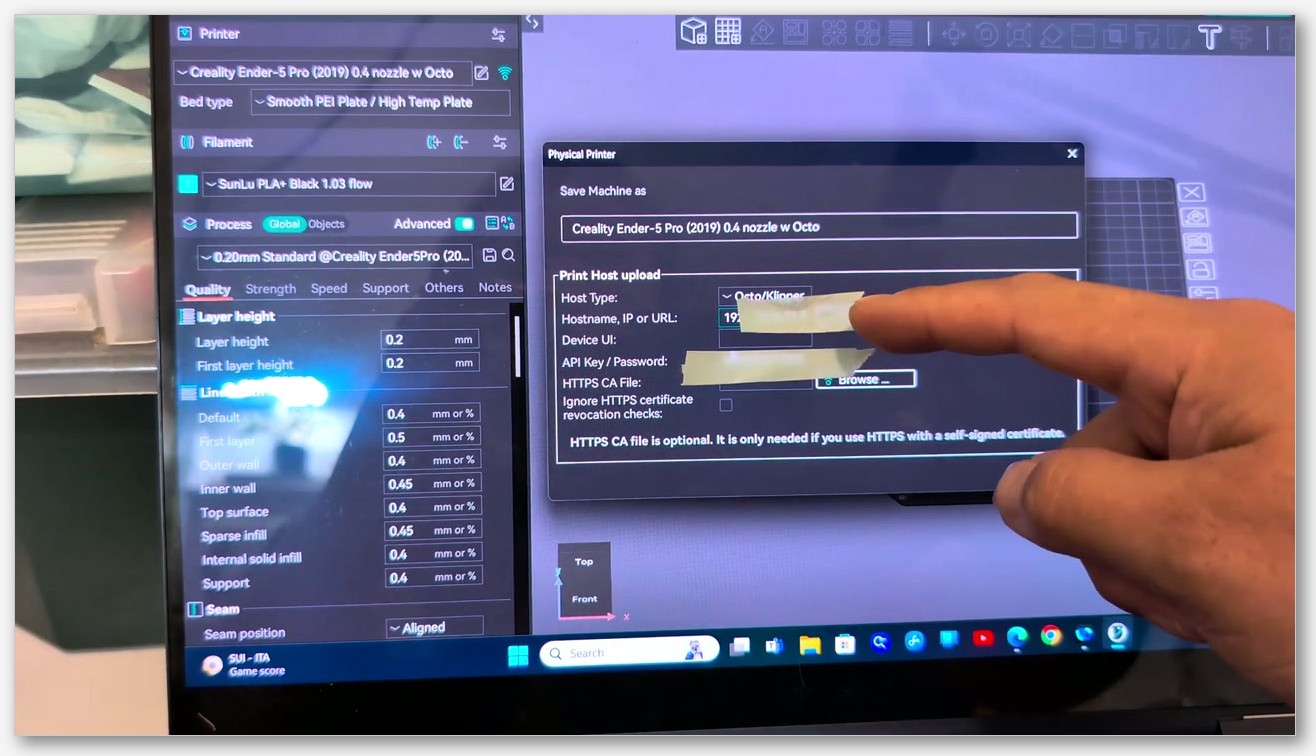
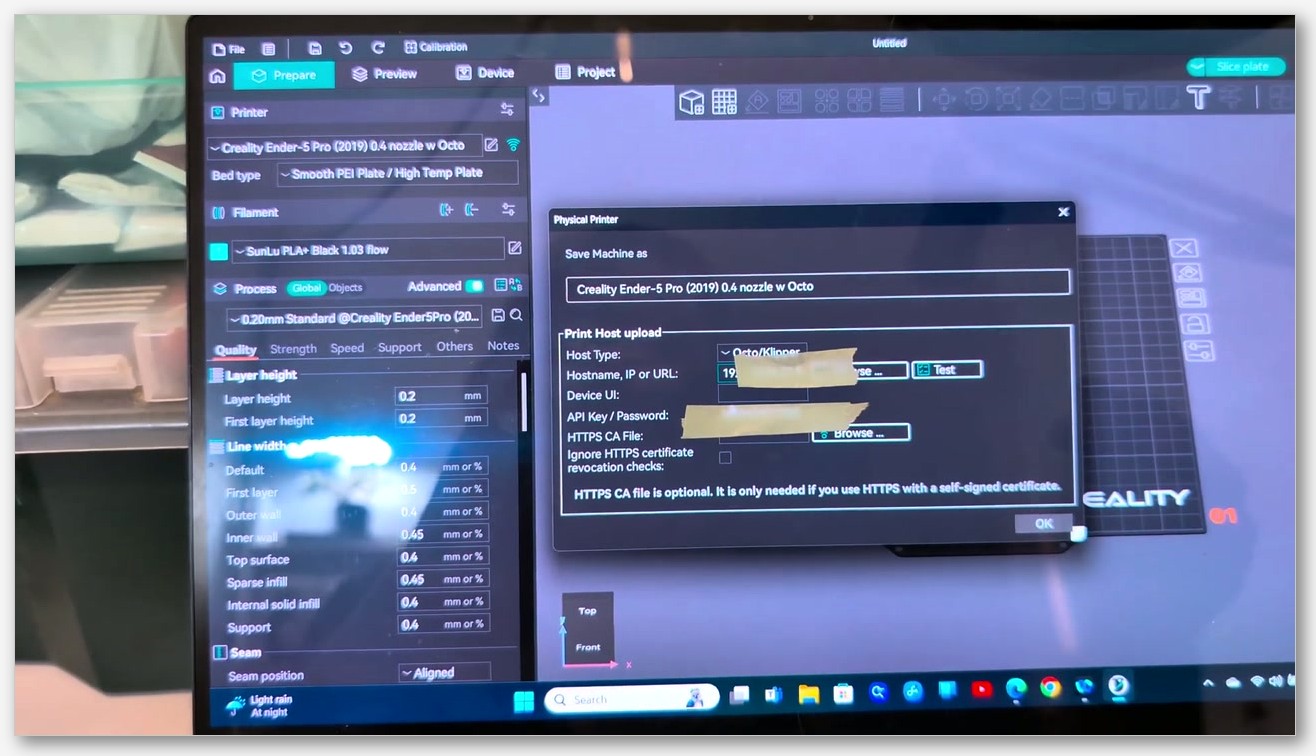
When you click Slice all, the right-hand panel switches into Preview mode and surfaces a button cluster. The third-party Kingroon write-up of the Device tab describes the two upload options as “Export the G-Code File” and “Upload&Print,” noting that the second one “directly sends the file to your printer and starts the print if you made the Wi-Fi connection in OrcaSlicer.” That’s the key word: connection. None of those upload buttons do anything wireless until you’ve added the printer as a “physical printer” with a host type and an address.
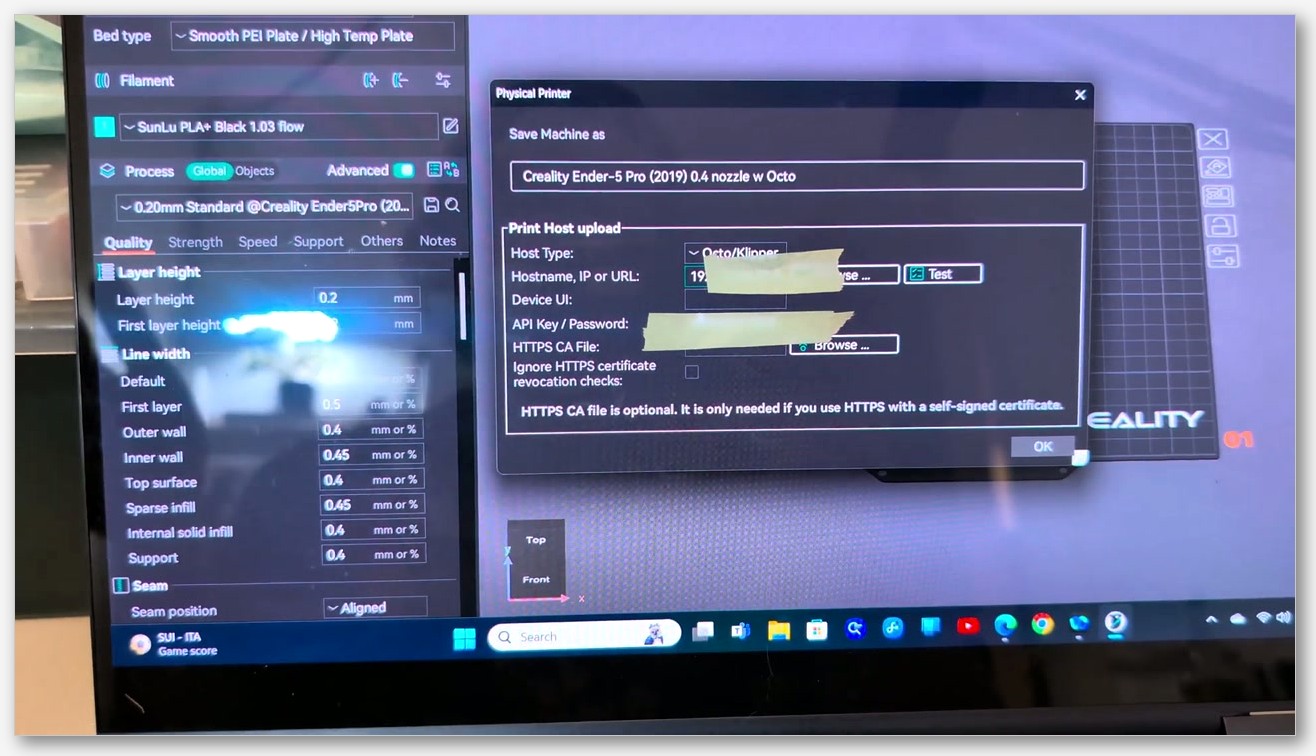
To add a connection, look for the small Wi-Fi icon next to the printer name at the top of the Prepare tab. Click it and OrcaSlicer opens the physical printer connection dialog. The single most important field is the Host Type dropdown. The values you’ll see, again per Kingroon’s overview of the Device tab, include OctoPrint, Mainsail, Fluidd, PrusaLink, PrusaConnect, Duet, FlashAir, AstroBox, Repetier, MKS, FlashForge, SimplyPrint, and Obico. There’s also a special entry labeled “Octo/Klipper” for Mainsail and Fluidd users, which the official Mainsail docs flag explicitly in their OrcaSlicer integration guide.
Underneath the Host Type, you’ll fill in the printer’s hostname or IP address (e.g. http://printer.local or http://192.168.1.100) and an API key or access code, depending on the host. There’s a Test button at the bottom of the dialog. Use it. If Test doesn’t go green, nothing else in this article will work, and you’ll save yourself a confusing forty-five minutes by fixing the connection now instead of after a failed upload.
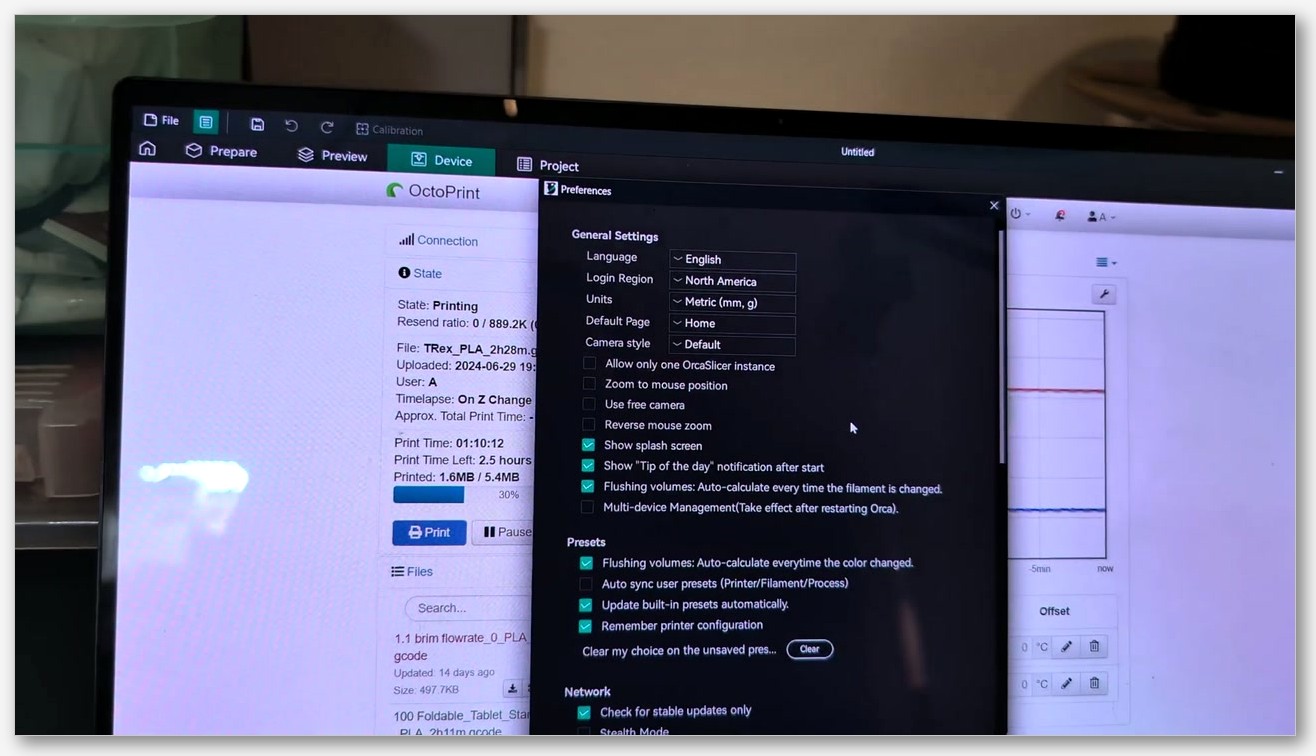
Once the connection is saved, the Device tab at the top of the OrcaSlicer window comes alive. Kingroon’s writeup describes it as “an integrated window inside the slicer which lets you control your 3D printer directly from the OrcaSlicer.” For Bambu printers you’ll get the famous camera feed, temperature gauges, and the file list straight off the printer’s storage. For Klipper, OctoPrint, and PrusaLink, the Device tab embeds the printer’s own web interface, which means you’ve got a one-tab cockpit instead of juggling browser windows.
One thing worth calling out now, because it bites people on every host: the buttons in the post-slice cluster behave subtly differently. The “Export G-code File” option just writes a .gcode file to your computer; nothing leaves your laptop. “Upload” sends the file over Wi-Fi but does not start the print. “Upload&Print” sends the file and tells the host to begin printing the moment the upload finishes. If you’ve ever clicked the wrong one and stared at your printer wondering why it isn’t doing anything, you know exactly the moment I’m talking about. I’ll come back to this in the troubleshooting section because it’s the single most common “wireless isn’t working” complaint, and it’s almost always button confusion.
Now let’s go printer by printer.
Bambu Lab over LAN (X1C, P1S, P1P, A1, A1 Mini, P2S)
Bambu’s the most polarising of the four ecosystems because their 2025 firmware story rattled a lot of people, but the LAN flow itself is genuinely fast once it’s set up. Here’s the honest version, step by step.
First, put the printer into LAN Only Mode. On the touchscreen, head to Settings, then General or Network depending on your model, and toggle LAN Only Mode on. Per the community-maintained Bambu LAN mode guide, this “logs you out and supposedly disconnects your printer from their servers, but since it is still connected to WiFi it theoretically could call home if it wanted.” The point is that LAN mode breaks the cloud account binding so OrcaSlicer can talk to the printer directly without going through Bambu’s servers.
Second, and this is the part that’s tripped up the most people since early 2025, enable Developer Mode. Bambu’s own wiki page on enabling Developer Mode walks through the menu path. The reason this matters is that in early 2025 Bambu introduced an authorisation control system and a piece of middleware they call Bambu Connect. The OrcaSlicer team and the wider community discussed the implications at length in Discussion #10464. The verified workaround is short: switching the printer into both LAN Mode and Developer Mode lets OrcaSlicer keep talking to it directly. Without Developer Mode enabled on post-2025 firmware, the direct LAN connection won’t establish, even if LAN Only is on.
Third, find the Access Code. Once LAN mode is on, the printer screen shows an Access Code on the same Network page. It’s typically eight digits. Write it down. You’ll also need the printer’s IP address from the same screen.
Fourth, jump back to OrcaSlicer. Click the Wi-Fi icon by the printer name, pick your Bambu model from the printer list if it isn’t already selected, and fill in the IP and Access Code fields. Hit Test. If it goes green, you’re done with setup. If it doesn’t, double-check that both LAN Only Mode and Developer Mode are toggled on.
Under the hood, OrcaSlicer’s Bambu integration uses MQTT on port 8883 with TLS (username “bblp” and the printer access code as the password), and file transfer uses FTPS on port 990 along with port 6000 for the file payload and ports 50000-50100 for the FTP data channel. You don’t need to memorise any of this, but if your network has a strict firewall, those are the ports your IT-curious roommate will need to open.
Now slice something. After Slice all, click Upload&Print (or whichever label your build of OrcaSlicer 2.3.x shows for “send and start”). The file will move over Wi-Fi to the printer’s storage and the print will begin within a few seconds. If you’d rather just stage the file without starting, hit plain Upload instead. For Bambu printers the file format that lands on the SD card is a .gcode.3mf bundle, which the OrcaSlicer wiki’s import/export page describes as “the sliced model as a Gcode.3MF file that includes the resulting G-code file along with printer, material, and process information.” That bundle is what enables the AMS material mapping and per-plate metadata that Bambu’s UI relies on, so don’t try to swap it for plain .gcode unless you’re prepared to lose features.
One storage note for the P1 and A1 owners: those models still need a microSD card inserted for the print to actually run, because they don’t have onboard storage for in-progress jobs. The X1 series has internal storage and doesn’t need the card. If you want a deeper dive into the LAN vs Cloud trade-off, I’ve got a separate Bambu LAN versus Cloud explainer that goes through the privacy and reliability questions in more detail.
Bambu Lab over Cloud, and when to skip it
Cloud is the path Bambu prefers you take. You sign in to your Bambu account inside OrcaSlicer, the printer stays bound to the same account, and uploads route through Bambu’s servers and back down to the printer. The advantage is that you can send a print from anywhere in the world with an internet connection, not just from your home network. The cost is that Bambu’s cloud is between you and your printer, and as the 2025 firmware drama made very clear, that relationship is theirs to redefine whenever they ship a firmware update.
For most readers of this article, who are reading it because they want their slicer to talk to their printer in the same room as them, Cloud is overkill. The setup is also simpler than LAN: sign in to your Bambu account from the OrcaSlicer login button at the top right, your bound printers show up in the printer list automatically, and Send + Print works the same way. There’s no Access Code dance and no Developer Mode toggle.
If you do want Cloud, the one thing worth knowing is that Cloud uploads use MakerWorld-flavoured .gcode.3mf bundles with extra metadata, so file sizes are typically a touch larger than LAN uploads of the same plate. Don’t try to mix the two; if you’ve put the printer into LAN Only Mode for LAN flows, you’ll need to take it back out before Cloud uploads will work, and vice versa. Most Bambu owners I know pick one and stick with it. I went LAN and haven’t looked back.
Klipper printers via Mainsail or Fluidd (Voron, Sovol, Sonic Pad, unlocked K1)
Klipper is my favourite ecosystem to set up wireless from OrcaSlicer because once you’ve done the five-minute Moonraker tweak, it just works for every Klipper printer you ever own.
The trick is that Moonraker, the API server that sits in front of Klipper on every Mainsail and Fluidd install, includes an OctoPrint compatibility layer. As the Fluidd slicer-uploads documentation puts it, “your slicer thinks it is talking to OctoPrint, and Moonraker translates the requests.” That means OrcaSlicer doesn’t need a Klipper-specific protocol; it just needs Moonraker to pretend to be OctoPrint, which Moonraker is happy to do once you enable the right config block.
SSH into your printer host (or open the Mainsail web UI’s machine config editor) and open moonraker.conf. Add this block if it isn’t already there:
[octoprint_compat]
That’s literally it. No values, just the section header. Save the file and restart Moonraker (either from the Machine tab in Mainsail/Fluidd or via sudo systemctl restart moonraker). Once Moonraker comes back up, OrcaSlicer can talk to it as if it were OctoPrint.
Back in OrcaSlicer, click the Wi-Fi icon and open the connection dialog. The Mainsail docs spell out the exact dropdown choice: “Host Type: ‘Octo/Klipper'” and “the Hostname, IP or URL of your Moonraker instance, e.g., mainsail.local.” The Fluidd docs give a parallel flow with five concrete steps: open Printer Settings, set Host Type to OctoPrint, enter the printer URL (something like http://printer.local or http://192.168.1.100), enter any non-empty string in the API Key field, then click Test to verify the connection.
Notice the “any non-empty string” detail for the API key. Moonraker’s compatibility shim doesn’t validate the key the way OctoPrint does; it just needs the field populated. If you’re worried about a stranger on your Wi-Fi uploading prints to your Voron, that’s a fair concern, and the right answer is to put Moonraker behind real authentication, not to rely on the shim’s loose API key check.
Click Test. Green tick? Slice something and hit Upload&Print. The file flies over Wi-Fi to Moonraker, lands in the directory configured in the [virtual_sdcard] section of printer.cfg, and Moonraker tells Klipper to start the job. Per Moonraker’s behaviour, an upload with the print flag set to true is queued, the printer device gets notified and powered on if you’ve set up power control, and the job queue loads and starts the queued print after Klipper reports itself as “ready.”
One detail people get wrong: the virtual_sdcard path is not a Klipper default. The Klipper config reference says directly:
[virtual_sdcard]
path:
#   The path of the local directory on the host machine to look for
#   g-code files. This is a read-only directory (sdcard file writes
#   are not supported). One may point this to OctoPrint's upload
#   directory (generally ~/.octoprint/uploads/ ). This parameter must
#   be provided.
Conventionally, KIAUH-style installs set the path to ~/printer_data/gcodes/, but that’s a convention, not a default. If you’ve inherited a printer from someone else, check the actual path in printer.cfg before assuming. Files uploaded from OrcaSlicer land in whatever directory that path points to, and the Mainsail or Fluidd web UI reads from the same place. If your virtual_sdcard path is wrong, Moonraker will accept the upload but Klipper won’t see the file and you’ll get a confusing “print didn’t start” symptom.
If you want the full step-by-step on the moonraker.conf side, I’ve written a deeper Klipper integration walkthrough that covers power control, the job_queue, and multi-printer setups for shops running more than one Voron.
OctoPrint on a Raspberry Pi (Marlin printers)
OctoPrint’s the old guard, and if you’ve got a Marlin printer with a Pi taped to the back, this is your path. The protocol is the same REST API that Moonraker imitates, but with stricter auth and a richer feature set on the OctoPrint side (plugins, timelapse, real per-user API keys).
Step one, get your API key. Open OctoPrint’s web UI, click the wrench icon (Settings), and head to API. There’s a global API Key listed there. Copy it. Note that newer OctoPrint versions also support per-user API keys under the User Settings, which is the better practice if more than one person uses the install, but the global key will work for a quick OrcaSlicer hookup.
Step two, back in OrcaSlicer, click the Wi-Fi icon, pick OctoPrint from the Host Type dropdown, enter the Pi’s IP (typically http://octopi.local or the literal IP from your router), paste the API key, and click Test. Green tick, you’re connected.
Step three, slice and click Upload&Print. Under the hood, OrcaSlicer calls OctoPrint’s POST /api/files/{location} endpoint, which the OctoPrint file operations documentation describes in full. The location is either local (the Pi’s filesystem) or sdcard (the printer’s actual SD card, if your firmware supports SD streaming). The call is a multipart/form-data request with these parameters, lifted verbatim from the OctoPrint docs:
- file: “The file to upload, including a valid filename.”
- path: “The path within the location to upload the file to or create the folder in (without the future filename or foldername – basically the parent folder).”
- select: “Whether to select the file directly after upload (true) or not (false). Optional, defaults to false.”
- print: “Whether to start printing the file directly after upload (true) or not (false). If set, select is implicitly true as well.” Default false; returns 409 Conflict if printer not operational.
- userdata: “[Optional] An optional string that if specified will be interpreted as JSON and then saved along with the file as metadata.”
The print boolean is the bit that matters for “did the print actually start?” When you click Upload&Print in OrcaSlicer, the slicer sets print=true in that POST. When you click plain Upload, it sets print=false, the file lands in ~/.octoprint/uploads/, and nothing else happens. That’s by design: OctoPrint does not auto-start prints unless you ask it to. Don’t go hunting for a “make it auto-start” toggle in OctoPrint’s web UI either; the per-upload print flag is the right answer, and OrcaSlicer’s button cluster is how you set it.
There’s a safety net worth knowing about. If the printer is currently busy with another job, OctoPrint will reject the print=true request with an HTTP 409 Conflict response, and you’ll see an upload failure in OrcaSlicer. The file itself may or may not have landed on the Pi depending on which stage failed; check the OctoPrint files list to confirm. The fix is to wait for the current print to finish, or click plain Upload to stage the file and then start it later from the OctoPrint UI.
For a deeper look at OctoPrint plugins, slicer-side post-processors, and the various ways OrcaSlicer hooks into OctoPrint’s extension points, see my dedicated OrcaSlicer plus OctoPrint setup guide.
PrusaLink for MK4, MK4S, Mini+, and Core One
PrusaLink is the wireless interface built into modern Prusa printers’ own firmware. There’s no Raspberry Pi involved; the printer’s own ESP32 (or, on the Core One, the built-in network controller) runs a small web server you talk to directly.
To set it up, grab the PrusaLink credentials from the printer. On the MK4/MK4S, go to the touchscreen, then Settings, then Network, then PrusaLink. You’ll see a username and a password listed. They’re randomly generated and printer-unique. Note them down along with the printer’s IP from the same Network menu.
Back in OrcaSlicer, click the Wi-Fi icon, pick PrusaLink from the Host Type dropdown, enter the IP, fill in the username and password, and click Test. Green tick, you’re connected.
Here’s where PrusaLink differs technically from OctoPrint, and it’s worth understanding even if you don’t intend to poke at the API yourself. The Prusa-Link-Web OpenAPI spec defines the modern upload endpoint as PUT /api/v1/files/{storage}/{path}, authenticated with HTTP Digest (not Basic auth, not an API key). The storage parameter is an enum with values LOCAL, SDCARD, or USB depending on which storage device you’re writing to. The MK4 and Mini+ commonly use a USB stick plugged into the printer’s USB port, in which case the storage value is USB; the Core One uses internal storage.
Print-on-upload is controlled by an HTTP header, not a query parameter. The spec lists Print-After-Upload as an RFC 8941 structured-field header that takes the value ?1 (truthy) or ?0 (falsy, default). There’s also an Overwrite: ?1 header for overwriting existing files, and a Content-Length header for the file size. A successful upload returns HTTP 201 Created. PrusaLink also retains a legacy POST /api/files/{target} endpoint that mirrors OctoPrint’s multipart upload, so older PrusaLink installs and slicers without the PUT support can still talk to the printer.
If you only care about clicking buttons, here’s the upshot: click Upload&Print in OrcaSlicer and the slicer fires off the PUT request with Print-After-Upload: ?1 set, PrusaLink stores the file on USB (or wherever you’ve configured), and the print starts. Click plain Upload and the file lands on storage with the header omitted, ready for you to start manually from the printer’s screen or PrusaLink’s web UI.
Two file-format gotchas. First, PrusaLink expects plain .gcode (or .bgcode on firmware 5.1+ printers). It does not accept .gcode.3mf bundles. If you’ve been targeting a Bambu and you absent-mindedly leave the export format set to .gcode.3mf when switching to your Prusa, the upload will fail. Second, OrcaSlicer does not natively export .bgcode (more on this in the next section), so for now you’re uploading the larger ASCII .gcode files even on hardware that supports binary. That works; it just doesn’t save you the file size win.
File formats: .gcode vs .gcode.3mf vs .3mf vs .bgcode
Four formats, three of which you’ll meet in OrcaSlicer’s export menu and one of which you can’t natively produce yet. Here’s the honest breakdown.
Plain .gcode is the universal format. It’s ASCII, it’s human-readable, and every printer that runs Marlin, Klipper, or Prusa firmware understands it. It’s also large; a complex multi-hour slice can run to tens of megabytes. There’s no metadata embedded beyond the comments OrcaSlicer adds at the top, so if you want to re-slice the same model with the same settings six months from now, you’ll need the original .3mf or STL.
Gcode.3MF is OrcaSlicer’s bundle format. The OrcaSlicer wiki’s import/export page describes it as “the sliced model as a Gcode.3MF file that includes the resulting G-code file along with printer, material, and process information.” That means the .gcode.3mf zip contains the G-code, a thumbnail, plate metadata, slicer settings, and the printer/material/process profiles you used. Bambu printers expect this format for full feature support; it’s also what enables the per-plate switching and AMS material mapping in OrcaSlicer’s Device tab.
Generic 3MF is the model-only export. The wiki describes it as “the current model as a generic 3MF file without printer, material, or process information.” Use this when you want to share an unsliced model with someone whose printer is different from yours; they’ll re-slice it on their setup. If you’re confused about the .gcode.3mf bundle versus the generic .3mf project file, my OrcaSlicer 3MF project files guide goes deeper on the difference and why both exist.
Binary G-code (.bgcode) is the format that doesn’t come out of OrcaSlicer natively. The Prusa Knowledge Base calls it “a new standard for encoding and compressing ASCII G-code files,” and says that “using binary G-code reduces the average size by about 70%” and that “PrusaSlicer version 2.7.0 and later includes binary G-code support with export functionality enabled by default.” It runs on the MK4 family, the XL family, the MINI family, and the MK3.9 family with firmware 5.1.0 and newer.
The catch: OrcaSlicer doesn’t export .bgcode yet. Issue #3564, “Port .bgcode support from PrusaSlicer 2.7.0,” is still open with no merged implementation as of OrcaSlicer 2.3.2 (March 2025). The community workaround is the bwees/orca_bgcode post-process script, which OrcaSlicer runs after the slice completes and converts the ASCII output into binary on the fly. It’s not bundled and it’s not officially supported, but it does work if you need it.
If you want the easy mental model: export plain .gcode for Klipper, OctoPrint, and PrusaLink; export .gcode.3mf for Bambu. Generic .3mf is for sharing unsliced models. .bgcode is a “later, maybe” feature for OrcaSlicer users.
Storage destinations, queues, and what happens after the print starts
Every wireless workflow lands the file somewhere, and the somewhere is different per host. Here’s the short version of where to look when you’re confused about why a file “isn’t there.”
On Bambu printers in LAN mode, files arrive via FTPS on port 990 and land on the printer’s storage. For the P1 and A1 series, that’s the inserted microSD card; the print physically reads from the card mid-job, which is why pulling the card mid-print is one of the few ways to brick a job. For the X1 series, internal storage handles the file and you can pop the card out the moment the upload completes.
On Klipper installs, files land in whatever directory the [virtual_sdcard] path: setting in printer.cfg points to. Conventionally that’s ~/printer_data/gcodes/ on Kiauh installs, but it varies. Files are visible from the Mainsail or Fluidd web UI as soon as they land, and they stay there until you delete them or the auto-cleanup plugin (if installed) sweeps them out. Moonraker also has a job_queue feature: when you upload with the print flag set, the file is queued, and if you’ve configured a power-control device, Moonraker can auto-power the printer before queuing the print. This is the right pattern for printers you’d rather not leave drawing standby power between jobs.
On OctoPrint, files land in ~/.octoprint/uploads/ by default. If you call the API with location=sdcard, OctoPrint streams the file to the printer’s actual SD card instead, assuming the firmware supports SD card streaming over the serial connection. Most OrcaSlicer users will stick with location=local and let OctoPrint feed the file line-by-line to the printer over serial.
On PrusaLink, the storage location is the storage parameter you set in the URL: LOCAL, SDCARD, or USB. MK4 and Mini+ owners typically default to USB (because the stick is the high-capacity option), Core One uses internal LOCAL storage, and SDCARD covers older flows on printers that retain a card slot.
One last note on what happens if the power drops mid-print. Power-loss resume is a firmware feature, not a slicer feature. Bambu printers have it baked in. Klipper has [power_loss_recovery] modules you can add to printer.cfg. Prusa MK4 has resume built into its firmware. OrcaSlicer doesn’t manage any of that; once the file is on the printer and printing, the slicer is no longer in the loop. The “wireless” part of the workflow ends at “print started.” Recovery from there belongs to the printer.
Troubleshooting wireless upload, the five things that actually break
I’ve helped enough people debug this over Discord that I can almost write the script. Five things go wrong, and they go wrong in roughly this order of frequency.
1. Test connection succeeds but Upload fails
Nine times out of ten, this is one of two issues. Either the printer is currently busy with another print and OctoPrint or PrusaLink is returning HTTP 409 Conflict for the print=true request, or the API key has been regenerated in the host’s settings page and the OrcaSlicer side is still using the old one. For the 409 case, wait for the current print to finish or use plain Upload to stage the file. For the API key case, copy the new key from OctoPrint’s Settings → API page and paste it into the OrcaSlicer connection dialog.
2. File uploads but the print never starts
This is the button confusion problem. You clicked Upload instead of Upload&Print, so the file went over Wi-Fi but the slicer didn’t tell the host to start. The file is sitting in the upload directory; go look. On OctoPrint that’s ~/.octoprint/uploads/; on Mainsail/Fluidd it’s wherever [virtual_sdcard] path: points; on PrusaLink it’s the storage device you picked. Start it from the host’s web UI, or re-upload using Upload&Print and let the print=true flag (or the Print-After-Upload: ?1 header for PrusaLink) trigger the start automatically.
3. Bambu printer rejects the connection after a firmware update
This is the 2025 firmware story. If your Bambu was working over LAN and stopped after an update, you’ve almost certainly lost Developer Mode. Bambu’s firmware updates have, on more than one occasion, reset that toggle. Go back into the printer’s Settings menu, re-enable Developer Mode (per the Bambu wiki guide), and confirm LAN Only Mode is still on. The OrcaSlicer connection should come back to life within a few seconds.
4. OrcaSlicer can’t find the printer on the network
OrcaSlicer’s discovery uses mDNS (the same protocol as Bonjour and Avahi). Some routers, particularly mesh systems and anything with “AP isolation” enabled, block mDNS between client devices by default. If printer.local or octopi.local doesn’t resolve, drop back to the literal IP address from your router’s DHCP page. It’s less elegant but it always works. For Bambu printers, the printer’s IP shows up on the same Network screen that has the Access Code.
5. Upload times out on large files
This usually means the file is genuinely large (a 100MB .gcode.3mf bundle is not unheard of for a multi-plate AMS print), your Wi-Fi is slow, or both. For Klipper, OctoPrint, and PrusaLink, switch to plain .gcode export instead of the .gcode.3mf bundle; the bundle’s metadata bloat is mostly for Bambu’s benefit and the other hosts don’t use it. If you’re on 2.4GHz Wi-Fi and your printer supports 5GHz, switching bands cuts upload time noticeably. For Bambu printers, stick with the .gcode.3mf bundle (the feature loss isn’t worth the file size win), and just accept that the first upload on a big plate takes a minute or two.
If you’re hitting something that isn’t on this list, my broader OrcaSlicer troubleshooting guide covers the slicer-side issues that show up before you even get to the upload step.
FAQ
Does Bambu Cloud work the same way as LAN?
No. Cloud uses a different set of ports, requires a signed-in Bambu account, and routes uploads through Bambu’s servers and back down to the printer. LAN uses MQTT on port 8883 and FTPS on port 990 directly to the printer, with no Bambu server in the middle. You can switch between them, but you’ll need to toggle LAN Only Mode on or off accordingly.
Can I send to multiple printers from one OrcaSlicer install?
Yes. Each printer is added as a separate physical printer in the connection dialog, and OrcaSlicer keeps the configurations independent. Switch between them from the printer dropdown at the top of the Prepare tab. There’s no limit I’m aware of; I’ve personally run four printers (two Bambu, one Voron, one MK4) off a single OrcaSlicer install with no issues.
Does OrcaSlicer support .bgcode for Prusa printers?
Not natively. GitHub Issue #3564 is open and tracks the feature request. The community workaround is the bwees/orca_bgcode post-process script, which converts ASCII .gcode to binary after the slice completes. It works but it’s not bundled with OrcaSlicer.
What if my printer doesn’t appear in the Host Type dropdown?
The dropdown covers the most common print hosts, including OctoPrint, Mainsail/Fluidd (as Octo/Klipper), PrusaLink, PrusaConnect, Duet, FlashAir, AstroBox, Repetier, MKS, FlashForge, SimplyPrint, and Obico. If your printer’s host isn’t in that list but it speaks the OctoPrint API (many do, including community firmware forks), pick OctoPrint and point it at the right IP and API key. Repetier-Server is the next-most-common fallback for printers that don’t speak OctoPrint.
Is wireless printing secure?
LAN-only flows keep the file on your network, which is as secure as your home Wi-Fi. Cloud flows (Bambu Cloud, PrusaConnect) use TLS for the upload itself, but you’re trusting the cloud provider with your file. Treat API keys and Access Codes like passwords; don’t paste them into screenshots, and rotate them if you’ve shared them. For PrusaLink, the Digest authentication is reasonable but it’s not a substitute for putting your printer on a network you control.
Why does my queued print not auto-start in Klipper?
Two common causes. First, you clicked Upload instead of Upload&Print, so the print flag wasn’t set on the upload. Second, Moonraker’s job_queue auto-start requires Klipper to report itself as “ready” before the queue triggers; if your printer hasn’t homed or there’s a config error in printer.cfg, Klipper sits in “startup” state and the queue waits. Check Mainsail’s dashboard for the Klipper state and any error messages.
Stop walking, start clicking
That’s every wireless workflow OrcaSlicer supports as of 2.3.x, with the actual button labels, the actual ports, and the honest gotchas. The setup work is front-loaded; once your printer is added to OrcaSlicer’s physical printer list and Test goes green, every subsequent print is a single Upload&Print click away. I haven’t sneakernet’d a print in eight months and my P1S’s SD card slot is grateful for the rest.
If you’re still on OrcaSlicer 2.2 or older, the upload flow has changed in 2.3.x and the Host Type dropdown picked up new entries. Grab the latest release from the canonical OrcaSlicer GitHub releases page before you start, and you’ll save yourself a round of “but my dialog looks different” confusion. Once you’re current, pick your printer ecosystem from the sections above, work through the steps, and you’ll be wireless by tomorrow.
Related OrcaSlicer guides
- OrcaSlicer for Beginners: Your First Print in 15 Minutes
- OrcaSlicer Review 2026: Honest Pros, Cons & Who Should Use It
- How to Connect OrcaSlicer to OctoPrint: IP, API Key, and the Common Errors
- OrcaSlicer Slow Slicing on Complex Models: How to Speed Up
- OrcaSlicer Infill Patterns Compared: Gyroid, Cubic, Honeycomb (2026)