I’ll never forget the first print I sliced after flipping the wall generator dropdown from Classic to Arachne in OrcaSlicer. It was a small enclosure with a logo on the lid, and the letters had been printing as crumbly little gap-fill messes for weeks. I switched generators, sliced again, and the preview suddenly showed clean, continuous perimeters tracing the letterforms with widths that bent along the path. I pulled the print off the plate and it looked like a different part. I was sold on Arachne harder than any forum post could’ve sold me, and yet, after a few hundred more prints, I’ve ended up back on Classic for entire classes of models. I want this article to be the honest version of that journey.
I’m guessing you’ve already seen the two options sitting in the Quality tab and wondered which one is “right.” I want to be upfront that there are two correct answers, and they map to different geometry. I’ll walk through what each generator does, where each one wins, where each one loses, and what the verified OrcaSlicer issue history says about Arachne’s known failure modes. I’ll cite primary sources where they exist and flag where community lore has run ahead of evidence.
The short answer
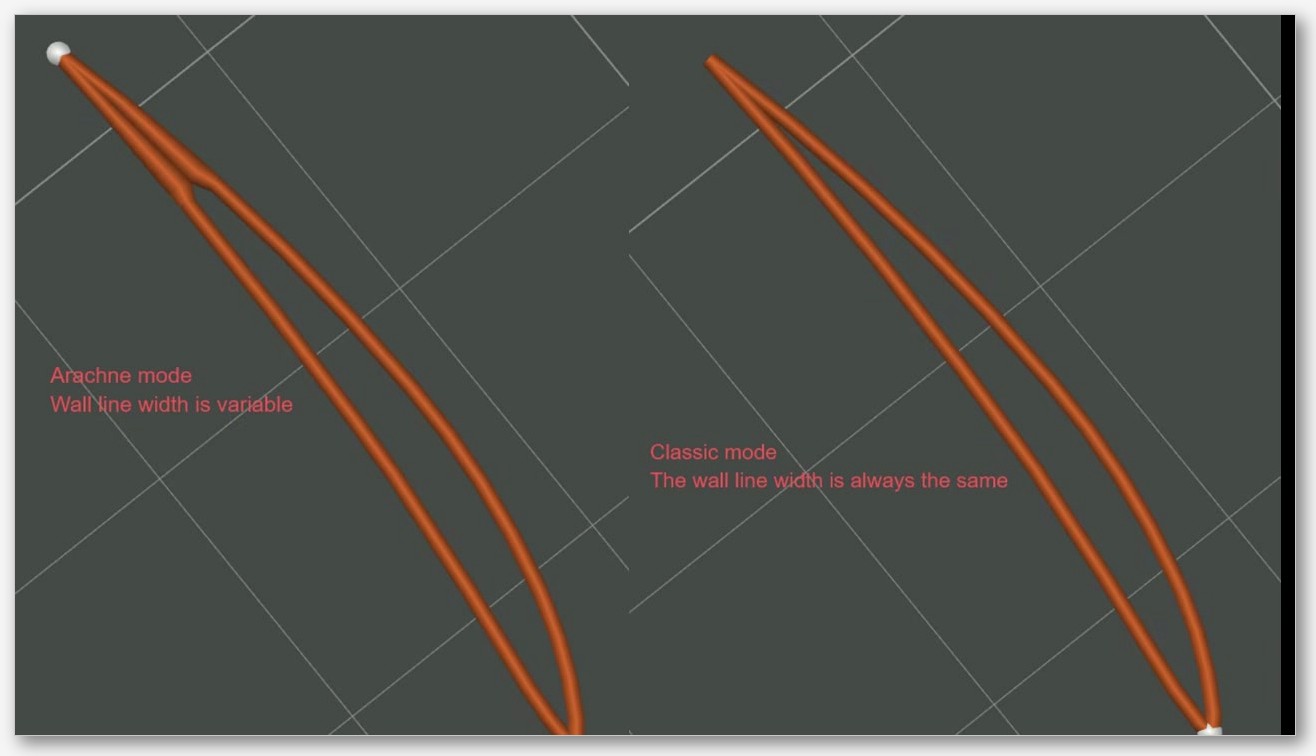
I think of Classic as the old, constant-width way of generating perimeter loops. It offsets the model contour with a fixed line width, stacks as many loops as will fit, and dumps whatever’s left into gap fill. I find it fast to slice, dead predictable, and great when the part’s wall thickness divides cleanly into integer multiples of your line width. I think of Arachne as the newer, variable-width approach. It builds a graph of the slice and lays down perimeters whose widths morph along the path, which lets it handle thin features, organic curves, and awkward thicknesses without spraying gap-fill artifacts everywhere.
I’d describe the headline trade-off like this. Classic gives you predictability and zero special settings to tune. Arachne gives you adaptive width at the cost of a heavier slice and ten extra settings most people will never touch. I don’t think either one is “better” in the abstract. I default to Arachne for organic, detailed, or text-heavy work, and I switch to Classic the moment I’m slicing a calibration tower, a 0.2mm-nozzle miniature, or a boxy enclosure whose wall thickness is already a clean multiple of the line width. I’d call the rest of this article just the long-form version of that sentence.
If you remember nothing else, remember this. I keep coming back to the fact that the OrcaSlicer dropdown lives at wall_generator in the Process settings, both options ship in the slicer, and switching between them is a single click. You don’t need to commit. I think the right move is to learn what each one does and pick per part.
What “wall generator” actually means in OrcaSlicer
I think of the wall generator as the algorithm that decides how the outer skin of your model gets turned into a sequence of looped extrusion paths. The OrcaSlicer wiki entry for wall_generator defines it bluntly: it “defines how the outer and inner walls (perimeters) of the model are printed.” I find the setting in Process settings, under the Quality tab, and it’s available in Advanced mode, which is where most non-default settings appear. If you can’t see it, flip the mode selector at the top of the Process panel from Simple to Advanced.
I see two values in the dropdown: Classic and Arachne. There’s no third option, no hybrid mode, no auto-detect. You pick one, and that pick cascades into almost every downstream quality setting. I watch wall ordering, seam placement, the way “Only one wall on top surfaces” behaves, the way thin walls get represented, whether Detect thin walls does anything useful, and how gap fill gets generated all shift around this single dropdown. I treat the wall generator as a higher-leverage decision than most of the sliders people obsess over.
If you want the full context for where this setting sits among the rest of OrcaSlicer’s quality controls, the OrcaSlicer settings master guide walks through the Process panel end to end. I’ll stay focused here on the generator itself and what it does to your perimeters.
I’d flag one practical tell. When you switch from Classic to Arachne, ten additional settings appear lower in the same panel. I’m talking about names like Wall transitioning threshold angle, Minimum wall width, and Maximum wall deviation that only render when Arachne is selected. When you flip back to Classic, they vanish. I’ve watched plenty of users wonder why a setting “moves” when they change generators, and that’s the answer. They were never there in Classic mode; they live inside the Arachne config and Classic doesn’t have anywhere to put them.
Classic, explained
I think of Classic as the Slic3r-lineage approach. The Prusa Knowledge Base describes it in one line: “The strategy PrusaSlicer used when generating perimeters was to offset the object contour with an extrusion line of constant width.” That’s it. I’d describe the algorithm as walking inward from the outer contour, laying down a loop at the configured line width, walking inward again, laying down another loop, and continuing until it runs out of room or hits the wall count limit. Whatever space is left between the innermost wall and the infill region gets filled with gap fill, which is the slicer’s way of cramming extrusions into spaces that aren’t wide enough for another full perimeter.
I find the OrcaSlicer wiki especially clear on this: Classic “creates as many walls as possible (limited by Wall Loops) by extruding along the model’s perimeter using the defined Line Width. This method does not vary extrusion width and is ideal for fast, predictable slicing.” I’d argue that predictability is Classic’s actual superpower. The wall count is a clean integer. The seam count is a clean integer. The line width is the line width you set. I can plug in a 0.45mm line width and a model with a 2.7mm wall, and I get six perimeter loops, exactly, every layer. There’s no transition logic, no adaptive behavior, no algorithm trying to be clever. I get what I set.
I think this matters more than people give it credit for. When you’re calibrating pressure advance, you want the tower identical layer to layer so you can read the pattern at different PA values. When the walls are integer multiples of the line width, you don’t need Arachne’s variable-width tricks. And when you’re chasing a print artifact, Classic’s predictability means fewer moving parts to blame. I’ve spent enough hours hunting weird blobs to know that “the algorithm decided to do something different this layer” is a frustrating debugging dead end.
I’d describe Classic’s weakness as the inverse of its strength. When the geometry doesn’t divide evenly into your line width, Classic punts and uses gap fill. I find gap fill is short, fast, and often produces small movements that don’t look great on the print. On thin text, embossed logos, organic shapes, and parts with awkward thicknesses, Classic can produce a mix of perimeters and gap-fill segments that creates visible artifacts. I’d say that’s the gap Arachne was built to close.
Arachne, explained
I want to be very clear here: Arachne is a Cura invention. The Ultimaker Cura team built it based on a 2020 paper by Tim Kuipers and collaborators, and PrusaSlicer ported the engine into PrusaSlicer 2.5.0, which shipped on September 7, 2022. From there, the Bambu Studio fork and OrcaSlicer inherited it. I’d point you at the PrusaSlicer 2.5.0 announcement blog as the definitive primary source for the porting story, and at the Prusa Knowledge Base Arachne article for a plain-language description of the algorithm. I want to underline the origin because the community sometimes credits OrcaSlicer with inventing Arachne. It didn’t. Arachne is a Cura algorithm, ported through PrusaSlicer, available as a selectable option in OrcaSlicer.
I’d describe what Arachne does this way. Instead of offsetting at a constant line width, it builds an internal graph of the slice and computes perimeter paths whose widths vary continuously along the path. The Prusa KB phrases it as “The Arachne generator produces perimeter loops and gap fills with varying extrusion widths” and “It automatically widens or thins perimeters as needed.” I’d say thin features, like the legs of a small letter or the wing of a tapered logo, get represented by a single perimeter whose width grows and shrinks to match the local geometry, instead of being chunked into two perimeters plus gap fill or skipped.
I think the Prusa 2022 blog nails the practical effect: Arachne “automatically makes perimeters wider or thinner as needed,” producing “nicer-looking prints with fewer artifacts,” reducing gap fill and print time, and excelling with text and small logos, producing “much cleaner texts even at a smaller scale.” I noticed that last clause on my embossed-lid test. The text wasn’t just better looking; it was structurally different, drawn as continuous strokes instead of as fragmented loops with gap fill.
I want to flag one auto-behavior. The Prusa blog says it directly: “The Detect Thin walls feature is disabled when the Arachne perimeter generator is selected as it’s not needed since Arachne always tries to adapt the extrusion width to thin lines.” OrcaSlicer’s own wiki on detect_thin_wall repeats the recommendation, suggesting Arachne in place of the Detect thin walls feature. So if you switch to Arachne and notice the Detect thin walls checkbox stops doing anything, it’s because Arachne is handling that work itself.
Underneath the hood, Arachne is heavier than Classic. I picture it like this: the algorithm has to construct that graph and plan variable-width paths, where Classic just has to offset contours. The Prusa KB acknowledges the academic basis (“based on the paper [Kuipers et al., 2020]”), and the algorithmic description in that work is more complex than constant-width offsetting. I’d say the practical upshot is that Arachne can take longer to slice. Whether it also takes longer to print is a separate question, and the answer is “it depends,” which I’ll get into in the print-time section below.
Side-by-side test case: narrow walls and small text
I’d call this the case Arachne was built for, and it’s the case where Classic’s weakness shows up most visibly. When a model has features narrower than two line widths, Classic has a choice: it can either skip the feature entirely (the geometry can’t fit a closed perimeter loop), or it can rely on the Detect thin walls option to draw a single open extrusion line down the middle of the feature. I’d argue both behaviors produce real problems. Skipping loses detail. Drawing a single line through the middle of a tapered feature gives you a constant-width extrusion that often doesn’t match the local thickness, so you get bumps where the line is too fat for the feature, or gaps where the line is too thin.

I think Arachne’s variable-width approach sidesteps both failure modes. A tapered serif on a small letter gets drawn as a single perimeter whose width tapers with the serif. A logo with a curving outline gets an extrusion whose width follows the curve. I’d describe the result as what the Prusa team called “much cleaner texts even at a smaller scale.” I’d add that the visual difference is often dramatic on embossed lettering at small font sizes, where Classic’s gap-fill behavior produces visible roughness and Arachne’s perimeters look almost laser-cut.
I want to be balanced, though. Classic isn’t useless on text. If you’re embossing chunky letters several line widths thick, Classic produces clean concentric perimeters with negligible gap fill, and the result looks fine. I’d say Arachne starts to dominate when letter stroke width drops below two line widths. Above that threshold, I find the two generators look essentially identical.
I’d flag a less-publicized weakness on Arachne’s side too. Issue #2840, “Thin walls with arachne have tiny moves causing blemishes” (opened November 2023, closed via linked PR #3014), documented a real failure mode where Arachne’s variable-width path planner could produce extrusion segments with almost zero movement. Those near-zero moves cause small overextrusion blobs on the print. I’d note the bug was fixed, but the lesson is that variable-width path planning can produce micro-moves that show up as defects. If you see tiny blemishes on a thin-wall Arachne print, it’s worth checking that you’re on a current version of OrcaSlicer.
Side-by-side test case: sharp overhangs
I’d argue overhangs are a place where the wall generator gets blamed for things that are actually about other settings. Issue #6583, “Slow down for overhangs + Arachne causing wall artifacts” (opened August 2024, closed via linked PR #6714), documented a real interaction between Arachne and the overhang slowdown feature. When the slicer slows down for an overhanging perimeter, it has to transition between speeds along the path, and Arachne’s variable-width perimeters interacted with that transition in a way that produced wall artifacts. I’d say the bug was fixed, but it’s a good illustration of how downstream features can be sensitive to which generator you’re using.
In current OrcaSlicer versions, both generators work with overhang slowdown. I treat the wall generator as a second-order effect on overhangs; the bigger levers are overhang speed, overhang threshold angle, fan speed, and your printer’s cooling. Classic gives you a slightly more predictable feed during the slowdown transition, which helps if you’re tuning that aggressively. Arachne gives you better-fitting perimeters in narrow tapered overhangs. I don’t see a clean win either direction.
If you’re chasing overhang artifacts more broadly, the OrcaSlicer overhangs and bridging guide covers the full set. I’d call the generator choice a knob worth flipping if you’ve tuned the others and still see artifacts. Don’t expect it to fix an underspeced cooling setup.
I’ll give you my honest take. I leave Arachne on for overhangs and I don’t notice a difference on most prints. If a specific model shows artifacts with Arachne that don’t appear with Classic, I switch for that model. I don’t generalize.
Side-by-side test case: top surface quality
I think this is where Arachne has the most clearly documented failure modes, and it’s the section where I’m going to be the most pointed about Classic’s wins. Issue #7762, “Combination of ‘Only one wall on top surfaces’, line width and Arachne wall generation leads to messed up additional layer” (opened December 2024, closed), is the canonical reference. I’d quote how the reporter described what happened to their print: “The object gets sliced, but there is no top surface. Instead an additional layer gets created including an unprintable sausage looking thing.” Switching to Classic resolved it. Turning off “Only one wall on top surfaces” also resolved it. I’d describe that combination as Arachne plus the top-surface optimization plus particular line widths producing output that physically could not print.
I’d note that issue is closed, but the underlying tension hasn’t gone away, and it’s why Issue #9267, “Disable Arachne wall generator on top/bottom surfaces only” (opened April 2025), is still open as of this writing. Users have been asking for the ability to use Arachne for the bulk of the model while forcing Classic on top and bottom layers, because the top-surface case is where Arachne’s variable-width behavior is most likely to produce visible defects. I’d report there’s no current way to do that. You pick one generator for the whole print.
Issue #10364, “Arachne wall generator creates messier and less accurate walls on small geometry compared to classic.” (opened August 2025, closed as not planned), is another point in the same direction. I’d describe the case: the reporter was printing a detailed miniature on a 0.2mm nozzle and described the result as “Note the random and lumpy walls. I’ve tried working with the Arachne settings and nothing seems to clear it up.” Switching to Classic produced a cleaner print. I read the maintainers’ “closed as not planned” decision as “Arachne behaves the way the algorithm is designed to; if you want different behavior, switch generators.”
I’d push back hard, in this section, against the idea that Arachne is universally better. On top surfaces, on small detailed miniatures, on parts where every wall matters, Classic frequently wins. I think the variable-width algorithm is doing more work, and that extra work has more opportunities to produce defects. If you see weird top-surface artifacts, flipping to Classic is the fastest A/B test in the slicer.
I’d note Arachne’s path fragmentation can introduce extra seams where Classic would have laid down a single continuous perimeter, and that interacts with how seams get hidden on visible faces.
Side-by-side test case: print time and slice time
I have to be careful in this section not to repeat numbers I can’t verify. I’ve seen a lot of community lore around Arachne being “X% slower to slice” or “X% faster to print,” and I haven’t found a primary benchmark with a verified number, so I’m not going to invent one. I’ll tell you what I can say, sourced to primary docs.
I’d say Arachne is computationally heavier than Classic. The Prusa KB attributes the algorithm to Kuipers et al., 2020, and the algorithm in that work involves graph construction and variable-width path planning that is genuinely more complex than offsetting contours. In practice, I find slice times for the same model tend to be longer on Arachne than on Classic. Whether that delta is noticeable depends on the model and your machine. On a simple cube you won’t see it. On a high-poly organic model with thin features you might.
On print time, the Prusa 2022 blog states Arachne “reduces gap fill” and that reducing gap fill reduces print time. The Bambu Lab wiki echoes that. Gap fill produces lots of short, slow extrusion segments with travel moves between them, and replacing those with continuous variable-width perimeters eliminates the travel overhead. I’d say Arachne can print faster on parts that would have generated significant gap fill under Classic. On parts that wouldn’t have generated gap fill in the first place, I see the two generators print in roughly the same time.
My informal experience matches that framing. On simple geometric parts, the print-time difference is in the noise. On text-heavy or detail-heavy parts, I see Arachne produce noticeably shorter print times because it’s eliminating gap fill that Classic would have spent real time on. I’d expect a measurable reduction on an embossed nameplate, not on a calibration cube.
If your slice times feel slow regardless of generator, that’s a separate problem. I’d say most of the causes are model complexity, settings depth, and hardware. Flipping generators won’t rescue a slice that’s slow because the model has half a million triangles.
Side-by-side test case: modifier meshes, multi-object, beams
I’d call this the section where Classic wins for reasons that have nothing to do with quality preference and everything to do with verified bug behavior. Issue #4916, “Incorrect Slicing of a thin wall close to another object with Arachne” (opened April 2024, closed as not planned), documented a real failure mode. When multiple objects are arranged close together on the plate and Arachne is on, gaps can appear between thin walls and outer walls. I find Classic doesn’t show the issue on the same models. I read the maintainers’ “closed as not planned” decision as a “this is how Arachne works” answer rather than a bug-to-be-fixed.
Issue #8023, “Arachne breaks the wall into chunks when there is a thin part” (opened January 2025, closed as not planned), covers a related case. When a thin section roughly one wall wide connects thicker regions, Arachne fragments the wall into separate chunks instead of laying down one continuous perimeter. I’d describe how the fragmentation introduces extra seams and can produce visible discontinuities where the wall transitions from thin to thick. I think this is the failure mode that bites beam-style models and lattice geometries the hardest, because they’re full of thin sections connecting thicker nodes.
If you’re slicing structural parts, brackets, lattices, or anything where multiple thicknesses meet at narrow junctions, I’d say Classic is the safer default. I’d argue the fragmentation behavior in Arachne isn’t a bug being fixed; it’s the algorithm doing what it was designed to do, and the workaround is to pick the other generator. For models with completely uniform wall thicknesses and no thin connecting sections, I find neither issue applies and either generator works fine.
I want to underline what these closed-as-not-planned outcomes mean in practice. I read them as the maintainers considering the behavior to be inherent to Arachne, not a defect. So you can’t wait for a future version to “fix” it. I’d say the fix is to pick Classic for the cases where Arachne’s behavior produces unwanted output. That’s it.
The Arachne-only settings you can tune (and what they do)
When you select Arachne, OrcaSlicer exposes a set of additional settings in the Process panel that don’t appear under Classic. I’ve listed the verbatim setting keys and their UI labels below, taken from the OrcaSlicer wiki entry for the wall generator.
wall_transition_angle(Wall transitioning threshold angle): controls the minimum angle at which Arachne is allowed to transition between wall counts. Lower values let Arachne add or drop a wall at more gradual angles; higher values force it to wait for sharper geometry changes.wall_transition_filter_deviation(Wall transitioning filter margin): a tolerance range that prevents the algorithm from rapidly toggling between N walls and N+1 walls in regions where the geometry hovers right at the transition threshold. Useful for stabilizing wall counts on noisy or near-threshold geometry.wall_transition_length(Wall transitioning length): the distance over which a wall-count transition is allowed to happen. Longer transitions look smoother; shorter ones are more abrupt.wall_distribution_count(Wall distribution count): how many walls, counted inward from the outer perimeter, are allowed to vary in width. Lower numbers concentrate the variable-width behavior on the outer walls and keep inner walls more uniform.min_bead_width(Minimum wall width): the narrowest extrusion Arachne will lay down. Setting this too low can produce extrusions thinner than your nozzle can reliably print.initial_layer_min_bead_width(First layer minimum wall width): the same asmin_bead_widthbut specifically for the first layer. First layers often need a slightly different minimum to get reliable adhesion on thin features.min_feature_size(Minimum feature size): the smallest model detail Arachne will attempt to represent. Features smaller than this are dropped from the perimeter plan.min_length_factor(Minimum wall length): a guard that prevents Arachne from generating short, isolated wall segments that wouldn’t print cleanly. Higher values eliminate more short segments at the cost of dropping some detail.wall_maximum_resolution(Maximum wall resolution, Expert mode): the smallest wall segment length kept during path simplification. Lower values preserve more detail but produce larger G-code files.wall_maximum_deviation(Maximum wall deviation, Expert mode): the maximum geometric error allowed when the slicer simplifies wall paths. Lower values keep paths closer to the original geometry; higher values produce smoother, less detailed paths.
I’d point out Classic exposes none of these. That’s the visible distinguisher when scrolling the Process panel: ten settings appear or disappear with the generator. I find for 95% of prints, the defaults are fine. I’ve only ever tuned min_bead_width (when a nozzle was producing inconsistent thin extrusions) and wall_transition_length (when wall-count transitions showed on a smooth surface). I leave the rest on their defaults.
If you want a broader tour of OrcaSlicer’s Process panel and how these Arachne settings sit among the rest of the quality controls, the settings master guide goes deeper than this article does.
Spiral vase mode, fuzzy skin, and other adjacent features
I think spiral vase mode is worth covering because users assume it interacts with the wall generator more than it actually does. Vase mode reduces the wall count to one per layer, removes top layers, removes infill, and converts the print to a continuous spiraling motion. With only a single outer perimeter per layer, Arachne’s variable-width capability has nothing to vary across. I’d describe the Classic-vs-Arachne distinction in vase mode as essentially moot; you get a single perimeter either way, and the algorithm choosing where to put it has very little geometric room to differ. I want to be precise about this because the community lore sometimes claims OrcaSlicer “forces Classic in vase mode” or “disables Arachne in vase mode.” I haven’t found a primary source confirming any forced behavior. I’d say the safe statement is that vase mode reduces the wall generator choice to a near no-op, not that one generator is programmatically blocked.
I’d flag fuzzy skin’s documented historical interaction. The PrusaSlicer 2.5.0 release notes explicitly list a fix: “Fixed seam-like artifact visible on certain models when using Arachne perimeter generator and Fuzzy Skin feature.” I’d say that tells you two things. Fuzzy skin and Arachne work together fine in current versions, and there was a real seam-like artifact at the original Arachne launch that needed fixing. If you’re on a very old build of any slicer in the Arachne lineage and you see seam artifacts under fuzzy skin, that’s why.
I covered the Detect thin walls auto-disable earlier. The Prusa blog and the OrcaSlicer wiki both make this clear: Arachne handles thin walls itself, so the Detect thin walls option becomes redundant. If you want the wider context on OrcaSlicer’s troubleshooting patterns for thin-wall and surface issues, the OrcaSlicer troubleshooting master guide is a useful catch-all reference.
I’d note wall ordering, seam placement, and the “Only one wall on top surfaces” toggle all interact with the generator choice. I think the most consequential is the top-surface toggle, covered above. I find seam placement is smoother under Classic, because Classic produces a predictable single seam per loop. Arachne’s variable-width behavior can introduce extra seams at transition and fragmentation points (per Issue #8023). On models with visible seams, I’d say Classic is often the safer pick.
When to pick each: a decision rubric
I’ll give you the actual decision rubric I use. It’s opinionated, it’s based on the verified failure modes from the issue tracker, and it doesn’t pretend Arachne is always better.
Default to Arachne for most general-purpose prints. I’d group organic models, decorative prints, detailed sculpts, parts with embossed text or logos, and anything where wall transitions matter for surface quality into this bucket. I’d note Arachne is also the default for many built-in OrcaSlicer printer profiles and the recent 2.3.2-beta switched the Snapmaker U1 profile to use Arachne. For text and small logos in particular, I find Arachne’s variable-width behavior is the difference between clean strokes and crumbly gap fill.
Switch to Classic for pressure-advance calibration towers. Issue #397, “Arachne generator and PA tower are not playing nice, creating bad paths for tuning” (opened February 2023, closed), documented that Arachne can produce extra corner fills and short moves on PA towers that make the calibration pattern harder to read. I find the clean three-line pattern people rely on for PA tuning is reliably produced under Classic. If you’re calibrating, switch generators first.
Switch to Classic for highly detailed miniatures, especially on a 0.2mm nozzle. I’d cite Issue #10364 as the canonical reference here. I find the reporter’s description of “random and lumpy walls” on a detailed miniature with Arachne, and a cleaner result with Classic, matches my own experience on small organic minis at small line widths. I’d note the maintainers closed the issue as not planned, so this isn’t going to change in future OrcaSlicer versions. I’d say the fix is to pick Classic for that class of model. For broader calibration patterns and tuning workflows, the OrcaSlicer calibration guide covers the full sequence.
Switch to Classic for boxy enclosures, bins, and parts with uniform wall thicknesses that divide cleanly into integer multiples of your line width. I find Arachne has nothing useful to do on a 4mm wall at 0.45mm line width; you just get nine perimeters either way. I’d say Classic slices faster and produces identical output.
Switch to Classic for beam-style models, lattice geometries, or any part where thin sections connect thicker regions. I’d point at Issue #8023’s fragmentation behavior as the relevant verified failure mode. If your print has lots of thin-to-thick transitions, I think Classic’s continuous perimeters look better than Arachne’s fragmented ones.
Switch to Classic when top surface quality is critical and you’re seeing artifacts under Arachne. I’d cite Issues #7762 (closed) and #9267 (open as of writing) as documentation of this case. I think the “Only one wall on top surfaces” optimization can interact badly with Arachne on certain line widths, and there’s currently no way to use Arachne for the bulk of the model while forcing Classic only on top and bottom surfaces. If top quality is the priority and Arachne is misbehaving, switch the whole print to Classic.
Switch to Classic as a debugging fallback when any of: gap-related artifacts appear, extra seams show up on visible faces, wall transitions are visible on smooth surfaces, or generally anything weird is happening that you can’t explain. I find Classic’s predictability makes it the right A/B test when you’re trying to isolate whether the wall generator is the culprit.
If none of those conditions apply, I’d leave Arachne on. It’s the default for good reason, and on the median print I find it produces output that looks at least as good as Classic with less gap fill and shorter print times on detail-heavy parts.
FAQ
Did OrcaSlicer invent the Arachne wall generator?
No. I’d say Arachne was developed by the Ultimaker Cura team based on a 2020 academic paper by Tim Kuipers and collaborators. PrusaSlicer ported the engine into PrusaSlicer 2.5.0, which shipped on September 7, 2022. OrcaSlicer inherited it from the Bambu Studio / PrusaSlicer lineage. I’d note OrcaSlicer ships both Classic and Arachne as selectable options, and the algorithm itself hasn’t been replaced; it’s still the Cura port that came through PrusaSlicer.
Is Arachne always better than Classic?
No. I think Arachne wins on text, small logos, organic geometry, and parts with awkward thicknesses that would produce gap fill under Classic. I’d say Classic wins on calibration towers (especially PA towers), small detailed miniatures (especially on 0.2mm nozzles), uniform-width enclosures, beam-style models with thin-to-thick transitions, and top surfaces in configurations where Arachne’s behavior is producing visible artifacts. I’d point at multiple verified GitHub issues that document classes of models where Classic genuinely looks better.
Why do extra settings appear when I select Arachne?
Because Arachne has tunable parameters that only make sense for variable-width perimeters: how it decides to transition between wall counts, what minimum width it’ll lay down, how it simplifies paths, and so on. I find Classic doesn’t have any of those concepts; it just offsets contours at a fixed width. So when you switch from Classic to Arachne, ten additional settings render in the Process panel. When you switch back, they vanish.
Does spiral vase mode use Arachne?
Vase mode reduces the print to a single perimeter per layer with no top layers and no infill, so the wall generator choice becomes a near no-op. I’d say there’s only one perimeter to lay down per layer, and there’s no variable-width behavior to vary across. I find the Classic-vs-Arachne distinction in vase mode has essentially no visible effect.
Does Arachne slow down slicing?
I’d say Arachne is computationally heavier than Classic because it constructs a graph and plans variable-width paths instead of offsetting contours at a fixed width. On simple models the difference is negligible. On complex models with many thin features it can be noticeable. I haven’t found a verified percentage delta, so don’t trust any specific number you see quoted online unless it cites a benchmark with reproducible methodology.
Does Arachne slow down printing?
Usually the opposite. I’d point at the Prusa 2022 announcement blog and the Bambu Lab wiki, which both note that Arachne reduces gap fill, and reducing gap fill reduces print time because gap fill is full of short slow extrusion segments with travel moves between them. On parts with lots of gap fill under Classic, I find Arachne can print noticeably faster. On parts with no gap fill under Classic, I find the two generators print in roughly the same time.
What’s the default in OrcaSlicer?
I’d say Arachne is the practical default in most current built-in profiles and the recent 2.3.2-beta extended that to additional printer profiles. If you’ve never touched the wall generator setting, you’re almost certainly on Arachne.
Where do I change the wall generator setting?
Process settings, Quality tab, Wall generator dropdown. I’d note the setting is available in Advanced mode. If you can’t see it, flip the mode selector at the top of the Process panel from Simple to Advanced. I’d point at the underlying variable name wall_generator and the two valid values, Classic and Arachne.
If you’re still deciding which generator fits a specific print, I’d offer my honest advice: slice the same model both ways and look at the previews side by side. I find the OrcaSlicer preview is detailed enough to see most of the differences I’ve described above, and it’s faster than printing both versions. You can grab the slicer itself from the official OrcaSlicer GitHub releases page if you don’t already have it installed. For the broader settings context once you’ve made the choice, the OrcaSlicer settings master guide walks through everything else you’ll likely want to tune next.
Related OrcaSlicer guides
- OrcaSlicer vs Bambu Studio: Which Is Better in 2026?
- OrcaSlicer vs Anycubic Slicer Next: Which Fork Wins for Kobra?
- OrcaSlicer vs Cura: Speed, Calibration & Compatibility (2026)
- OrcaSlicer Forks Explained: SoftFever, FlashForge, Anycubic, ELEGOO
- OrcaSlicer System Requirements: GPU, RAM, OpenGL Explained