
I printed three vases for a friend’s wedding and all three had a vertical scar running up the front. The seam was Aligned (the default) and it’d parked itself right on the most-photographed face of every one. Three reslices later I had it on the back, and on the fourth I tried Scarf Joint, and that’s when the seam basically disappeared. Here’s how to make any model do that.
I’ve been hunting seams in OrcaSlicer since the V1.x days, and there’s no single setting that hides the Z-seam on every model. There are about a dozen, and they interact. This guide walks every one, gives you a decision tree, covers the scarf joint properly, and tells you when to stop tuning and just rotate the model so the ugly side faces the wall.
Table of contents
- What the Z-seam actually is
- Every OrcaSlicer seam setting explained
- Which seam position should you pick
- Scarf joint seam, the 2024 technique
- Painted seam workflow step by step
- Pressure advance is half the battle
- Wipe and retraction tuning for cleaner seams
- Scarf joint vs traditional aligned, the comparison
- Troubleshooting common seam problems
- When you just have to accept some seam
- Related OrcaSlicer guides
What the Z-seam actually is
Every closed perimeter loop on a layer has to start somewhere and end somewhere. When the nozzle finishes a loop, the slicer commands a stop, often a small retraction, sometimes a wipe move, then a travel, then a de-retraction and a fresh start on the next layer’s perimeter. That stop-restart cycle leaves a tiny imperfection. There’s usually a small blob from residual nozzle pressure at the stop, sometimes a small gap if pressure advance over-retracts, and almost always a visible discontinuity in the wall.
Stack 200 layers on top of each other and the lift points form a vertical scar running the full height of the print. That scar is the Z-seam. It’s structurally fine but cosmetically ugly, and it’s worst on smooth curved surfaces (vases, helmets, figurines), single-perimeter prints, glossy or silk PLA where any imperfection catches the light, and PETG and TPU where flow control is just harder than with PLA.
Three honest truths. First, you cannot fully delete the seam in standard FDM. You can hide it, move it, or smear it across layers, but you can’t eliminate it without spiral vase mode, which only works for hollow single-wall objects. Second, an aligned seam stacked on a hidden facet beats a scattered random seam for most cosmetic models. Third, a clean Z-seam comes from tuning extrusion as much as placement. Pressure advance, retraction, and wipe matter as much as which seam_position you picked.
If you’re brand new to Orca’s settings layout in general, the OrcaSlicer settings master guide covers the whole Process panel and where every tab lives. The seam options I’m about to walk through all sit inside Process settings, Quality, Seam.
Every OrcaSlicer seam setting explained
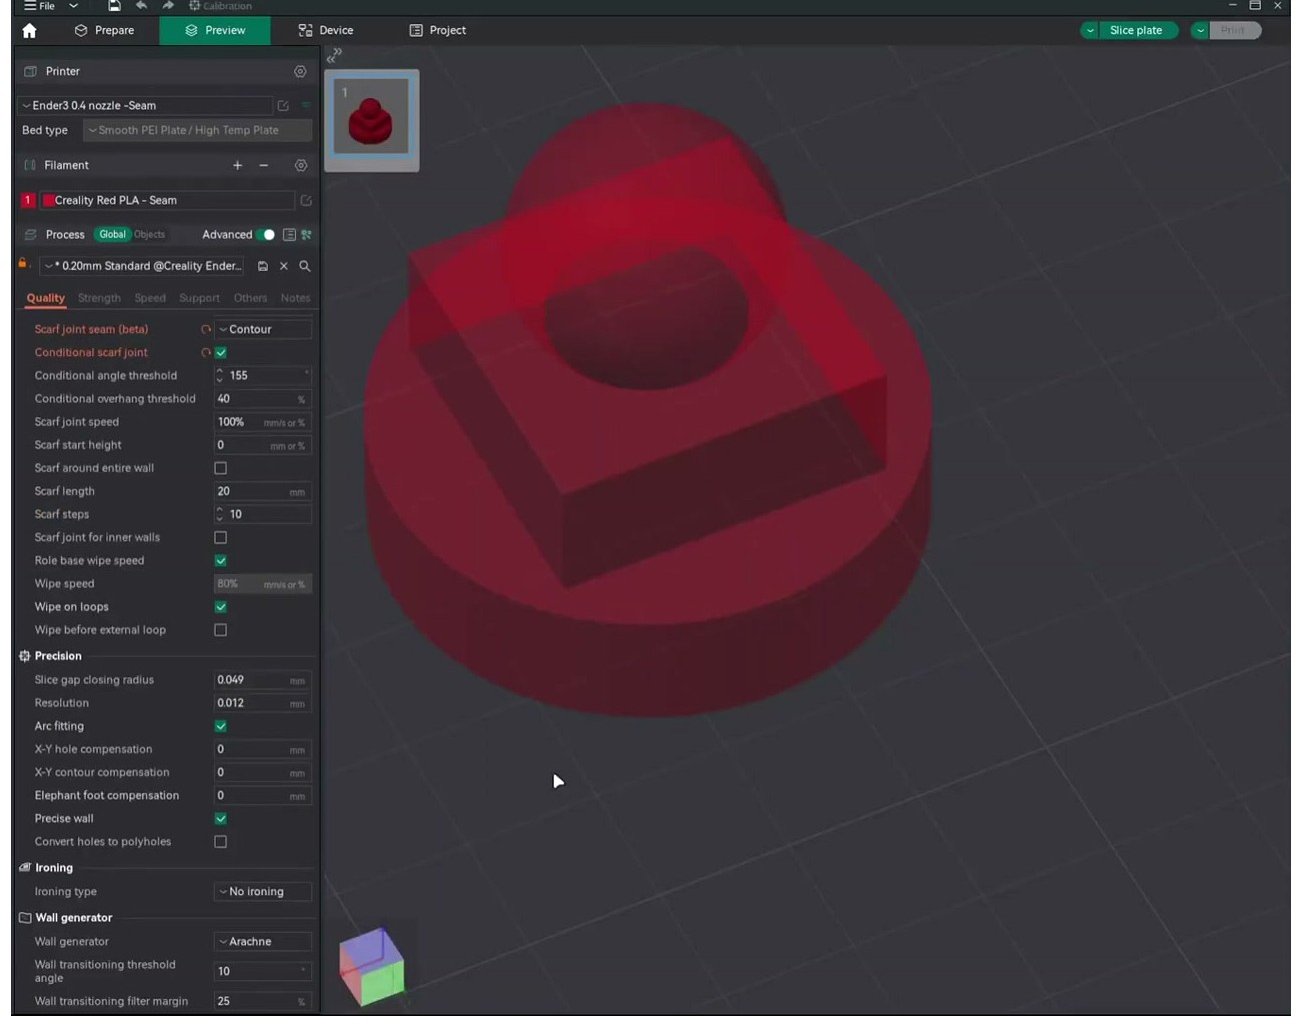
The Quality tab in Process settings holds every seam control you’ll touch.
Seam position (the main dropdown)
Variable: seam_position. Options: Aligned, Aligned Back, Nearest, Back, Random, Painted. Default in the system preset is Aligned (VERIFY, since some printer presets ship with Aligned Back).
Aligned stacks every seam on the same vertical line, preferentially on a hidden internal facet. It’s the right pick for anything with corners. On a cube, the seam climbs one corner and you can run your finger up it and barely feel it.
Aligned Back combines Aligned with a bias toward the rear of the print (negative Y in Orca’s coordinate space). It still hunts for a hidden facet, but prefers the back over the front. This is my default for figurines and display models. Open issue #12017: Aligned Back doesn’t behave correctly on mirrored parts. If you’ve mirrored a model and the seam still ends up on the front, switch to plain Aligned and rotate 180 degrees.
Nearest puts the seam at the nearest starting point compared to where the nozzle stopped on the previous layer. Print time is shortest with Nearest, but the seam can spiral around the model in a visible diagonal. I avoid it for cosmetic prints.
Back forces the seam to the rear (minimum Y point each layer). It ignores geometry hints, which makes it predictable but ugly on round and cylindrical models.
Random distributes seams across the whole surface, replacing a continuous line with a stippled pattern. Good for mechanical parts where you’d rather spread weak points across many spots. Bad for cosmetic prints because the eye picks up the dot pattern as noise.
Painted honors your manual Enforce/Block markup from the Seam Paint tool. The big gotcha: if you paint a seam line but leave seam_position on Aligned or Nearest or Random, the painted markup is treated as a soft hint, not an enforced location. This is the root cause of GitHub issue #5621. Switch the dropdown to Painted or your paint won’t be honored.
Seam gap
Variable: seam_gap. Default around 10% (VERIFY). Recommended range 0 to 15%. This shortens the loop slightly so the perimeter start and end don’t physically overlap and form a bulge. Larger gap means less bulge but higher chance of a visible split. Smaller gap means less split but higher chance of a blob. If your seam looks like a zit, gap might be too small or PA too low. If it looks like a crack, gap is too large or PA too high. When you turn on scarf seam, drop seam gap to 0.
Staggered inner seams
Variable: staggered_inner_seams. Default off (VERIFY). Moves the inner-wall seam start around across layers so internal seams don’t stack into a structural weak line. Mostly a strength feature. Turn it on for parts that take stress along the seam axis.
Wipe controls
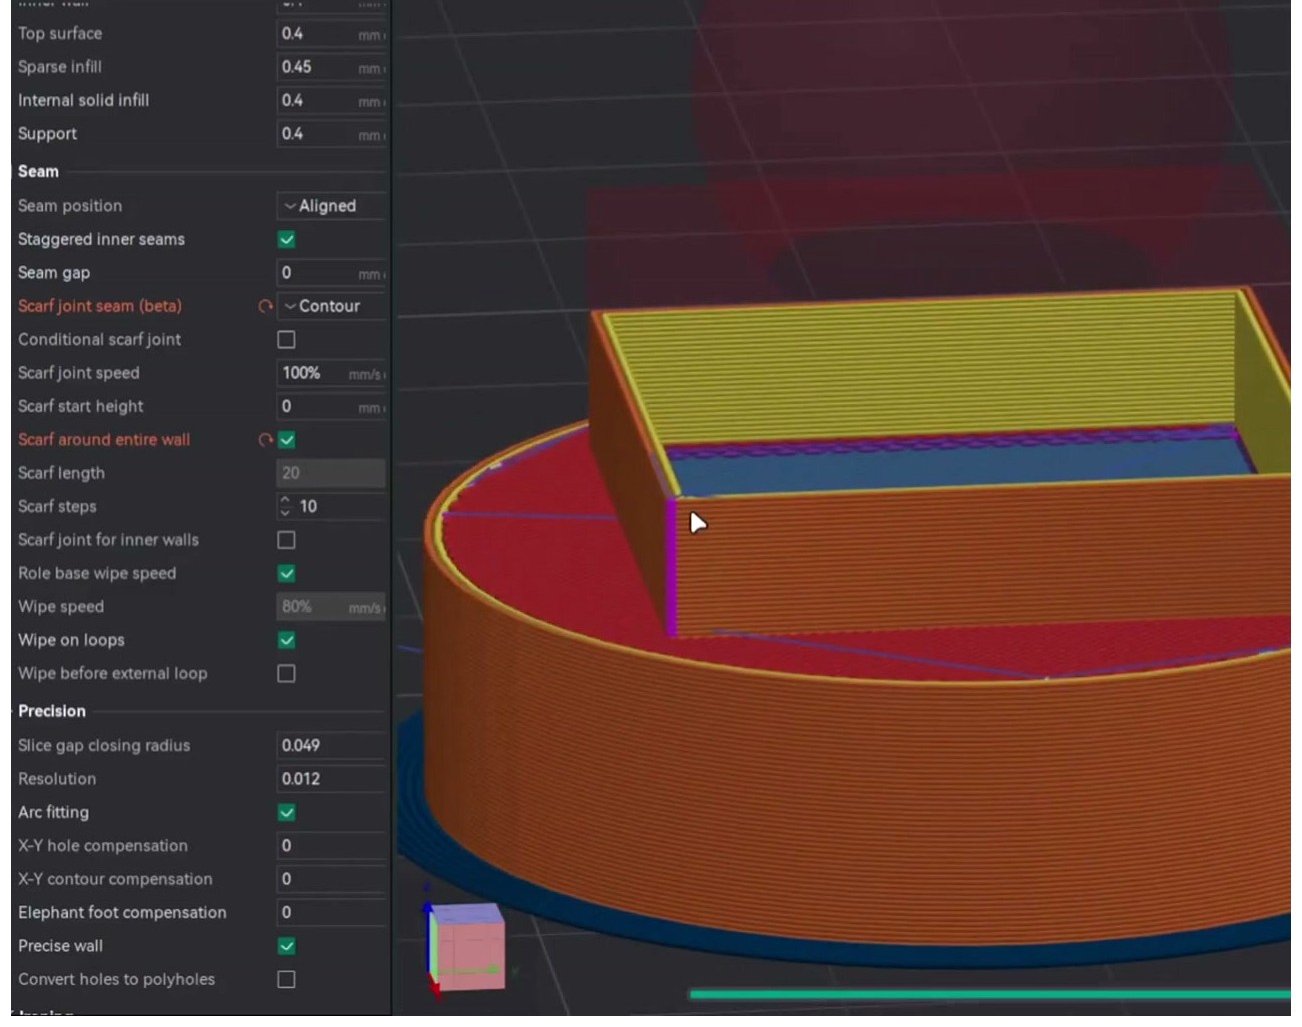
Wipe on loop (wipe_on_loops): pulls the nozzle inward at loop end to reduce the over-extrusion blob. On for traditional seam. Off for scarf joint.
Wipe before external loop (wipe_before_external_loop): does de-retraction inside the model so leftover ooze lands on the inner wall. Default off (VERIFY). Turning it on is one of the highest-value changes for clean outer-wall seams.
Role-based wipe speed (role_based_wipe_speed): syncs wipe motion with feature print speed instead of travel speed. Leave it on.
Retract before wipe: set to 0 when transitioning inner wall to outer wall. Small change, real effect.
Which seam position should you pick
I get asked this constantly, so here’s a rough flowchart. It assumes your pressure advance is calibrated. If it isn’t, none of this matters and you’ll get a blob no matter which option you pick. More on that below.
- Display figurine, vase, statue, helmet: Aligned Back, plus seam painting on the rear surface, and orient the model so the ugly side faces -Y.
- Mechanical part where strength matters more than looks: Random, to spread the layer-start weak points across the whole surface.
- Box, enclosure, anything with corners: Aligned. The seam will naturally hunt for a sharp concealed corner and hide on it.
- Tall round cylinder or pillar with no corner to hide on: Scarf joint seam (Contour, conditional on, length around 20 mm), or paint a back-facing line and use Painted. Random on cylinders looks like noise.
- Single-perimeter ornamental print: Spiral vase mode if the geometry allows it. Otherwise scarf seam with a low slope speed.
- Visible curved surface where nothing else works: Painted, following a panel break, hair line, or design seam line. Pick where the eye expects a join.
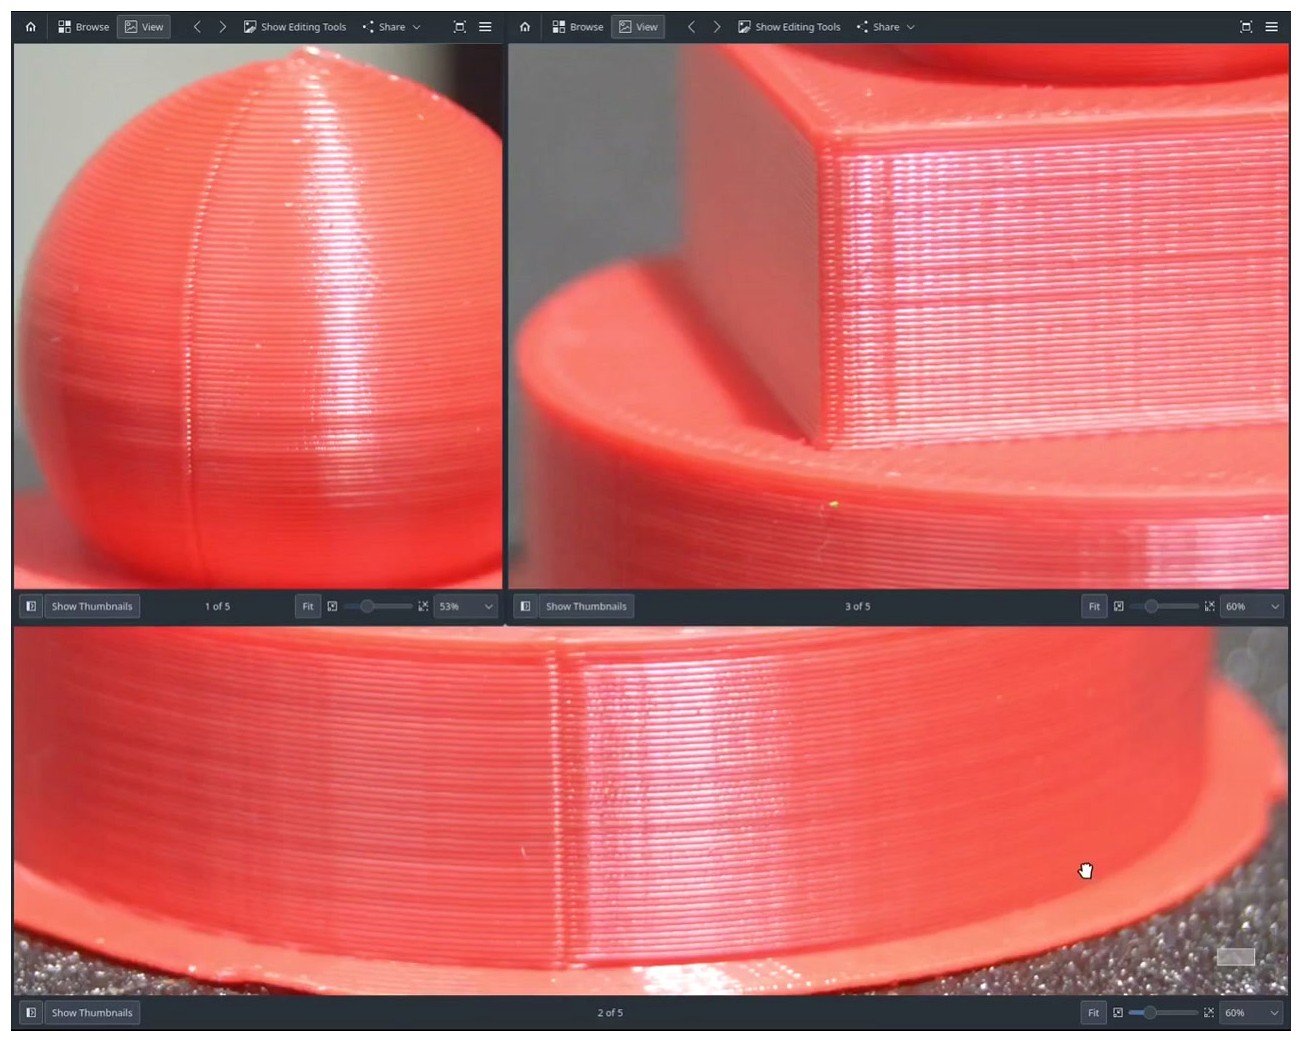
Same Aligned setting, three geometries. The cube hides it on a corner, the cylinder shows it as a vertical line, and the sphere shows it as a faint diagonal because there’s no flat facet for the slicer to lock onto.
Honest caveat: on a smooth round model with single perimeters, there is no setting in OrcaSlicer that makes the seam invisible. Scarf joint reduces it to a faint diagonal smudge. Everything else leaves either a line or a stippled pattern. If you absolutely need an invisible seam on a round single-perimeter print, you sand it after, or you print it in vase mode if the geometry allows.
Scarf joint seam, the 2024 technique
Scarf joint seam was introduced in OrcaSlicer V2.0.0 Beta, announced March 12, 2024, with the stable V2.0.0 release following in April 2024 (VERIFY exact stable date from the GitHub releases page). The original implementation was PR #3839 by Noisyfox, with conditional logic added by SoftFever and the underlying concept credited to vgdh and MichaelJLew. The master discussion thread is GitHub #4325 if you want to read every gotcha the community ran into in the first six months.
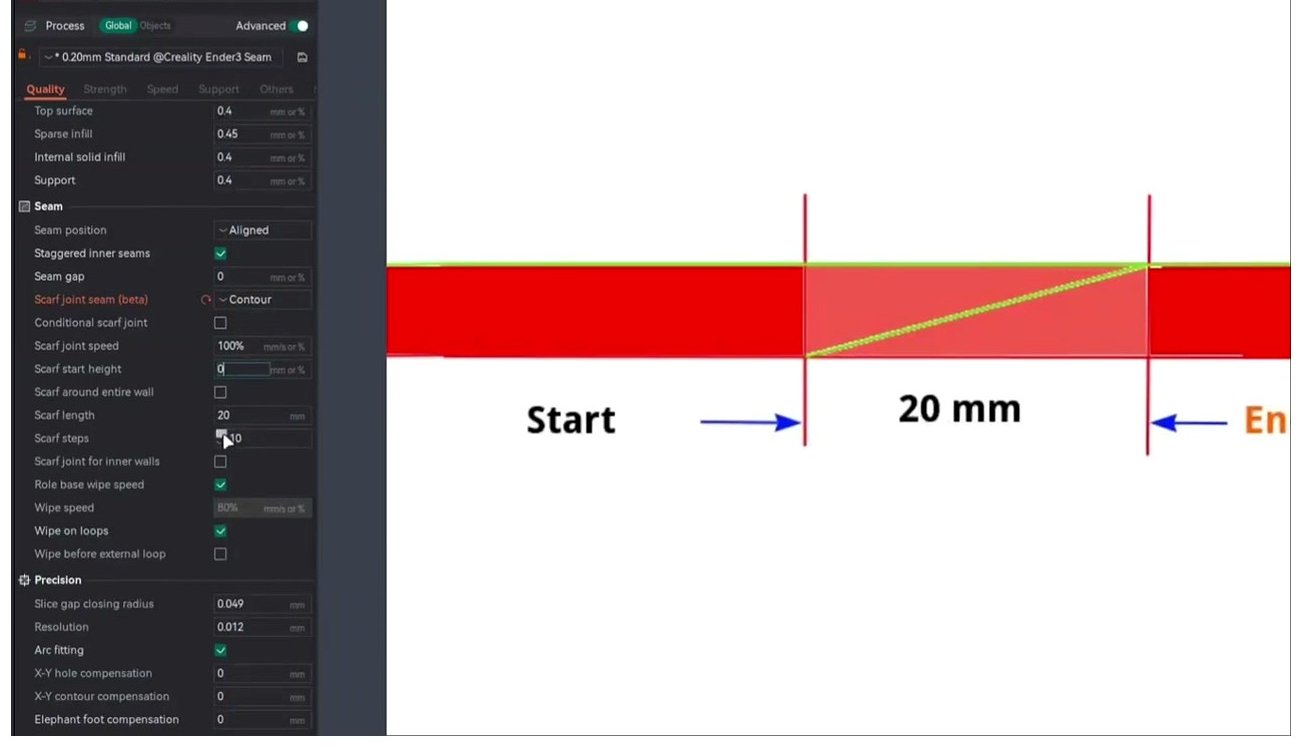
The scarf joint ramps flow up over a horizontal distance (here 20 mm) at the start of the loop, and ramps down again at the end. Stacked across layers, the abrupt vertical seam becomes a diffuse diagonal smudge.
How scarf actually works
Instead of stopping extrusion abruptly at a layer’s start point, the slicer ramps flow up over a horizontal distance (the scarf length) while also ramping Z. The perimeter starts at near-zero height and ramps up to full layer height. The opposite end of the loop ramps down the same way. Stacked across hundreds of layers, the seam becomes a diffuse diagonal smudge rather than a sharp vertical line. It’s geometry and flow control working together, which is why it doesn’t work if either piece is off.
Every scarf setting
| Variable | Label | Default | Notes |
|---|---|---|---|
seam_slope_type |
Scarf joint type | VERIFY | Disabled / Contour / Contour and Hole. Contour applies scarf to outer walls only. Contour and Hole includes internal hole perimeters. |
seam_slope_conditional |
Conditional scarf joint | off | Applies scarf only where geometry benefits. Strongly recommended. |
scarf_angle_threshold |
Scarf angle threshold | 155 degrees (VERIFY) | Angles sharper than this are treated as corners and skip the scarf. |
scarf_overhang_threshold |
Scarf overhang threshold | VERIFY | Skips scarf on aggressive overhangs. |
scarf_joint_speed |
Scarf joint speed | 100% of wall speed | Recommended below 100 mm/s absolute. Slower blends better. |
scarf_joint_flow_ratio |
Scarf joint flow ratio | 100% | Keep at 100. Below 90% is reported to cause failures. |
seam_slope_start_height |
Scarf start height | 0 | 0 starts the scarf at full layer height. Some users set 0.1 mm. |
seam_slope_min_length |
Scarf length | ~20 mm (VERIFY) | 0 disables scarf. Sweet spot 10 to 20 mm depending on material. |
seam_slope_steps |
Scarf steps | 10 (VERIFY) | Number of segments in the ramp. 10 to 20 is fine. |
seam_slope_entire_loop |
Apply scarf to entire loop | off | Smooths the ramp across the whole perimeter. |
seam_slope_inner_walls |
Apply scarf on inner walls | off | Start with outer only. Inner walls help on thin objects. |
VERIFY all defaults against the live UI. They’ve shifted between point releases and they vary slightly by printer profile.
Prerequisites you cannot skip
The scarf joint depends on responsive flow control. Pressure advance (or linear advance) MUST be calibrated. I cannot stress this enough. If your PA is wrong, scarf seam will look worse than the regular Aligned seam because the ramp will have visible underextrusion or a fat lump at the joint. Run the OrcaSlicer pressure advance test before you turn scarf on. Don’t try to debug scarf seam without this step done.
Wall print order matters. Inner / outer / inner outperforms outer / inner per Adam L’s widely cited Printables guide and per the discussion in #4325. Check your wall_sequence setting and switch if needed.
Disable wipe on loops AND wipe before external loop when running scarf seam. Both fight the flow ramp. Set seam gap to 0. And note that arc fitting gets disabled automatically when scarf is on (confirmed in #4325), which can extend slicing time on models that previously benefited from arcs.
Material recipes (community-verified starting points)
| Material | Scarf length | Scarf speed (% of outer wall) |
|---|---|---|
| Standard or matte PLA | 10 to 12 mm | 60 to 70% |
| Silk or glossy PLA | 12 to 15 mm | 50 to 60% |
| PETG | 12 to 15 mm | 50 to 60%, expect more tuning |
| Transparent filament | 15 mm | 50% |
| TPU | Skip scarf entirely | Bowden compression fights the ramp |
| Bowden setups (any material) | ~15 mm | 50 to 60%, lower than direct drive |
I default to 15 mm length and 60% speed on a direct-drive printer with PLA. If the seam still shows, I drop to 50% speed before I touch any other variable. Filament-specific tuning belongs in your filament profile, not the process profile, so the change persists across prints. The filament settings guide walks how to set per-filament overrides for things like flow ratio.
Known bugs and gotchas
The scarf joint seams go below set flow rate (and speed) bug from issue #5465 is real and still open at time of writing. The slicer outputs sub-target flow at the ramp on some setups. Workaround: keep scarf speed conservative, never drop scarf flow ratio below 100%, and retest after each Orca update.
“Scarf seam not doing much” (discussion #4647) is the most common forum complaint. Almost every case ends up being one of: scarf length set too short to actually cover a layer’s worth of progress (try 20 mm), scarf type still set to Disabled in the active preset, or PA not calibrated.
First-layer scarf can be too thin and cause bed adhesion problems. If you see lifting at the seam start on layer 1, set seam_slope_start_height to 0.1 mm or higher.
The v2.2.0 release fixed a real safety issue where the nozzle could collide with printed walls during travel movements when the scarf seam feature was enabled. If you’re on an older version, update before trusting scarf on tall prints (VERIFY the exact fix wording in v2.2.0 release notes).
Bowden setups consistently report worse results than direct drive. The tube lag eats the ramp’s flow precision. If you’re on a Bowden printer and scarf isn’t helping, that’s why.
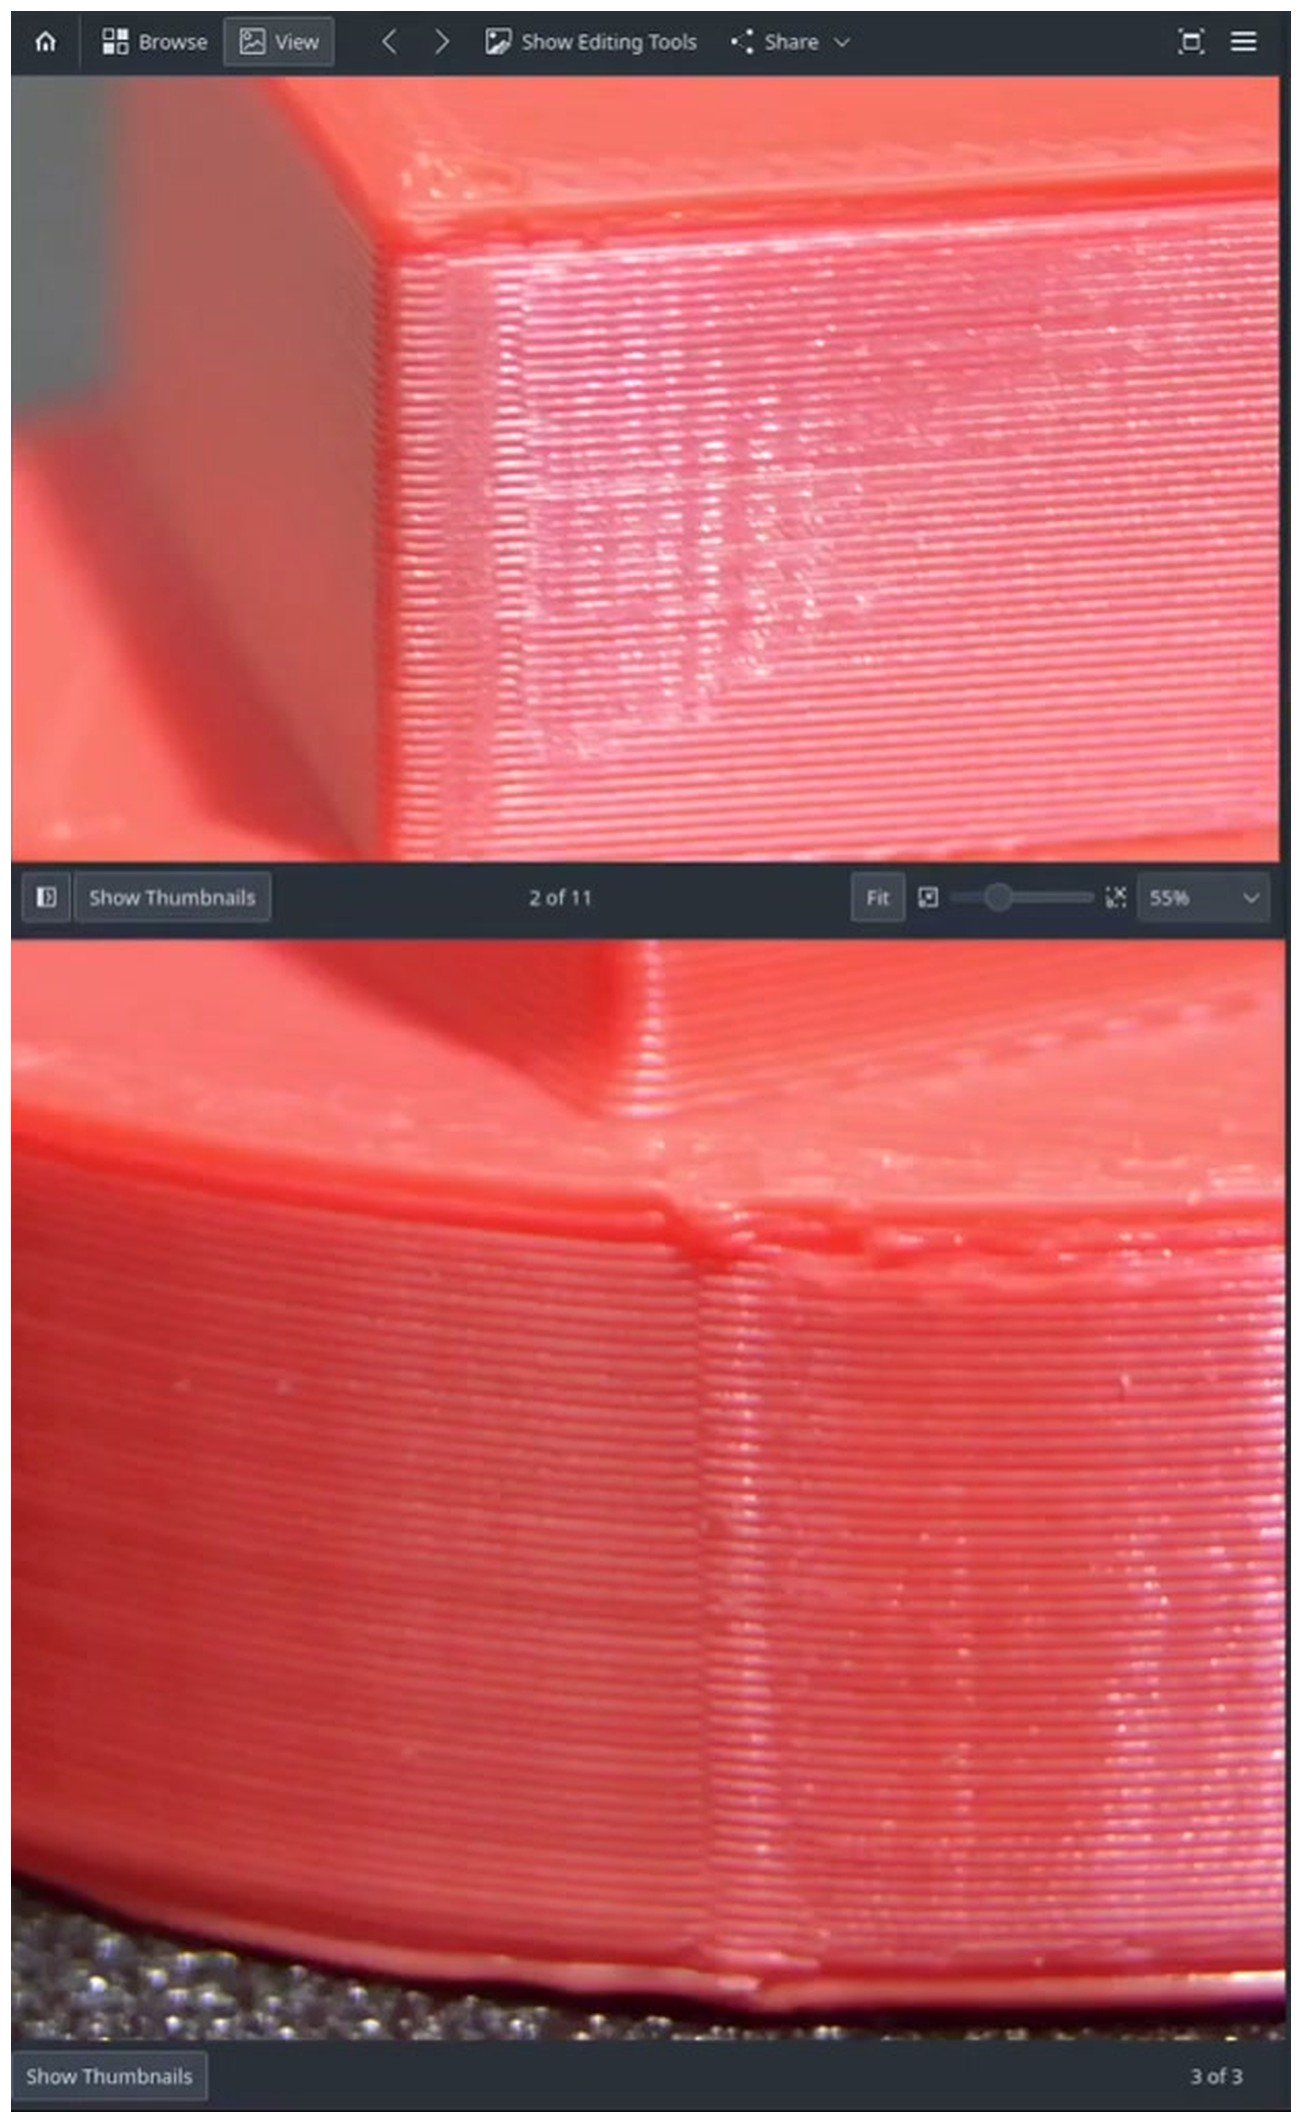
Same model, same filament, same printer. Aligned on the left, scarf joint on the right. The scarf doesn’t make the seam invisible but it converts a sharp vertical line into a diffuse smudge that catches less light.
Painted seam workflow step by step
Painted seam is the manual override. You tell the slicer exactly where you want the seam and it (mostly) puts it there. Use this when no automatic algorithm gets it right, or when you want the seam to follow a design line on the model.
- Load the model and orient it so the side you want the seam on faces -Y, or any direction you can hide later.
- Select the model in the 3D view.
- Press P, or click the Seam Painting icon in the left toolbar (VERIFY the hotkey is still P in your build, it has been stable for several releases).
- Pick a brush mode. Enforce (blue) means “prefer placing seams in these areas.” Block (red) means “avoid placing seams in these areas.” Erase clears painting.
- Set the brush size with the slider. A smaller brush is more precise but a continuous line is harder to draw. I usually start at the largest size that fits the surface I’m painting.
- Paint a continuous vertical line top to bottom where the seam should go. Continuity matters. A broken painted line confuses the slicer.
- Critical step: in Process settings, Quality, Seam, set Seam position to Painted. If you leave it on Aligned or Nearest or Random, the painted markup is treated as a soft hint, not an enforced location. This is documented behavior and is the root cause of issue #5621.
- Slice and switch to Preview mode. Step through layer by layer and confirm the seam dot follows the painted line.
- If seams jump off the painted line, widen the painted band, or paint Enforce on the desired path AND Block on everywhere it should NOT go.
After slicing, switch to Preview and step through layers. The pink line shows where each loop’s start sits. If your painted seam isn’t being honored, you’ll see it here before you waste filament.
Painted seam mistakes I see constantly
- Painting on the flat smooth surface where the seam is most visible. Paint on a hidden facet or vertical edge instead.
- Painting a thin precise line on a high-poly model, then being confused when preview shows a fuzzier path (#5621). Paint a thicker band.
- Cloning the painted model after painting. The seam recomputes per object on slice. Paint after cloning, or paint the source then re-clone.
- Combining fuzzy skin with painted seam on the outer wall (#11308). Ghost seam line. Don’t combine.
- Forgetting to switch
seam_positionto Painted. The universal one.
Pressure advance is half the battle
The bulge at the seam start is an extrusion problem, not a placement problem. Moving the seam to the back doesn’t fix the blob, it just hides it.
If PA is too low, the nozzle is still pressurized when the perimeter ends and you get a fat blob at the seam end. If PA is too high, you get under-extrusion at the start, which shows up as a gap or split. The goal: PA tuned so flow stops when motion stops.
Tuning is straightforward in Orca. Run the test from Calibration, Pressure Advance, Line Test. Print it. Pick the line with no blob at start AND no blob at end. Save the value to your filament profile (not your process profile) so it travels with the spool. Re-slice your seam test. Seam visibility drops dramatically before you touch any seam-specific setting, just from getting PA right. The full walkthrough is in the pressure advance calibration guide.
PETG-specific note: PETG holds nozzle pressure longer than PLA. PA for PETG runs roughly 0.03 to 0.06; PLA runs 0.02 to 0.04 (rough ranges, calibrate yours). People who report “seam blob with PETG no matter what” almost always have undersized PA. Same goes for filament changes in multi-material prints, where each filament needs its own PA value.
Wipe and retraction tuning for cleaner seams
Once PA is sorted, the next biggest wins come from retraction and wipe. None of these are dramatic on their own, but they stack.
- Retraction length: tune via the Orca retraction test. Bowden setups typically need 4 to 6 mm. Direct drive 0.4 to 1.2 mm. Don’t over-retract; it causes a “scab” at the de-retract point.
- Wipe distance: 1 to 2 mm in your printer’s extruder profile.
- Retract before wipe: set to 0 specifically when transitioning inner wall to outer wall.
- Z hop: keep off, or use Slope or Spiral type. Normal Z hop combined with high retraction can string and leave a scab right at the seam start.
- Travel distance threshold: 2 to 4 mm. This stops short travels from triggering a retract/de-retract cycle right next to the seam.
- Wipe on loops: ON for traditional seam. OFF for scarf seam.
- Wipe before external loop: ON to push the de-retraction blob inside. OFF if it’s causing visible scarring on the inner wall (unusual).
I tune in this order: PA first, then retraction length, then wipe before external loop, then everything else. If your seam still looks bad after PA and retraction are dialed, the placement settings are the lever to pull. If you skip those first two, no placement setting will save you.
Scarf joint vs traditional aligned, the comparison
People want a one-line answer. There isn’t one, but here’s the side-by-side.
| Aspect | Aligned (traditional) | Scarf joint |
|---|---|---|
| Visibility on flat or cornered models | Hidden on corners | Same or marginally better |
| Visibility on curved or smooth models | Visible vertical line | Faint diagonal smudge |
| Print time impact | Baseline | +5 to 15% (slower slope speed) |
| Material compatibility | All | PLA best, PETG OK with tuning, TPU not recommended |
| Requires PA tuned | Helps a lot | Required, no exceptions |
| First-layer reliability | Normal | Scarf ramp may be too thin on layer 1 |
| Plays nice with fuzzy skin | Yes | No |
| Plays nice with arc fitting | Yes | No, scarf disables arc fitting |
| Best for | Boxes, mechanical parts, anything with corners | Vases, helmets, organic shapes |
If your model has corners, Aligned is fine. Don’t overthink it. Scarf is what you reach for when the geometry has no corners to hide on. It isn’t a universal upgrade. It costs print time, it disables arc fitting, and it can fail on first layer or on Bowden setups. But on a tall round vase it’s the difference between a visible scar and something most people won’t notice without being told to look.
Troubleshooting common seam problems
These are the recurring complaints I see on the OrcaSlicer GitHub and the subreddit. Each one ties back to a specific real thread, so if you want the long discussion, search the issue number on the repo. For broader print issues, the OrcaSlicer troubleshooting master guide is the better starting point.
Aligned seam still visible on the front of my print. Two probable causes. First, your model orientation: rotate the print so the hidden facet faces -Y. Second, there might be no clean facet for Aligned to hunt to (smooth round shape). Switch to Aligned Back, or paint a back-facing line and switch to Painted. References: #5621, #7326.
Random seam looks like noise. Random isn’t a cosmetic seam option. It’s a strength option. Switch to Aligned with paint, or to scarf joint on smooth surfaces.
Back seam on a round model looks weird. Back forces the seam onto a smooth curve, where it has nothing to hide on. Use Aligned Back with paint instead, or scarf joint. See discussion #5632.
Scarf seam not doing anything. Triple-check three things: scarf length is at least 15 mm (not 5 or 10), scarf type is set to Contour or Contour and Hole and not Disabled, and your PA is calibrated. If you’re on Bowden, also expect worse results than direct drive users. Reference: #4647 and #4325.
Seam blob with PETG no matter what. Recalibrate PA for PETG specifically (it runs higher than PLA). Lower scarf speed if you’re using scarf. Disable wipe on loops if scarf is on. Reference: #4325 reports, #7540.
Painted seam ignored on slice. Verify seam_position = Painted in the dropdown. Paint a continuous vertical line. Widen the brush. Reference: #5621.
Orca leaving a wide gap in the seam. Lower seam_gap to 0 or 5%. Raise PA. Check filament profile flow ratio (a low flow ratio compounds the gap). Reference: #6378.
Aligned Back broken on mirrored parts. Known issue (#12017). Workaround: use plain Aligned and rotate the model 180 degrees instead of mirroring it.
Scarf joint flow rate goes below target. Open issue (#5465). Workaround: keep scarf speed conservative, keep scarf flow ratio at 100% (don’t lower it), retest after each Orca update.
Concentric infill creates a second visible seam. This was fixed in v2.2.0 with concentric infill seams now staggered (VERIFY exact release notes). If you’re seeing it on a current version, update.
Ghost seam line when fuzzy skin is painted. Don’t combine fuzzy skin with scarf or painted seam on the outer wall. Reference: #11308.
When you just have to accept some seam
There are models where no setting in OrcaSlicer (or Bambu Studio, or PrusaSlicer) gets you a fully invisible seam. Specifically: single-perimeter round prints with no corners, glossy or silk filament where every micro-defect catches the light, TPU on any geometry, and first-layer seams on tall thin pillars where scarf’s first-layer behavior fails.
The cheap fix is orientation. Rotate the model so the seam ends up on the back of the display position. The second-cheapest fix is sandpaper, 400 grit, light pass over the seam line. And honestly: a lot of “ugly seams” look ugly on a macro photo and are invisible at arm’s length. Print the part. Hold it. If you can’t see the seam without leaning in, you’re done.
Related OrcaSlicer guides
Seam tuning sits inside a wider Quality picture. The pillar overview is the OrcaSlicer settings master guide. For the extrusion-side prerequisites, see the pressure advance calibration guide and the retraction test guide. For per-filament tuning, the filament settings guide is next. If seam issues are part of a larger print quality mess, start at the troubleshooting master guide. Sibling Quality cluster topics live in the ironing settings guide, the infill patterns guide, and the tree supports guide.
Tune extrusion first. Tune placement second. Don’t combine fuzzy skin with scarf. Switch the dropdown to Painted when you paint. Calibrate PA for every new filament. That’s 90% of clean seams in OrcaSlicer.
Related OrcaSlicer guides
- OrcaSlicer Settings Master Guide: Every Setting Explained (2026)
- OrcaSlicer Cooling and Fan Curves Explained (2.3.x Guide)
- How to Update OrcaSlicer Without Losing Your Profiles (2026)
- OrcaSlicer for Voron 0.2 / 2.4 / Trident: Configuration Guide
- OrcaSlicer Custom G-code: Start, End and Layer-Change Macros