My first serious PETG print sagged like wet cardboard because I’d left OrcaSlicer’s cooling tab on the default PLA-style fan curve, and I’d assumed (wrong) that fan settings lived under Process. They don’t. I spent the next hour digging through the wiki, the JSON profiles in the OrcaSlicer repo, and a couple of late-night GitHub issues before I figured out that part cooling is a Filament setting, not a Process setting, and that every filament family wants a different shape of curve. This guide is the brain dump I wish I’d had that night, written for the 2.3.x release line and pulled almost entirely from the live wiki and the base JSON profiles in the OrcaSlicer source tree.
I’m going to walk through every cooling setting OrcaSlicer exposes, show the verified per-filament defaults straight from the repo, explain how overhang and bridge fan logic actually works (it’s not what most people think), and finish with the failure modes I’ve seen on my own bench. There’s no “perfect” fan curve waiting at the end of this article. There is, however, a clear mental model that will let you build one for your printer, your filament, and your specific part.
Table of contents
- Why cooling makes or breaks a print
- Where the cooling settings actually live in OrcaSlicer 2.3.x
- Every cooling setting explained, in order
- Per-filament fan defaults pulled from the source
- Overhang and bridge fan tuning
- Layer-time slowdown logic
- Aux fan, chamber fan, exhaust fan
- Per-printer notes (Bambu, Klipper, Marlin)
- Troubleshooting cooling-related failures
- Calibrating without a built-in Cooling Tower
- Known cooling bugs and feature requests in 2.3.x
- FAQ
Why cooling makes or breaks a print
Cooling is the single setting category that decides whether your overhangs droop, whether your bridges sag halfway across a span, whether PETG pulls long whiskers between travel moves, and whether ABS lifts off the bed like a sad taco. It’s also the category most people get wrong on their first few prints because OrcaSlicer puts the cooling tab in a non-obvious place, and because the default values are tuned for PLA and only PLA. If you switch from PLA to PETG without touching the Cooling tab, you’re using a curve that’s roughly twice as aggressive as the base JSON profile recommends for that material.
Here’s the rough rule of thumb I work from on my own bench. PLA wants the fan slammed on as early as possible because the polymer recrystallizes fast and benefits from quick solidification. ABS, ASA, and PC want almost no part cooling, and they actively want a warm enclosure to slow contraction. PETG sits in the middle and is genuinely case-by-case: bridges and steep overhangs need fan, but flat infill layers usually don’t. TPU is its own thing entirely. Aggressive airflow on a flexible filament weakens layer bonds and can drag the print sideways since the rubbery filament doesn’t tolerate the same mechanical stress as rigid plastics.
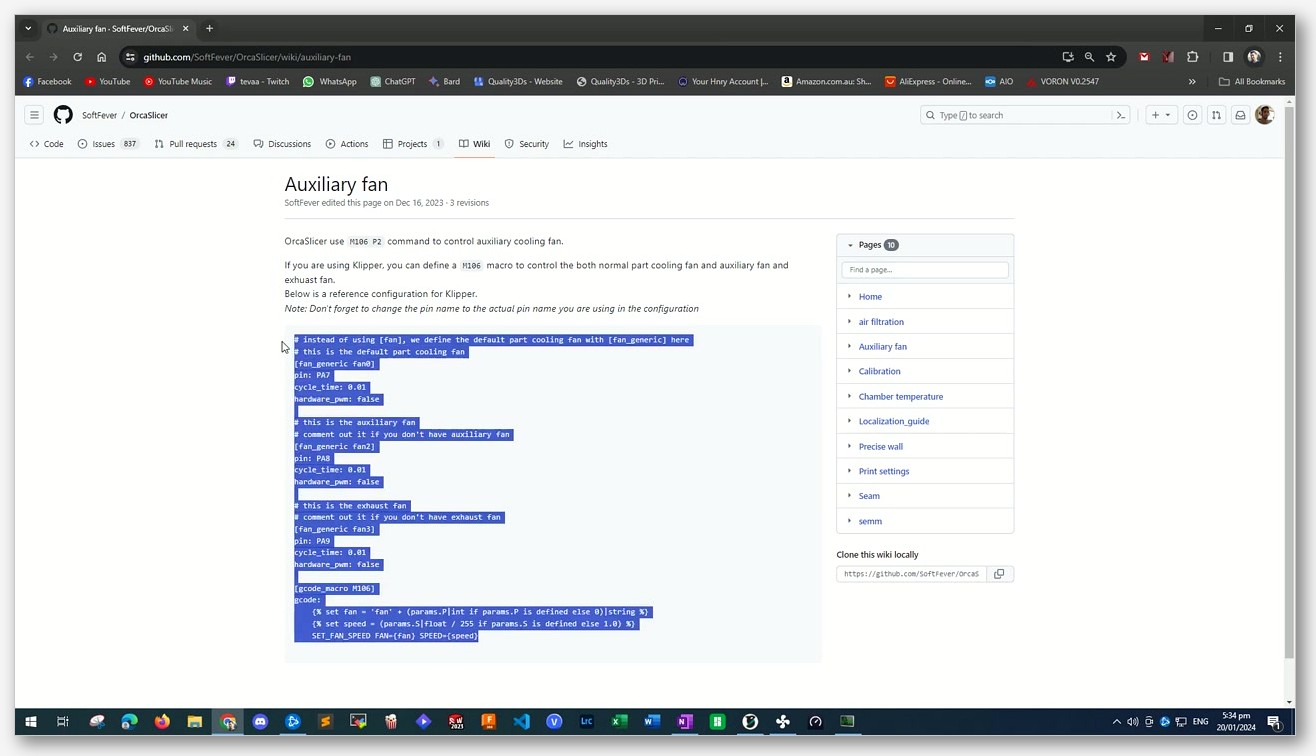
OrcaSlicer’s cooling model is genuinely richer than vanilla Bambu Studio or PrusaSlicer. You get separate fan speeds for overhangs and external bridges versus internal bridges, a configurable “no cooling for the first X layers” plus a linear ramp-up to “full fan speed at layer N,” a part-cooling auxiliary fan channel on the M106 P2 G-code address (used on Bambu hardware and any Klipper rig that’s configured for it), and a separate exhaust or air-filtration fan on M106 P3. The cooling logic also drives OrcaSlicer’s “slow down for layer cooling” behavior, which enforces a minimum layer time by automatically reducing print speed. That’s crucial for tall thin parts that otherwise stack hot layers on top of each other with no time to cool.
One thing I want to set straight before we dig in: OrcaSlicer didn’t invent the overhang-fan concept. PrusaSlicer had overhang_fan_threshold and overhang_fan_speed first, and OrcaSlicer inherited and extended the idea (notably with separate handling of internal bridges). The 2.3.0 release notes don’t actually mention any cooling or overhang-fan changes either, so if you’ve read a blog post crediting 2.3.0 with the overhang split, that’s wrong. The split is documented on the wiki, it’s just not tied to that specific release in the changelog.
Where the cooling settings actually live in OrcaSlicer 2.3.x
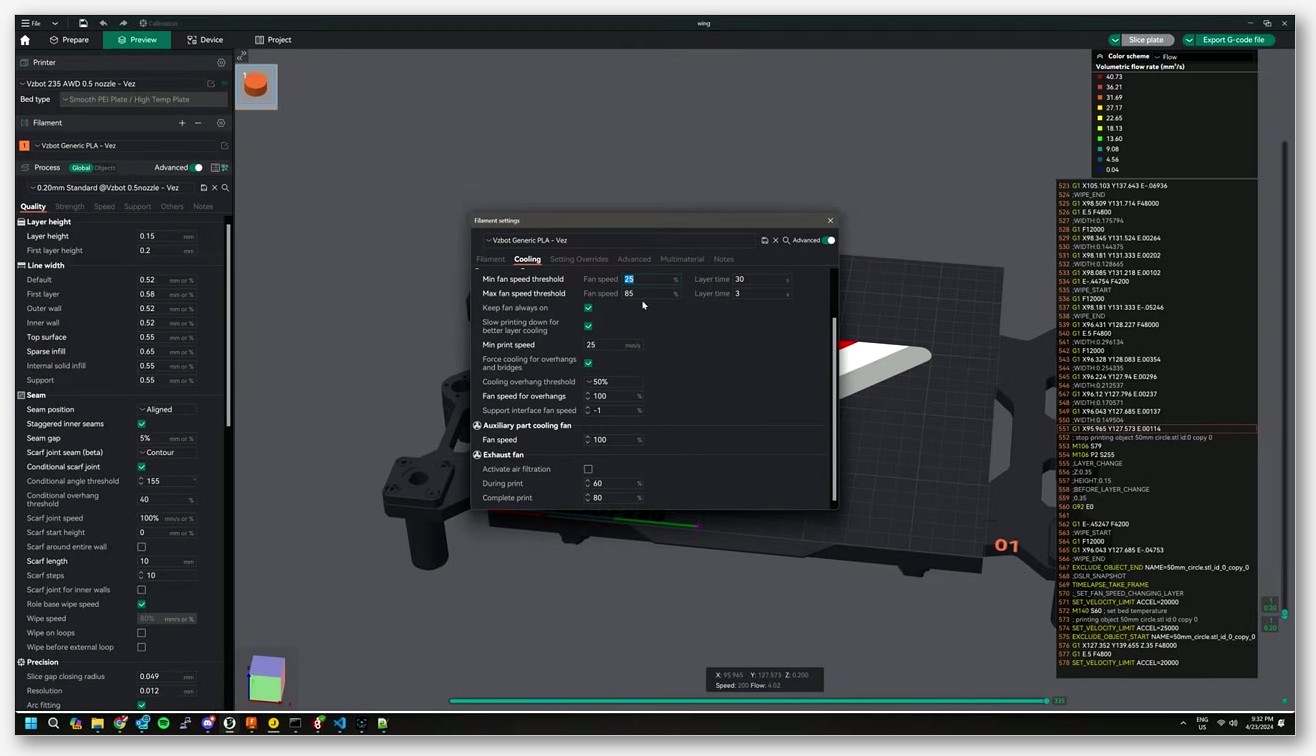
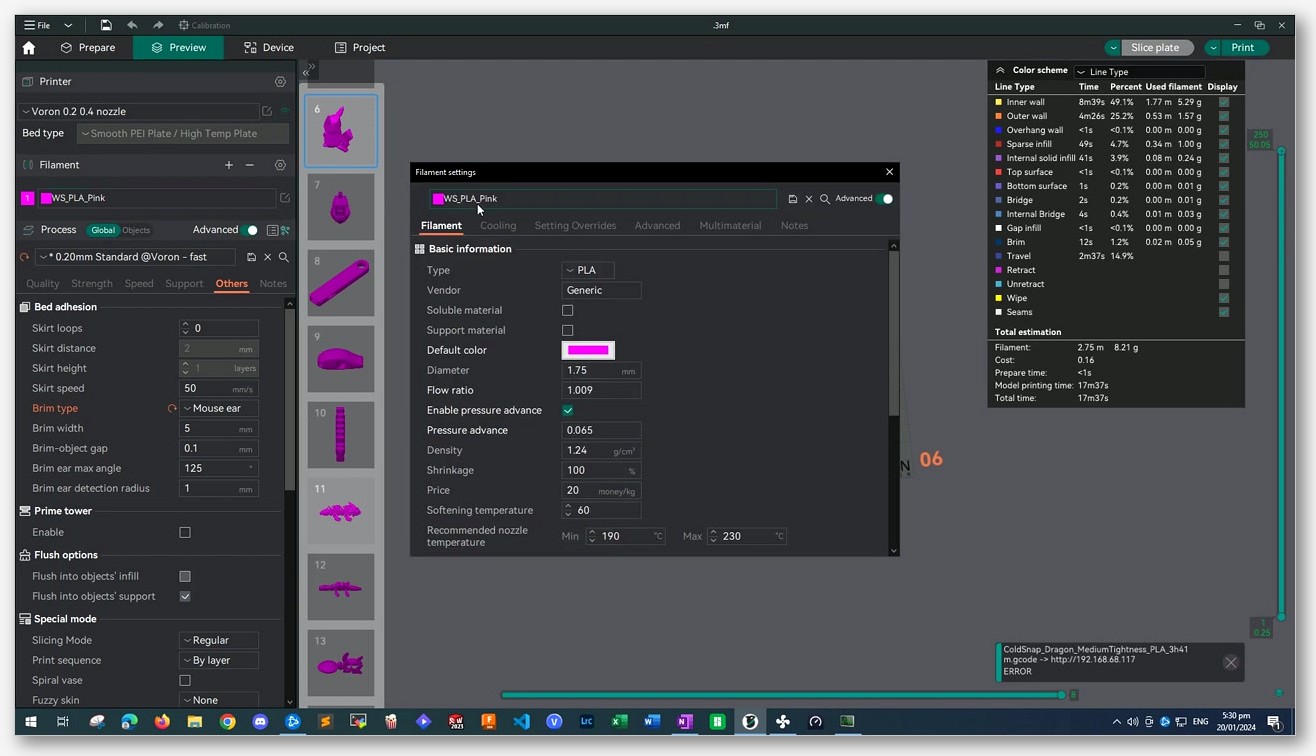
Open OrcaSlicer, look at the right-hand panel, and click the Filament icon (it’s the spool, not the gear). Inside the Filament settings dialog, you’ll find a tab called Cooling. That’s where 90% of the settings in this article live. The wiki page for this group is Material Cooling, and the URL slug itself (material_cooling) confirms it’s a material setting, not a process setting.
This trips people up because Cura, for example, exposes fan settings under print profile, and PrusaSlicer puts the slowdown and fan logic under Filament Settings but in a different visual location. In OrcaSlicer, Cooling is filament-scoped because the slicer assumes (correctly, in my experience) that the right fan curve depends mostly on the polymer you’re extruding, not on the part you’re printing.
There’s a second, smaller cooling page tucked under Printer Settings → Basic Information → Cooling Fan. Don’t confuse it with the main Cooling tab. The machine-level page only covers timing parameters: fan speed-up time (“Start the fan this number of seconds earlier than its target start time”) and fan kick-start time (“Emit a max fan speed command for this amount of seconds before reducing to target speed to kick-start the cooling fan”). Those two settings exist because real fans have spin-up inertia. They’re a printer characteristic, not a filament characteristic. If your fan is slow to come up to speed, raise the kick-start time. Otherwise leave it alone. There’s a full reference to that page on the OrcaSlicer wiki Cooling Fan entry.
If you’re new to the slicer’s overall layout, the broader walkthrough at our OrcaSlicer settings master guide covers the Filament vs Process vs Printer tab split in more detail. For this article, just remember: part cooling sliders live under Filament, fan-timing seconds live under Printer.
Every cooling setting explained, in order
Here’s every setting on the Material Cooling page, in the order the wiki lists them. I’m using the verbatim setting labels and the JSON keys, because the labels sometimes change between releases but the keys don’t.
Material Cooling for Specific Layer
No cooling for the first (key close_fan_the_first_x_layers). The wiki defines it as “Number of initial layers during which part-cooling fans are disabled.” This exists because bed adhesion depends on the first layers staying warm and pliable. Cool them off and they shrink, lift at the edges, and the rest of your print is doomed. The common-base default is 3 layers. PLA overrides this down to 1 (PLA’s first-layer warp risk is low). PETG inherits the 3. ABS, ASA, PC, and TPU also inherit the 3, but if you’re printing without an enclosure on a high-temp material, you may want to raise it further.
Full fan speed at layer (key full_fan_speed_layer). Verbatim: “Fan speed is increased linearly from 0% starting at the layer specified by close_fan_the_first_x_layers up to the maximum part-cooling speed at this specified layer.” This is the linear ramp. If close_fan_the_first_x_layers is 3 and full_fan_speed_layer is 6, the fan will go from 0% at the start of layer 4 to 100% at layer 6, scaling linearly across those three layers. Most users leave this at 0 (which disables the ramp and just snaps to full speed at the layer after the close-fan-first layers). I prefer a short ramp on PLA prints with delicate first features.
Material Part Cooling Fan
Min fan speed threshold and Max fan speed threshold. These are the heart of OrcaSlicer’s auto-cooling logic. Verbatim from the wiki: “When a layer’s estimated print time falls below the minimum time, the slicer begins enabling the part-cooling fan” and “Layers with an estimated time below the maximum time may trigger additional print-speed reduction to improve cooling.” In the JSON profiles these are fan_min_speed and fan_max_speed for the fan-speed pair, plus fan_cooling_layer_time for the layer-time threshold. The auto-cooling system reads estimated layer time, then ramps fan speed up linearly between those two layer-time bounds.
Keep fan always on (key reduce_fan_stop_start_freq). The wiki: “Enabling this setting means that part cooling fan will never stop entirely and will instead run at least at minimum speed.” Useful on long prints where rapid fan stop-start cycles create audible noise spikes. It’s also the safer default for any filament where a sudden cooling cut can cause a visible artifact. Note: this setting interacts with overhang fan logic in a known-buggy way (see the section on bugs).
Slow printing down for better layer cooling (key slow_down_for_layer_cooling). Verbatim: “Enable this option to slow printing speed down to ensure that the final layer time is not shorter than the layer time threshold.” When enabled, if the slicer’s estimate of a layer’s print time falls under the slowdown threshold, OrcaSlicer scales speed down so the layer takes at least the minimum time. This is the only mechanism OrcaSlicer has for handling skinny tall geometry where each layer otherwise finishes in two seconds and stacks heat.
Don’t slow down outer walls (key dont_slow_down_outer_wall). Verbatim: “If enabled, this setting will ensure external perimeters are not slowed down to meet the minimum layer time.” I turn this on for any model where surface finish on the outside matters more than absolute time accuracy. The trade-off: outer walls keep their full speed, so on a very small layer you may still get the heat-stacking problem on that one wall path.
Min print speed (key slow_down_min_speed). Verbatim: “The minimum print speed to which the printer slows down to maintain the minimum layer time.” This is the floor on the slowdown. OrcaSlicer will not go below this, even if hitting the minimum layer time would require a slower move. The common-base default is 10 mm/s, which is reasonable for most setups. Pushing it lower risks oozing artifacts since the extruder is still pushing plastic at a low speed.
Force cooling for overhangs and bridges (key enable_overhang_bridge_fan). Verbatim: “Enable this option to allow adjustment of the part cooling fan speed for specifically for overhangs, internal and external bridges.” The master toggle for the overhang-fan system. If this is off, the other overhang-related settings do nothing. Most users want this on.
Overhang cooling activation threshold (key overhang_fan_threshold). Verbatim: “When the overhang exceeds this specified threshold, force the cooling fan to run at the ‘Overhang Fan Speed’ set below.” Critical and frequently misunderstood point: this threshold is a percentage of line width, not an angle in degrees. The wiki’s overhang page is explicit: “Detect the overhang percentage relative to line width and use different speed to print.” I’ll come back to this in the overhang section because it has practical implications.
Overhangs and external bridges fan speed (key overhang_fan_speed). Verbatim: “Use this part cooling fan speed when printing bridges or overhang walls with an overhang threshold that exceeds the value set.” This is the fan speed forced on whenever an overhang or external bridge is detected. For PLA, the common base sets this to 100% (max). For ABS, ASA, and PC the profiles knock it down to 60 to 80 percent because high-temp filaments still don’t want full blast even on the tricky bits.
Internal bridges fan speed (key internal_bridge_fan_speed). Verbatim: “The part cooling fan speed used for all internal bridges. Set to -1 to use the overhang fan speed settings instead.” Internal bridges are the floors inside parts (the top of an infill region under a solid top layer, for example). They’re often the difference between a clean top surface and a saggy one. Setting this to -1 makes it inherit from the overhang fan speed; otherwise you can dial it independently. On PETG I sometimes run internal bridges at 100% and the rest of the print at 20 to 40 percent, which gives me decent top surfaces without sacrificing layer bonds elsewhere.
Support interface fan speed (key support_material_interface_fan_speed). Lets the fan speed differ when printing support interface layers. Useful if you want supports to detach more cleanly (more cooling tends to mean a slightly weaker bond, which is good for support interfaces but bad everywhere else).
Ironing fan speed (key ironing_fan_speed). Self-explanatory: the fan speed during ironing passes. Ironing benefits from controlled cooling because you’re trying to smooth a thin layer without distortion.
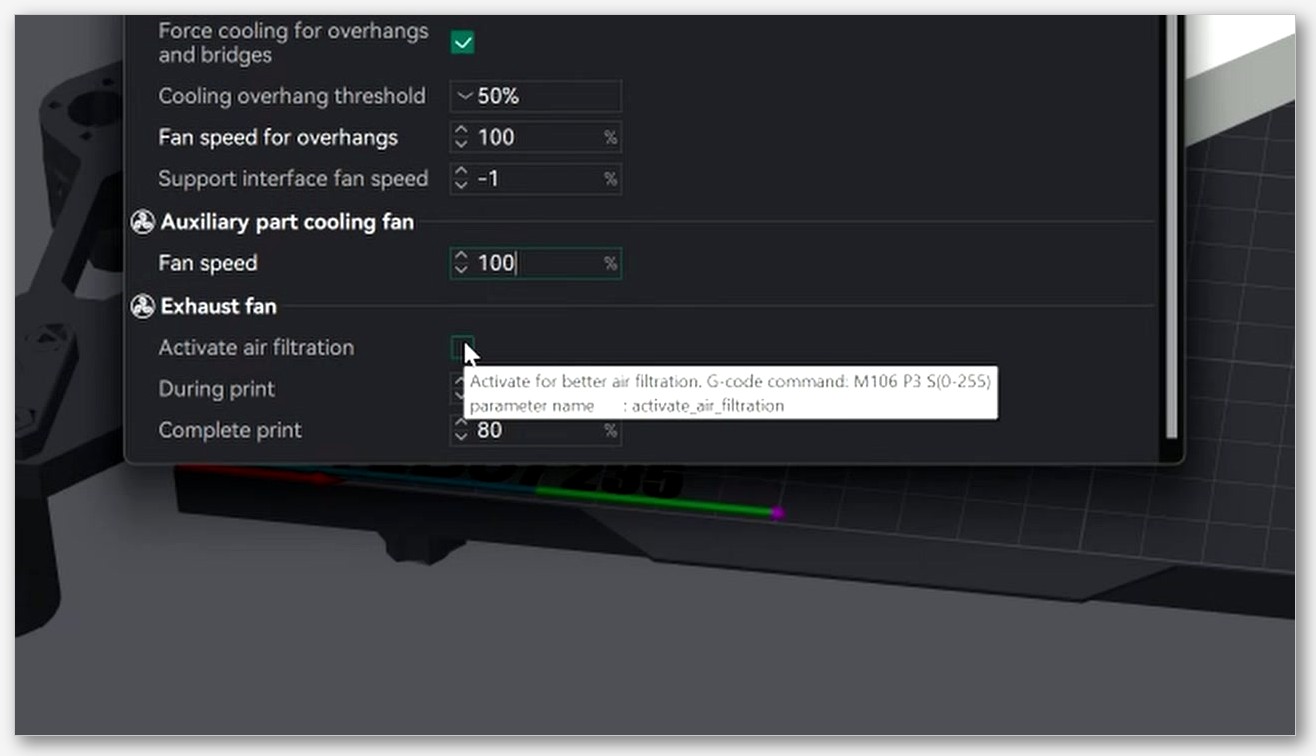
Auxiliary part cooling fan (key additional_cooling_fan_speed). Verbatim: “Set the speed for the auxiliary part-cooling fan if your printer provides one.” The G-code OrcaSlicer emits for this channel is M106 P2 S(0-255). We’ll dig into where this fan lives physically and which printers have one in the aux-fan section.
Activate air filtration / Exhaust fan (keys activate_air_filtration, activate_air_filtration_during_print, during_print_exhaust_fan_speed, activate_air_filtration_on_completion, complete_print_exhaust_fan_speed). G-code emitted: M106 P3 S(0-255). The wiki summary: “Activate for better air filtration” with separate speed controls during the print and after completion. This is the exhaust fan on enclosed machines that have one, used to vent VOCs and ultrafine particles.
Per-filament fan defaults pulled from the source
The numbers below are pulled directly from the base JSON profiles in the OrcaSlicer repo (in resources/profiles/OrcaFilamentLibrary/filament/base/). I’ve cross-checked them against the live main branch. The Generic PLA, PETG, ABS, and similar System profiles you see in the dropdown are metadata-only files that inherit from these bases.
| Filament | fan_min_speed | fan_max_speed | fan_cooling_layer_time (s) | overhang_fan_threshold | overhang_fan_speed | slow_down_layer_time (s) | close_fan_first_x_layers |
|---|---|---|---|---|---|---|---|
| Common base (inherited) | 35 | 100 | 60 | 95% | 100 | 8 | 3 |
| PLA | 100 | (inherits 100) | 100 | 50% | (inherits 100) | 4 | 1 |
| PETG (file: fdm_filament_pet.json) | 20 | (inherits 100) | 20 | (inherits 95%) | (inherits 100) | (inherits 8) | (inherits 3) |
| ABS | 10 | 80 | 30 | 25% | 80 | 3 | (inherits 3) |
| ASA | 10 | 80 | 35 | 25% | 80 | 3 | (inherits 3) |
| PC | 10 | 60 | 30 | 25% | 60 | 2 | (inherits 3) |
| TPU | 100 | (inherits 100) | 100 | (inherits 95%) | (inherits 100) | (inherits 8) | 1 |
A few things worth pointing out from this table.
PLA runs the fan flat-out from the second layer onwards. fan_min_speed and fan_max_speed are both effectively 100, which means there’s no auto-cooling ramp because the fan is already maxed. The PLA override on overhang_fan_threshold at 50% is interesting: PLA’s overhang fan kicks in earlier (at a less severe overhang) because PLA benefits from aggressive cooling on any unsupported geometry. For more on the PLA-specific full settings, our OrcaSlicer PLA settings guide goes deeper.
PETG is the one most often misrepresented. People say “PETG = 0% fan.” The base default is not 0%. It’s 20% min, inheriting up to 100% max via the common-base override, with a 20-second fan-cooling layer time. That’s a much more nuanced curve than “off.” The lower fan-cooling-layer-time means the auto-cooling system reaches max fan only on layers shorter than 20 seconds (versus 60 seconds on the common base and 100 on PLA). In practice that means the fan stays low on big flat layers and ramps up on small detail layers, which is exactly what PETG wants. The full PETG profile rundown is at our OrcaSlicer PETG settings guide.
ABS and ASA share an almost identical curve: 10% minimum, 80% maximum, overhang threshold dropped down to 25% (so only the steepest overhangs get fan), and overhang fan capped at 80%. The thinking is that these warp-prone filaments need just enough cooling to stop overhangs from drooping but no more, because every gust of air is contraction stress on a part trying to bond to itself. PC pushes this further: same 25% threshold but the cap drops to 60% because PC is even more warp-sensitive. Our ABS and ASA settings guide has the full per-material breakdown.
TPU mirrors PLA’s “fan always on” approach but with a much longer fan-cooling layer time (100 seconds). The reason is mechanical, not thermal: TPU is rubbery, and you want each layer to set firm before the nozzle drags across it again. The additional_cooling_fan_speed of 70 on TPU (and on PLA) is there for printers that have an aux fan, giving you extra airflow without overdriving the part fan.
Overhang and bridge fan tuning
This is the section that took me the longest to wrap my head around, and it’s where most printers either nail overhangs or fail them.
The first thing to internalize: overhang threshold is a percentage of line width, not a percentage of angle. The OrcaSlicer wiki’s overhang page is explicit about this. The setting reads “Detect the overhang percentage relative to line width and use different speed to print.” The same wording appears on the overhang speed settings page: “Overhang degrees are expressed as a percentage of line width.”
What does that mean in practice? If your line width is 0.42 mm and the overhang threshold is set to 50%, then any extruded line that’s more than 50% off the line below it (so, more than 0.21 mm hanging into open air) triggers the overhang fan. The threshold is measuring how much of the current line sits over nothing, not the angle of the surface in degrees. Setting it to 25% (the ABS/ASA/PC default) means even a quarter of the line being unsupported triggers the cooling. Setting it to 95% (the common default) means almost the entire line has to be unsupported before the fan kicks in.
The relationship between the three main overhang/bridge fan settings is worth memorizing:
- enable_overhang_bridge_fan. Master switch. Off = nothing else fires.
- overhang_fan_threshold. Decides which overhangs get fan.
- overhang_fan_speed. The speed the fan runs at when an overhang fires.
- internal_bridge_fan_speed. The speed for internal bridges. Set to
-1to inherit overhang_fan_speed; set to a number to use that number specifically.
The -1 inheritance trick is genuinely useful. If you want internal bridges and overhangs to use the same fan curve, leave internal at -1 and you’ll only need to tune one number. If your internal bridges are sagging but your overhangs look great, that’s exactly when you’d break the inheritance: set internal_bridge_fan_speed to something higher (often 100 even on filaments where overhang fan is lower).
There’s a long-standing open issue worth knowing about. Issue #7735 (opened December 2024, still open) reports that the overhang fan speed is ignored unless “slow down for overhangs” is also enabled. If you’ve set your overhang fan and it doesn’t seem to be firing, check that you also have the speed-side overhang slowdown turned on. It’s not officially required by the wiki, but it’s required in practice for at least some 2.3.x builds. For a deeper look at overhang and bridging behavior generally, see our OrcaSlicer overhangs and bridging problems writeup.
Layer-time slowdown logic
OrcaSlicer’s layer-time slowdown is one of those features that runs silently in the background and most users never notice until they look at G-code preview and wonder why a layer is suddenly printing at 12 mm/s.
The logic, in plain English: at slicing time, OrcaSlicer estimates how long each layer will take to print at the configured speeds. If that estimate falls below slow_down_layer_time (in seconds), the slicer scales print speed down to make the layer take at least that long. It will never go below slow_down_min_speed (in mm/s), so there’s a floor. If the math says even at the floor speed the layer would still finish too fast, the slicer prints at the floor and accepts that the layer might still be quick.
Why does this matter? Tall thin parts. Think of a 5 mm by 5 mm tower. At any sensible print speed, each layer is over before the previous layer has a chance to solidify. Without slowdown, the print turns into a melted puddle around layer 30. With slowdown, OrcaSlicer notices the estimated layer time is shorter than the threshold and drops the speed so each layer has time to cool before the next one lands.
The trade-off is surface quality on outer walls. At very low speeds, the extruder can ooze, leak pressure, or show artifacts. That’s where dont_slow_down_outer_wall comes in. With it enabled, OrcaSlicer keeps outer perimeters at full speed even when the rest of the layer is slowed. You’ll still get the heat-stacking risk on that one wall, but you keep the surface clean.
A subtle interaction to watch for: the slowdown threshold (slow_down_layer_time) is per-filament. ABS and PC have very short thresholds (3 and 2 seconds respectively) because high-temp filaments don’t want as much fan-driven cooling, and they don’t want the slicer to slow down on their behalf as aggressively. PLA, on the other hand, has a 4-second threshold and PETG defaults to the common-base 8 seconds. If you’re swapping filaments and you see your print times change dramatically on the same model, this is likely why.
Aux fan, chamber fan, exhaust fan
Three distinct things, often confused. Let’s separate them.
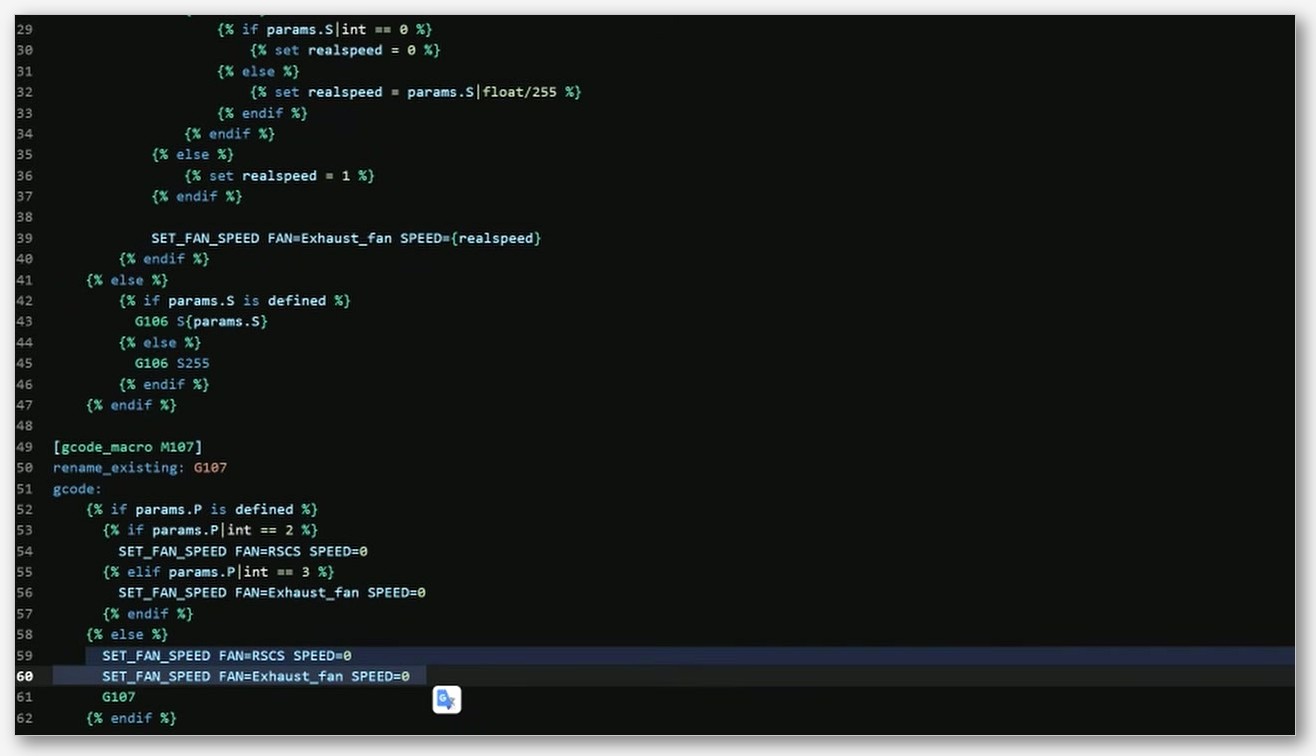
Part cooling fan. The fan on your toolhead pointing at the print. G-code: M106 P0 S(0-255) (or just M106 S(0-255) on a single-fan machine). This is the fan every part-cooling setting in this article is referring to by default.
Auxiliary part cooling fan. A second part-cooling fan mounted elsewhere in the print chamber, blowing across the print from a different angle. G-code: M106 P2 S(0-255). On Bambu hardware, this is the 12-watt fan mounted on the left-hand wall of the chamber, available across the X1C, X1E, P1S, P1P (factory-fit on some, add-on on others). On generic Klipper machines, you can wire your own and define a macro that responds to P2. The OrcaSlicer wiki entry for additional_cooling_fan_speed is the canonical reference for this channel. There are several Klipper-side configuration tutorials on YouTube if you’re rolling your own.
I want to address a common misconception: the M106 P2 channel is not “X1 only.” It’s available on any printer profile that defines an aux fan, which includes most Bambu machines and any Klipper rig configured for it. If your aux fan isn’t firing in OrcaSlicer’s G-code preview, check that your printer profile has the aux fan enabled. It’s a profile flag, not a hardware lockout.
Exhaust fan / air filtration fan. G-code: M106 P3 S(0-255). This is the fan that vents the enclosure. On Bambu enclosed printers, it’s the small fan at the top-rear of the chamber. The OrcaSlicer settings for it (activate_air_filtration_during_print, during_print_exhaust_fan_speed, activate_air_filtration_on_completion, complete_print_exhaust_fan_speed) let you run it differently during and after printing. Many users leave it off during printing for high-temp filaments (since ABS warping is worse with airflow) and only enable it during the cool-down phase to vent VOCs.
Chamber heater. Not a fan at all, but worth covering since it’s adjacent. OrcaSlicer emits M191 S(temp) before machine_start_gcode to set chamber temperature and wait, then M141 S0 at the end of the print to disable the chamber heater. The standard chamber-temperature recommendations from the wiki:
- PLA: Ambient
- ABS: 50-70°C
- ASA: 50-70°C
- Nylon 6 and Nylon 12: 70-100°C
- TPU: Ambient
- PC: 80-100°C
- PC-ABS: 60-80°C
- HIPS: 50-70°C
- PP: 40-70°C
- Acetal (POM): 70-100°C
The wiki is also explicit that PLA, PETG, TPU, and PVA should run with chamber heating disabled (set to 0) because “the chamber temperature should be low to avoid extruder clogging.” It’s worth heeding that warning. Running PLA in a hot chamber is a great way to soften the filament inside the extruder and create a heat-creep clog.
Per-printer notes (Bambu, Klipper, Marlin)
Different printer families surface different cooling capabilities, and OrcaSlicer’s behavior depends on what your printer profile claims to support.
Bambu X1C and P1S. Enclosed but passively heated only. The chamber retains heat from the bed and the print itself, but there’s no active heating element. That’s good enough for ABS and ASA in most ambient conditions. It’s not enough for PC, PA-CF, or other true engineering filaments where you want a maintained chamber temp. Both ship with a factory aux part cooling fan. If you’re tuning for these, the M106 P2 channel is fully supported out of the box. Our OrcaSlicer Bambu X1C and P1S guide has the full settings rundown.
Bambu X1E. The only Bambu with an actively heated chamber. The X1E can heat the chamber up to 60°C; below 40°C the heater stays off (the heating module operates only in the 40 to 60 range). Setting chamber temperature to 0 disables it. Bambu’s own X1E guide warns “It is strongly recommended not to enable high chamber temperature when printing PLA, PETG, TPU, PVA and other low-temperature filaments.” Use the chamber heat for PC, PA-CF, PAHT-CF, PET-CF, PPA-CF, PPS, and PPS-CF, where the higher interlayer strength is worth it.
Bambu A1 and A1 mini. Open frame, no chamber, no aux fan. M106 P2 won’t do anything meaningful. Stick to part-cooling fan tuning only and avoid high-temp filaments on these machines.
Generic Klipper machines (Voron, RatRig, custom rigs). Klipper is flexible and supports basically any G-code channel you want to map. If you’ve wired up an aux fan, define it in your Klipper config and OrcaSlicer’s M106 P2 output will drive it directly. Same for an exhaust fan on M106 P3. Klipper’s macro system can also expose chamber heaters if you’ve got a heated chamber. Several walkthroughs exist on YouTube; search for “OrcaSlicer Klipper aux fan” and you’ll find at least three quality tutorials.
Generic Marlin machines (Ender 3, Prusa MK3 with Marlin). Marlin firmware historically only exposes the single part-cooling fan via M106 (no P parameter). If you set an aux fan speed in OrcaSlicer on a Marlin profile, the M106 P2 command will be emitted but Marlin will probably ignore it (or worse, error if your firmware is strict). Stick to part-cooling fan tuning and exhaust-fan handling via macros if your build supports it.
Troubleshooting cooling-related failures
Here’s a quick triage of the cooling-related failure modes I see most often, plus what to change.
Warping or cracking on ABS, ASA, or PC. Symptom: corners lift off the bed, layer splits appear on tall walls, parts crack during cooldown. Cause: too much part cooling. The fan is pulling heat off the print faster than the polymer can stress-relieve, and contraction builds up until something gives. Fix: drop fan_min_speed and fan_max_speed down (the ABS/ASA defaults of 10 and 80 are a good starting point). Make sure your enclosure is closed. Consider disabling part cooling entirely for the bulk of the print and only enabling it for overhangs via the overhang fan settings. Our general OrcaSlicer troubleshooting master guide has more on this failure family.
Stringing on PETG. Symptom: thin whiskers between travel moves, especially over open chamber air. Cause: too much fan combined with high temps. PETG’s cooling defaults aren’t 0% (they’re 20% min, ramping to 100% on short layers) but they’re also not aggressive. If you’ve cranked PETG fan to PLA levels, you’re solidifying retracted strings instantly and they break clean off into whiskers. Fix: keep PETG fan at the JSON-base defaults. Drop temperature 5°C and retest. Don’t crank fan to fix stringing; tune retraction and temperature first.
Weak layer adhesion on PLA. Symptom: prints delaminate along layer lines, especially under stress. Cause: usually NOT too much fan on PLA (PLA is fine with maxed fan). Usually too low a temperature or too thin an extrusion. Check nozzle temp first. If you’ve disabled fan thinking it’ll help, you’re probably wrong. PLA wants the fan.
Sagging overhangs on any filament. Symptom: bottoms of overhangs droop and you can see strings or rough texture on the unsupported edge. Cause: not enough overhang fan, or overhang threshold set too high so it never fires. Fix: confirm enable_overhang_bridge_fan is on. Check that overhang_fan_threshold is reasonable (50% on PLA, 25% on engineering filaments). Verify with G-code preview that the M106 commands are actually changing during overhangs. If issue #7735 is biting you, enable the speed-side overhang slowdown.
Extruder clogs on PLA or PETG in a heated chamber. Symptom: print starts fine, then partway through the extruder grinds or skips and the print is ruined. Cause: chamber temperature is too high, softening the filament inside the heatsink. Fix: set chamber temp to 0 for PLA and PETG. Don’t run these in an X1E with the chamber heater on.
Top surface looks rough or pebbled. Symptom: solid top surfaces have a lumpy texture that doesn’t match the rest of the print. Cause: internal bridges underneath the top layer are sagging, deforming the top surface as the iron pass tries to smooth it. Fix: bump internal_bridge_fan_speed up. On filaments where you’ve set overhang fan low for warp reasons, breaking the -1 inheritance and giving internal bridges 100% fan often fixes this without affecting warp on the rest of the print.
Calibrating without a built-in Cooling Tower
If you’ve used OrcaSlicer’s Calibration menu, you might have looked for a Cooling Tower or Fan Speed Test option. It’s not there. The current Calibration menu lists eight entries: Temperature, Volumetric Speed, Pressure Advance (with the Adaptive Pressure Advance Guide), Flow Ratio, Retraction, Tolerance, Advanced Cornering (Jerk and Junction Deviation), and Advanced Input Shaping (with VFA). No cooling option exists. The full list lives on the OrcaSlicer wiki Calibration page.
That doesn’t mean you can’t calibrate cooling. You just have to do it manually. Two methods I use.
Method 1: community fan-speed test STL. There’s a popular Printables model called “Ultimate Fan Speed Test for Orca Slicer” that prints a tall part with steps designed to reveal where overhangs and bridges fail at a given fan setting. Print it at a few different fan speeds, compare the steps, pick the lowest fan speed that gives clean overhangs.
Method 2: A/B testing on your actual part. Slice the part with two different fan settings, print one of each, compare. Slower than method 1 but more relevant to the actual geometry you care about. For dialing in PETG specifically I’ll often print a small overhang test bracket at three fan curves: 0% min / 0% max (off), 20% min / 60% max (mid), and 30% min / 100% max (aggressive). The mid-curve usually wins on PETG; the aggressive curve usually wins on PLA.
For both methods, change one variable at a time. If you’re testing fan, don’t simultaneously change temperature or print speed. Otherwise you can’t attribute the result.
Known cooling bugs and feature requests in 2.3.x
Three open GitHub issues are worth knowing about as of mid-2026.
Issue #12858 (opened 20 March 2026, still open). Title: “When ‘Keep fan always on’ is enabled, the ‘Force cooling for overhangs’ settings are ignored.” Affects 2.3.1 and 2.3.2-rc2. If you have reduce_fan_stop_start_freq on and your overhang fan isn’t firing, this is why. Workaround: turn off “Keep fan always on” if you need overhang fan to work.
Issue #7735 (opened 13 December 2024, still open). Title: “Filament Fan Speed for Overhangs Ignored Unless Slow Down for Overhangs Enabled.” Mentioned above in the overhang section. The fix is the same: enable the speed-side overhang slowdown alongside the fan-side overhang settings.
Issue #7026 (opened 5 October 2024, still open). This one’s a feature request, not a bug. Asks for fan speed for overhangs to scale with overhang degree, similar to how overhang speed already does. Currently you get one binary “overhang detected, run fan at X” speed. The request is for a graduated curve like overhang_1_4_speed through overhang_4_4_speed but for fan. If implemented, it’d give significantly finer control. Worth following if you care.
If you want the latest OrcaSlicer release, the canonical download is the OrcaSlicer GitHub releases page. As of writing, V2.3.2 is the latest stable. Don’t download OrcaSlicer from random mirror sites; the GitHub releases are the only canonical source.
FAQ
Does OrcaSlicer have a built-in Cooling Tower calibration test?
No. The Calibration menu has eight entries and Cooling Tower isn’t one of them. Use a community Printables model like the “Ultimate Fan Speed Test for Orca Slicer” or run A/B tests manually on your actual part. The wiki Calibration page lists all eight available calibrations and confirms the absence.
Why are fan settings in Filament instead of Process?
Because the right fan curve depends on the polymer you’re extruding, not on the geometry of the part. PLA wants flat-out fan; ABS wants almost none. OrcaSlicer (and PrusaSlicer before it) put the cooling settings on the material side so changing filaments automatically changes the curve. Process settings are for print-specific stuff like layer height, perimeter count, and infill.
Does overhang threshold mean angle in degrees, or something else?
It’s a percentage of line width. The wiki is explicit: “Detect the overhang percentage relative to line width.” So a 50% threshold means “trigger when more than 50% of the extrusion line is hanging over nothing.” It’s not a 50-degree-angle threshold. This trips up almost everyone migrating from Cura.
Why is my aux fan not firing in G-code preview?
Check your printer profile. The M106 P2 channel only emits if the profile defines an aux fan. On generic Bambu profiles for the X1C, X1E, P1S, and P1P, the aux fan is defined. On Marlin printers and bare-bones Klipper configs, you need to enable it explicitly. Also check the JSON value of additional_cooling_fan_speed: if it’s 0 (the inherited common-base default for filaments that don’t override it), you won’t see any M106 P2 in the output.
Can I turn off the chamber fan during PLA prints on a Bambu?
Yes, and you probably should for any chamber-heated workflow. The exhaust fan settings (activate_air_filtration_during_print) let you disable air filtration during the print. For PLA in a passive enclosure like the X1C or P1S, leave the chamber heater at 0 entirely. PLA does not want a hot chamber; it’ll soften inside the extruder and clog.
Does PETG really need 0% fan?
No, that’s a myth. The OrcaSlicer base default for PETG is fan_min_speed: 20 and inherits fan_max_speed: 100 from the common base. The fan-cooling-layer-time is 20 seconds, which means full fan only kicks in on layers shorter than that. For typical PETG geometry the fan stays at the 20% floor for big layers and ramps up on small detail layers and overhangs. Running 0% on PETG often causes overhang sagging.
What’s the difference between Min fan speed threshold and Min print speed?
“Min fan speed threshold” (in the JSON, fan_min_speed) is the minimum fan percentage the auto-cooling system will set when fan is active. “Min print speed” (slow_down_min_speed) is the floor on how slow OrcaSlicer will reduce print speed when the layer-time slowdown kicks in. They’re different systems: fan speed and print speed. Both have “min” in the label, which is why they get confused.
Does OrcaSlicer 2.3.0 add new cooling features?
The 2.3.0 release notes don’t mention any cooling, fan, or overhang/bridge changes. The cooling settings discussed in this article existed in earlier versions and remain in 2.3.x. If you’ve seen blog posts crediting 2.3.0 with the overhang-fan separation, those are wrong; the feature is documented on the wiki but not tied to 2.3.0 in the changelog.
That’s the full tour. Cooling is one of those topics where there’s no single right answer, but there’s a clear mental model: fan settings live under Filament, overhang threshold is a line-width percentage, the auto-cooling system reads layer time and ramps fan plus print speed in response, and the M106 P2 aux fan is available on any printer with the channel defined. Tune from the verified per-filament defaults rather than starting from scratch. If you’re going deeper into per-material tuning, our settings master guide ties cooling into the broader profile picture.
Related OrcaSlicer guides
- OrcaSlicer Settings Master Guide: Every Setting Explained (2026)
- OrcaSlicer for Ender 3 V1, Pro, V2, S1, S1 Pro: Setup Guide
- OrcaSlicer for Flashforge Adventurer 5M, 5M Pro and AD5X: Setup
- OrcaSlicer Keyboard Shortcuts Cheat Sheet (Every Verified Key)
- OrcaSlicer By Object vs By Layer: Picking the Right Print Sequence