I bought my X1C with the AMS expecting OrcaSlicer support to be a one-click toggle. The first time I sliced a 4-color print, OrcaSlicer didn’t see the AMS at all, and the LAN-only mode access code I’d ignored for months turned out to be the whole problem.
That was a couple of firmware revisions ago. Since then, Bambu has rolled out Authorization Control, launched the AMS 2 Pro alongside the H2D, pushed the AMS HT to nearly every printer in the lineup via OTA, and OrcaSlicer has had to chase all of it. If you landed here in 2026 trying to figure out why your AMS works in Bambu Studio but not in OrcaSlicer, or whether the AMS Lite on your A1 will let you run a 4-color print without melting your TPU, this is the guide I wish I’d had.
I’ll be honest about where Bambu Studio still wins, where OrcaSlicer is the better tool, and where both are still actively buggy. Nothing here is marketing. If you want a broader view across every printer brand, our wider multi-color guide is the pillar that ties this all together.
Which AMS do you have, and what does OrcaSlicer do with it
Bambu sells four units that all get called “the AMS” in casual conversation, and they’re not interchangeable. The original AMS is the boxy 4-slot enclosure that sits on top of an X1 or P1. The AMS Lite is the open-frame 4-arm spool holder that ships with A1 and A1 Mini bundles. The AMS 2 Pro launched alongside the H2D and added active drying. The AMS HT is the single-spool drying-focused unit that’s now compatible with most of the lineup via OTA updates rolled out across 2025.
OrcaSlicer treats all four roughly the same way at the slicer level. You bind the printer, the slicer reads the AMS state over MQTT, and each slot shows up as a tray with a color, a filament type, and a remaining percentage. Color mapping, RFID readout, and slot-aware slicing all work. What differs by hardware isn’t the slicing, it’s what filaments each AMS can physically push without jamming.
The big asterisk is Authorization Control. Recent Bambu firmware versions introduced a stricter handshake between the printer and any third-party software trying to send a print job. OrcaSlicer can still slice, map, and prepare your AMS print perfectly, but the actual “send to printer” call may need to hand off through Bambu Connect or you can run the printer in LAN-only Developer Mode to bypass the check. I’ll walk through both paths in the pairing section.
Quick orientation before we dig in: if you have an X1C, X1E, P1S, P1P, or P2S, you almost certainly have the original AMS or an AMS 2 Pro. If you have an A1 or A1 Mini, you have an AMS Lite. If you have an H2D, you started with an AMS 2 Pro and may have added AMS HT units for engineering filaments. Each of these has its own quirks in OrcaSlicer, and we’ll cover them in turn.
AMS hardware comparison table
This table is the cheat sheet I keep open when someone in our Discord asks which AMS they should buy for what printer. Spec sheets change with every Bambu refresh, so verify pricing and OTA compatibility on the Bambu compare page before you put money down. The functional rows below have been stable through 2025 and into early 2026.
| Spec | Original AMS | AMS Lite | AMS 2 Pro | AMS HT |
|---|---|---|---|---|
| Slot count | 4 per unit | 4 per unit | 4 per unit | 1 per unit (single spool) |
| Compatible printers | X1C, X1E, P1P, P1S, P2S | A1, A1 Mini only | X1, X1E, P1P, P1S, P2S, A1, A1 Mini, H2D (A1 series via OTA) | Most current Bambu printers (X1, P1 added in 2025; A1 added later in 2025 via OTA) |
| Max units chained | 4 (16 spools) via AMS Hub | 1 (no chaining) | Multi-AMS chaining supported with mixed AMS HT units | Chains in mixed setups with AMS 2 Pro |
| PLA, PETG | Yes | Yes | Yes | Yes |
| ABS, ASA | Yes | Compatible but warned against (open frame, no enclosure) | Yes | Yes |
| TPU | Only “Bambu TPU for AMS” (stiffer formulation), no generic flexible TPU | Same restriction; FAQ recommends external spool | “TPU for AMS” only | Single spool path tolerates flexible TPU more freely |
| PA, PC, carbon fiber | Hardened nozzle required for CF blends | Not recommended (abrasive plus open environment) | Yes, full support | Designed for engineering filaments and drying |
| RFID auto-detect (Bambu spools) | Yes | Yes | Yes (also stores drying timestamps) | Yes |
| Drying capability | None (passive desiccant only) | None (open air) | Active drying, sealed chamber | Active drying, higher temperature ceiling and stronger heater |
| Sealed and humidity controlled | Sealed lid plus desiccant pouches | No (open frame) | Sealed, humidity sensor | Sealed, humidity sensor |
| OrcaSlicer support level (2.3.1, late 2025) | Full multi-color, RFID, mapping. Print initiation may route through Bambu Connect on auth firmware. | Full multi-color, RFID, mapping. Same auth caveat. | Full support added in 2.3.1. | Full support added in 2.3.1; intermittent P1S print-stall reported in Issue #11498. |
Two things to take away from this table. First, if you own an A1 or A1 Mini, your AMS Lite is the only Bambu AMS rated to push generic flexible TPU at all, and even then via the external spool path rather than through the Lite itself. Second, the 24-channel mixed setup people quote on YouTube is achieved by chaining multiple AMS 2 Pro units with AMS HT units on the H2D. That’s a lot of money and a lot of desk real estate. For 95 percent of users, one AMS or one AMS 2 Pro is enough.
If you’re still deciding between printer plus AMS combos, our X1 Carbon and P1S setup guide covers the original-AMS workflow in depth, and the A1 and A1 Mini guide covers the AMS Lite specifics.
Setting up the AMS itself (hardware first)
I’m going to assume you’ve already gotten your printer assembled and printing single-color. The AMS install is its own little project, and skipping the physical setup steps is the most common reason “OrcaSlicer can’t see my AMS” later turns out to be a mechanical problem.
Mounting. On an X1C, X1E, P1S, P1P, or P2S, the AMS or AMS 2 Pro sits on top of the printer or on a shelf next to it, with its bowden output routed into the back of the printer’s filament-in port. On A1 and A1 Mini, the AMS Lite mounts on the printer’s left side using its dedicated 4-arm bracket and uses 4 short PTFE tubes, one per slot, no buffer.
PTFE routing. This is the single biggest cause of “slot 3 keeps jamming” complaints. Slots 3 and 4 use longer tubes than slots 1 and 2, so they have more bend and more resistance. Keep the AMS within roughly 600 mm of the printer’s back panel, route tubes with no kinks, and push the AMS as close to the printer as you can spare the desk space for. Failure rates on slot 3/4 swaps drop to near zero with clean routing.
Loading your first spool. Open the lid, drop the spool in, cut the leader at a 45-degree angle, and push it into the slot intake until the auto-load motor grabs it. For Bambu spools, the RFID tag is read automatically and the AMS knows the brand, type, and color within a few seconds. For generic spools, mark the type and color manually, either on the printer screen or in OrcaSlicer’s Device tab.
Desiccant and drying. The original AMS has a desiccant slot at the bottom with orange beads that turn dark green when saturated. Replace or oven-recharge them if you’re somewhere humid. AMS 2 Pro and AMS HT use active drying instead. AMS Lite has nothing by design, so overnight moisture absorption on the open arms is just part of the deal.
Pairing OrcaSlicer to your Bambu printer
This is the section where I get the most questions. The pairing flow has changed twice since OrcaSlicer 2.2 because Bambu kept moving the goalposts on third-party authentication. Here’s where it stands as of early 2026.
LAN-only mode walkthrough
LAN-only mode is the path I recommend for most OrcaSlicer users. It avoids the cloud auth dance entirely, doesn’t depend on Bambu’s servers being online, and gets you full multi-color and AMS mapping with no Bambu Connect dependency. The tradeoff is you lose MakerWorld direct send and the cloud video stream.
On the printer, go to Settings, then WLAN, then enable LAN Only Mode. The screen will show your printer’s IP address and an 8-character access code. Write both down. If you’re going full LAN-only Developer Mode (which bypasses Authorization Control entirely), you’ll find that option in the same area; check the printer’s on-screen prompts.
In OrcaSlicer, open the Device tab. Choose the printer model from the dropdown, then click Bind With Access Code. Enter the IP and the access code exactly as shown. If the bind fails with a network error, the printer and your PC are probably on different VLANs or your firewall is blocking the MQTT port. Both devices need to see each other directly.
Once bound, the AMS panel renders in the Device tab. You’ll see 4 tray icons per AMS unit, each with the loaded filament’s color, type, and remaining percentage. If the printer screen shows the AMS but OrcaSlicer says “no AMS detected”, restart OrcaSlicer after the printer has fully booted. That alone fixes the issue 80 percent of the time.
For a deeper walkthrough of the LAN-only setup including the Developer Mode flow that skips Bambu Connect entirely, our Bambu Cloud vs LAN-only mode deep dive covers the full step-by-step.
Cloud mode and the Bambu Connect reality
Cloud mode signs OrcaSlicer into your Bambu account and lets it pull printer state from Bambu’s servers. You’ll need your Bambu account email and password, and the printer must already be bound to that account in Bambu Handy.
The complication is Authorization Control, which Bambu rolled out in firmware updates throughout 2025. Once your printer is on auth-controlled firmware, the actual print initiation handoff has to go through Bambu Connect, a small desktop app that runs alongside OrcaSlicer and validates the print job with Bambu’s servers. OrcaSlicer still does all the slicing, AMS mapping, and file preparation. It just hands off the final “send” call.
OrcaSlicer’s official position is that they won’t bake Bambu Connect into the slicer, but installing it separately works. After installing Bambu Connect, OrcaSlicer’s Send Print dialog will route the job through it automatically. If you’d rather avoid the extra app, the cleaner path is LAN-only Developer Mode as described above.
Verifying the AMS appears in the Device tab
Once bound, open the Device tab. You should see your printer’s name, current state, temperatures, and the AMS panel below. The AMS panel shows each slot with the color swatch, filament type label, and remaining percentage.
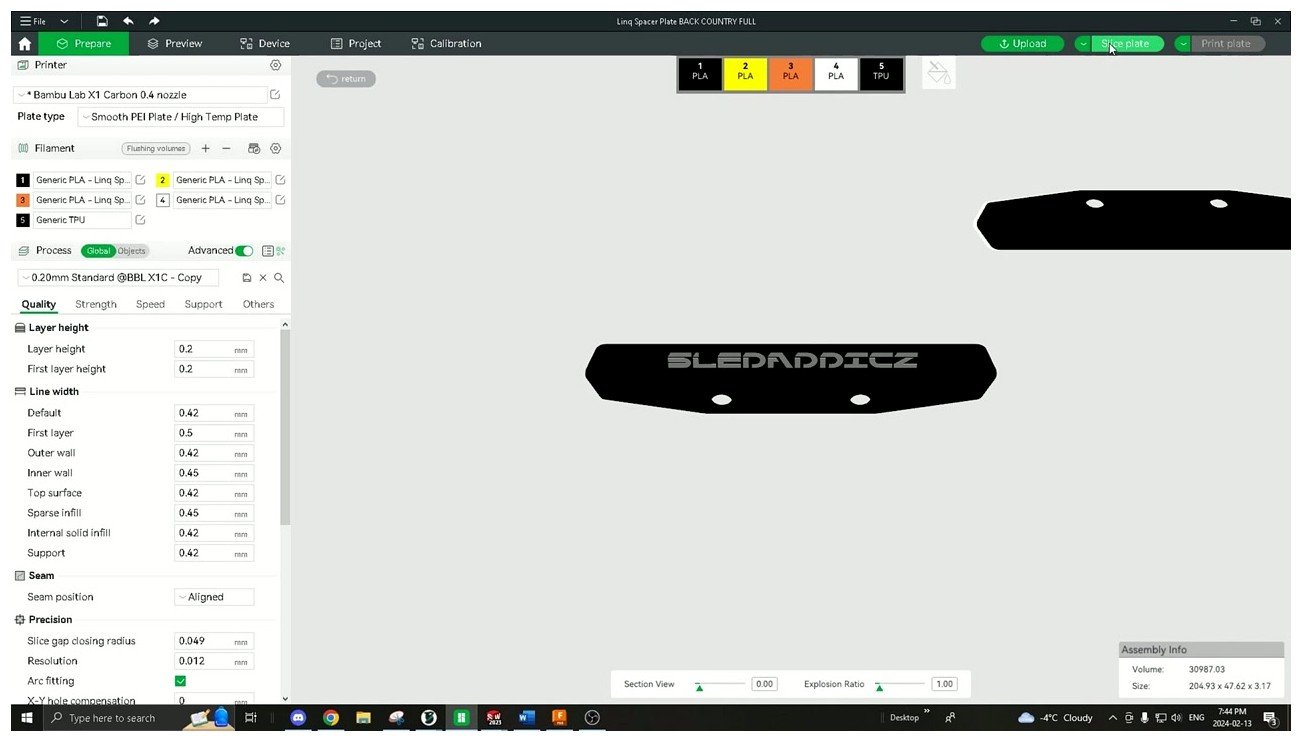
The slot row at the top of OrcaSlicer’s Prepare view, with four PLA spools and a TPU loaded in slot 5. This is what a healthy AMS pairing looks like once OrcaSlicer is talking to the printer.
If a slot shows up as empty when there’s actually filament loaded, check whether the slot is registering on the printer screen. If the printer sees it but OrcaSlicer doesn’t, force a refresh by closing the Device tab and reopening it. If it still doesn’t appear, unbind the printer and re-bind with the access code. That hard reset clears any stale MQTT subscriptions.
Your first multi-color print
I’d recommend a 2-color benchy or the official 4-color cube on MakerWorld for your first multi-color test. Both are forgiving on color contrast and let you watch the wipe tower behavior live. Don’t start with anything you actually care about printing, because you will tweak settings.
Open the model in OrcaSlicer’s Prepare view. If it’s a multi-body 3MF with each body assigned to a filament number, the colors will already be in the right slots. If it’s a single STL or you want to override colors, you have two options: assign filament numbers per body (in the right-hand panel for the selected object), or use the color painting tools in the top-left toolbar. The painting tools include Bucket fill (whole face), Brush (paintable), Smart Fill (auto-detects by face angle), and Triangle/Sphere selection.
For multi-body imports, right-clicking on a selected part lets you assign filaments per object directly. This is faster than dragging filament numbers around if you’ve got a 3MF with separate parts.
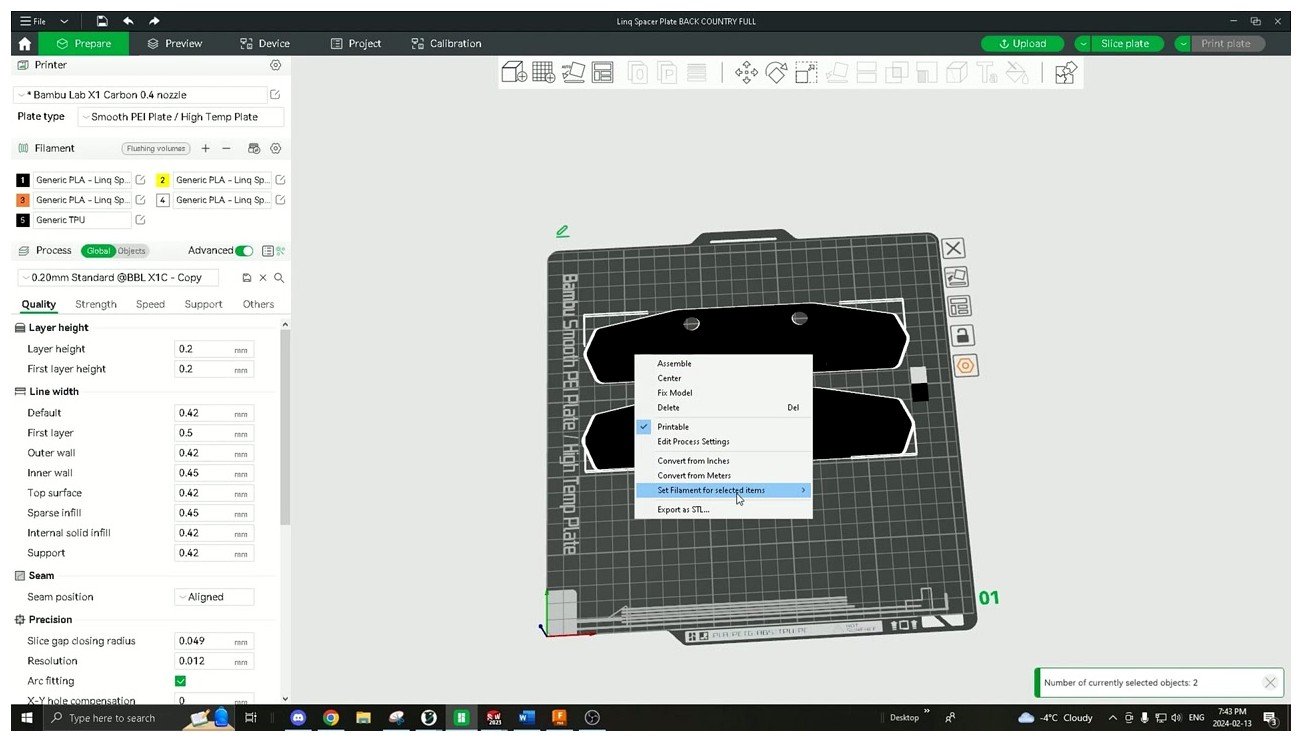
Right-clicking a selected part exposes the “Set Filament for selected items” option. This is the fastest way to assign a filament number to one or more objects in a multi-part scene without painting anything.
Before slicing, open Process settings and confirm Prime Tower (sometimes labeled Wipe Tower) is enabled. The tower is the sacrificial column where the printer flushes old filament during color changes. It’s ugly, it wastes plastic, and it’s the most reliable way to get clean color transitions on a Bambu setup. We’ll cover ways to reduce or replace it in the next section, but for your first print, leave it on.
Slice the model. In the preview, you should see the prime tower positioned away from the model, with bands of color stacked up showing each transition. If the tower is colliding with the model or sitting off the build plate, you can drag it to a better spot in Prepare view.
Open the Send Print dialog. The Map Filaments panel shows each slicer color paired to an AMS slot. If a color is unmapped (red warning icon), drag the slicer color onto the correct slot manually. The slicer will try to auto-match by name, then by type, then by color, but contrast-similar swatches sometimes get mismapped. Always glance at the mapping before hitting send.
Send the print. Watch the first 3 layers. If the printer cancels at minute 5 with “Failed to get AMS mapping table”, you’ve hit a known Bambu Connect handshake bug. Kill Bambu Connect, restart OrcaSlicer, and re-send. If it keeps happening, switch to LAN-only Developer Mode and skip Bambu Connect entirely.
If you want to walk through your very first print step by step including bed prep and slicer profile selection, the first print walkthrough covers the basics.
Flush volumes and purge towers
Flush volumes are where multi-color printing turns from “fun gimmick” into “actual usable workflow”. The defaults are conservative because Bambu would rather you waste filament than print muddy colors. Once you calibrate, you can usually cut purge waste by 30 to 50 percent without losing color quality.
Where to find the flush volume matrix
In OrcaSlicer, go to the Project menu, then Filaments, then click the Flushing Volumes button at the top of the Filaments panel. (The UI shape is the same as Bambu Studio’s, so if you’ve used that, you’re already familiar.)
The dialog opens a matrix where rows represent the “from” filament and columns represent the “to” filament. Numbers are in mm of 1.75 mm filament, which works out to roughly 2.4 mm³ of plastic per mm. There’s been long-running confusion in the community about whether the row or column is the source. As of OrcaSlicer 2.3.1, the convention is row equals “from this filament” and column equals “to this filament”. Read the labels carefully if you’re tweaking individual cells.
What the defaults actually mean
I’m going to give ranges here rather than exact numbers because the defaults shift between OrcaSlicer builds and depend on which printer profile you’ve loaded. The general shape is consistent.
Same color, same filament type: the slicer uses a small same-color flush, typically under 100 mm. PLA-to-PLA different colors: the default is somewhere in the low hundreds, scaling with color contrast. PLA to PETG and PETG to PLA cross-material transitions sit around 280 mm of filament for cross-color transitions. Forum users widely report that the cross-material default is too low for clean PETG over PLA and recommend bumping it up to 480 to 680 mm.
Dark to light transitions almost always need 1.5x to 2x the inverse direction. White over black needs a much bigger purge than black over white. The auto-calculate feature uses a color contrast formula plus a multiplier; Bambu’s recommended multiplier is 0.5 on the X1 and P1 series and 0.65 on the A1 series. Going lower than those numbers risks color contamination, which shows up as a thin band of the previous color bleeding into the new one for the first few mm of fresh filament.
Calibration via MakerWorld
The shortcut to dialing in your real numbers is the MakerWorld Flushing Volumes Calibration model. Print it with your actual color combinations and read off the smallest purge that gives you clean transitions. After that, plug those numbers into your matrix and save the calibrated values into your filament profiles.
This is honestly the highest-ROI calibration you can do on a multi-color setup. A 30 percent reduction on default flush volumes saves serious filament across a few hundred prints, and you only have to do it once per filament combination. Our calibration guide has the broader workflow.
Wipe tower vs purge to infill vs purge to object
You have three ways to handle purge waste, and they’re not mutually exclusive.
Wipe tower (or prime tower). A separate sacrificial column that catches all the flush filament. Most reliable, biggest waste. Default for most Bambu profiles.
Purge to infill. Under Multi Material settings, enable “flush into infill”. The slicer routes flush filament into the model’s interior infill path, which becomes invisible after the print finishes. Reduces waste by 30 to 60 percent depending on how dense your infill is. Works best when you have a lot of solid infill volume to absorb the flush.
Purge to object. Pick a separate sacrificial object on the build plate that catches the purge. Useful when you want to print something genuinely useful as a “purge sponge” alongside the main model.
For best waste reduction, combine them: keep a small prime tower as a safety net (set the brim to 0 and reduce the width to roughly 30 mm) and enable purge to infill. The Bambu forum recommends this exact combo, and I’ve been running it on my X1C for the better part of a year with no issues. If you want a deeper dive into tower geometry and the new RIB tower in 2.3.1, our wipe and prime tower guide goes into more detail than we have room for here.
RFID, filament profiles, and generic spools
Bambu’s RFID-tagged spools are the part of the AMS ecosystem that most clearly has not been replicated elsewhere. When you insert a Bambu spool, the AMS reads the tag, the printer screen shows the brand and color, and OrcaSlicer’s Device tab updates within a few seconds.
The RFID tag stores filament type, color (as a hex value), recommended print temperature range, recommended bed temperature, recommended flow ratio, and on the AMS 2 Pro and AMS HT it also stores drying time and the last-dried timestamp. That’s how the printer knows when a spool is overdue for a drying cycle.
OrcaSlicer’s filament mapper uses a three-tier matching algorithm: it tries to match the AMS slot to a slicer filament by exact profile name first, then by type, then by color. So if you have a Bambu PLA Basic spool loaded and your slicer project has a “Bambu PLA Basic” profile, the mapping is automatic. If the names don’t match exactly, it falls back to type and color, which usually still works but sometimes asks you to confirm.
Generic and non-Bambu spools
Generic spools have no RFID, so you mark them manually. Two ways to do it: either tap the slot on the printer screen, choose Edit, and pick from the preset list (Generic PLA, Polymaker PLA, eSun PETG, Hatchbox, Overture, etc.), or open the slot from OrcaSlicer’s Device tab and choose Edit Filament.
The OrcaSlicer Device tab path is more reliable because it writes the slot configuration via MQTT, and that setting persists across power cycles. The printer-screen path occasionally loses the selection after a reboot, which is a long-running annoyance documented in Issue #3874.
For mixed-material setups (PLA in one slot, ABS in another), the slot row in OrcaSlicer reflects the assigned types and the slicer’s Map Filaments dialog respects them. Here’s a real example with PLA Basic and ABS sharing the same AMS:
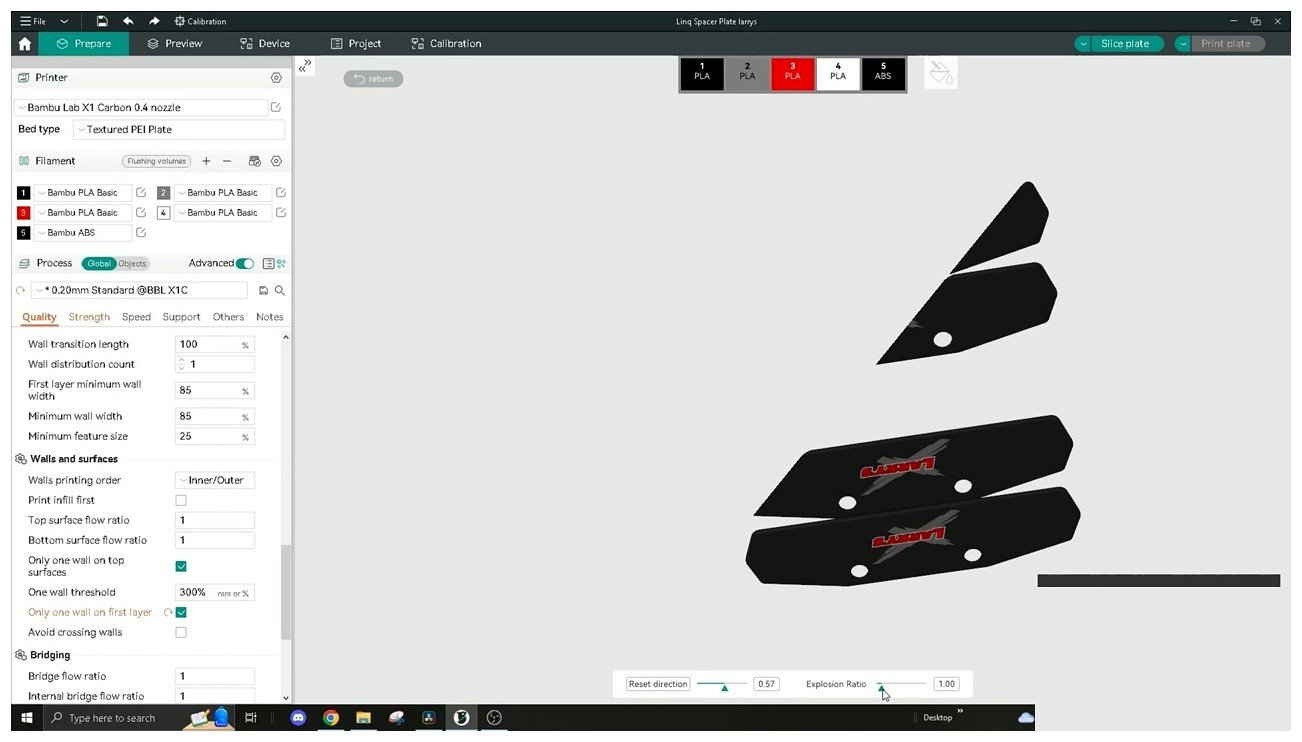
A multi-filament setup with PLA Basic and ABS loaded in adjacent AMS slots. Cross-material transitions like this benefit from a hand-tuned flush volume rather than the default; the auto-calculate value tends to under-purge on the ABS-to-PLA direction.
Custom filament profiles for the AMS
If you have a generic spool that isn’t in the preset list (or you want to set custom temperatures and flow ratio for an existing brand), create a new profile in OrcaSlicer’s Filament Settings by cloning Generic PLA or Generic PETG, then editing temps, flow, and any other parameters.
One gotcha: for the new profile to be selectable on the AMS slot menu, the filament_id in the profile JSON must be 8 characters or fewer. This is a Bambu protocol limitation, not an OrcaSlicer limitation. If you create a profile with a longer ID and don’t see it on the slot menu, that’s why. Save, restart OrcaSlicer, and the new profile will show up. Our filament settings reference has the full profile editing guide.
TPU on the AMS
This is the special case that catches new owners off guard. Standard TPU (Shore 95A and softer) cannot run through the original AMS or AMS 2 Pro reliably. The bowden curves and the AMS feed mechanism deform soft filament, leading to slot jams that are a nightmare to clear.
“Bambu TPU for AMS” is a stiffer formulation specifically designed to survive the AMS path. It’s the only TPU Bambu officially supports through the AMS units. The AMS Lite goes further and warns against any flexible material in its FAQ, even Bambu’s own TPU for AMS, because the open-arm path doesn’t constrain the filament well enough.
If you want soft TPU on a Bambu printer, run it from the external spool holder on the back, not through the AMS. The AMS Lite owners get the easiest external-spool experience because the A1 already has a back-mount spool holder out of the box.
Multi-color workflow tricks
Once you’ve got the basics working, there are a handful of tricks that turn multi-color from “ok this works” into “I can actually print whatever I want”.
5 colors on a 4-slot AMS. Three viable approaches. First, OrcaSlicer 2.3.1 added a color remap feature that lets you collapse two similar colors into one before slicing. Pick the two closest colors and merge them. Second, use the external spool slot for the 5th color and let the printer pause and prompt you to load the external spool when needed. Third, the classic pause-and-swap: load 4, pause when filament 5 is needed, manually unload one slot and load the new color, resume. Each approach has tradeoffs but the external spool path is the cleanest for one-off 5-color prints.
Per-object filament assignment. The right-click menu shown earlier is the fastest way to assign different filaments to different objects on the same plate. Combine this with sequential print mode to eliminate per-layer color changes entirely; the printer finishes one part fully before moving to the next, with zero flush waste between parts.
First-layer filament order. By default, the slicer picks the first-layer filament based on the lowest filament number used. Override this in Plate Settings to force the first layer in a known-good filament for bed adhesion before swapping to weirder colors for the rest of the model.
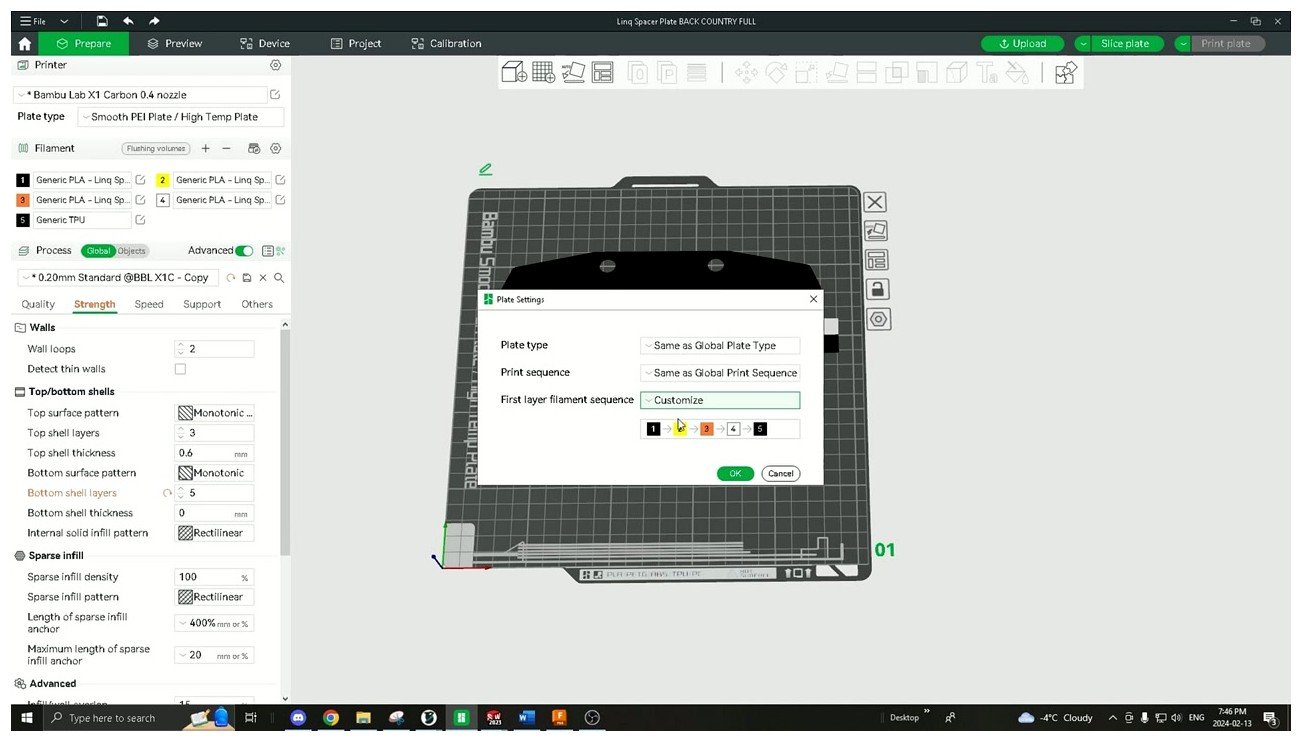
The Plate Settings dialog includes a first-layer filament sequence customizer. Forcing the first layer to print in your most reliable filament avoids the situation where a finicky color or material fails the first-layer adhesion check and tanks the entire print.
Color painting workflow. The painting tools in the top-left toolbar (Brush, Bucket, Smart Fill) let you color a single STL with multiple filaments without splitting the file into separate bodies. Smart Fill is great for low-poly models, Brush for organic shapes.
For more on the multi-color workflow including manual filament change patterns that don’t require an AMS at all, the M600 manual filament change guide covers the prompt-based approach.
Common AMS plus OrcaSlicer problems and fixes
I’ve collected the most common AMS-related issues from the OrcaSlicer GitHub tracker and Bambu forum threads. Here’s the quick-fire list with what actually fixes each one.
OrcaSlicer not detecting AMS. Most common cause is that OrcaSlicer was opened before the printer finished booting. Restart OrcaSlicer once the printer is fully up. If it persists, unbind and re-bind with the access code. If it still doesn’t work, check that your PC and printer are on the same subnet.
“Failed to get AMS mapping table” five minutes into the print. Bambu Connect handshake bug from Issues #10588 and #10718. Kill Bambu Connect, restart OrcaSlicer, re-send. If it keeps happening, switch to LAN Developer Mode.
Filament tangles after slot 3 or 4. Almost always a PTFE tube routing issue. Slots 3 and 4 use longer tubes that bend more easily. Keep the AMS within roughly 600 mm of the printer and route tubes with no kinks.
AMS humidity sensor reads wrong. Right after a drying cycle, RH temporarily spikes as the AMS cools. Wait 30 to 60 minutes. If AMS 2 Pro readings are stuck low regardless of conditions, that’s a known calibration drift; check for an AMS firmware update.
Print pauses mid color change. Caused by the slicer’s pause-on-layer feature being mis-applied as a color change. Community fix is to add M400 U1 in custom filament-change G-code.
Filament not loading from AMS after sending the print. Bed and nozzle reach temp, then nothing happens. OrcaSlicer 2.3.1 plus Bambu Connect handshake bug (Issue #10836). Restart Bambu Connect and resend, or switch to LAN Developer Mode.
AMS slot 3 spool stuck. Usually the spool is binding inside the AMS rather than a software issue. Loosen the spool, make sure it can spin freely.
OrcaSlicer forgets X1C access code. Long-running issue (#6169) fixed in 2.3.0. If you’re on an older build, upgrade.
AMS Lite slot 4 not detecting filament. Often a contaminated filament sensor. Clean with isopropyl on a cotton swab.
Custom filament selection doesn’t save. Set the filament from OrcaSlicer’s Device tab rather than the printer screen. The MQTT command path persists; the printer-screen UI sometimes doesn’t.
If your specific issue isn’t here, our master troubleshooting guide has a wider symptom-to-fix lookup.
AMS for non-Bambu printers
Honest answer: not officially, and the workarounds are flaky.
Bambu’s AMS communicates with the printer over a proprietary serial protocol that’s never been publicly documented. Community projects have reverse-engineered enough of the protocol to drive an AMS from a Klipper or Marlin printer using a microcontroller bridge, but as of 2026 it’s hobbyist-level rather than turnkey. Search GitHub for “AMS adapter Voron” or similar if you want to dig into it.
The AMS Hub is just a passive multiplexer for chaining multiple AMS units to one X1 or P1. It doesn’t turn the AMS into a standalone unit you can drive from a non-Bambu printer.
For users who want AMS-style multi-color on a non-Bambu printer, the practical paths are 3DChameleon, ERCF (Enraged Rabbit Carrot Feeder), Box Turtle for Voron, or the SMuFF. None of these are AMS, but all are mature and supported by OrcaSlicer’s MMU profiles. If you’ve gone deep enough into 3D printing to be considering one of these, you probably already know the tradeoffs.
AMS 2 Pro and AMS HT in OrcaSlicer specifically
OrcaSlicer 2.3.1 added full support for both the AMS 2 Pro and the AMS HT. Slot mapping, RFID readout, and color assignment all work the same way as the original AMS. The new piece for both units is drying control surfaced in the slicer.
For AMS 2 Pro, the Device tab exposes a drying control that lets you start a drying cycle directly from OrcaSlicer rather than from the printer screen. After a cycle finishes, the AMS logs the timestamp on each Bambu spool’s RFID tag so the printer knows when it’s due for another cycle.
The AMS HT is a single-spool unit with a higher temperature ceiling and a stronger heater designed for engineering filaments like PA-CF and PC. It shows up as a single-slot AMS in the Device tab. One known bug to flag: P1S printers with an AMS HT have reported intermittent print stalls (Issue #11498). Workaround is keeping firmware current and running cloud mode rather than LAN Developer Mode for those specific prints.
For mixed setups with multiple AMS 2 Pro units and AMS HT units chained on an H2D, OrcaSlicer treats the whole chain as one logical AMS surface. You drag colors onto whichever slot you want and the slicer routes each filament from the correct physical unit automatically.
When Bambu Studio still wins
I’m not going to pretend OrcaSlicer is the better choice for everyone. There are genuine reasons to keep Bambu Studio installed alongside OrcaSlicer, and on certain workflows Bambu Studio is the right answer.
MakerWorld direct send. If you live on MakerWorld pulling down community models, Bambu Studio’s “Send to Printer” button on a MakerWorld page is one click. With OrcaSlicer you download the 3MF, open it in OrcaSlicer, then send. Not a deal-breaker, but a real friction point if you print 5 community models a day.
Cloud video stream and Bambu Handy integration. Bambu Studio’s connection to the Bambu Handy mobile app and the cloud video stream are smoother than anything OrcaSlicer offers. If you check on prints from your phone constantly, Bambu Studio plus Handy is better.
Multi-printer fleet management. If you run 3 or more Bambu printers, the Bambu Studio fleet view is genuinely useful. OrcaSlicer’s Device tab handles one printer at a time well but isn’t designed for fleet workflows.
RFID auto-flow. When you swap a Bambu spool in mid-job, Bambu Studio picks up the change a beat faster than OrcaSlicer because it shares Bambu’s MQTT plumbing more directly. OrcaSlicer gets there too, just with a slight lag.
Where OrcaSlicer wins is flexibility, third-party filament profile depth, finer flush tuning, more calibration tools, and a community-driven update cycle that ships features Bambu hasn’t gotten to yet. The honest play is to install both. Use OrcaSlicer for slicing and per-print tuning, and keep Bambu Studio around for MakerWorld send and Handy connectivity. The OrcaSlicer vs Bambu Studio comparison goes deeper into the feature-by-feature breakdown if you want to commit to one.
FAQ
Does OrcaSlicer support the AMS on every Bambu printer? Yes for X1C, X1E, P1S, P1P, P2S, A1, A1 Mini, and H2D. AMS HT support is in OrcaSlicer 2.3.1 with a known P1S stall bug being tracked.
Do I need Bambu Connect? Only if your printer is on Authorization Control firmware and you want to print over cloud mode. LAN Developer Mode skips it. Slicing and AMS mapping always work in OrcaSlicer regardless.
Can I run TPU through my AMS? Only “Bambu TPU for AMS” (Shore 68D, stiffer formulation). Standard soft TPU will jam. AMS Lite owners should use the external spool holder for any TPU.
How many colors can I print at once? 4 per AMS unit. With AMS Hub on X1/P1, up to 4 units chained for 16 colors. Mixed AMS 2 Pro plus AMS HT setups on H2D support around 24 channels. AMS Lite is single unit, max 4 colors.
Why is my purge waste so high? Default flush volumes are conservative. Run the MakerWorld calibration model; 30 to 50 percent reductions are realistic. Enable purge to infill alongside a small prime tower.
Can I use my AMS with PrusaSlicer or Cura? No. Only Bambu Studio and OrcaSlicer drive the AMS as of 2026.
Wrapping up
Getting OrcaSlicer talking to a Bambu AMS is a 20-minute job once you know the path. The hard part is knowing which path to take. If you’re on a recent firmware and want zero friction, install Bambu Connect and use cloud mode. If you want to skip the cloud entirely and don’t need MakerWorld direct send, LAN-only Developer Mode is the cleaner long-term setup.
Once you’re paired, the AMS surfaces in OrcaSlicer’s Device tab and your multi-color workflow lives in the Map Filaments dialog and the Flushing Volumes matrix. Spend an hour calibrating your flush volumes for the colors you actually use, enable purge to infill alongside a small prime tower, and you’ll be cutting purge waste by a third or more on every print.
For the broader picture across every printer brand, head back to our multi-color pillar guide, or check the settings master guide for OrcaSlicer’s full configuration map. If you’re brand new and just trying to get a single-color print out the door first, the download page has the latest stable build with install notes for every platform.
Related OrcaSlicer guides
- OrcaSlicer for Bambu Lab X1C, X1E and P1S: Setup, Profiles & Calibration
- OrcaSlicer for Bambu Lab H2D: Setup, IDEX Modes and AMS
- OrcaSlicer for Bambu Lab P1S / P1P – Complete Setup Guide (2026)
- OrcaSlicer for Bambu Lab A1 & A1 Mini: Setup, AMS Lite, Calibration
- OrcaSlicer System Requirements: GPU, RAM, OpenGL Explained