Half the multi-color tutorials online assume you bought an AMS. I’m running an Ender 3 V3 SE that cost less than the AMS Lite alone, and I do clean two-color prints every week using nothing but a single line of G-code. M600 is the trick, but the firmware story is messier than anyone tells you, and OrcaSlicer has its own quirks on top.
This guide is the long version of what I wish someone had handed me two years ago. I’ll walk through what M600 actually is, which printers respond to it out of the box, which ones need a macro or a firmware flash, and exactly where to click in OrcaSlicer to make it all work. I’ll also be honest about when an AMS is genuinely the better answer, because for some workflows it is.
Table of contents
- What is M600 and what does it actually do
- Does your printer even support M600?
- OrcaSlicer setup: pointing the slicer at your M600
- Technique A: a single color change at one layer
- Technique B: full multi-color with painted regions
- Klipper M600 macro, line by line
- Enabling M600 on Marlin (Ender 3 etc.)
- What happens at the printer when M600 fires
- Common mistakes and how to fix them
- M600 vs AMS vs prime tower
- Bambu A1 / A1 Mini without AMS: the special case
- FAQ
What is M600 and what does it actually do
M600 is a Marlin G-code that triggers a filament change pause. The official Marlin documentation puts it plainly: “the basic procedure will move the print head away from the print, eject the filament, wait for new filament to be inserted and the user to confirm, load and prime the filament, and continue with the print.” That’s the whole pitch. One line in your sliced file, and the printer stops cleanly so you can swap colors.
The catch is that M600 is a Marlin command. Other firmwares either reimplement it, ignore it, or replace it with something completely different. That’s where most of the pain comes from. People drop M600 into a gcode file, watch their printer plow straight through it, and conclude that OrcaSlicer is broken. It isn’t. The slicer is doing its job. The firmware just doesn’t speak that dialect.
The Marlin recipe, step by step
When a properly configured Marlin board hits an M600 line, here’s what happens in order:
- Retract by
PAUSE_PARK_RETRACT_LENGTH(or by theEparameter you pass) so molten filament doesn’t ooze. - Park the head, moving to the X/Y coordinates set by
NOZZLE_PARK_POINTwith a configurable Z lift on top. - Unload by
FILAMENT_CHANGE_UNLOAD_LENGTH, which is typically around 100 to 120mm for Bowden setups and roughly 50mm for direct drive. - Beep and prompt on the LCD: “Insert filament and press to continue.” The number of beeps comes from
FILAMENT_CHANGE_ALERT_BEEPS. - Wait for you to load the new spool and click the encoder.
- Load by
FILAMENT_CHANGE_FAST_LOAD_LENGTH, then prime byFILAMENT_CHANGE_SLOW_LOAD_LENGTH. - Purge loop: the printer asks “More purge?” until you say no.
- Return to the original X/Y/Z and resume extrusion.
You can override almost any of those values inline. M600 X10 Y15 Z5 parks at X10 Y15 with a 5mm Z lift, for example. The full parameter list (per the Marlin docs) covers T (tool index), E (initial retract), U (unload length), L (load length), X/Y/Z (park position), B (beep count), and R (resume temperature). For 95% of single-extruder workflows you’ll never touch any of them. Bare M600 just works, assuming the firmware supports it.
How Klipper handles it (it doesn’t, until you add the macro)
Klipper has no native M600 because M600 is Marlin’s invention. Drop it into a gcode file on a stock Klipper printer and you’ll get an “Unknown command” error in the console while the print continues underneath it. To make it work you need to define a [gcode_macro M600] block in printer.cfg, and you also need [pause_resume] enabled. The Klipper team ships a sample in config/sample-macros.cfg in the official repo. I’ll walk through that whole file later in the article.
How Bambu handles it (it doesn’t, period)
Bambu firmware is the awkward one. The X1, P1, A1, and A1 Mini all use Bambu’s own AMS-flavored toolchange codes (community-reverse-engineered as M620 and M621) and they don’t reliably respond to bare M600. Multiple Bambu Lab forum threads confirm this: people insert M600, the printer ignores it, the print continues. If you’re on a Bambu without an AMS you have to use the slicer’s pause workflow with custom Bambu-specific gcode. There’s a section near the end of this article that covers that path.
Does your printer even support M600?
Before you spend an hour configuring OrcaSlicer, run a five-second sanity check on your firmware. The matrix below is what I’ve confirmed against firmware docs and forum posts.
| Firmware | M600 native? | Setup needed |
|---|---|---|
| Marlin 2.x stock (Ender 3 etc.) | Usually no | Uncomment ADVANCED_PAUSE_FEATURE in Configuration_adv.h and reflash |
| Marlin 2.x with ADVANCED_PAUSE_FEATURE | Yes | None beyond the flash. LCD recommended for the press-to-continue prompt |
| Klipper | No | Add [pause_resume] and a [gcode_macro M600] to printer.cfg |
| RepRapFirmware (Duet) | Yes, configurable | Create /sys/filament-change.g, otherwise it falls back to pause.g |
| Prusa firmware (MK3, MK4, Mini, XL) | Yes | Nothing. Best-supported implementation out there |
| Bambu firmware (X1, P1, A1, A1 Mini) | No | Use Bambu Studio / Orca pause feature with community workaround gcode |
| Stock Creality Klipper (K1, K1 Max, K1C) | No | Install Creality Helper Script or write your own M600 macro |
| Stock Creality Marlin (Ender 3, V2, Pro 4.2.7) | No | Flash a community Marlin build with the pause feature enabled |
| Ender 3 V3 SE / V3 KE / V3 | No | Creality-modded Klipper. Same fix path as standard Klipper, or use the slicer’s PAUSE |
The fastest test I know is to write a five-line gcode file by hand:
G28
G1 Z20 F1500
M600
G1 Z40 F1500
M104 S0
Send that to your printer. If it homes, lifts, then pauses and beeps, your firmware understands M600. If it homes, lifts, lifts again, and turns the heater off without ever stopping, your firmware doesn’t. No need to slice an actual model and waste filament finding out.
OrcaSlicer setup: pointing the slicer at your M600
OrcaSlicer doesn’t generate M600 by itself. It generates whatever string you put in the “Change filament G-code” field. Once you’ve confirmed your firmware speaks M600, you’re going to tell Orca to inject that string at every color boundary.
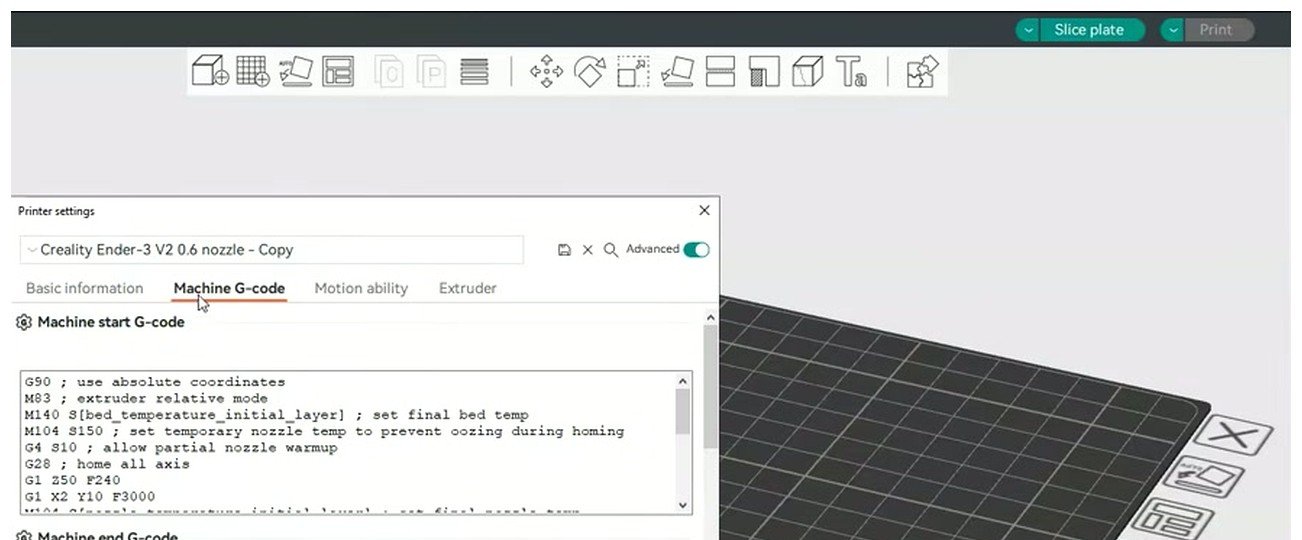
The Machine G-code panel inside Printer Settings is where Orca stores all the firmware-level snippets that get baked into your sliced files.
Open the printer profile by clicking the small wrench icon next to your printer name in the right panel, then switch to the Machine G-code tab. You’ll see a column of fields: Machine start G-code, Machine end G-code, Before layer change G-code, and a few rows down, Change filament G-code. That last one is the field you care about for this whole article.
For Marlin and Prusa printers, a single M600 in this field is all you need. Klipper users typically put M600 here too, with the supporting macro in printer.cfg.
What you type depends on your firmware. For Marlin with the pause feature enabled, Prusa, and Klipper with a macro defined, just put:
M600
For Klipper without an M600 macro, you can use the bare PAUSE command instead:
PAUSE
The Marlin docs confirm M600 is the right thing to inject for any Marlin-flavored firmware that has ADVANCED_PAUSE_FEATURE enabled. The Klipper sample-macros.cfg confirms PAUSE works on its own once the [pause_resume] module is loaded.
Enable Manual Filament Change
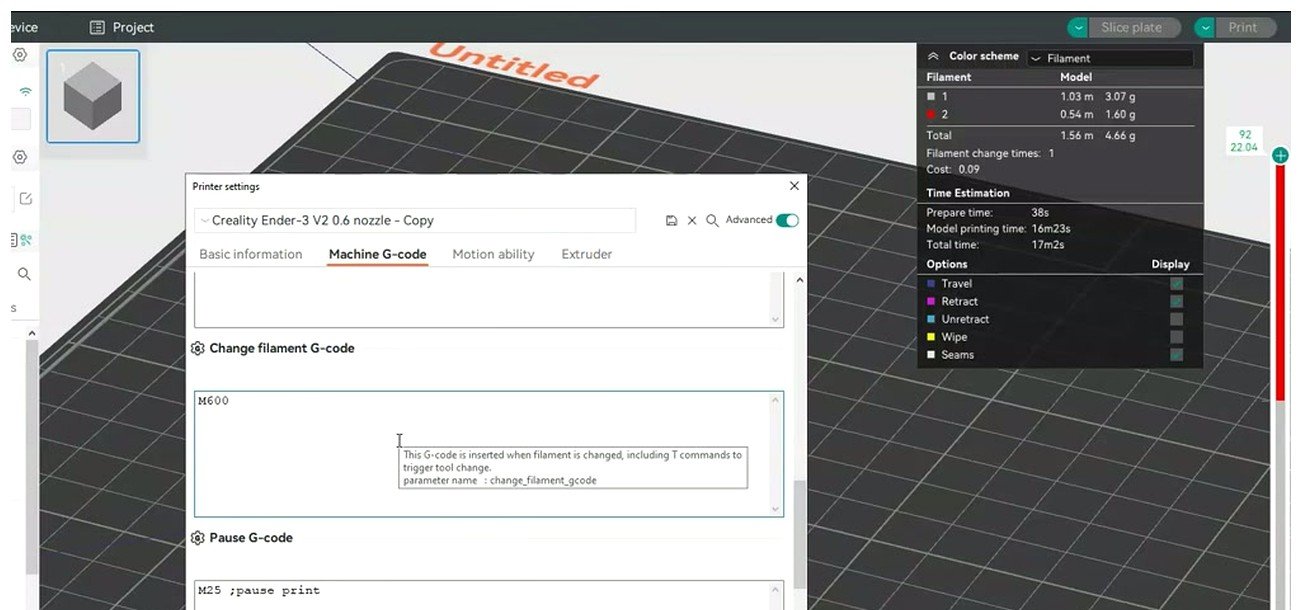
Still in Printer Settings, switch to the Multimaterial tab. Find the Manual Filament Change toggle and turn it on. This single switch tells OrcaSlicer that your printer doesn’t have an AMS or a toolchanger, so any color transitions should fire your Change filament G-code instead of trying to issue an automated tool swap. Without it enabled, the slicer can either skip the color changes entirely or insert the wrong codes.
While you’re there, decide whether you want a prime tower. For a single-color change at one layer it’s overkill. For full multi-color prints with painted regions, a prime tower keeps the first few millimeters of the new color off your part, which matters a lot when you go from black to white. There’s a separate guide on wipe and prime tower setup if you want the deep dive.
Save the printer profile (Ctrl+S, or the floppy icon at the top of the printer dropdown). If you skip the save you’ll lose the change as soon as you switch projects, which is the kind of small thing that wastes a whole afternoon if you don’t notice.
Technique A: a single color change at one layer
This is the workflow I use most. A name plate where the letters pop in red on a black base. A benchy with a different color top hat. A logo on a tool box where the recessed text is one color and everything else is another. One swap, one layer, done.
Here’s the click path inside OrcaSlicer:
- Add at least two filament profiles in the Filament panel on the left sidebar. Even if you only physically own one spool, you need two slots defined or Orca won’t know there’s a color transition to mark.
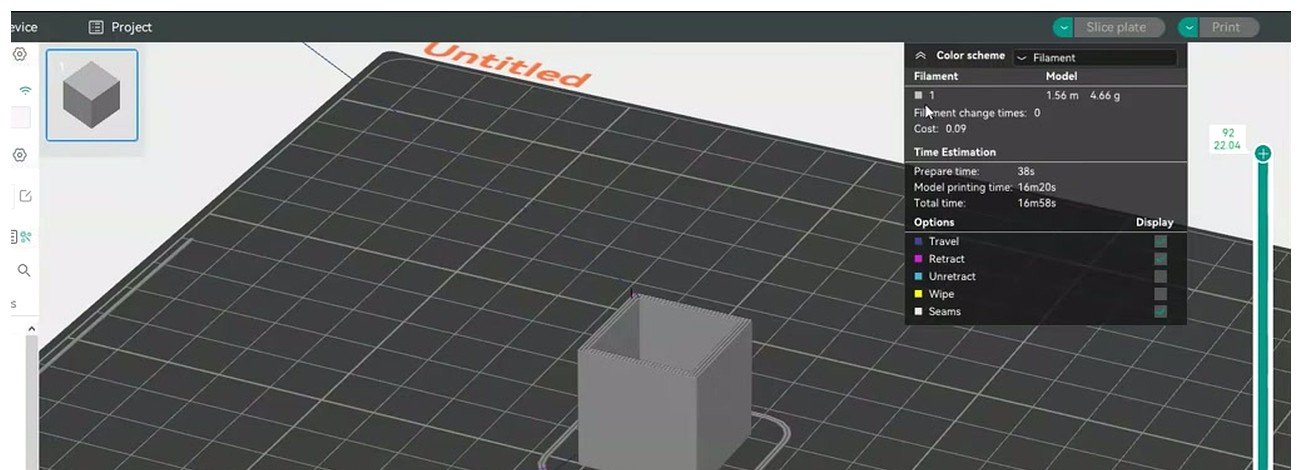
- Slice the model normally with Ctrl+R or the Slice Plate button.
- Click into the Preview tab at the top center of the screen.
- On the right edge of the preview window you’ll see a vertical layer slider with two range handles. Drag the upper handle to the layer where you want the color change.
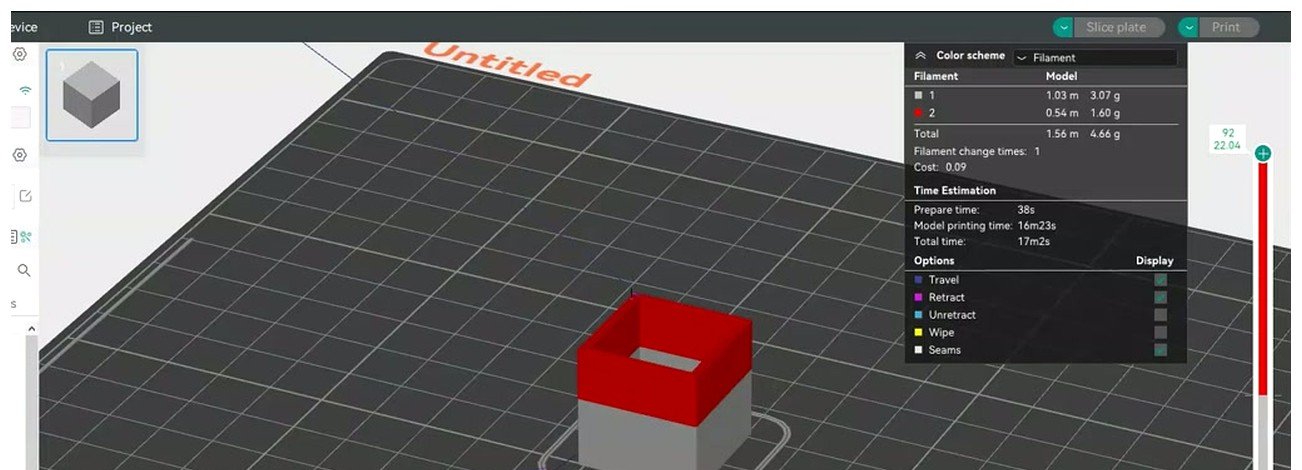
- Right-click on the slider track at that height. The slider track is the green or orange bar, not the handle itself.
- Pick Add color change from the context menu. A small colored dot appears on the slider at that layer.
- Re-slice. OrcaSlicer injects your Change filament G-code at the start of that layer in the exported file.
The preview pane after slicing. The vertical slider on the right edge is where you right-click to inject color changes. Right-click on the bar, not on the round handle.
One thing the official wiki doesn’t tell you: the slider is a little jumpy. When you right-click, it often snaps to a different layer than the one you wanted. I’ve trained myself to click first, then nudge with the scroll wheel until the layer counter reads what I want, and only then open the context menu again. It’s a small UX papercut but it’ll save you an hour of “why did this print at layer 39 instead of 40.”
What the exported gcode actually looks like
If you’re curious (or paranoid, like me), open the exported .gcode in any text editor and search for ;LAYER_CHANGE. Around the layer where you set the color change, you’ll find a block that looks roughly like this:
;LAYER_CHANGE
;Z:8.0
;HEIGHT:0.2
M600
G1 Z8.0 F1500
G1 X110 Y110 F9000
G1 E0.8 F1800
;TYPE:External perimeter
G1 X110.4 Y110.4 E0.012 F1500
That M600 line is what the slicer added because of your right-click. Everything else is normal layer-start gcode. If you ever need to add or remove a color change after slicing, you can just open the file and edit it manually. Sometimes that’s faster than going back to the slider.
After re-slicing with the color change applied, the preview renders the upper layers in your second filament’s color. This is your sanity check before you hit Print.
The issue #4118 ooze trap
Orca historically inserts the M600 at the end of the previous layer rather than at the start of the new one. That sounds like a hair-splitting distinction, but the practical effect is that after the swap completes, the head returns from the park position to the end of the old layer (not the start of the new one), then has to travel across the print to begin the next layer. That travel oozes the new filament across your print surface.
It’s documented as GitHub issue #4118, closed as “not planned.” There’s no slicer-level fix. The workaround that works for me is to set the print order so inner walls or infill print first on the new color, so any travel ooze gets buried under perimeters. If your part has a smooth visible top surface where the change happens, just accept that the first few mm of the new color may be slightly imperfect, or commit to a prime tower.
Technique B: full multi-color with painted regions
If you want a single change point, technique A is enough. If you want full painted regions (think a Hueforge-style portrait, or a logo with multiple colored zones across multiple layers), you’ll lean on Orca’s color-painting tool plus the same M600 plumbing.
The flow:
- Add as many filament profiles as you have colors. For a 3-color print, define 3 filaments in the Filament panel. They don’t have to match your physical spools yet, just placeholder slots with distinct colors.
- Select your model in the model view. In the left toolbar there’s a multi-material color brush icon (palette / paint bucket style). Click it.
- Pick filament 2, paint the regions of the model you want in that color. Switch to filament 3, paint those regions. Repeat.
- Slice. Orca walks the layers and inserts your Change filament G-code every time the active filament changes from one layer to the next.
- At the printer, every M600 will pause and wait for you. With four colors and twenty changes, you’ll be there for hours. There is no way around this without an AMS.
This is also where I’ll be honest: if you’re doing genuine 4-color prints regularly, the math starts favoring the AMS. Reading 20 pause prompts and swapping spools every 8 minutes for a 3-hour print is a chore. If that’s your workflow week in and week out, the Bambu AMS workflow exists for a reason. M600 is for hobbyists, occasional swaps, calibration parts, name plates, and the kind of thing where you’re at the printer anyway.
For a 2-color print where the second color appears at one or two layer transitions, M600 wins on cost (it’s free), waste (basically zero if you skip the prime tower), and simplicity. For a print where colors are interleaved every other layer, the AMS wins on convenience.
Klipper M600 macro, line by line
If you’re on Klipper, the slicer setup above isn’t enough by itself. You need a macro in printer.cfg that defines what M600 should do. The official Klipper sample lives at klipper/config/sample-macros.cfg in the project repo. Here it is verbatim:
[pause_resume]

[gcode_macro M600]
gcode:
    {% set X = params.X|default(50)|float %}
    {% set Y = params.Y|default(0)|float %}
    {% set Z = params.Z|default(10)|float %}
    SAVE_GCODE_STATE NAME=M600_state
    PAUSE
    G91
    G1 E-.8 F2700
    G1 Z{Z}
    G90
    G1 X{X} Y{Y} F3000
    G91
    G1 E-50 F1000
    RESTORE_GCODE_STATE NAME=M600_state
Save that block somewhere in your printer.cfg (or in an included file), then run FIRMWARE_RESTART from the Mainsail or Fluidd console. That’s it. Now Klipper understands M600. Drop it in a gcode file or have OrcaSlicer inject it via Change filament G-code, and the macro will fire.
Here’s what each line is doing:
[pause_resume]. This is a Klipper module declaration. Without it, the PAUSE and RESUME commands are no-ops. You only need to declare it once anywhere in your config.[gcode_macro M600]. Declares the macro. The name is what gets matched: when Klipper parses anM600line in a gcode file, it runs this block.- The three
{% set ... %}lines are Jinja templating. They let you call M600 with optional X, Y, and Z parameters, with defaults of 50, 0, and 10 if you don’t pass anything. SoM600 X100 Y100would park at X100 Y100 instead of the defaults. SAVE_GCODE_STATE NAME=M600_state. Snapshots positioning mode, extruder mode, fan state, all of it. Lets you restore everything cleanly later.PAUSE. Calls the pause_resume module’s PAUSE command, which is what flags the print as paused so RESUME later does the right thing.G91. Switch to relative positioning so the next move is interpreted as offsets, not absolute coordinates.G1 E-.8 F2700. Small initial retract of 0.8mm at 45 mm/s to drop hotend pressure and stop ooze.G1 Z{Z}. Z lift by the parameter value (default 10mm). The nozzle clears the print.G90. Back to absolute positioning so the park move is interpreted correctly.G1 X{X} Y{Y} F3000. Move to the park position (default X50 Y0).G91. Back to relative.G1 E-50 F1000. Long retract: pull 50mm of filament out at ~16 mm/s. This drags the filament out of the hotend and back past the extruder gears for a direct drive setup. Bowden printers need a longer value here, typically -120 or -150mm depending on PTFE tube length.RESTORE_GCODE_STATE NAME=M600_state. Restores the saved state. The actual restore of position takes effect after RESUME, because PAUSE blocks execution at the PAUSE line.
One thing to note: this sample macro UNLOADS the old filament but doesn’t load the new one for you. After you swap spools, you’ll either run LOAD_FILAMENT manually, or extrude from Mainsail / Fluidd to push new filament into the hotend, then click RESUME. If you want a fully automated load-and-purge, look at jschuh’s pause_resume_cancel.cfg or Lexx3D’s MOM macro on GitHub. Both are battle-tested community macros that wrap the official sample with extra niceties.
Bowden vs direct drive
The default -50 retract works fine for most direct drive printers (Voron, Ender 3 V3 KE, anything where the extruder sits on the carriage). For Bowden printers (older Ender 3, classic Prusa MK3 layouts) you need to pull the filament back through the entire PTFE tube, which is usually 400 to 600mm long but you don’t want to retract the full length, just enough to get past the extruder gears. -120 to -150mm is typical. Measure your tube length to be sure.
Heater cooldown for long pauses
If you’re going to walk away during the pause, add an M104 S0 after PAUSE to turn the hotend off, and an M109 S{nozzle_temp} in your RESUME macro to reheat. Wet PLA can carbonize in 20 to 30 minutes at print temp, and a carbon plug will block the new filament from feeding. jschuh’s macro sets idle_timeout to 12 hours during a pause and explicitly turns off the hotend, which is the safest pattern.
For more on getting Klipper configured cleanly with OrcaSlicer in general, the OrcaSlicer Klipper setup guide covers the full host pipeline, including printer.cfg patterns, network printing, and getting Mainsail talking to Orca.
Enabling M600 on Marlin (Ender 3 etc.)
If you’re on a stock Creality Ender 3, Ender 3 V2, or Pro with the 4.2.7 board, your firmware almost certainly doesn’t have ADVANCED_PAUSE_FEATURE compiled in. Vanilla Creality builds are years old and ship without it. The fix is to flash a more current Marlin build with the flag enabled.
The high-level steps:
- Download the latest Marlin source for your board variant. The Marlin community config repo on GitHub has pre-tuned
Configuration.handConfiguration_adv.hfiles for almost every printer model. Find the one matching your printer (e.g. “Creality / Ender-3 / 4.2.7 board / SKR Mini E3 v2.0” depending on your hardware). - Open
Configuration_adv.hin VS Code. Find the line//#define ADVANCED_PAUSE_FEATUREand remove the//at the start to uncomment it. - While you’re in there, set sane defaults for the related parameters.
FILAMENT_CHANGE_UNLOAD_LENGTHat 100 to 120 for Bowden, 50 for direct drive.NOZZLE_PARK_POINTto a corner that won’t collide with your part (X10 Y10 Z5 is a safe default for an Ender 3). - Compile with PlatformIO (the recommended path) or Auto Build Marlin from the VS Code marketplace. The build produces a
firmware.binin the.pio/build/<your-board>/directory. - Copy that .bin to a freshly formatted SD card, rename it according to your bootloader’s expectation if needed (some Creality boards want the file renamed each flash so it doesn’t re-flash on every boot), and insert into the printer with the printer off. Power on. Wait for the LCD to come up, which should take a bit longer than usual.
- Once flashed, the LCD should show a Filament menu with a “Change Filament” entry. Run that to confirm M600 is now available.
Per the Marlin docs, the minimum version that supports ADVANCED_PAUSE_FEATURE is 1.1.0, so anything modern (2.x) is fine as long as the flag is enabled. If you’d rather not deal with a firmware build, the Ender 3 V3 OrcaSlicer setup guide covers the V3 SE / KE / V3 variants, which run modded Klipper instead and don’t need a flash, just the macro from the previous section.
Once your firmware is updated, the OrcaSlicer side is identical to what I described earlier: set Change filament G-code to M600, enable Manual Filament Change, slice, swap. The slicer doesn’t care which firmware emitted M600. It only cares that the printer responds.
What happens at the printer when M600 fires
Knowing the gcode side is one thing. Knowing what to do at the machine is another. Here’s the moment-by-moment routine I follow when an M600 hits.
Beep. The printer parks the head, retracts the filament, and starts beeping. On Marlin you’ll see “Insert filament” on the LCD. On Klipper with PAUSE, the print just stops with no audio prompt unless your macro adds one.
Cut. Before doing anything else, snip the filament with flush cutters at a 45-degree angle just above the extruder. This matters: if you skip the cut, the soft melted blob at the end of the filament can be wider than the PTFE tube and refuse to feed back in.
Unload. The Marlin macro will continue retracting and pull the filament out the rest of the way. On Klipper with the sample macro, the -50 retract has already happened, so the filament should be loose at the extruder. Pull it the rest of the way out by hand.
Insert the new spool. Cut the leading tip of the new filament cleanly, then push it through the runout sensor (if you have one) and into the extruder. Push gently until you feel the gears bite.
Load. On Marlin, click the encoder and the printer will run the load and prime sequence automatically. On Klipper with the sample macro, you’ll either run LOAD_FILAMENT manually, or use the extrude buttons in your web UI to push 80 to 120mm of new filament through.
Purge. Watch the new color extrude. For high-contrast transitions (white after black, or vice versa) keep purging until the extruded filament looks pure. 100 to 150mm is not unusual for white after black. For low-contrast (red after orange) 30 to 50mm is plenty.
Resume. On Marlin, the LCD will ask “More purge?” until you say no, then the print resumes automatically. On Klipper, click RESUME in your web UI. The head returns to the print and continues from where it paused.
The whole process takes 30 to 90 seconds if you’re attentive. It can sit indefinitely if you wander off, which is the upside of M600 over an AMS: you’re not on the clock. The downside is that you have to be there at all.
Common mistakes and how to fix them
I’ve made all of these. Probably twice each. Here’s what to watch for and how to recover.
The printer just keeps printing through M600
Cause: firmware doesn’t have M600 enabled. Fix: run the five-line test gcode I gave earlier. If the printer doesn’t pause, you need to address the firmware (flash Marlin with ADVANCED_PAUSE_FEATURE, add the Klipper macro, or accept that Bambu won’t respond to M600 and use the slicer pause workflow instead).
Filament cooks in the nozzle during the pause
Cause: nozzle stays at print temp while you finish dinner. Fix: add M104 S0 at the start of your M600 / Change filament G-code so the heater turns off. Re-heat at the start of the resume sequence. Marlin has PAUSE_PARK_NOZZLE_TIMEOUT which defaults to 45 seconds before dropping the nozzle to 175°C, but if you’re stepping away for half an hour, set it to a few minutes or use an explicit M104 S0.
Z-hop too low and ooze attaches to the print
Cause: if Z lift in M600 is 0.4mm and the hotend oozes a 1mm string while parked, the string drags back across your print on resume. Fix: use Z lift of 5 to 10mm. The official Klipper sample uses 10. Don’t match z-hop to layer height for M600. That’s a different optimization.
Forgot to cut filament before unloading
Cause: the molten tip of the filament ends up wider than the PTFE tube. Fix: always cut at a 45-degree angle just above the extruder before pulling. If you’ve already pulled and the tip is bulbous, cut the bulb off, reshape the tip with snips into a clean point, then load.
Pause / resume causes a layer line, blob, or gap
Cause: hotend pressure builds during the wait, then squirts on resume. Marlin issue #25302 documents an off-by-0.2mm Z gap at resume. Fix: prime 5 to 10mm into a purge bucket or off the part before the head returns. OrcaSlicer’s prime tower handles this if you have it enabled. If not, manually add a G1 E10 F300 line to your resume sequence.
OrcaSlicer adds an extra unwanted M600 at the start of the print
Cause: known bug, issue #6089. When Change Filament G-code is M600 and Orca thinks an initial tool change is needed, it inserts M600 right after the start gcode. Fix: confirm Manual Filament Change is on. If the bug still bites, open the exported gcode and delete the first stray M600 line. It’ll be in the first 200 lines.
Klipper M600 resumes immediately
Cause: the macro calls PAUSE but [pause_resume] is missing from printer.cfg, or a runout sensor is set to pause_on_runout: False and is auto-resuming. Fix: confirm [pause_resume] is declared. Confirm runout sensor is set correctly. Use printer.pause_resume.is_paused checks in your macro before doing anything destructive.
New color is muddy for the first few mm
Cause: color bleed from old filament still in the melt zone. Fix: purge more. White after black needs 100 to 150mm of new filament. Same-family transitions (red to orange) need only 30 to 50mm. Practice on a calibration cube before committing to a real print.
For deeper diagnostics, the OrcaSlicer troubleshooting master guide covers slicer-side issues across the board, and the general filament settings reference has flow and retraction tuning that affects how clean your color transitions look.
M600 vs AMS vs prime tower
I’ll be direct: M600 is not a replacement for an AMS, and an AMS is not a replacement for M600. They solve overlapping but different problems.
| Aspect | Manual M600 / pause | Bambu AMS | Prime tower (single extruder, multiple spools) |
|---|---|---|---|
| Hardware cost | $0 | ~$249 to $349 | $0 hardware, more filament per print |
| Waste per change | ~0g (you control the purge) | 1.5 to 4g per change | 5 to 20g of tower depending on volume |
| Time per change | 30 to 60s attended | 18 to 25s automated | 8 to 15s automated |
| User attention | High, every change | None | None |
| Practical max colors per print | 2 to 4 | 4 per AMS, up to 16 with 4 AMS units | 2 to 5 |
| Best use case | Logo, label, occasional swap | High-volume hands-off multi-color | Multi-extruder Voron / MMU, or creative spool routing |
My personal verdict, after running both an Ender 3 V3 SE (M600) and a borrowed P1S with AMS for a few months: M600 wins for hobby use, calibration parts, name plates, occasional accents, and any print where you’d be at the printer anyway. AMS wins if you’re running a small business, doing genuine 4-color prints regularly, or want hands-off long prints. The prime tower / wipe tower workflow sits in between and is mainly relevant if you have a multi-extruder rig.
The full OrcaSlicer multi-color guide covers the strategic side of this decision in more depth, including when to use color painting vs separate STLs vs multi-body assemblies.
Bambu A1 / A1 Mini without AMS: the special case
If you bought a Bambu A1 or A1 Mini without the AMS Lite, you’re in an awkward spot. The printer is excellent. The firmware just doesn’t speak M600. Forum threads going back to 2024 confirm: drop bare M600 into a sliced file, the printer ignores it. There are two paths.
Path 1: use the Bambu Studio / OrcaSlicer Pause feature with Bambu pause gcode. Instead of M600, enter the actual Bambu pause command sequence in the Change filament G-code field. The community has reverse-engineered something close to this, but Bambu hasn’t published an official gcode reference, so treat it as approximate. The avatorl bambu-a1-g-code repo has a maintained a1-manual-filament-change-v3.gcode snippet that handles parking, retracting, beeping, and waiting properly on the A1.
Path 2: use the slicer’s Add pause feature instead of Add color change. This route uses Bambu’s internal pause mechanism, which the firmware does respond to. The downside is that the “Add pause” option is greyed out in some Bambu-flavored OrcaSlicer profiles. When that happens, the workaround is to switch the printer profile temporarily to a generic non-Bambu profile, set up the color change, then switch back. Hacky but it works.
The honest reality is that for an A1 without AMS, multi-color is more painful than on a Marlin or Klipper printer where M600 is well-supported. If multi-color is a major part of your workflow, the AMS Lite upgrade pays for itself fast on Bambu hardware. The OrcaSlicer for Bambu A1 Mini guide covers the broader workflow for that printer family in detail.
Bambu users with the K1 or other Creality Klipper machines should reference the Creality K1 OrcaSlicer profile guide, since the K1 ships with stock Klipper that needs the M600 macro added just like a custom Voron build.
FAQ
Does M600 work on the Ender 3 V3 SE?
Not out of the box. The V3 SE runs Creality-modded Klipper, and the stock printer.cfg doesn’t include an M600 macro. The fix is identical to standard Klipper: add [pause_resume] and the M600 macro from the Klipper sample-macros.cfg, then FIRMWARE_RESTART. Confirmed by the Creality forum thread on the V3 M600 problem. Quote from that thread: “M600 is a Marlin command, not yet implemented in Klipper.”
Why does my print resume immediately on Klipper?
Almost always because [pause_resume] is missing from printer.cfg, so PAUSE is a no-op. Less commonly, you have a runout sensor set to pause_on_runout: False that’s auto-resuming. Add [pause_resume], restart, retest. If it still resumes immediately, check your runout sensor config and look for any conflicting RESUME calls in adjacent macros.
Can I do 4 colors with M600?
Yes. You can do 8 colors with M600 if you want to. The slicer doesn’t care how many filament profiles you define. The practical limit is your patience: every color change is a manual stop-and-swap, and a 4-color print can have dozens of changes. For occasional 4-color work it’s fine. For a weekly habit, the AMS is genuinely the better tool.
What’s the difference between M600 and PAUSE in OrcaSlicer?
M600 is a firmware-level Marlin command that pauses, parks, unloads, waits, loads, primes, and resumes. PAUSE is a Klipper / OctoPrint convention that just halts the print. PAUSE is what you use when you don’t have an M600 macro defined. M600 with a proper macro does more for you automatically.
Do I need a wipe tower with M600?
Only if you want clean color transitions on visible surfaces with high contrast. For a single change at one layer (red top hat on white benchy) you can skip the tower and just purge by hand into a bucket. For full multi-color with painted regions, a tower is helpful because it absorbs the contaminated first few mm of new filament so they don’t end up on your part.
If you’re tuning Orca more broadly for any of this, the OrcaSlicer settings master guide covers the global parameters that interact with multi-color printing, including retraction, prime tower volume, and layer-change behavior.
Wrapping up
M600 is one of those small features that punches way above its weight. One line of G-code, properly understood, gives a $200 printer the same color-change capability as a $1,000 multi-material rig, at the cost of standing next to the machine for 60 seconds at a time. The whole pipeline is: pick your firmware path (native Marlin, Klipper macro, or Bambu workaround), set OrcaSlicer’s Change filament G-code field, enable Manual Filament Change in the Multimaterial tab, slice, and swap. That’s the whole article in one paragraph.
The trickiest part for most people is the firmware step, which is why I spent so much time on it. Once you’ve confirmed your printer actually responds to M600 (or your firmware’s equivalent), the slicer side is straightforward and the at-the-printer routine becomes muscle memory after three or four prints. From there it’s just a question of how much patience you have for manual swaps, and whether your workflow eventually justifies an AMS upgrade or stays comfortably in M600 territory.
Related OrcaSlicer guides
- OrcaSlicer Settings Master Guide: Every Setting Explained (2026)
- OrcaSlicer for Elegoo Neptune 4 / Pro / Plus / Max: 2026 Setup Guide
- OrcaSlicer Infill Patterns Compared: Gyroid, Cubic, Honeycomb (2026)
- OrcaSlicer Seam Placement: Hide That Z-Seam (2026 Guide)
- OrcaSlicer Custom G-code: Start, End and Layer-Change Macros