
I sliced a 4-color phone stand last weekend and OrcaSlicer told me the prime tower would burn through 84g of filament. The model itself was 22g. After two hours of settings work I had it down to 31g of purge with zero color bleed, and almost all of the saving came from three settings that don’t show up in any tutorial I’ve watched.
If you’re printing multi-color on an AMS, an MMU2 or MMU3, an IDEX rig, or you’re a power user running M600 swaps, you already know the prime tower is a tax. The question is how big a tax, and the honest answer is that the slicer’s defaults are wildly conservative because they have to assume the worst about your nozzle, your filaments, and your color order. Most people accept the default 280 mm³ per swap because changing it feels risky. It isn’t, if you do it in the right order. This guide walks through every setting that controls the wipe tower, every place purge volume can be redirected, and the tuning sequence I use to get a 50% to 80% reduction without color bleed.
Table of contents
- What the wipe and prime tower actually is
- Why every multi-color print wastes filament
- Every OrcaSlicer prime tower setting, decoded
- The flush volume matrix (the headline win)
- Calibrating flush volumes the proper way
- Twelve ways to cut waste, ranked
- Show me the math: a worked savings example
- AMS, MMU, IDEX: printer-specific quirks
- Common pain points and fixes
- When to disable the prime tower entirely
- FAQ
What the wipe and prime tower actually is
The wipe tower (PrusaSlicer’s name), prime tower (Bambu Studio and most OrcaSlicer menus), prime pillar (Simplify3D), or purge tower (community shorthand) is a sacrificial structure printed beside your main object on multi-material and multi-color jobs. Every time the printer swaps filament, the new color enters a hot end that still has melted residue from the previous color sitting in the melt zone. If you don’t dump that contaminated transition material somewhere, the next visible feature on your model prints streaky.
The tower is that “somewhere.” It absorbs the dirty transition extrusion into a place you’ll throw out. It also stabilizes nozzle pressure after the swap so the first wall extrusion of the next color lands at the right flow rate, which matters more than people realize because under-pressured walls show as stripes on the next layer.
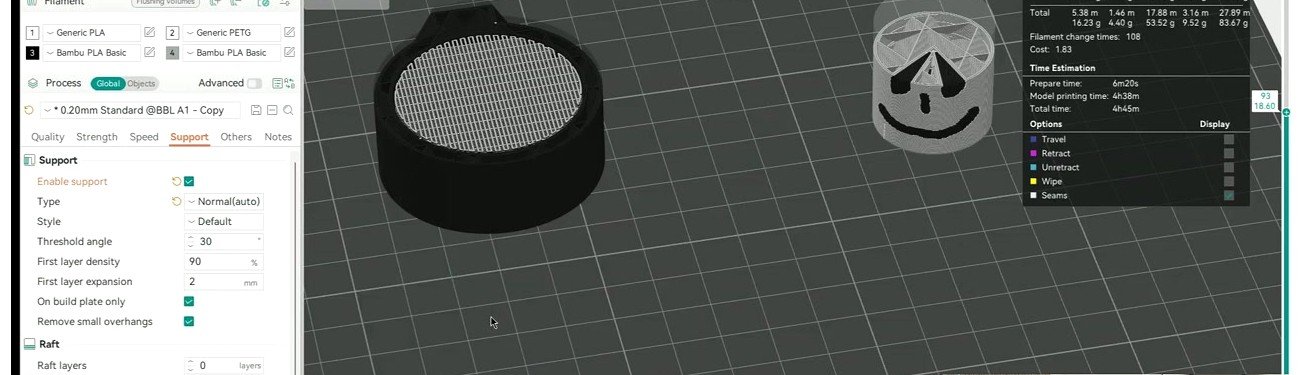
There are exactly three places that purge volume can go in OrcaSlicer:
- Into the prime tower. The default. Always works, wastes the most filament, because every gram you purge is a gram you throw out.
- Into the object’s infill. Purge is dumped into infill walls where you can’t see it. Saves a lot of filament if the object has enough hidden volume at the right layer heights.
- Into a sacrificial flush object. A separate “trash” model absorbs the purge instead. Best when your main object doesn’t have enough hidden volume to soak up the swaps.
One terminology note before we go further. OrcaSlicer is genuinely inconsistent. The print-settings menu uses “Prime Tower” but most underlying variables are named wipe_tower_*. The wiki page is called multimaterial_settings_prime_tower but lists settings like wipe_tower_rotation_angle and wipe_tower_no_sparse_layers. PrusaSlicer’s documentation uses “Wipe Tower” everywhere. Treat them as the same thing. I’ll use both names interchangeably below, the way the program does.
One more thing worth flagging if you’re new to multi-color: there’s a separate waste source on Bambu printers that has nothing to do with the prime tower. The “purge poop” ejected through the chute on the P1 and X1, or the on-bed brick on the A1, comes from the cutter upstream of the hot end. That’s controlled by Bambu firmware, not the slicer. The prime tower is downstream of the chute purge, and it’s the part you actually have control over from inside OrcaSlicer. We’ll come back to this in the AMS section.
Why every multi-color print wastes filament
This is the part most tutorials skip and it matters because if you don’t understand it, you’ll over-tune and get color bleed, or you’ll under-tune and waste spools.
The hot end isn’t a clean instant-swap mechanism. It’s a melt zone. When you push white PLA through a nozzle that just printed black, you’re not magically replacing every molecule of black with white. You’re shoving white in behind a slug of black, and the first few centimeters of extrusion come out as a gradient. The exact volume needed to flush that gradient out depends on three things:
- Color contrast. Black in white shows immediately. White in black shows even more. Yellow in red barely registers. The slicer knows this and the auto-calculation uses color delta.
- Material chemistry. PLA into PLA flushes faster than PLA into PETG, because the melt temps and viscosities differ. The auto-calc doesn’t always weigh material, which is why PLA to PETG transitions need bumping by 1.2 to 1.5 times the auto value at minimum.
- Nozzle and hot end geometry. A hot end with a steep transition cone holds less residual than a long melt zone. This is why a fresh hardened-steel CHT-style nozzle behaves differently from the stock brass on the same printer.
The slicer can’t measure your specific nozzle’s residue, so it picks safe defaults. Bambu Studio sits at around 280 mm³ per swap on stock profiles per multiple community references. That’s a lot. For comparison, a single-perimeter wall on a 0.4 mm nozzle at 0.2 mm layer height is about 0.08 mm³ per millimeter of travel, so 280 mm³ is roughly 3.5 meters of wall extrusion thrown out per swap. Multiply that by every color change in a 3-hour print and you’re suddenly in “the tower weighs more than the model” territory.
Tuning is mostly about calibrating that mm³-per-swap number for the specific filament pairs you actually use, then redirecting whatever you can’t avoid into places that don’t need to look pretty. We’ll do exactly that in a few sections.
Every OrcaSlicer prime tower setting, decoded
Menu path varies by Orca version, which is annoying. In Orca 2.x the simple-mode controls live in Process settings panel, “Others” tab, Prime Tower section. Switch the settings panel to Advanced (top-right of the panel) and the rest appear under Process settings, “Multimaterial” tab. Older Orca docs and some forks like Anycubic put the toggle under a “Multiple Extruders” group instead. If you don’t see what I’m describing, switch the mode dropdown to Advanced and check both tabs.
Process-settings level (per-print)
| Setting | Variable | What it does |
|---|---|---|
| Enable prime tower | enable_prime_tower |
Master on/off. Defaults ON for any multi-material printer profile. |
| Prime tower width | prime_tower_width |
Diameter of the rectangular footprint. Community threads cite a default around 60 mm; Snapmaker U1 users have dropped this to 20 to 25 mm with stable results. |
| Prime volume | prime_volume |
Volume of priming extrusion per tool change in the tower itself, separate from the per-pair flush volume in the matrix. |
| Brim width | prime_tower_brim_width |
Brim around the tower base for adhesion. Default sits around 3 mm; raising to 4 to 8 mm stops most topples. |
| Wipe tower rotation angle | wipe_tower_rotation_angle |
Rotates the tower’s purge-line direction relative to the X axis. |
| Maximal bridging distance | wipe_tower_bridging |
Maximum distance between supports on sparse infill sections inside the tower. |
| Purge lines spacing | wipe_tower_extra_spacing |
Spacing of the purge lines themselves. |
| Extra flow for purge | wipe_tower_extra_flow |
Multiplier for thicker or thinner purge lines vs normal extrusion. |
| Maximum wipe tower print speed | wipe_tower_max_purge_speed |
Default sits around 90 mm/s per the wiki. Raising it requires verified bridging behavior. |
| Wall type | wipe_tower_wall_type |
Rectangle (default), Cone (fillet at base), or Rib (four ribs for stability). |
| Stabilization cone apex angle | wipe_tower_cone_angle |
Apex angle of the cone wall. Larger angle equals wider base. |
| Extra rib length | wipe_tower_extra_rib_length |
Positive grows ribs, negative shrinks. Cannot go below the size required by purge volume. |
| Rib width | wipe_tower_rib_width |
Width of each rib wall. |
| Fillet wall | wipe_tower_fillet_wall |
Adds a fillet to the prime tower wall. |
| No sparse layers | wipe_tower_no_sparse_layers |
Tower only prints on layers with an actual swap. Marked experimental in older versions. |
| Enable tower interface features | enable_tower_interface_features |
New in 2.3.2. Cross-material support (PLA/PETG mix). Helps tower not tip over. |
| Cool down from interface boost during prime tower | enable_tower_interface_cooldown_during_tower |
New in 2.3.2. Lets the nozzle drift back to print temp during the tower so you don’t get heat-induced color blemishes after the swap. |
| Prime tower framework | prime_tower_enable_framework |
Internal scaffolding option. |
| Prime tower infill gap | prime_tower_infill_gap |
Spacing between infill lines inside the tower. Reportedly defaults near 150% with 200 to 250% being a safe waste-saving range. |
| Prime tower skip points | prime_tower_skip_points |
Skips priming on selected travel points. |
| Single extruder multi-material priming | single_extruder_multi_material_priming |
First-layer priming behavior on single-extruder MMU/AMS systems. |
If your eyes glazed over, the only ones you need to touch on a first pass are width, wall type, brim width, no sparse layers, and infill gap. The rest stays at default for 95% of users. For the wider context of where these sliders sit relative to the rest of the program, the OrcaSlicer settings master guide covers the full panel layout.
Filament-settings level (per spool)
Open Filament settings, Multimaterial tab for these. They run per-filament, not per-print, which means a setting tweaked on your “Bambu PLA Basic Black” profile applies to every print using that filament forever.
| Setting | Variable | What it does |
|---|---|---|
| Minimal purge on wipe tower | filament_minimal_purge_on_wipe_tower |
Smallest amount that must hit the tower before flush-into-infill or flush-into-object can absorb the rest. Snapmaker U1 thread reports a default near 60 mm³; same user dropped to 10 mm³ with no quality loss. |
| Loading speed (start / sustained) | filament_loading_speed_start, filament_loading_speed |
Initial and sustained speeds of the load move. |
| Unloading speed (start / sustained) | filament_unloading_speed_start, filament_unloading_speed |
Same idea for unload. |
| Delay after unloading | filament_toolchange_delay |
Default 0 s. Pause to let flexible filaments shrink before the next move. |
| Cooling moves | filament_cooling_moves |
Number of back-and-forth moves in the cooling tube on MMU2/MMU3 hardware. |
| Ramming volume / flow | filament_multitool_ramming_volume, filament_multitool_ramming_flow |
Burst extrusion just before tool change on multi-tool printers. |
| Stamping loading speed / distance | filament_stamping_loading_speed, filament_stamping_distance |
Movement toward the nozzle between cooling moves. |
The big one is filament_minimal_purge_on_wipe_tower. If you set it to 60 mm³ and you’re trying to dump 280 mm³ of purge into a 200 mm³ infill cavity, the slicer dumps 60 to the tower first and then 140 to the cavity (which won’t fit, so it falls back). Drop that minimum to 10 mm³ and the same scenario sends 270 mm³ into the cavity. Massive difference. Detailed walk-through of the rest of the filament tab lives in the OrcaSlicer filament settings guide.
The flush volume matrix (the headline win)
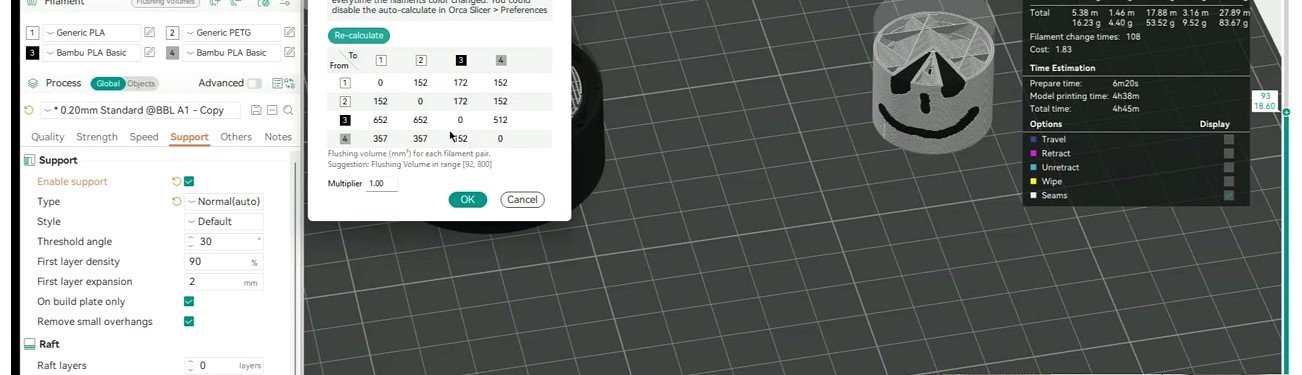
This dialog is the single biggest waste lever in OrcaSlicer. Find it under Process panel, Multimaterial tab, Flushing volumes button, or in some versions on the project filaments side panel. The matrix is N by N where N is the number of loaded filaments. Each cell holds the mm³ that must purge when going from filament A (row) to filament B (column). The diagonal is zero because filament-to-itself doesn’t need a flush.
What the defaults actually are
Bambu Studio’s overall default is reported around 280 mm³ per swap before tuning, per multiple community references. OrcaSlicer inherits that for Bambu profiles and varies it for other printer profiles. The auto-calculation uses color delta to scale per-cell values: white into black needs less purge than black into white, and the matrix reflects that asymmetry. Click Re-calculate at the top of the dialog and every cell resets to the auto value, which also wipes any manual edits you made.
The Multiplier field at the top of the matrix scales every cell uniformly. Default 1.00. This is the single most important number on the entire dialog.
Recommended starting multipliers
- 0.80 on the first pass. Saves 20% with very low risk on similar-color same-material swaps.
- 0.60 to 0.70 on the second pass once you’ve confirmed no color bleed at 0.80.
- 0.40 to 0.50 aggressive territory. Only safe for similar-family swaps with similar colors. stlDenise3D has tested this with profile-specific tuning.
One annoying gotcha: the multiplier is project-scoped, not global. If you set it to 0.6 on one project and start a new one tomorrow, the new project starts at 1.00 again. Bambu Studio Issue #6718 documents the same complaint over there. Workaround is to save your full project as a template and start new prints from that template, which is also useful for keeping your filament order consistent across runs.
Per-pair tuning that beats the multiplier
The multiplier is a blunt instrument. The smarter move is to tune individual cells. A few rules I’ve found hold up across printers:
- Light into dark needs less than dark into light. White into black can run as low as 44 mm³ in tuned profiles. Black into white realistically wants 350 to 600 mm³.
- Same-color, same-brand transitions can run very low. Bambu PLA Basic Black to Bambu PLA Basic Black is 0 mm³ (same filament). Bambu Black to Sunlu Black might want 60 to 120 mm³ because the pigments aren’t identical.
- Cross-material swaps need a bump. PLA to PETG and the reverse should be at least 1.2 to 1.5 times the color-only auto value. The auto-calc only weighs color, not chemistry, and OrcaSlicer Issues #4783 and #8990 document the resulting pain.
- Support interface to model wants near-max. Leave 600 to 800 mm³ in those cells. Soluble or breakaway support contamination on the model surface is the single ugliest failure mode in multi-material.
- Rare-color cells can run low. If a color is only 2% of the print (a logo accent, say), the auto value over-purges relative to need. Hand-tune those cells lower because each swap is a fixed cost.
Calibrating flush volumes the proper way
Multipliers are guesses. If you want actual numbers, print a calibration tower. The two canonical models are MakerWorld “Flushing Volumes Calibration V2” (model 62782) and Printables “ORCA Flush/Purge Volume Test for MMUs” (model 1322272). Either works; the V2 model is better if you’re on a Bambu printer because the modified G-code is built for it.
The workflow:
- Load the calibration model. Set every flush volume in the matrix to 0 if you’re using V2 (its custom G-code injects fixed test volumes per layer band) or to a known fixed value like 100 mm³ with multiplier 1.00 if you’re using the generic Printables model.
- Slice and print on the actual filaments you want to characterize. One filament pair per print, ideally.
- When the print finishes, look up the tower for the band where the new color goes fully clean (no streaking, no shadow of the previous color). Each 5 mm of tower height in V2 equals 100 mm³ of purge volume, so 1 mm equals 20 mm³. The newer V2 generations use 50 mm³ per mm at lower precision but work on any nozzle.
- Add a 20 mm³ safety buffer to the value where the color first cleared. This protects against minor variation in pigment loading between spools.
- Enter that buffered number into the matrix cell for that A-to-B pair. Re-test on a small two-color part before you commit.
If that sounds like a lot of work, it is. The payoff is permanent though. Once you’ve characterized your six or eight regular filaments, you have a private set of matrix values that beats the auto-calc by 50% or more on most pairs, and they stay accurate as long as you’re printing the same brands.
Twelve ways to cut waste, ranked
Order is rough ROI. The top four are where I’d spend the first hour. The bottom three are micro-optimizations that only matter on production multi-color runs.
1. Flush into object
Right-click an object on the bed, choose Flush options, Flush into this object. Reroutes purge into the designated object’s infill and walls instead of the tower. Real-world example from 3DBite: a colored Bambu Cube job that would normally generate around 70 g of flushed filament dropped to less than 1 g when a flush object was assigned. Critical condition: the flush object must be at least as tall as the highest layer that has a color change. If it stops short, the slicer falls back to the tower above that height.
Honest caveat: this can leave color bleed in the wrong cases, specifically when the absorbed purge bleeds through to the visible wall. Use it on objects with at least 2 walls and ideally infill density above 15%. Don’t use it on translucent filaments. And see the next item.
2. Flush into infill
Path: Process settings, Others, Flush into objects’ infill (also surfaced as a project-level toggle). Default OFF. Currently requires the prime tower to be enabled (community wants this lifted; see Issues #11670 and #13164). Routes purge into the model’s hidden infill where contamination is invisible. Best with opaque filaments and walls thick enough to hide the inside (3+ walls preferred).
3. Flush into support
Often enabled by default per 3DBite. Same logic, uses support material as the dump. Useful only when your prints actually have generated supports, but free savings when they do.
4. Reduce flush volume per pair after calibration
The matrix work from the previous section. Tower waste drops linearly with mm³ per swap. Starting multiplier 0.80, then 0.60 once you’ve validated. This is the single biggest lever after enabling flush-into-object.
5. Color-order strategy
Print light to dark when feasible. Light-into-dark transitions need less purge volume. Group transitions by similar color and similar material. If you have white, yellow, red, black, the slice order should walk that direction at any given Z when possible. The slicer doesn’t always optimize for this automatically, so on parts where you have a choice (like models where the AMS slot assignment is arbitrary), assigning slots in color order helps.
6. Group transitions per layer
Avoid alternating colors back and forth on the same layer. Each round-trip is a full purge cycle. Where the model permits, design or rotate the part so each color block resolves before the next change happens.
7. Sparse tower layers (no sparse layers toggle)
Enable wipe_tower_no_sparse_layers to skip printing the tower on no-tool-change layers. Per Prusa Knowledge Base testing this cut wipe tower filament by roughly 16% and total print time by around 3%. The exact ratio in OrcaSlicer may differ slightly, but it’s free savings either way. Watch for collision warnings on tall thin models; Issue #11703 documents some of those.
8. Increase prime tower infill gap
3DBite reports the prime tower line gap defaulting around 150% with a recommended 200 to 250% range, saving 20 to 35% tower material with no stability trade-off. This corresponds to OrcaSlicer’s prime_tower_infill_gap. The wider the gap, the less filament per layer of tower. Don’t go past 250% or the tower’s purge function starts to fail because the lines are too far apart to capture all of the gradient.
9. Reduce prime tower width
Footprint multiplied by purge-line height equals tower volume per layer. Shrinking width helps but pushed too far causes topples. Snapmaker U1 users report 20 to 25 mm width with stable results when they pair it with the Cone or Rib wall types. The Rib wall type especially is what makes aggressive width reductions safe.
10. Print multiple copies on one plate
Flush volume per swap is fixed. Printing 4 copies of the same model amortizes that fixed cost over 4 useful objects, and the per-object waste drops by a factor of 4 minus the infill saved.
11. Lower flush ratio for small-percentage colors
Repeating the matrix point because it’s worth a second mention. If one color is only 2% of the print, the auto value over-purges relative to need. Hand-tune those rare-color cells down hard.
12. Use Print-by-Object mode
When you have several single-color models on one plate, switch to Print-by-Object. This eliminates per-layer color changes between separate parts. The prime tower is disabled automatically for objects that are single-color in this mode. Documented in the Bambu forum thread “Print by Object disables purge tower.” This is also the mode of choice when you’re combining single-color prints with M600 filament swaps; for the manual swap workflow specifically, see the OrcaSlicer M600 manual filament change guide.
Show me the math: a worked savings example
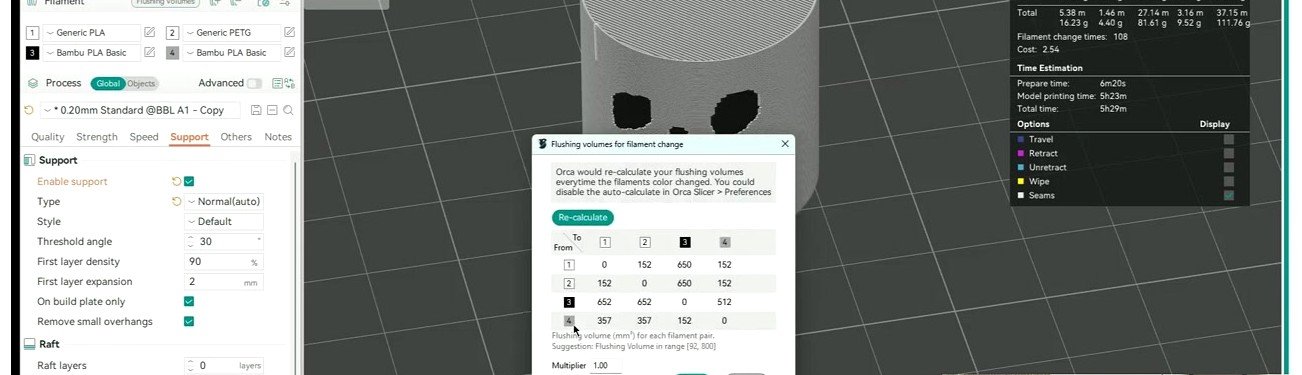
Numbers work better than abstractions. Here’s a 4-color PLA print on a Bambu A1 with AMS, 200 layers at 0.2 mm, plate-rotation enabled so two color changes per layer on average. PLA density used is 1.24 g/cm³, which is standard but can range 1.21 to 1.27 by brand.
Baseline waste with stock defaults:
- Swaps per layer: 2
- Total swaps over the print: 200 layers x 2 = 400 swaps
- Default purge volume per swap: roughly 280 mm³
- Total purge volume: 400 x 280 = 112,000 mm³ = 112 cm³
- Mass: 112 x 1.24 = 138.9 g of purge waste
That’s almost a quarter of a 750 g spool gone, on a single 4-color print. And that’s before we count the AMS chute waste, which is a separate firmware-controlled stream.
After tuning (multiplier 0.6, flush-into-infill enabled, flush-into-object on a sacrificial 30 mm cube):
- Multiplier 0.6 brings effective volume per swap down to 168 mm³
- Roughly 80% of that is absorbed by infill and the sacrificial object on average. Community-cited absorption rates run 60 to 98%; I’m using a conservative 80%.
- Net tower purge per swap: 168 x 0.2 = 33.6 mm³
- Total purge: 400 x 33.6 = 13,440 mm³ = 13.44 cm³
- Mass: 13.44 x 1.24 = 16.7 g of tower waste
Net savings: 138.9 g down to 16.7 g, an 88% reduction. Roughly 122 g saved per print, or about $2.50 in PLA at typical prices.
If you don’t trust those assumptions and want a deliberately conservative version (multiplier 0.8 and only 50% absorption):
- 280 x 0.8 x 0.5 = 112 mm³ per swap
- 400 x 112 = 44,800 mm³ = 55.5 g
- Savings: 138.9 g down to 55.5 g, a 60% reduction
Even with the pessimistic numbers you’re past the 50% headline claim. With tuned per-pair matrix values and a properly sized flush object, you should see something between those two scenarios on a typical print.
Worth flagging: these numbers assume the slicer’s flush volume actually applies. There’s a known bug (Issue #12659, affecting 2.3.x) where the flush_volume G-code placeholder doesn’t update for non-Bambu printers when “Purge to infill” or “Purge to object” is enabled. Verify your sliced G-code against expected purge volumes before you commit to a long print on a non-Bambu machine.
AMS, MMU, IDEX: printer-specific quirks
Bambu chute and brick vs the prime tower
This is the single most-confused topic in multi-color printing. There are two waste streams on Bambu printers:
- Chute or brick waste. The “poop” ejected through the rear chute on the P1 and X1, or the on-bed brick on the A1, comes from the cutter just upstream of the hot end. This is largely controlled by Bambu firmware. The slicer can influence it slightly through filament profiles but cannot eliminate it.
- Prime tower waste. Happens at the hot end after the chute purge. This is what OrcaSlicer’s settings control.
If you’ve optimized your prime tower down to nothing and you’re still ejecting bricks, that’s because Bambu’s firmware is doing its own purge before the filament even reaches the hot end. The slicer settings don’t reach that part of the toolchange. For a deeper dive into AMS-specific behavior including how slot order affects chute ejection, the OrcaSlicer Bambu AMS guide covers the firmware side.
The A1 series is the worst offender for visible waste because it’s a bed-slinger, so it can’t eject through a chute. Instead it builds a stack of purge cubes on the corner of the bed that you dump manually after each print. Same overall waste budget as the P1/X1, just more visible.
H2C “Purge-Saving Mode” (the 15 mm³ trick)
If you happen to have a Bambu H2C, there’s a built-in mode in Bambu Studio called Purge-Saving Mode that pins the prime-tower clean volume at 15 mm³ and grays out the per-filament prime volume column. This is the most aggressive built-in waste-reduction mode and it’s currently H2C exclusive per the Bambu Lab H2C wiki page. Don’t expect to see this on the P1, X1, or A1 anytime soon. The hot end on the H2C has different geometry that makes the 15 mm³ pin viable.
PrusaSlicer / MMU3 differences
PrusaSlicer’s wipe tower behavior is older and more mature in some areas, particularly around ramming and cooling moves on MMU2/MMU3 hardware. OrcaSlicer is catching up; 2.3.2 ported over Bambu Studio’s interface-layer logic via enable_tower_interface_features which mostly fixes the cross-material PLA/PETG topple problem. But for soluble support work specifically, PrusaSlicer is still the easier ride. Also worth flagging: on the P1 and X1, Bambu’s firmware sometimes overrides slicer settings during the actual swap, particularly the chute purge length. There’s nothing OrcaSlicer can do about that directly.
Common pain points and fixes
Prime tower keeps falling over. Most common with PLA + PETG mixed prints. Fixed in OrcaSlicer 2.3.2 via the new enable_tower_interface_features toggle. If you can’t update, switch wall type to Rib (four ribs for stability), bump brim width to 6 to 8 mm, and reduce the tower height by enabling no-sparse-layers. Bambu forum thread “Prime Tower Knocked Down: This is not an adhesion problem” has a long discussion of the failure mode.
Wipe tower height taller than the actual print. Issue #7073, happens on imported MakerWorld models. Workaround is to re-slice or restart the project. Sometimes triggered by stale cached layer data.
Purge volume way too high, eating spools. The headline complaint, captured in the Bambu forum thread “So much purge: tower, infill, support, poop, why does it do them all?” Run the matrix calibration. Drop multiplier to 0.7 as a first move. Enable flush-into-infill. If you’ve done all that and you’re still wasting, check that filament_minimal_purge_on_wipe_tower isn’t pinning the tower to a high floor.
Tower base layers won’t stick. Issue #8661 (brim moves beyond plate). Fix: increase brim width to 4 to 8 mm and verify the model is centered. Also check that bed adhesion is in spec for your build plate type, because the tower’s first layer is more demanding than the model’s.
Flush options disabled when prime tower is disabled. Issue #894. By design today, though active feature requests #11670 and #13164 want to lift the coupling. Workaround: keep the prime tower enabled but shrink it dramatically (small width, no sparse layers, tall infill gap).
3+ colors on one layer breaks flush-into-object. Issue #8266 (2.2.0). Workaround is to over-allocate flush volume, which defeats the purpose. If your model has 3+ colors per layer, consider whether you can reorganize so colors don’t all appear on the same layer, or accept the tower waste for that print.
Flush volumes auto-calculate to zero with support filament. Bambu forum issue. The auto-calc thinks soluble support has the same color as the model. Manually edit the matrix cell for the support pair to 600+ mm³ before slicing, or you’ll get model-colored support that contaminates the model surface.
Internal ribs always generated even when toggle is off. Issue #12399 (2.3.2-dev). The toggle exists but is currently broken. Workaround: switch wall type to Rectangle if you don’t want ribs, since the rib generation only triggers when wall type is Rib. The general OrcaSlicer troubleshooting master guide has more on tracking down version-specific bugs.
Flush-into-object only works after the swap when set to 100% infill. Issue #10329 (2.3.0). With 100% walls the flush object prints BEFORE the swap, wasting the purge. Set the flush object’s infill to a lower density (15 to 30%) so it has hidden volume after the swap.
When to disable the prime tower entirely
Short list, with caveats.
- Print-by-Object mode with single-color objects. The slicer disables it automatically. Free savings.
- 2-color prints where one color is purely on the first or last layer. If the only color change happens at layer 1 (a colored brim or skirt) and the rest of the print is one color, you can technically run without a tower because the first-layer purge can land on the bed outside the model.
- Single-color prints on a multi-material printer profile. If you’ve loaded a Bambu A1 profile that defaults the tower ON but you’re only printing one filament, disable it.
For literally any other case, leave the tower on and shrink it instead. The tower exists because the melt zone needs a dump site. Disable it without an alternative dump (flush-into-object, flush-into-infill) and your model surfaces will streak. The Bambu forum thread “How to ditch the purge tower” has a long discussion that lands on the same conclusion: not safely, but you can shrink it dramatically.
FAQ
What’s a safe starting flush multiplier if I don’t want to calibrate? 0.80 is essentially risk-free for similar-color, same-brand swaps. 0.70 is fine for most multi-color PLA work. Below that, calibrate or risk color bleed.
Does the prime tower need to be the same height as my model? Yes, by default, because each layer of the model with a tool change needs a corresponding tower layer to absorb the purge. Enable wipe_tower_no_sparse_layers to skip layers without swaps, which can shrink tower height significantly on prints where color changes are clustered at the bottom or top.
Why does my tower waste more than the model? Because default flush volumes are conservative and your model is small relative to the per-swap fixed cost. Either tune the matrix down, redirect to flush-into-object, or print multiple copies to amortize the fixed cost over more useful parts.
Is flush-into-infill safe for visible parts? Yes if you have at least 2 walls and the filaments are opaque. No on translucent filaments and no on parts with thin walls (1 wall) where the contaminated infill can show through.
Can I save my tuned matrix as a default? Not directly. The matrix is project-scoped. Workaround is to save your full project as a template and start new prints from that template. The full multi-color workflow including matrix-template tricks is covered in the OrcaSlicer multi-color guide.
Where this fits
The prime tower is one piece of the multi-color puzzle. Filament order, AMS slot assignment, color-change strategy, and the tower itself all interact, and tuning one in isolation gives you maybe 30% of the savings. For the full picture of how to plan a multi-color print from initial slice to finished object, the pillar OrcaSlicer multi-color guide is the place to start. If you’re specifically running a Bambu printer with the AMS, OrcaSlicer Bambu AMS covers the slot-order tricks that complement matrix tuning. And if you’re a manual-swap user, OrcaSlicer M600 manual filament change walks the alternative workflow that bypasses the prime tower entirely for single-color objects with periodic color swaps.
The headline reduction in this article isn’t a stretch goal. It’s a baseline you should hit on the second or third tuned multi-color print after you’ve calibrated the matrix for your regular filaments. If you’re not there yet, work down the twelve-item list in order and the savings will land.
Related OrcaSlicer guides
- OrcaSlicer Settings Master Guide: Every Setting Explained (2026)
- OrcaSlicer for Creality CR-10 Series: Profiles and Setup Guide
- OrcaSlicer for Flashforge Adventurer 5M, 5M Pro and AD5X: Setup
- OrcaSlicer Keyboard Shortcuts Cheat Sheet (Every Verified Key)
- OrcaSlicer Modifier Meshes: Different Settings on One Model