I bought a Bambu A1 in 2024 because I wanted a CoreXY-ish bedslinger that didn’t cost X1C money. Then the January 2025 firmware lockdown happened. Then I read three different blog posts that contradicted each other on whether OrcaSlicer would still work on the A1, and one of them claimed the A1 Mini had a 4.3-inch touchscreen which it does not. So I wrote my own.
This is the OrcaSlicer setup guide for Bambu Lab A1 and A1 Mini owners in 2026, post-firmware-lockdown. It covers the LAN-Mode-plus-Developer-Mode walkthrough (different menu paths from the X1 series and P1 series), how AMS Lite mapping works in OrcaSlicer (different from regular AMS), the eddy-current Flow Dynamics calibration that’s specific to A1, and the single biggest “Orca won’t connect to my A1” mistake (it’s not what you think). Written against OrcaSlicer v2.3.2, current stable.
Per-printer spec reference
| Spec | Bambu A1 | Bambu A1 Mini |
|---|---|---|
| Release | 2024 (Jan/Feb) | 2023 Q4 |
| Build volume | 256 × 256 × 256 mm | 180 × 180 × 180 mm |
| Motion | Bedslinger CoreXY-style with linear rails on X | Same architecture, smaller frame |
| Max toolhead speed | 500 mm/s | 500 mm/s |
| Max acceleration | 10,000 mm/s² | 10,000 mm/s² |
| Max nozzle temp | 300°C | 300°C |
| Max bed temp | 100°C (textured PEI rated) | 80°C (lower-power bed) |
| Stock nozzle | 0.4mm stainless steel quick-swap | 0.4mm stainless steel quick-swap |
| Optional nozzles | 0.2 SS, 0.4 / 0.6 / 0.8 hardened steel | Same range |
| Toolhead | EBB01 (eddy-current force sensor on filament path) | Same EBB01, physically interchangeable |
| AMS | AMS Lite only (4 open spool slots, rotary RFID) | AMS Lite only |
| Lidar | None | None |
| Auto-cal sensors | Eddy current (Flow Dynamics) + load-cell-style nozzle Z-probe | Same |
| Wi-Fi | 2.4 GHz only (ESP32, internal antenna) | 2.4 GHz only |
| Ethernet | None | None |
| Touchscreen | 4.3″ capacitive color | 2.4″ capacitive color |
| Default plate | Bambu Textured PEI | Bambu Textured PEI |
| Enclosure | Open frame | Open frame |
| Power | 1300W | 150W (low-power bed) |
Two important corrections I see misreported elsewhere:
- The A1 Mini has a 2.4-inch screen, NOT 4.3-inch. Bambu’s own spec sheet confirms this. Many third-party sites copy each other and get this wrong. The 4.3-inch touchscreen is on the full A1 only.
- The A1 series uses AMS Lite ONLY. Original Gen-1 AMS (the enclosed unit on X1 / P1) does not work on A1 hardware. AMS Lite has 4 open slots and rotary RFID; it’s a fundamentally different mechanical design.
The firmware lockdown context (read this first)
On January 17, 2025, Bambu pushed firmware introducing the Authorization Control System (ACS). This affects all current Bambu printers including A1 / A1 Mini. The ACS requires third-party tools to route through Bambu Connect (proprietary middleware) for direct print initiation, AMS RFID auto-detect, and cloud features.
OrcaSlicer’s maintainers declined to integrate Bambu Connect (it would mean shipping closed code inside an AGPL project). The community workaround that’s stable and supported on A1 / A1 Mini: enable LAN Only Mode plus Developer Mode on the printer touchscreen. This keeps OrcaSlicer talking to the printer over LAN. Cloud printing through Orca on A1 is gone. AMS RFID auto-detect is gone (you assign filament types manually now).
The independent OrcaSlicer-BambuLab fork by Pawel Jarczak briefly restored cloud printing; Bambu issued a cease-and-desist in early 2026 and the fork is shuttered. Don’t try to install copies floating online.
The 2026 practical answer: A1 + OrcaSlicer = LAN Mode + Developer Mode. Or stay on firmware 1.07.x to keep older direct-print behaviour.
Enabling LAN Mode + Developer Mode on A1 / A1 Mini
The A1’s touchscreen is 4.3-inch capacitive; the A1 Mini’s is 2.4-inch capacitive. Menu structure is identical, only the touch targets are smaller on the Mini.
- Tap the Settings gear (top right corner)
- Scroll to WLAN (NOT “Network”, since A1 series uses “WLAN” because there’s no Ethernet option). Tap.
- Scroll past the SSID list to the toggle row labelled LAN Only Mode. Default OFF. Tap to switch ON.
- Confirm the warning (“printer will disconnect from Bambu Cloud”)
- The screen now shows an Access Code (8 digits) and the printer’s IP address. Photograph or write these down.
- Scroll further down in the same WLAN screen. A new entry Developer Mode appears (only after LAN Only is on)
- Tap Developer Mode. Read the multi-screen warning. Scroll to the bottom. Tap Enable.
This is different from sibling printers. The X1C uses a 5″ capacitive screen with a “Network” tile. The P1S uses a 2.7″ mono LCD with a click-wheel and the toggles live under “General” not under “WLAN”. Only the A1 series consolidates everything under one WLAN tile.
Connecting OrcaSlicer to A1 / A1 Mini
Once LAN + Dev Mode is on:
- Open OrcaSlicer. Switch to the Device tab.
- Click Add Printer (or the + icon)
- Enter the IP address (e.g., 192.168.1.62) and the 8-digit Access Code
- Pick the model: Bambu Lab A1 or Bambu Lab A1 mini
- Click Bind / Connect
If the connection succeeds, the Device tab shows your printer’s name, current temperatures, and a thumbnail of the AMS Lite slots if attached.
Common A1 connection errors and fixes
Printer not visible after enabling LAN-Only Mode (especially A1 Mini): Issue #8188. Power-cycle the printer after the toggle. Confirm 2.4 GHz Wi-Fi (no 5 GHz, no Ethernet). Ensure router AP isolation or guest-VLAN segmentation is OFF; mDNS broadcast doesn’t traverse VLANs.
“Failed to upload print file to FTP” error -4020: almost always a stale connection from another client. Bambu Handy or Home Assistant integration is hogging the single MQTT/FTP slot. The A1 firmware enforces ONE active client connection at a time. Disconnect Home Assistant, Bambu Handy, OctoEverywhere first, then retry from OrcaSlicer.
“Cannot find printer” after firmware update: re-enable LAN Only + Developer Mode (toggles get reset by some updates). Re-enter Access Code in OrcaSlicer. If it still fails, reinstall the Bambu Network Plugin via OrcaSlicer Preferences → Network plugin → Reinstall.
AMS Lite handling in OrcaSlicer (different from regular AMS)
AMS Lite is a rotary 4-spool open carousel. It’s NOT enclosed (no humidity control). Same RFID protocol as the original AMS, so OrcaSlicer auto-syncs Bambu-branded filaments via the green “Sync with AMS” button on the Filament panel.

Important AMS Lite differences from regular AMS:
- Hard-capped at 4 slots. Multi-AMS daisy-chaining (which X1C / P1S can do up to 16 colors with 4 AMS units) is NOT supported on A1 series.
- No drying chamber. The Lite is open. Warn yourself: PETG and TPU left in AMS Lite for 2-3 days will start absorbing humidity. Use an external dryer if you care about print quality on those materials.
- External spool (“Ext”). The A1 Mini’s right-side filament holder is a 5th source. Use this slot only for materials AMS Lite can’t handle (TPU 95A, soft TPU, abrasive CF that you don’t want grinding the rotary mechanism).
Slot mapping workflow (post-firmware-lockdown)
RFID is no longer auto-pushed in Dev Mode. Manual workflow:
- In OrcaSlicer’s Device tab, confirm the A1 shows the AMS Lite panel with 4 slots (A1, A2, A3, A4)
- In the Filament panel (left rail in Prepare tab), click each slot icon and select the filament preset (e.g., “Bambu PLA Basic @BBL A1M”)
- Set color manually. Click the swatch, enter HEX or use the eyedropper
- For multi-color prints, use the + button to add filaments up to 4 (no chaining on A1)
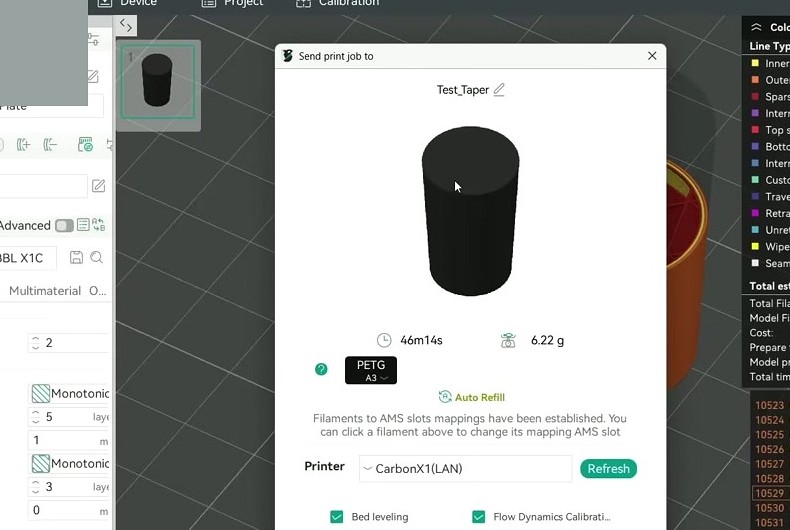
- Send-time AMS Mapping dialog: top row is sliced project filaments, bottom row is AMS slots. Reorder if material/color mismatch. Click “Use AMS” then Send.
Calibration sequence: eddy-current changes everything
This is where A1 / A1 Mini differ most from other Bambu printers. The eddy-current Flow Dynamics calibration was introduced in firmware 01.04.00.00 for A1 Mini and shortly after for the full A1. Both share the eddy-current sensor in the EBB01 toolhead.
Eddy-current Flow Dynamics works similarly in concept to the X1C’s lidar Flow Dynamics, but uses an in-line force sensor at the filament path instead of a camera. It’s more accurate than lidar for opaque or dark filaments because it measures actual extrusion pressure rather than visual squiggles.
Recommended calibration order:
- Auto Flow Dynamics on the printer (Calibration → Flow Dynamics on touchscreen). Runs eddy-current K-cal. Value stored on printer per slot. Do this FIRST. Skip OrcaSlicer’s PA Pattern test for these filaments unless you suspect a bad reading.
- Temperature Tower (OrcaSlicer). Calibration menu → Temperature. Still needed because eddy-current cal is K-only, not temperature. Run for any non-Bambu filament.
- Flow Rate (OrcaSlicer). Pass 1 (coarse ±5%) then Pass 2 (fine ±1%). Eddy-current does NOT adjust flow ratio, only K. This is the single highest-value manual calibration on A1.
- Retraction test. Direct-drive extruder with short melt zone, narrow retraction range. Test 0.4-1.2mm in 0.1mm steps. Most PLA settles at 0.6-0.8mm at 30 mm/s. (Bambu Studio default for A1 is 0.8mm.)
- Max Volumetric Speed test. Important on A1 Mini because of smaller cooling envelope.
- Optional: Pressure Advance Pattern (OrcaSlicer). Only run if eddy-current value looks wrong (sharp-corner bulges or under-extruded corners). This conflicts with the on-printer K value. If you set a manual PA in OrcaSlicer’s filament profile, disable “Use printer’s stored K value” or you double-apply pressure advance. This is the single most-reported A1+OrcaSlicer issue.
The PA conflict deserves its own callout. In OrcaSlicer, K is stored on the filament profile. On the A1 firmware, K is stored on the printer per slot. If both are non-zero, they STACK. The simplest fix is to leave OrcaSlicer’s PA at 0.000 and let the A1 firmware apply its eddy-current value.
Per-filament settings for A1 / A1 Mini
Real numbers from Bambu’s wiki and the A1-specific OrcaSlicer system profiles. A1 Mini differs from A1 mainly on max volumetric speed (smaller cooling envelope) and on which filaments are practical.
| Filament | Nozzle°C | Bed°C | Max Vol (A1) | Max Vol (A1 Mini) | Notes |
|---|---|---|---|---|---|
| Bambu PLA Basic | 220 | 65 | 21 mm³/s | 18 mm³/s | A1 Mini lower because of weaker part-cooling fan and 80°C bed cap |
| Bambu PLA Matte | 220 | 65 | 12 mm³/s | 10 mm³/s | Matte filler is abrasion-friendly but flow-limited |
| Bambu PETG HF | 255 | 70 | 16 mm³/s | 12 mm³/s | A1 Mini bed cap (80°C) is fine for PETG |
| Bambu PETG (regular) | 255 | 80 | 12 mm³/s | 10 mm³/s | A1 Mini at the bed-temp ceiling |
| Bambu ABS | 270 | 90 | 12 mm³/s | Not recommended | A1 Mini bed only reaches 80°C → poor adhesion. A1 OK for small parts only (open frame) |
| Bambu TPU 95A HF | 230 | 35 | 6 mm³/s | 5 mm³/s | Use external spool, not AMS Lite |
| Bambu PA-CF | 290 | 100 | Not supported | Not supported | Open-frame chamber temp insufficient. Per Bambu wiki, excluded officially. |
Retraction defaults (direct-drive, both models): 0.8mm at 30 mm/s for PLA / PETG; 1.0mm for TPU.
Outer wall speed defaults: A1 standard profile = 200 mm/s; A1 Mini standard profile = 200 mm/s. Same setting, but A1 Mini hits its volumetric ceiling sooner so effective speed on solid geometry drops.
Layer height range (0.4 nozzle): 0.08-0.28mm. Default 0.20mm Standard.
Where A1 differs from X1 / P1 in OrcaSlicer’s defaults:
- Lower default initial layer print speed (50 mm/s vs X1’s 60 mm/s); open-frame thermals cause first-layer warp without it
- “Reduce infill retraction” forced ON because eddy-current cal is over-aggressive on infill
- No chamber temp setting (open frame)
Common A1 + OrcaSlicer issues and fixes
Eddy-current K and OrcaSlicer K stacking → bulging corners. Set OrcaSlicer filament PA to 0 if you’ve already run Auto Flow Dynamics on the printer.
AMS Lite filament mapping wrong color. Happens when third-party filament has a generic RFID. Manually drag the swatch in OrcaSlicer’s Send to printer dialog and tick “Don’t ask again for this slot”.
First-layer adhesion on A1 Mini stock textured PEI. Frequent forum complaint. Causes: (a) wrong plate selected in slicer (Cool Plate vs Textured PEI mismatch), (b) PEI contaminated with skin oils, so wash with warm water plus dish soap, NEVER acetone, (c) first-layer speed above 60 mm/s. Bump initial line width to 0.5mm and layer to 0.25mm.
Custom filament profile is nozzle-locked. Issue #5490. A user-created “My PLA @BBL A1 0.4 nozzle” doesn’t show when switching to 0.2mm or 0.8mm nozzles. Workaround: duplicate the profile per nozzle, or edit the JSON’s compatible_printers regex.
Cosmetic profile-label inheritance. Issue #6183 was filed for X1 / X1E / P1S sharing X1C-labelled processes. The same family-share pattern occasionally affects A1 ↔ A1 Mini. Users see “0.20mm Standard @bbl A1” while on an A1 Mini. It’s purely cosmetic; settings are correct because compatible_printers filters at runtime.
PLA-CF / PETG-CF blocked even with hardened nozzle. Issue #9970. Even after setting Printer → Nozzle Type → Hardened Steel and loading Bambu PLA-CF, the orange “incompatible” warning persists. Workaround: ignore the warning and slice anyway; the G-code is fine. Plus: A1 / A1 Mini cannot print PA-CF properly because the open frame can’t sustain chamber temp.
“Failed to upload print file to FTP” error -4020. Stale connection. Bambu Handy or Home Assistant is hogging the single MQTT/FTP slot the A1 firmware allows. Disconnect them first.
LAN-only print fails on macOS for A1. Issue #12563. Apple’s macOS Local Network privacy entitlement blocks the A1’s mDNS broadcast intermittently. Fix: System Settings → Privacy and Security → Local Network → toggle OrcaSlicer ON (toggle off then on if it’s already on).
Brief note on X1 / P1 differences
If you also own an X1C or P1S (many users have multiple Bambu printers), the OrcaSlicer setup workflow is similar but the menu paths differ:
- X1C / X1E: 5″ capacitive touchscreen. LAN+Dev Mode lives under “Network” tile.
- P1S / P1P: 2.7″ mono LCD with click-wheel. Toggles under “General” not “WLAN”.
- A1 / A1 Mini (this article): touchscreen, toggles under “WLAN” tile.
Calibration also differs. X1C/X1E auto-calibrate Flow Dynamics via lidar. A1/A1 Mini auto-calibrate via eddy-current sensor. P1S/P1P have no auto Flow Dynamics, so you run the OrcaSlicer manual PA test instead. The full X1C / P1S setup article covers those differences in detail.
Frequently asked questions
Does OrcaSlicer still work with my A1 after the firmware lockdown?
Yes, via LAN Mode + Developer Mode toggled on the touchscreen. Cloud printing through OrcaSlicer is gone. Local LAN printing, AMS Lite slot mapping, and live temps still work.
Can I use a regular Gen-1 AMS with my A1?
No. The A1 series is hardware-locked to AMS Lite. Plugging a Gen-1 AMS into an A1 won’t be recognised. If you need 8 or 16 colors, you’d need to switch to an X1C or P1S that supports daisy-chaining.
Does the A1 Mini have a 4.3-inch touchscreen?
No. The A1 Mini has a 2.4-inch capacitive screen. Only the full A1 has the 4.3-inch screen. Many third-party sites repeat this incorrectly because they copy each other.
Why does my eddy-current PA fight with OrcaSlicer’s PA?
Because they stack. OrcaSlicer stores K on the filament profile; the A1 firmware stores K per AMS slot. If both are non-zero, both apply, and you get double pressure advance, which shows as bulgy corner exits. Fix: set OrcaSlicer’s filament PA to 0 if you’ve run the printer’s Auto Flow Dynamics.
Why won’t my A1 Mini connect to OrcaSlicer in LAN-Only Mode?
Most likely Bambu Handy or Home Assistant is hogging the single MQTT/FTP connection slot the A1 firmware allows. Close those first. Second most likely: 5 GHz Wi-Fi (the A1 only does 2.4 GHz). Third: VLAN segmentation blocking mDNS.
Can I print PA-CF on the A1 / A1 Mini?
Officially no, per Bambu’s wiki. The open-frame chamber can’t sustain the temperature PA-CF needs to print without warping. PETG-CF and PLA-CF will technically slice (despite OrcaSlicer’s “incompatible” warning) but you need a hardened steel nozzle first; the stock stainless wears in one spool.
Does the A1 work with the OrcaSlicer-BambuLab fork that restored cloud printing?
The fork is shuttered (Pawel Jarczak received a cease-and-desist from Bambu in early 2026). Don’t try to install copies floating online. They’re unmaintained and may be modified in unsafe ways.
Why are my AMS Lite filaments wrong color in OrcaSlicer?
Either third-party filament with a generic RFID tag, or you swapped spools without re-syncing. Click the green “Sync with AMS” button on the Filament panel, or manually drag the swatch in the Send to printer dialog and tick “Don’t ask again for this slot”.
Wrap-up
OrcaSlicer with Bambu A1 or A1 Mini in 2026 is workable but requires the LAN+Dev mode dance and accepting that cloud features are gone. The slicer-side workflow (multi-color, calibration, scarf seam, Precise Wall) remains far ahead of Bambu Studio’s defaults.
The single biggest mistake I see in setup: leaving OrcaSlicer’s filament PA at a non-zero value while the printer also has eddy-current Flow Dynamics enabled. They stack, you get bulgy corners, and you blame the slicer when the printer is doing exactly what you told it. Set Orca PA to 0 unless you’ve explicitly disabled the printer-side Flow Dynamics for that slot.
For the full calibration walkthrough across all nine OrcaSlicer tests, the calibration guide covers each in order. If you’re new to OrcaSlicer entirely, start with the beginners guide. Or grab the install from the download page.
Related OrcaSlicer guides
- OrcaSlicer for Bambu Lab X1C, X1E and P1S: Setup, Profiles & Calibration
- OrcaSlicer for Bambu Lab H2D: Setup, IDEX Modes and AMS
- OrcaSlicer for Bambu Lab P1S / P1P – Complete Setup Guide (2026)
- OrcaSlicer Bambu AMS Setup & Tips: Complete 2026 Guide
- OrcaSlicer System Requirements: GPU, RAM, OpenGL Explained