
The first multi-color print I ever sliced in OrcaSlicer came out looking like someone smudged ketchup across the side of a white toy. The white surface had pink streaks running through the first few millimeters of every layer change, and I had no idea why. The tower next to my model looked fine. The colors in the slicer preview looked perfect. But the actual print? A mess.
It turned out I had the same problem almost every multi-color beginner runs into. I’d been quietly nudging the flush multiplier down to save filament, and the purge volume had dropped below the point where the hotend could actually clear the previous color before laying down the next one. That smudgy result is the exact thing the wipe tower (or prime tower, depending on which panel you’re looking at) is built to prevent. And if you’ve ever wondered why OrcaSlicer uses two different names for what looks like the same thing, or why your tower is sometimes twice as tall as your model, or why the AMS doesn’t magically eliminate that ugly purge structure next to your print, this guide is going to walk you through all of it.
I’ll cover every setting in the panel, the matrix that controls purge volumes, the three wall types, and how to actually tune the thing instead of just leaving the defaults and hoping. I’ll also call out the GitHub issues that are still open in 2.3.x so you know what’s a real limitation versus what’s just a setting you haven’t found yet.
Table of Contents
- Prime Tower vs Wipe Tower: Why OrcaSlicer Uses Both Names
- Why the Tower Is Needed at All
- Where the Settings Live in OrcaSlicer
- Settings Walkthrough: Simple Mode
- Settings Walkthrough: Advanced Mode
- The Three Wall Types: Rectangle, Cone, Rib
- Purge Volume Tuning and the Flush Matrix
- AMS vs Non-AMS Behavior
- When You Can Skip or Minimize the Tower
- Common Problems and Fixes
- How to Calibrate Purge Volume With a Test Print
- FAQ
- Wrap-Up
Prime Tower vs Wipe Tower: Why OrcaSlicer Uses Both Names
Let’s clear this up before anything else, because almost every confused forum post about this feature starts here. OrcaSlicer uses the term “Prime Tower” in one place and “Wipe Tower” in another, and a lot of new users assume those are two different features they need to configure separately. They’re not. It’s the same physical structure with two names, and the naming inconsistency is inherited from the slicer’s two ancestors.
Here’s the breakdown. In Print Settings > Others, you’ll see a section called Prime Tower. That panel holds the per-print toggles: enable on or off, width, brim, wall type, prime volume, and everything to do with the shape and behavior of the structure on a print-by-print basis. This is the language Bambu Studio uses, and Orca inherited it.
In Printer Settings > Multimaterial, you’ll see a section called Wipe Tower. That panel holds the printer-level configuration: X position, Y position, rotation angle, which extruder owns the perimeter, and a few flush-related toggles. This language comes from PrusaSlicer, which has called it a wipe tower since the original MMU days.
And if you dig into the config keys themselves (the ones you’d see if you exported a profile and opened it in a text editor), the naming is split too. You’ll find enable_prime_tower, prime_tower_width, prime_volume, prime_tower_brim_width on one hand, and wipe_tower_x, wipe_tower_y, wipe_tower_rotation_angle, wipe_tower_extruder, wipe_tower_wall_type, wipe_tower_cone_angle on the other. Same feature, two prefixes, no clean rule for which is which.
For the rest of this article I’ll use “the tower” when I’m talking about it generally, and I’ll use the exact UI label when I’m pointing at a specific setting. If you remember nothing else from this section, remember this: the structure that gets printed next to your model to absorb purge is the tower, and you configure parts of it in two different panels because of OrcaSlicer’s mixed lineage.
Why the Tower Is Needed at All
To understand why you can’t just delete this structure and save filament, you need to think about what’s happening inside the hotend during a filament swap.
When the printer decides to switch from filament A to filament B, it retracts A out of the melt zone, feeds B in, and starts pushing B toward the nozzle. But the hotend isn’t empty. There’s still a slug of melted A in the melt zone, in the throat, and in the bore of the nozzle itself. As B pushes through, the first material that comes out isn’t pure B at all. It’s mostly leftover A, then a transitional gradient of A and B mixed together, and only after a certain volume of filament has passed through do you finally get pure B coming out the nozzle.
If you skipped the tower and let that gradient land on your model, you’d see exactly what I described in the intro. Streaks of the previous color smeared across the new surface for the first few millimeters of every perimeter after a swap. On a dark-to-light transition like black to white, you’d see grey stripes. On a red-to-yellow, you’d see orange smudges. It’s not subtle and it’s not fixable in post-processing.
So the tower’s primary job is to absorb that contaminated transition material somewhere off the model. The slicer routes the nozzle to the tower after every toolchange, extrudes a known volume of filament into the tower (purging the old color and priming the new one), and only then sends the toolhead back to the actual part where it lays down the now-clean new color.
There are a couple of secondary reasons too. After a toolchange the filament pressure in the hotend is unstable, and priming a known volume into the tower lets that pressure equalize before the printer tries to start a fresh perimeter. The tower also guarantees the nozzle isn’t dry or under-extruding when it starts on the part. And for IDEX and toolchanger setups (like the Prusa XL or Snapmaker U1), the tower gives idle tools a known clean starting point too, which matters for tool reliability over a long print.
The wiki phrasing from the Bambu Lab docs (which Orca largely inherits) puts it like this: the tower “cleans up the residue on the nozzle and stabilizes the chamber pressure inside the nozzle, in order to avoid appearance defects when printing objects.” That’s the formal version. The informal version is: without it, your multi-color print looks like crap.
Where the Settings Live in OrcaSlicer
Before we go through every parameter, here’s the lay of the land so you know where to click.
Print Settings > Others > Prime Tower is where you find the per-print toggles. This panel changes when you switch process profiles (so a “0.20mm Standard” profile and a “0.16mm Optimal” profile can have different tower widths if you’ve tuned them). The settings here are: enable, width, prime volume, and (when you switch the UI mode to Advanced) brim width, rotation angle, max bridging distance, purge line spacing, extra flow, max print speed, wall type, cone angle, rib parameters, fillet wall, and no-sparse-layers.
Printer Settings > Multimaterial > Wipe Tower is where you find the physical placement and extruder assignment. This panel changes when you switch printer profiles. The settings here are: X position, Y position, rotation angle (yes, also appears here on some printers), and extruder.
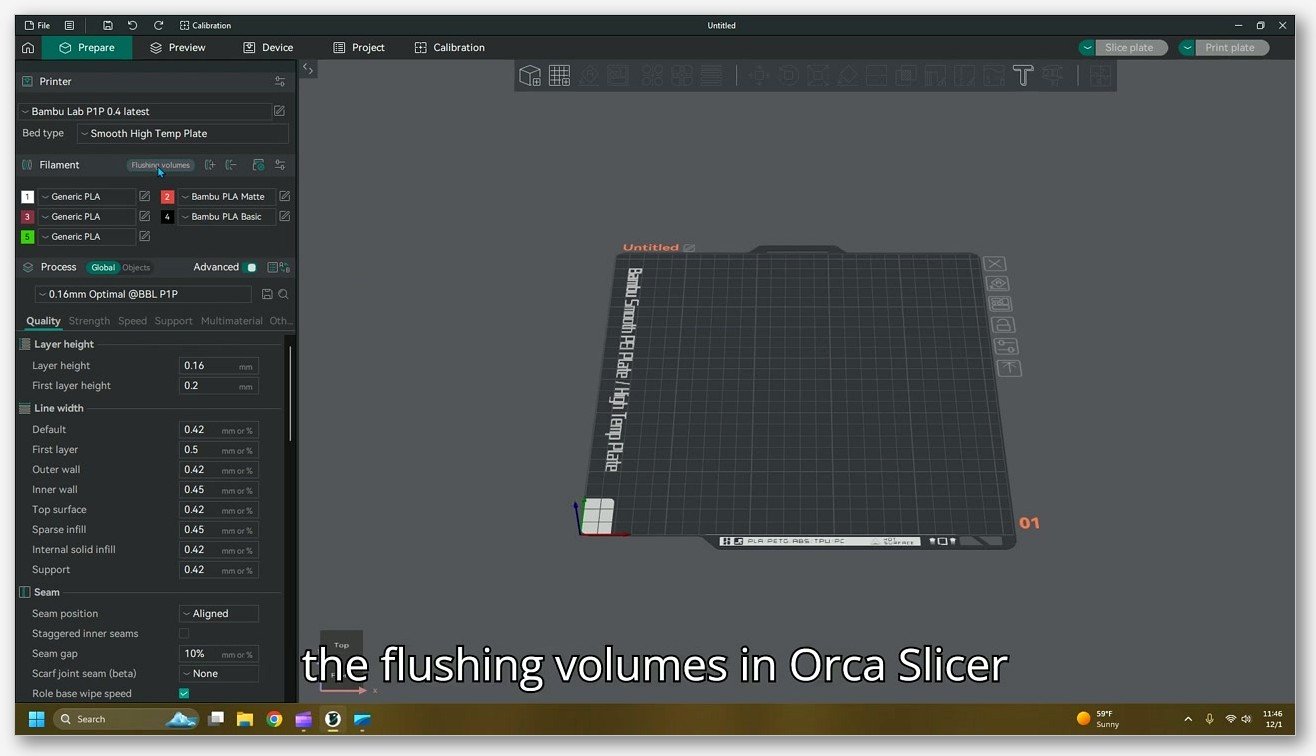
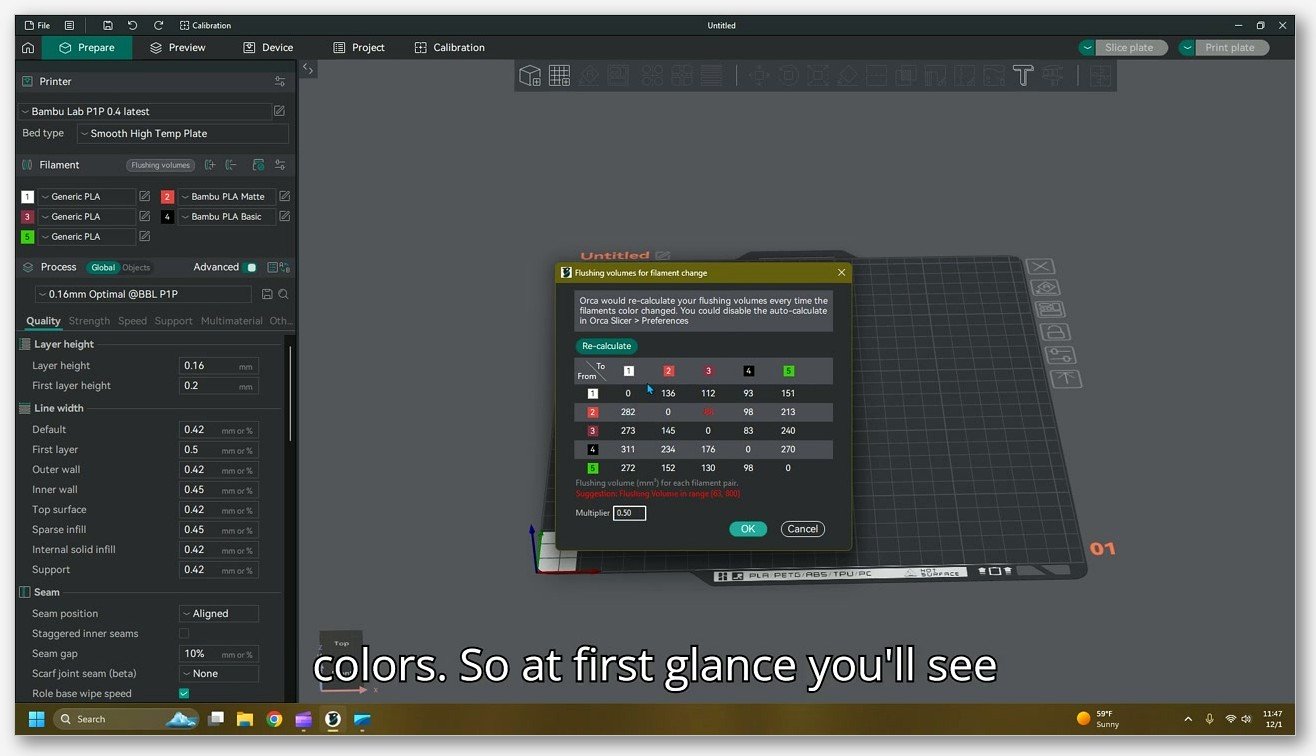
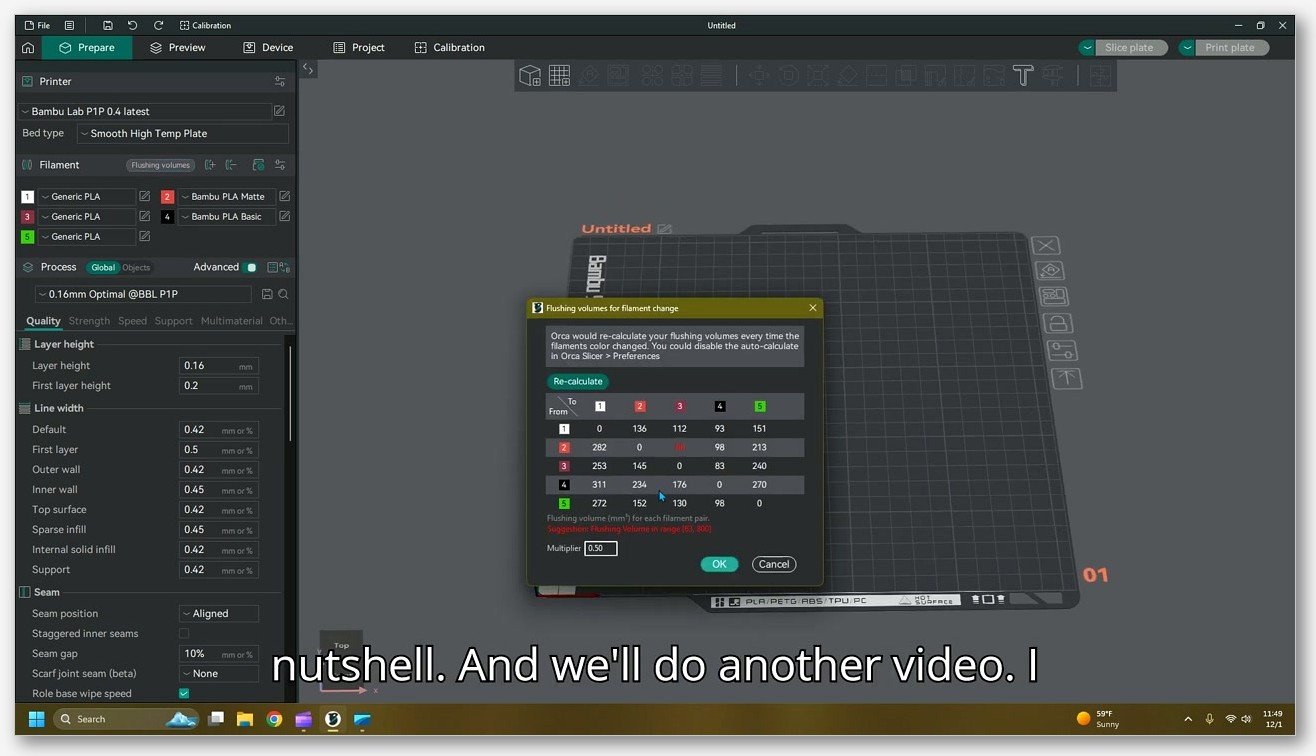
Filaments > Flushing Volumes (or the equivalent button in the filament dialog) is where you find the matrix of mm-cubed values that controls how much filament gets purged for each pair of colors. There’s also a global multiplier that scales the entire matrix at once.
The flush-into destination toggles (flush into infill, into objects, into support) live in a slightly different place depending on the OrcaSlicer version: in 2.3.x they’re under Print Settings > Multimaterial alongside the prime tower section, but check the search box at the top of the settings panel if you can’t find them.
One thing worth noting if you’re new to OrcaSlicer’s UI: most of these settings only appear when the slicer detects more than one filament configured for the plate. If you load a single-color print and start looking for the tower settings, you might not see them at all. Add a second filament and the panel will populate. Our multi-material guide walks through the initial filament setup if you need that part first.
Settings Walkthrough: Simple Mode
OrcaSlicer has a UI mode toggle at the top of the settings panel: Simple, Advanced, Develop. In Simple mode, the prime tower section gives you three controls. These are the ones that 90 percent of users will ever touch.
Enable (config key enable_prime_tower). This is the master switch. Default is false for single-material profiles and true for multi-material profiles. If you’ve loaded two or more filaments and you have a multi-color print, this should be on. If you turn it off for a multi-color print with mid-layer color changes, your print will have visible streaks at every transition. Don’t do that.
Width (config key prime_tower_width). Default 60 mm, minimum 2 mm. This is the X dimension of the tower’s footprint. The Y dimension is calculated automatically by the slicer based on how much purge volume needs to fit on each layer. A wider tower spreads the purge across a larger footprint, which means a shorter tower for the same total purge volume. A narrow tower stacks tall and is more prone to falling over.
I generally leave this at 60 mm for prints under maybe 80 mm tall. If I’m doing a tall multi-color print (say 150 mm or more), I’ll bump the width to 80 or even 100 mm so the tower doesn’t end up looking like the Burj Khalifa next to the part. There’s a sweet spot here: too narrow and it’s unstable, too wide and you’re wasting build plate area you might want for actual parts.
Prime volume (config key prime_volume). Default 45 mm-cubed, minimum 1 mm-cubed. This is the volume of filament primed into the tower after every toolchange, on top of whatever the flush matrix specifies for that color pair. Think of it as the “make sure the nozzle is wet and pressurized” volume.
You’ll see advice on forums to drop this number to save filament. Be careful. The volume between the cutting blade and the nozzle tip on a typical 1.75mm filament setup works out to about 107 mm-cubed (pi times 0.875 squared times 44.5 mm of melt zone length, roughly). That’s the theoretical minimum amount of filament you have to push through to clear the old color from the hotend on its own. The default 45 mm-cubed is the prime on top of the flush, so the total purge per swap is flush plus prime, which sums comfortably above the hotend volume. Drop both numbers too aggressively and you’re guaranteed to see color bleed.
For most users, the three Simple-mode settings are all you need to touch. Leave the wall type at Rectangle, leave the rotation at zero, leave the brim at default, and ship it. The Advanced mode controls are for tuning specific problems, which I’ll get into next.
Settings Walkthrough: Advanced Mode
Flip the UI mode to Advanced and the prime tower section grows considerably. Here’s what each control does, with verified config keys.
Brim width (config key prime_tower_brim_width). Default 3 mm. This is a brim drawn around the base of the tower for first-layer adhesion. Three millimeters is plenty for short towers. For tall towers (over about 100 mm), or for towers made of materials that don’t stick well to your bed surface, bump this to 6 or 8 mm. If the tower keeps detaching mid-print, this is one of the first knobs to turn. The general brim/raft/skirt guide has more on how brim width interacts with first-layer adhesion overall.
Wipe tower rotation angle (config key wipe_tower_rotation_angle). Default 0 degrees. Rotates the tower around its center point relative to the X axis. The reason this exists isn’t aesthetic. It’s so you can orient the tower’s long edge away from the part if your plate is cramped, or so you can avoid a printer-specific exclusion zone like the bed clip on a Bambu A1.
Maximal bridging distance (config key wipe_tower_bridging). Default 10 mm. On layers where no toolchange happens, Orca prints a sparse pattern for the tower instead of a solid one (to save filament). This setting controls how far apart the bridging strands can be on those sparse layers. Bigger value means a more open structure (less material) but also a more fragile tower. The default is fine for almost everyone.
Wipe tower purge lines spacing (config key wipe_tower_extra_spacing). Default 100 percent. Adjusts the spacing between purge lines on the tower. Setting this above 100 percent makes the tower less dense; below 100 percent makes it tighter. Useful for diagnosing under-extrusion artifacts on the tower itself.
Extra flow for purge (config key wipe_tower_extra_flow). Lets you over-extrude on purge lines specifically (without affecting your model’s flow). If you’ve calibrated flow rate for your filament and you find the tower walls look thin or gappy, a small bump (say 105 percent) on extra flow can fix the tower without touching the model’s print quality.
Maximum wipe tower print speed (config key wipe_tower_max_purge_speed). Default 90 mm/s. Caps the speed at which the tower is printed. The actual speed used is the lowest of this value, your sparse infill speed, and the filament’s max volumetric speed converted to a linear speed for the tower’s line width. If your tower is shaking the printer (high inertia at the corner of the bed), drop this to 60 mm/s.
Wall type (config key wipe_tower_wall_type). Rectangle, Cone, or Rib. This is the single most useful Advanced setting for stability problems, and it gets its own section below.
Stabilization cone apex angle (config key wipe_tower_cone_angle). Default 0 degrees. Only used when wall type is Cone. The apex angle controls how much the base of the cone flares out relative to the top. A larger angle means a wider base and a more stable structure, at the cost of using more material and more plate area.
Extra rib length (config key wipe_tower_extra_rib_length). Used when wall type is Rib. Positive values make the ribs longer (more material, more stability); negative values shrink them. The default depends on the printer profile.
Rib width (config key wipe_tower_rib_width). Used when wall type is Rib. Width of the rib walls themselves.
Fillet wall (config key wipe_tower_fillet_wall). Default false. Rounds off the sharp corners of the tower. Slight stability benefit, slight purge-routing benefit.
No sparse layers (config key wipe_tower_no_sparse_layers). Default false. When set to true, the slicer skips drawing the tower on any layer that doesn’t have a toolchange. Useful for prints where color changes are concentrated in just a few specific layers and the tower would otherwise be a wasteful tall column of empty sparse layers. The caveat is that you have to make sure the toolhead doesn’t crash into the model in the layers above the now-shorter tower, since the slicer won’t account for that automatically.
Skip points (config key prime_tower_skip_points). Advanced control to skip the prime step for specific tool transitions. Used by people who’ve manually identified pairs that don’t need any priming (for example, identical filament in two slots).
Tower framework (config key prime_tower_enable_framework) and tower infill gap (config key prime_tower_infill_gap). Internal stabilizing framework for the tower and the gap between that framework and the outer wall. Niche stability controls.
Single extruder MM priming (config key single_extruder_multi_material_priming). Configures the initial priming sequence for single-extruder MMU setups (like a Prusa MMU or ERCF) at the start of the print, before the first layer of the model.
That’s the full list of 27 verified config keys associated with the tower and its flush behavior, drawn from the OrcaSlicer wiki and the r6e.dev config reference. You won’t touch most of them in any given print, but it’s worth knowing they exist so you know there’s a knob for almost every behavior.
The Three Wall Types: Rectangle, Cone, Rib
Wall type deserves its own section because it’s the setting that solves the single most common tower complaint: “my tower fell over halfway through the print.”
Rectangle is the default and what you’ll see on most stock profiles. The tower is a simple rectangular prism, perimeter walls plus internal sparse infill. It’s fine for short and medium-height towers, and it has the lowest material cost of the three options. The downside is that as the tower gets taller, the aspect ratio gets worse, and a tall rectangular prism is just not a stable shape. Around 120 to 150 mm of height on a 60 mm-wide tower, you start to see real risk of it tipping during a toolchange when the nozzle hits the side wall on its way in.
Cone takes the rectangle and flares the base outward. The apex angle controls how much. A 5 to 10 degree angle gives you a noticeably wider foundation without exploding the plate footprint. This is the right choice for tall towers (over about 100 mm) on prints where you have room to spare. The cone shape lowers the center of mass and gives the tower way more resistance to lateral force from toolchange moves. Material cost is slightly higher than rectangle, and you do lose some plate area at the base.
Rib is the newest option and it’s the one I’d reach for first on really tall or really finicky towers. Instead of just a perimeter wall, the tower gets external rib structures (think of buttresses on a gothic cathedral) that brace it against tipping. The Anycubic wiki for their Orca fork describes it as the stability option of choice, and the Snapmaker U1 troubleshooting docs specifically recommend it for tall tower collapse issues. Material cost is between rectangle and a steep-angle cone. Setup involves wipe_tower_extra_rib_length and wipe_tower_rib_width to tune the ribs themselves.
Note that the Rib wall type is relatively new and might not exist on every OrcaSlicer fork or every version. If you’re on the mainline OrcaSlicer 2.3.x release it should be there. On older or third-party forks, you might only see Rectangle and Cone.
Pick Rectangle for short and simple, Cone for tall with plate room to spare, and Rib for tall when you really need stability and don’t mind a bit more material.
Purge Volume Tuning and the Flush Matrix
If the wall type setting is the answer to “why is my tower falling over,” the flush matrix is the answer to almost every other tower question: why is it so big, why is it so small, why is my new color contaminated, why is the print taking forever, and how do I save filament without ruining the result.
Here’s how the matrix works. You open Filaments > Flushing Volumes and you get an N-by-N grid, where N is the number of filaments you have configured. Each cell is labeled with the volume in mm-cubed to purge when transitioning from filament i to filament j. Cells on the diagonal (i to i, same filament to itself) are usually zero, though you can set them to any value.
The defaults you’ll see on a fresh OrcaSlicer install for an AMS-equipped Bambu printer (verified):
- Vector (config key
flush_volumes_vector): ~140 mm-cubed per filament slot. This is the load/unload baseline applied at the start and end of using any filament. - Matrix (config key
flush_volumes_matrix): around 280 mm-cubed for color-to-color transitions on most pairs by default. - Multiplier (config key
flush_multiplier): 0.3 on AMS-equipped Bambu profiles. Yes, 0.3, not 1.0. Orca ships with this scaled down because Bambu’s stock matrix is conservative and would otherwise produce towers far larger than needed for most prints. - Prime volume (config key
prime_volume): 45 mm-cubed, on top of whatever the matrix specifies for the pair.
These are verified defaults from the OrcaSlicer wiki and config reference. Don’t take random numbers from forum posts as gospel; check what your installed profile actually has.
For non-AMS profiles (a generic printer with a manual MMU, or an ERCF, or a Prusa XL), the flush multiplier is typically 1.0 rather than 0.3, because there’s no AMS-tuned matrix and the slicer wants the full conservative volume by default. Verify in your own installed profile.
The 107 mm-cubed minimum. Here’s a number every multi-color user should know. The theoretical minimum purge volume for 1.75mm filament is about 107 mm-cubed, which comes from the volume of the bore between the filament cutter (or whatever cuts the trailing filament) and the nozzle tip. The math: cross-section of 1.75mm filament is pi times (1.75/2) squared, or about 2.4 square mm. Multiply by the roughly 44.5 mm of melt-zone length between cut point and nozzle, and you get about 107 mm-cubed. Below that, you literally cannot push the previous color out of the melt zone, no matter what your matrix says.
If you find yourself dropping matrix values below 107 for a color pair, expect contamination. That’s not a tuning failure, that’s physics.
The asymmetric matrix. One thing new users miss is that the matrix is not symmetric. The volume needed to go from filament A to filament B is not the same as B to A. The rule of thumb:
- Light to dark (white to black, beige to navy): you can purge less, because residue of the light color hidden inside the dark color is invisible.
- Dark to light (black to white, red to yellow): you need the most purge. Any leftover dark filament will show as a smudge against the light background.
- Similar to similar (red to orange, blue to teal): minimal purge needed; the residue blends.
- Identical to identical (white PLA in slot 1 to white PLA in slot 2): can be set to zero. No reason to purge anything.
So when you’re tuning the matrix manually, you don’t bump every cell up or down together. You bump specific pairs based on which direction the transition goes.
The flush multiplier as the master knob. If you don’t want to tune individual cells, the multiplier is your single biggest lever. Going from 0.3 to 0.5 scales every cell up by 1.67x. Going from 0.3 to 0.15 halves the purge across the board. Most users start here, push the multiplier up until contamination stops, and then maybe tune individual problem pairs later.
Symptoms of under-purge. Stripes or ghost-color bleed on the first few millimeters of perimeter after a swap. New color looks desaturated or muddy. Worst on dark-to-light transitions. Fix: bump the multiplier or bump the specific matrix cells for the offending pair.
Symptoms of over-purge. Massive tower, lots of waste filament, ballooning print times, and sometimes Z-banding on the model itself when the tower’s repeated tall extrusions warp the print. Fix: drop the multiplier, zero out same-color matrix cells, enable no-sparse-layers, or widen the tower so it gets shorter.
AMS vs Non-AMS Behavior
One of the most common questions on the OrcaSlicer Discord and the Bambu forum is: “Do I still need the tower if I have an AMS?” The short answer is yes, and the longer answer is that the AMS changes how the tower is sized but doesn’t eliminate it.
Here’s what the AMS actually does:
- It physically automates the toolchange (you don’t have to manually swap spools).
- It provides color and material data to the slicer, which OrcaSlicer (inheriting from Bambu Studio) uses to auto-calculate the flush matrix based on color difference.
- It comes with profiles tuned to a multiplier of 0.3 by default, because Bambu’s stock matrix is sized for worst case and Orca’s AMS-aware profiles scale it down.
What the AMS does not do: it doesn’t change the physics of what’s in the hotend after a swap. There’s still a slug of the previous color in there, and that slug still has to go somewhere. The AMS just makes the swap automatic. The tower is still printed.
The Bambu wiki phrases it like this: “Bambu Studio uses an algorithm to auto-calculate the required flushing volume during a filament change, with color and material properties being the main factors used to calculate the default volumes.” OrcaSlicer inherits this auto-calculation, and it’s a decent starting point, but it’s heuristic. The algorithm makes assumptions about your hotend, your retraction settings, your print speed, and your specific filament behavior, and those assumptions might be off for your setup. Manual tuning, using a calibration print, usually beats the auto-calculation if you care about minimizing waste.
If you’re running Orca with the Bambu X1C, P1S, A1, A1 Mini, or H2D and you have an AMS attached, the default flush multiplier in the AMS-aware profile is 0.3. Check it in your installed profile to confirm. Our AMS setup guide walks through the initial configuration; the X1C/P1S guide covers the specific profile defaults for those two printers.
For non-AMS multi-material setups (Prusa MMU2/MMU3, ERCF, Bondtech LGX with a manual splicer, Snapmaker U1 with its toolchanger, Prusa XL with its toolchanger, IDEX setups, and so on), the behavior differs:
- You have to enter color and material data manually in the filament dialog for each slot, because there’s no electronic spool tag to read.
- The auto-calc button is there, but it works only on what you’ve typed in.
- The mechanical reliability of swaps matters more, and under-purge errors compound across long prints with many swaps.
- For toolchangers, the
wipe_tower_extrudersetting (default 0, meaning “whichever extruder is active”) becomes important. On a Prusa XL or Snapmaker U1, you often want to pin this to a specific tool (say, tool 0) so the slicer doesn’t waste swaps just to print the tower perimeter.
For IDEX setups specifically, wipe_tower_extruder selects which extruder owns the outer perimeter of the tower. The body of the tower is still built layer by layer with whatever tool is active for that swap, but the perimeter wall (which is what gives the tower its shape) gets assigned to one tool. Verified from the OrcaSlicer config reference: default 0 means “the extruder currently doing the printing.”
If you’re coming from manual M600-style filament changes, where you swap colors by pausing the print, note that the tower isn’t relevant to those workflows. M600 is for single-color objects with a layer-band color change. The tower exists for multi-color objects with automated mid-layer swaps.
When You Can Skip or Minimize the Tower
“Can I just turn the tower off?” This is the third-most-asked question (after “wipe vs prime?” and “how do I tune purge?”). The conservative answer is: not really, not for prints with mid-layer color changes. But there are scenarios where you can reduce the tower significantly or skip it on specific layers.
Cases where the tower can be effectively eliminated:
- Single-color object on a multi-color plate. If you have several objects on the plate and one of them only uses filament 1 (no swaps during any of its layers), then for the layers where only that object is being printed, the tower stays empty. Orca has a per-object filament assignment (Prepare > right-click on the object > Change filament) that lets you lock an object to one filament.
- No-toolchange layers. The
wipe_tower_no_sparse_layerssetting skips the tower on any layer that doesn’t have a swap. This is great for prints where the color changes are concentrated in a specific band of layers (say, layers 30 through 50) and everything above and below is single-color. Caveat: you have to manually verify no toolhead-to-model collision in the layers immediately above the now-shortened tower. - Solid top/bottom shells with color zones in between. Same logic as above. The tower only exists for layers that need it.
- Color-painted regions confined to interior layers. If your color-painted regions are all in the middle of the print, the tower exists only for those middle layers.
Cases where you cannot skip the tower:
- Any layer with a mid-layer toolchange. Without a tower the contaminated transition material has nowhere to go except your model surface.
- Single-extruder MMU prints. The purge has to be absorbed by something: tower, supports, infill, or a sacrificial object.
Flush-into alternatives. OrcaSlicer offers three settings that redirect purge into places other than (or in addition to) the tower:
- Flush into support (
flush_into_support, default true). Purge gets routed into support material, which is getting thrown away anyway. This is basically free if you’re using supports. - Flush into infill (
flush_into_infill, default false). Purge becomes hidden infill inside nearby objects. The trade-off is that your infill ends up multi-colored, which doesn’t matter for opaque prints but can show through translucent filaments. - Flush into objects (
flush_into_objects, default false per-object). You designate a specific object as a sacrificial purge target. Common setup: place a hollow cube next to your main parts and mark it as the flush target.
Important verified limitation. Even with all three of these set to true, OrcaSlicer in 2.3.x still requires the prime tower to be enabled. The flush-into options are additive to the tower, not a replacement. GitHub issues #11670 and #13164 are open feature requests asking for flush-into-object to fully replace the tower, but as of writing, those are still requests. Don’t believe any tutorial that tells you flush-into-object eliminates the tower entirely in current Orca. The tower will still appear, just smaller.
The Snapmaker U1 thread on its forum and the Bambu forum’s “Pros and cons of purge into prime tower” thread both have detailed walkthroughs of how users have used flush-into-object to shrink (but not delete) their towers.
Common Problems and Fixes
Here are the issues that come up most often on the OrcaSlicer GitHub, the Bambu forum, and various Reddit threads, with what’s actually been confirmed to work.
The tower falls over or detaches from the bed
Cause: tall narrow towers, dissimilar materials in adjacent layers (PLA bonded to PETG, for example, which doesn’t layer-bond well), or weak first-layer adhesion.
Fixes that work:
- Increase
prime_tower_brim_widthfrom the default 3 mm to 8 to 10 mm. - Switch
wipe_tower_wall_typeto Rib. This is the most stable option for tall towers and is specifically called out in the Snapmaker U1 collapse troubleshooting docs. - Alternatively, switch to Cone with a 5 to 10 degree apex angle for a wider base.
- Clean the bed properly. Warm water plus dish soap, no fingerprints on the first-layer area.
- Bump the bed temp +5 degrees C for the first few layers, and lower the part-cooling fan during the first 5 to 10 mm of the tower.
The tower bleeds onto the model
Cause: under-purge. Either matrix values are too low for the color pair, or the flush multiplier is set too aggressively low.
Fixes that work:
- Run a flush calibration print (see the calibration section below).
- Increase the specific cell in the matrix for the offending pair. Almost always a dark-to-light transition.
- Verify
prime_volumeis at least 45 mm-cubed. Some users drop it lower thinking it’ll save filament. It saves filament right up until it starts ruining prints. - If you’ve dropped any matrix cell below 107 mm-cubed, bring it back up. That’s the physical minimum.
The tower is too tall and causes Z-banding on the model
Cause: over-purge. Matrix values are excessive for the transitions you’re actually doing, or like-color pairs aren’t zeroed out, or the tower isn’t wide enough to spread the purge volume across a short footprint.
Fixes that work:
- Drop
flush_multiplierfrom 0.3 to 0.15 and re-slice. Verify the print still looks clean, then settle on a value in between. - Zero out same-color cells in the matrix. White PLA in slot 1 to white PLA in slot 2 should be 0, not 280.
- Enable
wipe_tower_no_sparse_layersif you have many layers without toolchanges. - Increase
prime_tower_width. A wider tower for the same purge volume is a shorter tower.
The tower brim sticks to the model
Cause: the tower is placed too close to the object, and its brim overlaps the model’s brim.
Fixes that work:
- Adjust
wipe_tower_xandwipe_tower_yin Printer Settings to push the tower away from the object. - Use
wipe_tower_rotation_angleto orient the tower so its long edge faces away from the part. - Reduce
prime_tower_brim_widthif your part doesn’t actually need a wide brim itself.
Tower is gigantic or partly off the build plate
This is a known OrcaSlicer issue (#7073). When you have many materials configured, the flush matrix sometimes scales up unexpectedly and you end up with a tower the size of your part.
Fixes that work:
- Close OrcaSlicer entirely and reopen. Several users on the issue thread report this as the fix.
- Open Filaments > Flushing Volumes and visually scan the matrix for absurd values. A pair that should be ~280 mm-cubed shouldn’t be ~900.
- Increase
prime_tower_widthso the volume gets spread over a wider, shorter footprint.
Stringing on the move to the tower
Known issue #11463 on the OrcaSlicer GitHub. Deretraction happens on the toolchange move toward the tower, which causes stringing between the model and the tower.
Fixes that work:
- Enable wipe-before-retract on the filament profile.
- Add Z-hop on toolchange.
- Verify travel and toolchange retraction values are sane.
Prime tower not visible in the prepare view
Known issue #11116. The tower spawns outside the plate or inside an exclusion zone and just doesn’t render.
Fix: toggle enable_prime_tower off and back on, or reset its X and Y in Printer Settings to safe values inside the printable area.
How to Calibrate Purge Volume With a Test Print
If you’re going to tune the matrix instead of just leaving the defaults, do it with a calibration print rather than by guessing and re-running your main job. There are several free models designed exactly for this.
Recommended calibration prints:
- ORCA – Flush / Purge Volume Test for MMUs by GcodeGearHead on Printables. Designed specifically for OrcaSlicer and the way Orca lays out purge.
- AMS Purge Calibration V2 on MakerWorld. Designed for Bambu AMS but works with any AMS-style multi-material rig.
- AMS Poop Calibration – V1 with new G-code on MakerWorld. Another variant that produces clearer pass/fail strips.
The procedure:
- Pick two filaments for the pair you want to tune. Start with your worst-case transition (typically your darkest and your lightest filaments).
- Set the flush multiplier high. 1.0 or even 2.0 for the calibration. You want the test strips to be over-purged so you can find the breaking point by going down.
- Slice and print the calibration model. It’ll lay down a series of test strips, each with progressively less purge volume between the color transitions.
- Inspect the strips under good lighting after the print finishes. Find the shortest segment that still looks clean (no ghost color, no smearing, no streaks).
- That segment’s length times the line’s cross-sectional area gives you the minimum mm-cubed for that pair. Most calibration models do this calculation for you and label each strip with its purge volume.
- Enter that value (with a safety margin of maybe 10 to 20 percent) in the corresponding cell of the flush matrix.
- Repeat for the other significant pairs in your print, especially dark-to-light transitions.
Don’t bother tuning every cell. Tune the pairs you actually use. If you only ever print with white, black, red, and blue, you only need 12 cells (4×4 minus the 4 diagonal cells) to be accurate. The rest can stay at defaults.
Once you’ve got values you trust for the pairs you use, save the filament profile and reuse it for all your multi-color prints. Flow rate calibration also affects how much filament is actually deposited per mm-cubed, so make sure flow is dialed in before you spend time on purge tuning.
FAQ
Is the prime tower the same as the wipe tower in OrcaSlicer?
Yes. They refer to the same physical structure: a sacrificial tower printed next to your model where the printer purges old filament after every toolchange. “Prime Tower” is the term used in the Print Settings panel (inherited from Bambu Studio), and “Wipe Tower” is the term used in the Printer Settings panel and most of the underlying config keys (inherited from PrusaSlicer).
Can I turn off the wipe tower for multi-color prints?
Not effectively, no. Any print with a mid-layer color change needs somewhere to absorb the contaminated transition material between colors. If you turn the tower off, the contaminated filament gets deposited onto your model surface, causing streaks and color bleed at every transition. The flush-into-support, flush-into-infill, and flush-into-object settings can reduce the tower’s size, but in OrcaSlicer 2.3.x they don’t replace it. GitHub issues #11670 and #13164 are open feature requests for full replacement.
Does the Bambu AMS eliminate the need for a prime tower?
No. The AMS automates the physical filament swap and feeds color data to the slicer for matrix auto-calculation, but the purge still has to go somewhere. Orca still slices a tower for AMS-equipped Bambu printers. The AMS-aware profiles ship with a flush multiplier of 0.3, which keeps the tower smaller than it would be on a non-AMS profile.
What’s the default flush multiplier in OrcaSlicer?
On AMS-equipped Bambu profiles (X1C, P1S, A1, A1 Mini, H2D) the default is 0.3. On non-AMS profiles for generic printers it’s typically 1.0. Verify in your installed profile, since this can vary by version and printer.
What are the default purge volumes in OrcaSlicer?
Verified defaults: vector (load/unload baseline) is ~140 mm-cubed per slot, matrix color-to-color is around 280 mm-cubed for most pairs, prime volume on top of the matrix is 45 mm-cubed, and the multiplier scales the matrix (0.3 on AMS profiles).
What’s the minimum purge volume I can use?
About 107 mm-cubed for 1.75mm filament, derived from the physical volume of the hotend between the cutter and the nozzle. Below this you literally cannot push the previous color out of the melt zone. If you find yourself dropping matrix cells below 107, expect contamination.
Why is my prime tower so tall?
Three common causes. First, the flush multiplier might be too high (try dropping from 0.3 to 0.15). Second, like-color pairs in the matrix might not be zeroed (set white-to-white in different slots to 0). Third, the tower width might be too narrow (a wider tower is shorter for the same purge volume). If the tower is genuinely gigantic, you might be hitting issue #7073, fixed by closing and reopening OrcaSlicer.
Why does my tower keep falling over?
Tall narrow towers with poor first-layer adhesion are the usual culprits. Switch the wall type to Rib, increase the brim width to 8 to 10 mm, and clean the bed. Cone wall type with a 5 to 10 degree apex angle is also effective.
What’s the difference between flush into infill, flush into objects, and flush into support?
Flush into support routes purge into your support material, which is getting thrown away anyway. Flush into infill routes purge into the hidden infill of nearby objects (which can be visible on translucent filaments). Flush into objects lets you designate a specific sacrificial object on the plate as the purge target. None of them eliminates the tower in current Orca; they all reduce its size.
How do I tune the flush matrix?
Use a calibration print like the GcodeGearHead Orca Flush/Purge Volume Test or AMS Purge Calibration V2. Set the multiplier high (1.0 or 2.0), print test strips of your worst-case transition pair, and find the shortest strip that still looks clean. Multiply that strip’s length by the line’s cross-sectional area for mm-cubed. Enter the value with a 10 to 20 percent safety margin in the relevant matrix cell.
Is the Rib wall type better than Cone?
For very tall towers (over 120 mm), yes, Rib is generally more stable per unit of extra material used. For medium-height towers (60 to 100 mm), Cone with a 5 to 10 degree angle is simpler and uses slightly less filament. For short towers (under 60 mm), Rectangle is fine. The Snapmaker U1 troubleshooting docs and the Anycubic Orca-fork wiki both call out Rib as the stability choice.
Why does my new color have a colored streak on the first perimeter after a swap?
Under-purge. The flush matrix value for that specific pair is too low, or the multiplier is set too low globally. Bump the cell for that pair (especially if it’s dark-to-light) or raise the multiplier. Also verify prime_volume is at default (45 mm-cubed) and that no matrix cell is below 107.
Can I use flush-into-object to replace the tower entirely?
Not in OrcaSlicer 2.3.x. It reduces the tower’s purge load but doesn’t eliminate the tower itself. Open GitHub issues #11670 and #13164 are tracking this as a feature request.
Does the wipe tower work with single-extruder MMU setups like Prusa MMU or ERCF?
Yes. In fact, those setups depend on the tower more than AMS setups do, because the manual MMU swap has less margin for error and the purge has to go somewhere. The single_extruder_multi_material_priming setting handles the initial priming sequence at the start of those prints.
What does the wipe tower extruder setting do?
On IDEX or toolchanger setups, wipe_tower_extruder picks which extruder owns the outer perimeter of the tower. Default 0 means “whichever extruder is currently active.” On a Prusa XL or Snapmaker U1, you might pin this to a specific tool to avoid wasting swaps just to build the perimeter.
Wrap-Up
If you walked into this article wondering why OrcaSlicer talks about prime towers in one place and wipe towers in another, hopefully that mystery is cleared up. Same structure, two name conventions, no clean rule. Once you accept that, the rest of the tower configuration is just three layers: enable it and pick a width in Print Settings, set position and extruder in Printer Settings, and tune the flush matrix in the filament dialog.
If your tower is falling over, switch to Rib or Cone and widen the brim. If your new color is bleeding, your matrix is under-purged for that pair (almost always dark-to-light). If your tower is gigantic, your matrix is over-purged or the multiplier is too high, or you’ve hit one of the known issues that gets fixed by restarting OrcaSlicer. The 107 mm-cubed minimum, the 140 mm-cubed vector default, the 280 mm-cubed matrix default, the 0.3 multiplier on AMS profiles, and the 45 mm-cubed prime volume default are the numbers worth memorizing.
And one more time, because it’s the source of so much misinformation: the AMS does not eliminate the tower, flush-into-object does not replace the tower in 2.3.x, and the tower is required for any print with mid-layer color changes. Plan for it, tune it, and you’ll save filament without ruining prints.
If you want to keep going on the multi-color side of OrcaSlicer, our pillar guide on multi-material printing covers filament setup and slot management end to end, and the color-painting walkthrough covers per-region color assignment on a single object. For the printer-specific path, see the AMS setup guide or the X1C and P1S profile guide. If you’re calibrating other parts of the slicer at the same time, flow rate calibration directly affects how much filament actually lands per mm-cubed of purge, and the brim/raft/skirt guide covers the wider topic of first-layer adhesion that intersects with tower stability. For the contrast case where you’re doing single-object color bands manually rather than automated mid-layer swaps, the M600 manual filament change guide walks through that workflow without the tower.
Related OrcaSlicer guides
- OrcaSlicer Settings Master Guide: Every Setting Explained (2026)
- OrcaSlicer for Creality CR-10 Series: Profiles and Setup Guide
- OrcaSlicer for Ender 3 V1, Pro, V2, S1, S1 Pro: Setup Guide
- OrcaSlicer Keyboard Shortcuts Cheat Sheet (Every Verified Key)
- OrcaSlicer M600 Manual Filament Change: Single-Extruder Multi-Color (2026)