
The print that broke me was a tiny architectural model. Smooth cylinder, sharp cube on top, nothing exotic. It came off the build plate looking like a teenager going through a bad week. There was a column of round bumps stacked up the side of the cylinder, a few pimply specks scattered across the cube, and the bottom three layers had flared out like the base of a wedding cake. I had been printing this exact model with this exact filament for six months. So I did the wrong thing first. I dropped the temp by 10 degrees, cranked the retraction, and reprinted. Got a different version of the same disaster.
That moment is when I learned, with feeling, that “blobs and zits” is not one problem. It is at least three different problems that share a vocabulary, and the fix for one is irrelevant to the others. If you treat them as one bucket, you end up doing what I did: chasing your tail through settings menus, breaking calibration you’d already done, and convincing yourself the printer hates you.
This article is the diagnostic walk-through I wish I had that night. We are going to separate the defects first, then attack each one with the right OrcaSlicer setting, in the right order. If your symptoms look like the opposite (gaps in walls, thin top layers, missing infill) you want the sibling piece on OrcaSlicer under-extrusion instead. If you’re just dropping in to triage and don’t have time for a long read, the broader OrcaSlicer troubleshooting guide has the 30-second flowchart version. Everything below is verified against OrcaSlicer 2.3.x.
Table of contents
- 60-second diagnosis: which defect do you actually have
- Causes ranked by impact
- Fix 1: Flow ratio (the real “over-extrusion” lever)
- Fix 2: Pressure advance (the real “blob” lever)
- Fix 3: Seam strategy, painting, and scarf joint (honest version)
- Fix 4: Wipe and retraction
- Fix 5: First-layer elephant foot
- Other contributors worth checking
- Common false fixes
- FAQ
- Wrap-up and what to calibrate next
60-second diagnosis: which defect do you actually have
Most blob/zit guides online treat every surface artifact as one thing. The Obico blog on blobs and zits, for example, does this. It’s a useful resource for setting names, but it conflates two distinct defects, and that conflation is exactly why people end up applying the wrong fix. Before you touch a single slicer value, look at your print and decide which of the four families below you’re staring at.
| Defect | What it looks like | Where it appears | Primary cause | Where to jump |
|---|---|---|---|---|
| Over-extrusion | Whole part looks puffy. Top surface is ridged. Holes are undersized, outer dimensions are oversized. Layers bulge between perimeters. | Everywhere. Not point defects. | Flow ratio too high, or first-layer Z-offset too low. | Flow ratio |
| Blobs | Round bumps roughly 1 to 3 mm wide. Vertically stacked at one location, often the Z-seam line. Sometimes at the end of a long straight line. | Same spot, every layer. | Pressure advance miscalibration and seam settings. | Pressure advance |
| Zits | Tiny pimples, sub-millimeter. Scattered randomly across the surface or along seams. | Random spread across walls. | Slightly high temp, mild ooze, wet filament, or retraction at start/stop points. | Wipe + retract |
| Scars / travel marks | Linear smears or diagonal scratches across the surface. | Following travel paths. | Nozzle dragging during travel (Z-hop or wipe problem), not flow. | Other contributors |
Two things this table is not telling you:
Stringing is a separate problem. Thin filament hairs spanning gaps between two separated print islands. That’s a retraction and travel-temp problem, and it has its own fix path. If you have hairs more than visible bumps, jump to OrcaSlicer stringing and oozing fixes.
Most “blobs” people complain about are really pressure advance problems wearing a costume. If your blobs are stacked vertically on the same outer-wall column on every single layer, that’s a pressure release problem at the seam, and changing seam settings will move it around but won’t make it go away. The thing that makes it go away is calibrating pressure advance. Hold that thought, it’ll matter in the PA section.
Look at your print. Pick one of the four. The rest of the article assumes you’ve done that.
Causes ranked by impact
Here is the order I attack these defects in. I have spent enough time on this to know that randomly tweaking from the bottom of the list is how you waste a Saturday. Top of the list first, every time.
- Flow ratio too high. Single biggest cause of overall over-extrusion. Every 0.01 above the true value adds roughly 1 percent material across the whole print. Manifests as elephant foot, ridged top surface, swollen layers, undersized holes. Calibrate with OrcaSlicer’s built-in flow ratio test. Do not chase a universal target value, every printer-filament-nozzle combo lands somewhere different.
- Pressure advance not calibrated. Single biggest cause of corner blobs and seam-start blobs. When PA is too low, pressure built up in the nozzle during acceleration does not get released cleanly on deceleration, so the nozzle dumps excess plastic at corners and at the end of each perimeter loop. That deposit is your seam blob.
- Seam placement concentrating all artifacts at one spot. Even with perfect flow and PA, plastic has to start and end somewhere. The seam mode you pick decides whether you see a wandering column of small bumps or a clean line in a hidden corner.
- Temperature too high for the filament. Each 5 degrees C above the ideal point increases ooze and zit count. Run a temp tower. Note: if PA is the real issue, lowering temp is just papering over the symptom.
- Wipe on retract misconfigured. If
retract_before_wipeis 0 percent (the default) and your wipe distance is short, the nozzle is still pressurized during the wipe move and smears plastic, instead of cleaning it. GitHub PR #3094 and Issue #5896 trace this exact failure mode. - Filament diameter mismatch. The slicer expects 1.75 mm. The actual filament might be 1.78 or 1.72. Because cross-sectional area scales with diameter squared, a 0.05 mm error is about a 5 percent volume error. Measure with calipers in 5 spots, 10 cm apart, average them, plug the value into the filament profile.
- Z-hop type wrong for your setup. Normal lifts straight up and can leave a blob at the lift point. Slope and Spiral keep the nozzle moving while lifting. GitHub Issue #10663 documents a bug where Slope and Spiral do not always apply Z-hop to all travel moves, leaving stray blobs. Auto is usually the safe default.
- Inner wall direction.
Inner/Outeris the OrcaSlicer default for most profiles.Inner/Outer/Inner(re-introduced with arachne) gives the best outer surface quality because the outer wall prints between two already-laid inner walls. Don’t change it universally, change it when you have a specific surface goal. - First-layer flow specifically over-extruding. Separate setting family. A too-low Z-offset can give you elephant foot even when your overall flow ratio is correct.
- Outer wall slowdown not applied. If you’re printing outer walls at the same speed as inner walls, pressure advance has less time to do its job and you get more blobs. Slow outer walls to roughly 50 to 100 mm/s.
Notice the top two are calibration tasks, not setting tweaks. That is not an accident. Most articles that say “tweak these eight values to fix blobs” are skipping the only thing that actually works.
Fix 1: Flow ratio (the real “over-extrusion” lever)
If your symptoms are whole-part over-extrusion (puffy walls, ridged top, holes too small) you almost certainly have a flow ratio that is too high. Lowering nozzle temperature will not fix this. Increasing retraction will not fix this. The only thing that fixes it is calibrating flow ratio so the slicer’s expected extrusion volume matches what the printer actually lays down.
OrcaSlicer ships with a built-in flow ratio calibration test under Calibration > Flow Rate. There are two variants:
- YOLO single-pass. Faster. Prints one set of squares at varying flow ratios, you pick the cleanest top surface.
- 2-pass legacy. First pass narrows the range, second pass narrows it further. Slower but gives a tighter number.
The walkthrough lives in OrcaSlicer flow rate calibration, so I won’t re-do the whole thing here. The point worth making in this article: do not borrow somebody’s flow ratio from a Reddit thread. I see “set your flow ratio to 0.98” or “0.95 is the magic number for Creality” all the time. There is no universal flow ratio. Your starting point is whatever your printer profile defaults to (commonly 0.98 for many profiles, 1.0 for Bambu, 0.95 for some Creality), and you calibrate down or up from there.
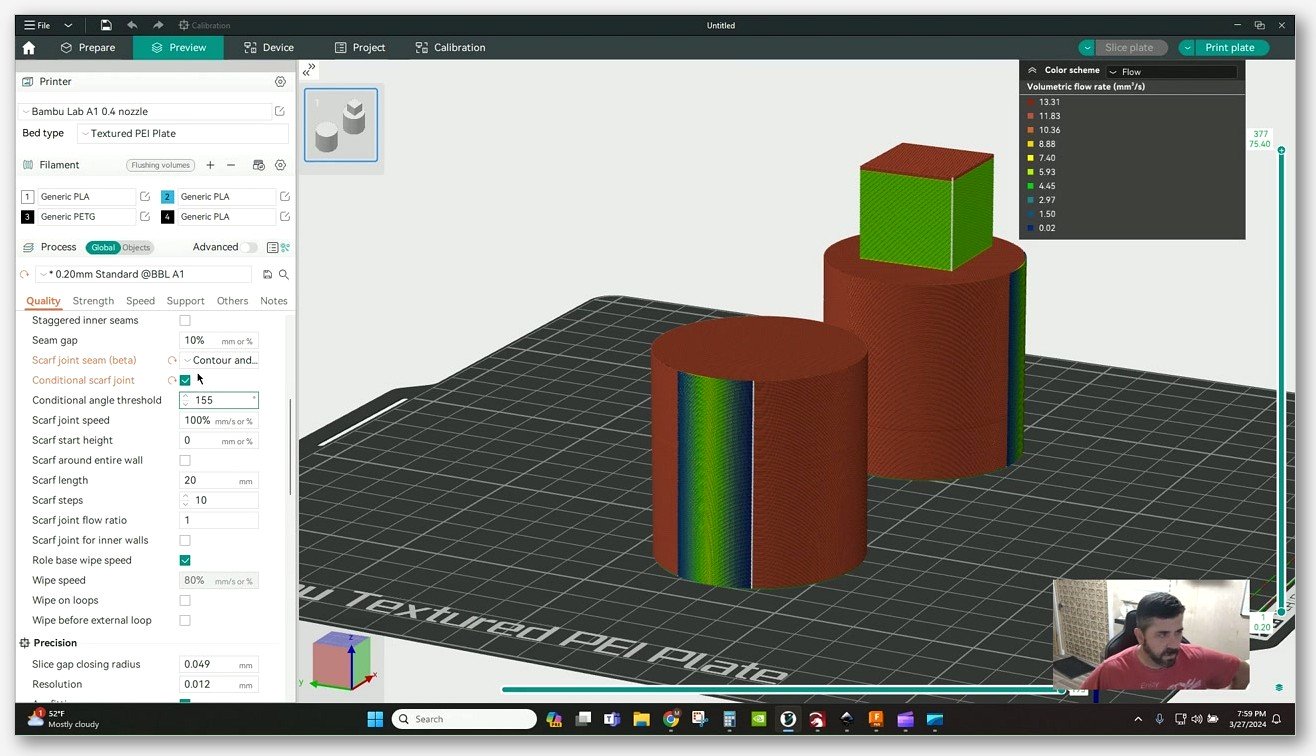
One quiet trap on this calibration: if your bed leveling and first-layer Z are off, the first-layer flow test pad will give you a misleading reading. Always level and Z-offset before flow calibration, never after.
Fix 2: Pressure advance (the real “blob” lever)
Pressure advance does more for blob elimination than any other single setting in any slicer. If you are reading this article and have not calibrated PA, stop reading and do that first. Genuinely. The rest of the article is downstream of getting PA right.
Here is what is happening physically. When the nozzle accelerates into a new line, the extruder is pushing filament against the back-pressure of the nozzle. There is a delay (the “pressure advance”) between the extruder gear turning and plastic actually exiting the nozzle. Without PA compensation, the slicer commands the extruder to stop at the end of a line, but molten plastic continues oozing out for a fraction of a second because the pressure inside the nozzle has not bled off yet. The result is a blob, dumped at the end of the line. If the seam is at the end of that line (which it usually is), the blob sits exactly on the seam, every single layer.
That’s why “blob at the seam” is almost always a PA problem disguised as a seam-setting problem. Move the seam around with seam_position and you’ll just move the blob. Fix the PA and the blob disappears regardless of where the seam lands.
OrcaSlicer’s PA calibration methods
- PA Pattern. Generates a prism with PA increasing across the X axis. Read the cleanest column to get your PA value. Easiest visual read, best for most people.
- PA Line. The straight-line method, similar to Klipper’s built-in test. Faster to print but harder to read because subtle bulges are harder to spot on a line than a wall.
- PA Tower. Increases PA value with Z height. Slow but reliable, and not affected by first-layer issues.
Which one to run depends on your printer family, and I dug into the trade-offs in OrcaSlicer PA line vs PA pattern. The full calibration walkthrough is in OrcaSlicer pressure advance. Use that as your reference. Do not let me give you a number to plug in. Starting points to be aware of, not to use directly:
- Klipper direct-drive: usually lands somewhere around 0.02 to 0.05.
- Klipper Bowden: usually 0.4 to 0.8.
- Marlin: uses Linear Advance with a K-factor that scales differently from Klipper’s PA. Calibrate independently.
Those are not values to set. They are the order-of-magnitude range so you know if your test result is way off.
Klipper pressure_advance_smooth_time interaction
If you’re on Klipper and have already tuned PA but still see slight ringing or fuzz at corners, you may need to tune pressure_advance_smooth_time too. Klipper averages the extruder velocity over a window of time. Default is 0.04 s. Higher smooth_time means more deviation from ideal extrusion. For direct-drive, reducing to 0.02 before tuning ERS gives less deviation for OrcaSlicer’s Extrusion Rate Smoothing to clean up.
OrcaSlicer’s ERS feature exists exactly to compensate for the slight deviation introduced by smooth_time on the slicer side. The OrcaSlicer wiki page on extrusion rate smoothing has the recipe. Save that for after PA is calibrated, not before.
Outer wall speed and PA
One last PA-adjacent thing. If you set your outer wall speed to 200 mm/s because you saw a YouTuber do it, pressure advance has less time to ramp pressure down before the line ends. You’ll see more blobs even with PA calibrated. Slowing outer walls to 50 to 100 mm/s gives the controller breathing room. The first thing I do on any new profile is cap outer wall speed at 80 mm/s and only push it higher after I have a calibrated PA confirming the part actually looks good at speed.
Fix 3: Seam strategy, painting, and scarf joint (honest version)
You have calibrated flow and PA. You still see a thin vertical line on the side of every cylindrical print. Welcome to “seam tuning.” This is not a bug, it is geometry. Every closed loop has to start and end somewhere, and the slicer has to pick where. The job from here is to put the seam in a place you don’t mind looking at, not to make it vanish.
Seam Position options (verified)
The setting is seam_position, in Simple mode under Quality > Seam. The choices, verified against the OrcaSlicer wiki:
- Aligned. Places the seam on the most concave or hidden internal facet across layers, stacking it into a column on a hidden edge. Best on parts with obvious concave corners.
- Aligned Back. Combines Aligned with Back, prioritizing the rear of the part. Useful for figurines and busts where “back” is well-defined.
- Nearest. Places the seam at the closest point to where the nozzle was on the previous layer. Often results in a wandering seam that reads as a column of small bumps. The “I’m not picking” default.
- Back. Places the seam at minimum Y (rear of the object). Clean if the back is hidden in the final use of the part.
- Random. Distributes seams randomly across each layer. Hides “the line” at the cost of scattering small bumps across the entire surface. Works on textured prints, looks bad on smooth ones.
- Painted. Uses the Seam Painting tool to manually place enforcers and blockers. Best for hero parts.
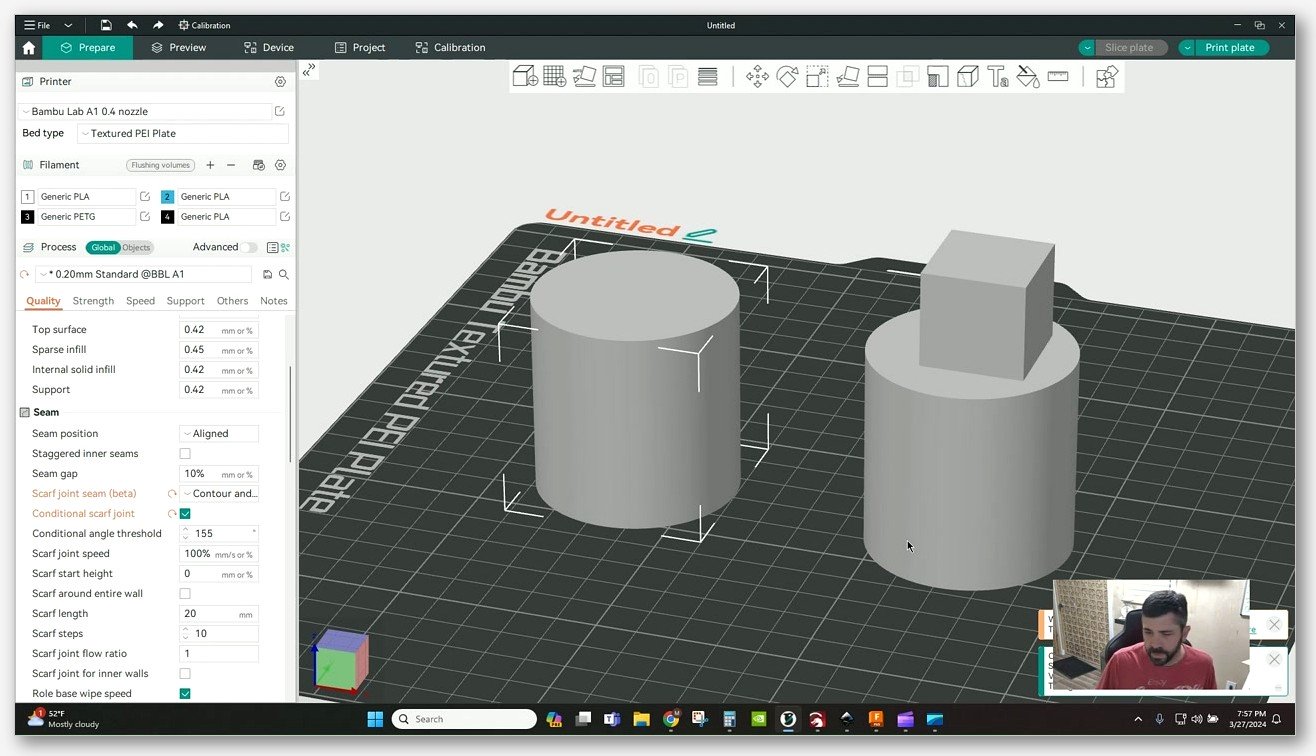
OrcaSlicer’s default seam mode varies by printer profile. Some profiles default to Aligned, some to Nearest. Don’t trust me, don’t trust anyone else, open Quality > Seam and check what your profile actually has.
Seam Gap
Setting is seam_gap, Advanced mode. Accepts millimeters or a percent of nozzle diameter. Default 10 percent. The OrcaSlicer wiki recommendation: on a well-tuned printer with calibrated PA and retraction, 0 to 15 percent is the optimal range. Anything beyond that to “hide” a remaining blob will backfire (more on that in the false fixes section).
Staggered Inner Seams
staggered_inner_seams is in Advanced mode. It offsets inner-perimeter seam positions away from the external seam across layers, so the cumulative weak-point line is reduced. Worth enabling on parts where you care about structural strength along the seam axis, like vases or pressure parts.
Painted seam workflow
- Open your model in the Prepare tab.
- Click the Seam Painting tool in the left toolbar (or press P).
- Set
seam_position = Paintedin process settings. - Use the Enforcer brush to paint where you want the seam.
- Use the Blocker brush to paint where the seam must not go.
Tip: paint a thin strip down a visually hidden edge. The painter is generous about extrapolating between layers, so you don’t have to be precise on every Z level.
For really complex parts where painted enforcers are not precise enough, advanced users can add a negative-volume modifier mesh with custom seam settings assigned. It is overkill for almost every use case, so I won’t pad this article with the full procedure. Mentioning it because you’ll see it referenced in old GitHub threads.
Scarf joint seam: the honest version
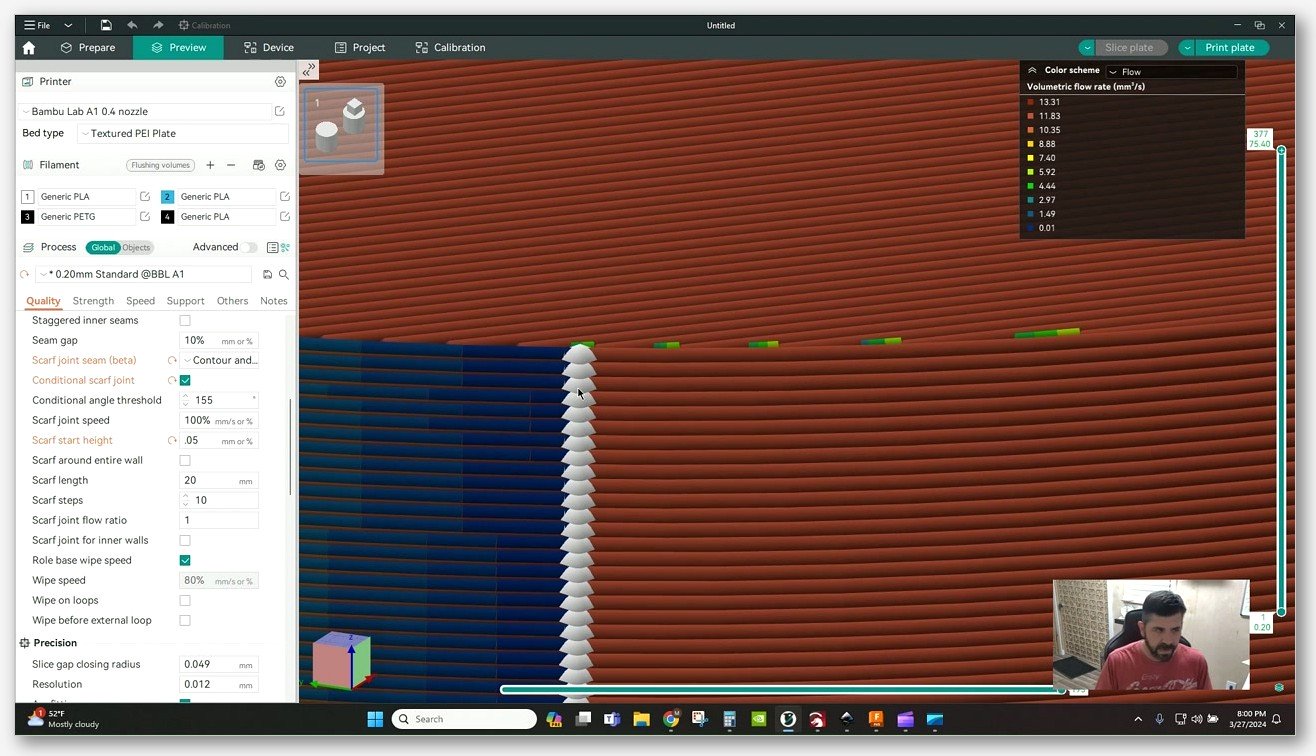
Scarf joint, introduced in OrcaSlicer 2.0.0 and refined in 2.0.x and 2.1.x, tapers the extrusion volume up at the start of a perimeter and down at the end. The overlap zone ends up with approximately the same total volume as a normal extrusion, just spread out. The result is a seam that is much less visible. The result is not “no seam.” Anyone selling scarf as “no more seam ever” is overselling.
Verified field names and recommended starting config:
seam_slope_type: Contour (not “Contour and Hole” unless you specifically want it on internal holes too, GitHub Issue #12049 documents surface quality dropping on parts with protruding features when “Contour and Hole” is on).seam_slope_conditional: enable. Applies scarf only to smooth curves, avoids overhang issues (Issue #4354).scarf_joint_speed: 100 mm/s or lower.seam_slope_start_height: vertical taper start, mm or percent of layer height. Default works for most parts.seam_slope_entire_loop: wraps the scarf around the full perimeter, slower but cleaner.seam_slope_min_length: horizontal taper distance, default about 20 mm in most profiles.seam_slope_steps: number of segments in the taper, default 10.scarf_joint_flow_ratio: Expert/Dev mode only as of 2.0.0. Keep at 100 percent.seam_slope_inner_walls: optional, enable scarf on inner walls too. Helps strength on thin walls.
Scarf limitations to know about (don’t skip this)
This is the part most articles leave out. Scarf joint is useful, but it has documented limits:
- Wipe-on-loops conflict. When scarf is on, the wipe-on-loops behavior fights with the taper end. Disable
wipe_on_loopsandwipe_before_external_loopwhen running scarf. Discussions #4325 and #4647 confirm this combination causes regressions. - Spurious retractions at scarf end. Discussion #4325 reports retractions firing on each layer’s scarf end, which can add subtle stringing if your filament is on the edge of being wet.
- Blobs at start/end of scarf if PA is off. Scarf does not save you from PA miscalibration. It actually makes a miscalibrated PA more visible, because the taper depends on accurate volumetric extrusion. Calibrate PA before turning scarf on, not after.
- Z-hop conflict. Scarf is incompatible with Z-hop set to Slope or Spiral (Issue #7380). Use Auto or Normal Z-hop with scarf, or disable Z-hop on outer-wall travels.
- Overhangs. Do not put scarf seam on overhang faces. Either use
seam_slope_conditionalor paint a blocker on overhang faces (Issue #4354).
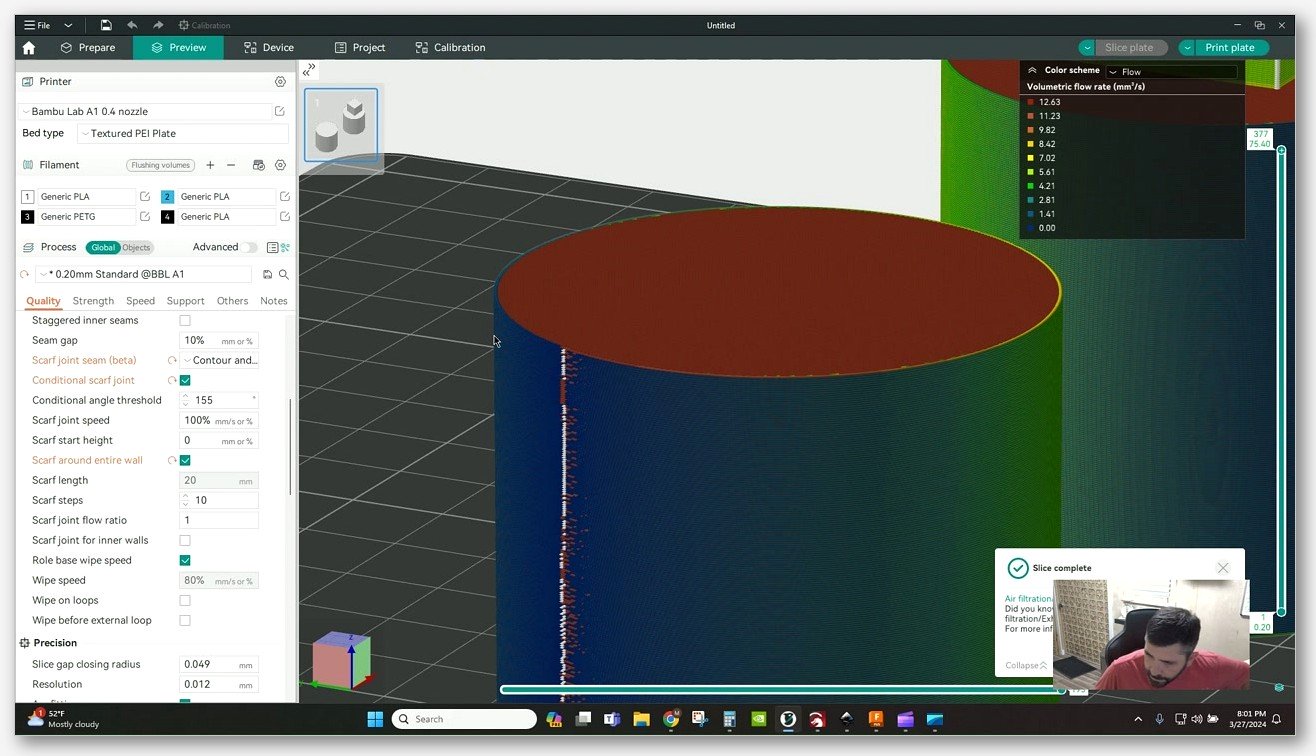
If you want a deeper dive on scarf, the Printables guide by Adam L (model 783313) is solid because it is honest about scarf’s limits. So is the SpoolHound Z-seam and scarf seam guide. The All3DP article on the OrcaSlicer 2.0 release also correctly calls scarf a minimizer, not an eliminator.
Fix 4: Wipe and retraction
Once flow, PA, and seam are sorted, wipe and retraction is the last layer of cleanup. The job of the wipe move is to drag the nozzle along the last extrusion path to clean off ooze before the retraction completes. Done right, it tucks any remaining ooze into the wall you just printed and the seam disappears into the wall texture. Done wrong, it smears plastic across the outside of the part.
The wipe settings that actually matter
role_based_wipe_speed: matches wipe speed to the feature being wiped. Enable.wipe_speed: absolute mm/s or percent of travel speed. 80 percent is a reasonable starting point.wipe_on_loops: enables an inward movement at loop end that tucks the seam into the wall. Enable, unless you’re running scarf joint (then disable, see above).wipe_before_external_loop: performs the de-retraction move inside the model before printing the external wall. Significantly reduces blob visibility at the seam. Enable, unless on scarf.retract_before_wipe: percent of retraction performed before the wipe move. Default 0 percent. This default is the root of a surprising number of blob complaints. Set to 60 to 70 percent so the nozzle is mostly de-pressurized during the wipe.wipe_distance: part of retraction settings, per filament/extruder. Default around 2 mm. If you increase retraction length, increase wipe distance too. GitHub Issue #5896 documents extruder stalls when retraction is long and wipe distance is short.
The combo I run on most direct-drive setups: wipe_before_external_loop on, retract_before_wipe at 60 to 70 percent, default wipe distance. Adjust wipe distance up if you bump retraction length.
Z-hop type
Z-hop has its own quiet contribution to zits. The setting is in printer extruder settings:
- Normal. Lifts straight up. Lowest collision risk. Can leave a blob at the lift point if the nozzle dwells there for any reason.
- Slope. Lifts at an angle while moving forward. Reduces dwell blobs but can drop a blob at the start of the lift if PA is off.
- Spiral. Helical lift. Same trade-off as Slope.
- Auto. Picks per move. Usually the safe default.
GitHub Issue #10663 documents that Slope and Spiral do not always apply Z-hop to all travel moves, which can drop stray blobs on previously printed surfaces. If you see scars (linear smears) across the top of your print, set Z-hop to Auto or increase Z-hop height by 0.05 to 0.1 mm.
Fix 5: First-layer elephant foot
Elephant foot is the sibling problem to over-extrusion. Same family, different fix. The bottom 1 to 3 layers of your print bulge outward, sometimes by half a millimeter or more, while the rest of the part is dimensionally fine. It is caused by a combination of bed heat softening the first layer while the upper layers press down, plus a Z-offset that is squashing the first layer too thin.
The setting in OrcaSlicer is elefant_foot_compensation. Yes, with “elefant,” not “elephant.” OrcaSlicer, Bambu Studio, and PrusaSlicer all spell it the same way. Don’t fight it, it’s not a typo, it’s just how the code field is named.
- Units. Millimeters.
- Mode. Advanced.
- Default. 0.0 mm. The setting is opt-in.
- Range. Generally 0 to 1 mm.
- What it does. Applies a negative XY offset to the first layer(s), shrinking them inward to compensate for the bulge.
Two related settings worth knowing:
elefant_foot_compensation_layers: number of layers across which the compensation tapers linearly from full to zero. If your elephant foot extends across two layers, set this to 2.elefant_foot_layers_density: Expert mode. Range 50 to 100 percent. Default 100 percent (disabled). Reduces internal solid infill density on the compensated layers to reduce nozzle scrape artifacts when first-layer squish is high.
Per-material starting values, with the strong reminder that these are starting points only:
- PLA: 0.1 to 0.2 mm
- PETG: 0.15 to 0.25 mm
- ABS / ASA: 0.2 to 0.3 mm
- TPU: 0 (TPU rarely shows elephant foot because of its flexibility)
Your actual value depends on bed temp, Z-offset, and first-layer line width. The cleanest way to dial it in: print a 20 mm calibration cube, measure the first layer’s width with calipers, and adjust elefant_foot_compensation until first-layer width equals your nominal line width.
Why a brim does not fix elephant foot
A brim is a flat skirt around the first layer that improves adhesion. It does nothing about the vertical bulge of the first 1 to 3 layers. In fact, a too-thick brim can fuse into the elephant foot and make it harder to remove cleanly. They solve different problems and people keep conflating them. If you have elephant foot, use elefant_foot_compensation. If you have a part lifting off the bed, use a brim. They’re orthogonal.
The fuller first-layer playbook is in OrcaSlicer first layer problems, which covers Z-offset, bed leveling, and first-layer speed in the depth those topics deserve.
Other contributors worth checking
If you’ve worked through flow, PA, seam, wipe, and first-layer and still have something that bugs you, these are the lower-impact factors that occasionally are the cause:
Filament diameter mismatch
Cheap filaments often have diameter variation of plus or minus 0.05 mm. Because area scales with diameter squared, that’s roughly a 5 percent volume error. Measure your spool with calipers at 5 spots, 10 cm apart, average the readings, and enter the average into the filament profile’s diameter field. This is a one-minute fix that occasionally explains “why does this random spool over-extrude when my normal one doesn’t.”
Wall sequence
The setting is wall_sequence with three options:
- Inner/Outer. OrcaSlicer’s default for most profiles. Reasonable surface quality, good overhang behavior.
- Outer/Inner. Can cause poor dimensional accuracy and slightly more visible seams because the outer wall is unsupported when laid down.
- Inner/Outer/Inner. Best outer surface quality because the outer wall is sandwiched between two already-laid inner walls. Re-introduced for arachne. Slightly slower.
If you have a surface-critical hero part, switch to Inner/Outer/Inner. If you have a part with heavy overhangs and bridging, stay on Inner/Outer. Don’t switch this globally and assume it’s an upgrade, it isn’t.
Temperature
Each 5 degrees C above the ideal temp for your filament increases ooze and zit count. The cleanest way to find your filament’s true sweet spot is a temp tower, walked through in OrcaSlicer temp tower. Important: temperature is a downstream fix. If PA is uncalibrated, lowering temp will reduce the visible blob but you’ll be printing cold to compensate for an extruder timing problem. That means weak layer adhesion and brittle parts. Calibrate PA first, only then run a temp tower.
Moisture
Wet filament boils microscopically in the hot end. That steam pushes plastic out in bursts, which shows up as scattered zits and occasional popping noises. A 4-hour dry at 50 to 65 degrees C in a filament dryer (PLA at the lower end, PETG and ABS higher) will fix this if it is your problem. If your zits are scattered and the printer is otherwise dialed in, dry the spool before you change any settings.
Common false fixes
This is the section I would have wanted on hour two of my bad-print night. These are the patches that look like they fix the problem and actually push you further from a calibrated machine.
False fix 1: Lowering temperature without calibrating PA
Most generic guides say “reduce temp by 5 C until blobs go away.” Sometimes it works, in the sense that the blob shrinks. What you’ve actually done is run cold to compensate for an extruder timing problem. You get weak layer adhesion, brittle parts, and inconsistent extrusion on the next filament you try. Calibrate PA first. Then run a temp tower and pick a temp inside the filament’s working range, not below it.
False fix 2: Cranking retraction to 8+ mm
The reasoning: more retraction equals less ooze equals fewer blobs. The reality: for direct-drive extruders, 0.5 to 2 mm is the normal range. 8 mm causes filament strain, grinding, heat creep in the heatbreak, stringing (a different problem from blobs and the opposite direction of fix), and extruder stalls during wipe (PR #3094, Issue #5896). For Bowden, 4 to 7 mm is normal and even there, 8+ is excessive. If you find yourself wanting to crank retraction higher to fix blobs, the actual fix is in the PA section.
False fix 3: Maxing out seam gap
“If the seam still has a blob, increase seam gap to 30 percent, 40 percent.” The loop now ends so far short of where it started that you see a visible gap line instead of a blob. You have traded one defect for another. Stay at 0 to 15 percent. If the seam blob is still visible at 15 percent, your problem is upstream (PA, flow, or wipe), not seam gap.
False fix 4: Slathering on a brim to fix elephant foot
Already covered above. Different problem, different fix.
False fix 5: Flow ratio “round numbers”
The Reddit cargo-cult that everyone should use 0.98 or 0.95 or 1.00. There is no universal flow ratio. The number that works for someone else’s printer-filament-nozzle combo is statistically unlikely to be the number that works for yours. Calibrate.
False fix 6: Scarf seam solves everything
Scarf joint minimizes seam visibility, it does not eliminate seams. Multiple GitHub threads (Discussion #4647, Issue #12049) confirm scarf has limits. If a tutorial sells it as “no more seam ever,” that tutorial is overselling. Use scarf when you want the seam minimized, accept that scarf is incompatible with some wipe settings, and don’t expect a magic fix.
False fix 7: “Just disable wipe entirely”
I’ve seen this on Reddit threads. The argument: wipe is causing your smear, so turn it off. The reality: wipe was put in for a reason. Disabling wipe makes the blob worse because de-retraction now happens with the nozzle stationary at the seam start. The fix is to tune retract_before_wipe and wipe_distance, not to disable the mechanism.
FAQ
Is over-extrusion the same as blobs?
No. Over-extrusion is a whole-print symptom (puffy walls, bulged top, undersized holes) caused by too much plastic being laid down everywhere. Blobs are localized bumps stacked at a single location, almost always the seam. They share some causes (slightly high flow can contribute to both) but the primary fix for over-extrusion is flow ratio calibration, and the primary fix for blobs is pressure advance calibration.
Does scarf joint eliminate the seam?
No. It minimizes the seam by tapering the start and end extrusion volumes so the overlap zone reads more like a smooth transition than a hard line. The seam is still there, it’s just less visible. The result depends heavily on PA being calibrated and on the part geometry. On overhangs and small holes, scarf can actually make things worse, which is why seam_slope_conditional exists.
What flow ratio should I use?
The one your calibration test gives you. Start from your printer profile’s default (commonly 0.98 for many profiles, 1.0 for Bambu profiles, 0.95 for some Creality) and run OrcaSlicer’s flow rate calibration. Plug the result into your filament profile, not your printer profile. Do not copy somebody else’s number from a forum.
Why does my elephant foot setting use “elefant”?
Historical spelling carried over from PrusaSlicer. OrcaSlicer kept the field name elefant_foot_compensation for compatibility. It is not a typo on your end, it is the code field name. Just live with it.
Should I enable wipe_on_loops if I’m running scarf joint?
No. Discussions #4325 and #4647 document a conflict between scarf and wipe-on-loops. Disable wipe_on_loops and wipe_before_external_loop when running scarf. Re-enable them if you turn scarf off.
My blobs only appear on one specific face of the print. Why?
That’s a seam placement issue. Your seam_position is probably set to a mode that places the seam at the same X/Y point on every layer (Aligned, Back, Aligned Back). Move it to a hidden face with Painted, or accept it as a cosmetic trade-off. The blob isn’t worse than other prints, it’s just consistently in one place.
Why does PA Pattern look weird on my printer?
If your PA pattern test prints look distorted or unreadable, your printer might have other issues masking the PA reading. Check first-layer adhesion and bed leveling. If the test prints fine and just the pattern is hard to read, try PA Tower instead. The breakdown is in OrcaSlicer PA line vs PA pattern.
Should I change anything in the Klipper config or just OrcaSlicer?
For PA, the value is set via OrcaSlicer’s filament settings (it injects a SET_PRESSURE_ADVANCE command into your gcode). For pressure_advance_smooth_time, that’s in your Klipper printer.cfg, not in OrcaSlicer. Touch printer.cfg only after PA itself is calibrated.
Does Inner/Outer/Inner wall sequence cost much print time?
Modestly. You’re printing three wall paths instead of two for that perimeter set. On a part with 3 perimeters, the difference is one extra inner wall pass per perimeter set, which is usually 5 to 15 percent more time depending on geometry. Worth it for a surface-critical hero part. Not worth it for a bracket nobody will look at.
Wrap-up and what to calibrate next
If you started this article with a print that had three different defects on it (the way mine did), you should now have:
- A way to tell the four defect families apart (over-extrusion, blobs, zits, scars), and which OrcaSlicer setting cluster maps to each.
- An order of attack: flow ratio first, then PA, then seam, then wipe, then first-layer, then everything else.
- A list of patches that look like fixes but make the underlying problem worse.
The two pieces of homework that will pay off the most, in this order:
- Run the flow rate calibration. The walkthrough is in OrcaSlicer flow rate calibration.
- Run the pressure advance calibration. The walkthrough is in OrcaSlicer pressure advance, and the test method choice is in OrcaSlicer PA line vs PA pattern.
After both are dialed in, run a temp tower from OrcaSlicer temp tower for each filament family you print. That alone will handle most zits.
For surface quality fine-tuning, the next step after the calibration trio is the VFA (Vibrations / Fine Artifacts) test, covered in OrcaSlicer VFA test. That catches ringing, ghosting, and resonance artifacts that are different from blobs but tend to show up at the same time on a poorly tuned machine.
If your symptoms look like the inverse of this article (gaps in walls, thin top surfaces, missing infill), head over to OrcaSlicer under-extrusion. The underlying calibration paths overlap heavily, so a lot of what you read here applies, just with the dial moving the other direction.
One last note. I’ve watched a lot of people, myself included, get furious at a printer for ten minutes, then spend half a Saturday tweaking settings that had nothing to do with the actual problem. The reason the four-defect diagnosis at the top of this article exists is exactly because that pattern is so common. Match the symptom to the family, do the calibration that family demands, and trust the process over a Reddit thread that promises a magic number. Your prints will get cleaner faster, and you’ll stop blaming the printer for problems the slicer was actually solving for you.
Download links and the latest build of OrcaSlicer are on the official GitHub releases page. If something in this article reads as out of date by the time you find it, the wiki for OrcaSlicer 2.3.x and the GitHub discussions linked above are the most authoritative sources for verified field names and known issues. Happy slicing.