I lost a 30-dice plate to a single nozzle clog three hours in, and that’s the moment I finally sat down and learned what OrcaSlicer’s Print Sequence dropdown actually does. The next week I ran the same batch in By Object, hit a clog at die 18, and ended the night with 17 perfect dice in a jar instead of one fused blob in the bin.
So I’ve spent a lot of plates figuring out when this setting saves you and when it bites you back. I’ve also wasted slices waiting for the red “Object too tall” warning to go away, and I’ve stared at a greyed-out Filament Change menu wondering why my multi-color test print refused to do anything multi-color. This guide is what I wish I’d had on day one. It’s long because the setting touches gantry geometry, AMS workflows, calibration profiles, and failure recovery, and skipping any of those is how plates end up in the bin.
I’ll walk through what the toggle does, where it lives, the three printer-profile variables that decide whether OrcaSlicer will even let you slice, the layer-injection hooks that quietly disable themselves the moment you flip it, two worked examples (small Benchies and a die batch), the failure-isolation math, the troubleshooting list, and a decision checklist at the end. If you’ve ever wondered whether “By Object” is faster, the honest answer is “it depends.”
Table of contents
- What “print sequence” actually means in OrcaSlicer
- How By Layer works (the default)
- How By Object works
- The gantry clearance check: why By Object sometimes refuses to slice
- Multi-color and AMS: what breaks the moment you flip to By Object
- Worked example: four small Benchies
- Worked example: a tray of 30 dice
- Failure isolation: when “saving 27 of 30 parts” matters
- Object ordering and the “tallest object last” trap
- When to pick By Layer vs By Object: a decision checklist
- Troubleshooting
- FAQ
What “print sequence” actually means in OrcaSlicer
Print Sequence is a plate-level setting that decides one thing: do all of your objects rise together, one layer at a time, or does the printer finish each object completely before walking the toolhead over to the next start position? Those are the only two options. There’s no third mode, there’s no per-object override, and the choice you make applies to every part on the build plate. The internal key in your project file is print_sequence, the labels in the UI are “By Layer” and “By Object”, and the default is By Layer.
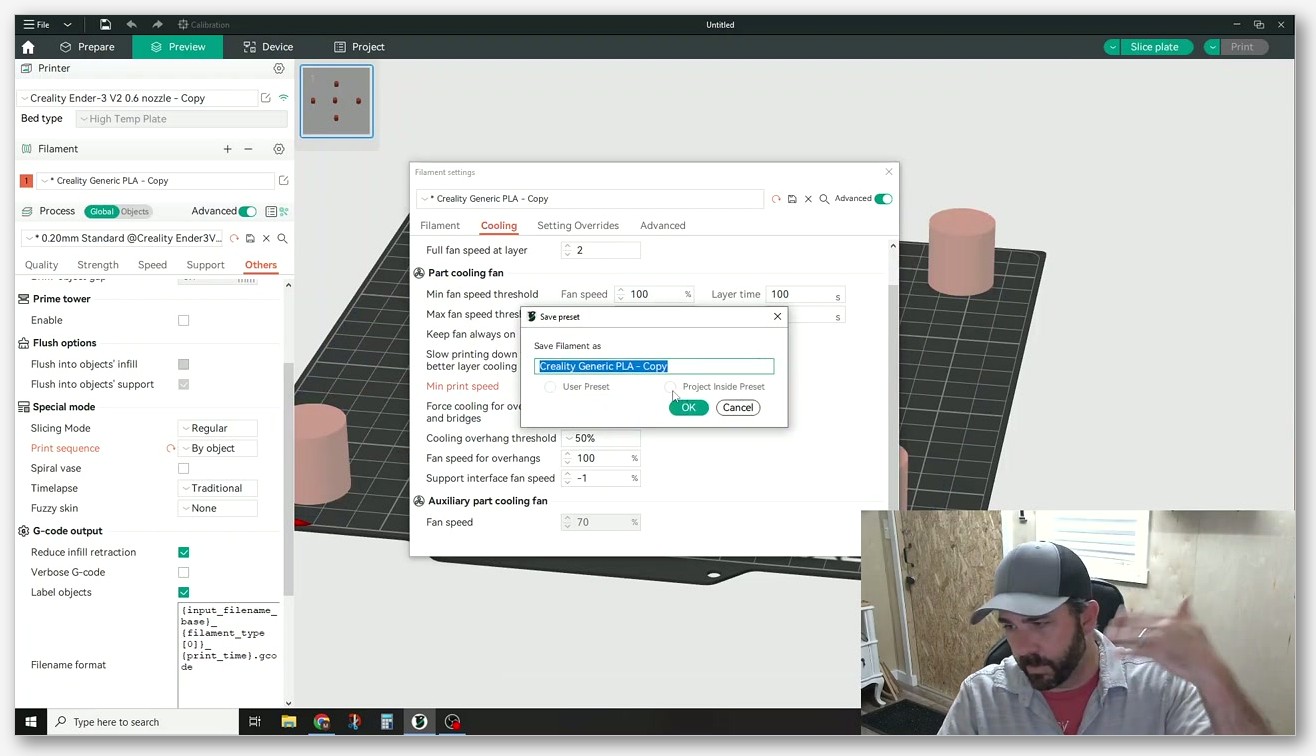
You’ll find it in Process settings under the Others tab, inside the Special Mode group. That same group also holds Slicing Mode, Spiral vase, and Timelapse, so if you’ve gone hunting for vase mode before, you already know the neighborhood. The dropdown is right there, two options, no hidden menus. The whole thing takes about three seconds to change and can cost you a plate if you change it without understanding what flips along with it.
One thing to clear up early: there’s a separate setting called print_order (note the different name) that controls intra-layer order when you stay in By Layer mode. It has two values, Default and “As object list,” and it decides which object on the plate gets touched first within a single layer. It does not switch between By Layer and By Object. People confuse these two settings all the time, partly because the names are close and partly because the OrcaSlicer wiki tucks them on the same page. We’ll come back to print_order later, but for now: print_sequence is the big switch, print_order is the tiebreaker inside a By Layer pass.
OrcaSlicer didn’t invent any of this. The sequential-printing feature traces back to Slic3r, was carried into PrusaSlicer as “Complete individual objects,” and OrcaSlicer inherited it and renamed the toggle to “By Layer / By Object.” If you’ve ever toggled that PrusaSlicer checkbox, you already know how this works mechanically. The gantry-clearance check, the warning text, the symmetric keep-out radius, even the rationale (oozing, stringing, failure isolation) are all Slic3r heritage. That’s worth keeping in mind because some of the corner-case behavior you’ll hit in OrcaSlicer makes more sense once you know it’s a 10-year-old feature that’s been carried forward.
The reason this setting matters more than most plate-level toggles is that it changes how OrcaSlicer treats the plate as a unit. In By Layer, your plate is one big print job that happens to contain several geometries. In By Object, your plate is N separate print jobs queued up back to back. That distinction propagates into travel paths, into the AMS layer-injection hooks, into what happens after a failure, and into whether the slicer will even accept your part layout. If you’ve been reading my OrcaSlicer settings master guide, you already know that’s the kind of setting worth spending an article on.
How By Layer works (the default)
By Layer is the default, and it’s what most people are running without ever thinking about it. The OrcaSlicer wiki describes it like this: “This option prints all objects layer by layer, one layer at a time. This is efficient for multi-part prints as it minimises travel time between objects and can improve overall print speed.” Translated to behavior on the bed: the nozzle prints layer 1 of every object before any object sees layer 2, then layer 2 of every object, and so on. The whole plate rises together.
That has three immediate consequences. First, the gantry never has to clear a finished object because nothing is finished until the entire plate is finished. There’s no collision check needed and no symmetric keep-out radius enforced. You can pack parts as tightly as your normal arrangement-spacing rules allow. Second, travel moves between objects are short because the toolhead is jumping from one half-built object to its half-built neighbor, not walking from one corner of the bed to another. Third, anything that depends on the slicer being able to inject a command at a specific Z height (filament change, pause, custom G-code) works normally, because the slicer still has the concept of “this layer applies to the whole plate.”
Within a single layer, the order in which objects get touched is controlled by the print_order Advanced setting I mentioned earlier. The two options are Default (travel-distance optimised, picked by OrcaSlicer’s path planner) and “As object list” (the order objects appear in the object-list sidebar). Most people leave it on Default and never touch it. You’d switch to “As object list” if you needed deterministic ordering on the first layer (so a particular object gets its skirt down first, for example) or if you were debugging a stringing problem and wanted to control travel direction. There’s a long-standing issue (#2270) where users report that the list order is ignored on the first layer even in By Layer mode, and the workaround is to explicitly set print_order to “As object list.”
The thing I want to flag here, because it trips people up: print_order only changes intra-layer object ordering. It doesn’t change whether objects rise together or finish one at a time. If you want one object finished before another starts, you need By Object, not “As object list.” Don’t conflate them.
By Layer is the right default for almost every multi-color or AMS workflow. If you’ve inserted a filament change at layer 40 on a logo-keycap plate to swap from black to white, that filament change applies to the whole layer 40 (every object on the plate), and the swap happens once per color, not once per object. If you tried to do the same thing in By Object, every object would need its own color sequence and the layer-injection menu would be greyed out anyway (we’ll get to that in the multi-color section). For anything where parts are sharing a color-change schedule, By Layer is what you want.
By Layer also handles tall, narrow objects without complaint. The gantry never needs to step over anything because nothing is taller than anything else at any given moment. You can put a 200 mm vase next to a 20 mm cube and By Layer will print them together, with the cube finishing 180 mm before the vase reaches the top. By Object would refuse that plate in many printer profiles. We’ll see why in the clearance section.
How By Object works
By Object flips the loop inside out. The OrcaSlicer wiki: “This option prints each object completely before moving on to the next object. This is better for prints where objects need to cool separately or when using different materials per object, but it may increase total print time due to more travel moves.” Object one finishes bottom to top, then the toolhead lifts, parks, walks to object two’s start position, and the second object goes from layer 1 to its top layer. Repeat for every object on the plate.
The original reason this mode exists, from the Slic3r manual: “When printing several objects at once it can be useful to print each one separately as this will minimise oozing and strings running between the prints.” That’s the canonical justification. If you’ve ever printed five objects in By Layer with poorly tuned retraction and ended up with cobwebs strung between them, you’ve seen the problem By Object was invented to solve. There’s no travel happening across the plate during a single object, so there’s nothing to ooze across.
The second reason, and honestly the one I care about more, is failure isolation. If your filament runs out at the 80% mark of a By Layer plate with five parts, you’ve lost the top 20% of all five parts. If the same runout happens during the third of five objects in By Object, you’ve finished two parts cleanly, you’ve lost part three, and parts four and five never started, so they’re still sitting at G-code stage waiting to print. AMS can rescue some runouts automatically, but only if you’re using AMS, and not all failures are runouts (clogs, layer shifts, bed-adhesion pops). For long batch jobs, that isolation is the whole point.
The wiki’s “may increase total print time due to more travel moves” is doing some heavy lifting in that sentence. The extra travel is real (parking, walking to the next object’s start, settling for the first layer again), but the total is workload-dependent. On a tight cluster of four Benchies, By Layer wins on time because the toolhead is already inside the cluster and the travel cost is tiny. On a sparse batch of 30 short objects, the travel cost per object is also small (each is finished in a couple of minutes) and By Object can be competitive or even faster in practice because it skips the inter-object retraction-and-travel that happens hundreds of times per layer in By Layer mode. The honest answer is: don’t assume, watch the slicer’s time estimate for your specific plate.
If you’re worried about stringing in By Layer specifically, before you switch to By Object, it’s usually worth tightening retraction first. I wrote up the dial-in process in OrcaSlicer stringing and oozing fixes because retraction is almost always the cheaper fix. By Object solves stringing by removing inter-object travel entirely, but it comes with the gantry-clearance restriction and the layer-injection lockouts, so it’s worth burning a calibration plate first.
One detail that matters in By Object and doesn’t in By Layer: object order on the plate becomes object order in time. Whichever object is at the top of the object list prints first. Whichever is at the bottom prints last. That sounds trivial but it has a sharp edge that I’ll come back to: OrcaSlicer does not auto-reorder shortest-to-tallest, even though doing so would prevent the most common post-print collision. That’s on you to set manually.
The gantry clearance check: why By Object sometimes refuses to slice
Here’s where By Object goes from “different mode” to “the slicer is yelling at me.” When you select By Object, OrcaSlicer runs a clearance check before slicing. The check uses three numeric variables that live in your printer profile under Printer settings, Basic Information, Extruder Clearance. The variables are:
extruder_clearance_radius: “Clearance radius around extruder: used for collision avoidance in by-object printing.”extruder_clearance_height_to_rod: “Distance from the nozzle tip to the lower rod. Used for collision avoidance in by-object printing.”extruder_clearance_height_to_lid: “Distance from the nozzle tip to the lid. Used for collision avoidance in by-object printing.”
Those quotes are from the OrcaSlicer wiki’s Extruder Clearance page. The values are printer-profile-defined (each printer profile ships its own numbers based on the gantry geometry of that machine), and the wiki doesn’t publish defaults per printer class, so I won’t either. If you want to know what your specific printer is using, open Printer settings, Basic Information, Extruder Clearance, and read the three fields.
The way the check works in plain terms: when an object on your plate is taller than the relevant clearance-height threshold, OrcaSlicer believes the toolhead body (or the gantry rod, or the lid mechanism, depending on which threshold is exceeded) would collide with that finished, taller object on its way to start printing the next one. If the check fails, you get a red warning on the affected object and the slicer refuses to produce G-code. The exact warning text, reported verbatim in Issue #6876 from OrcaSlicer 2.1.1: “Object X too tall, and collisions will be caused.”
The clearance radius is enforced as a single number in all directions, not a per-side rectangle. Issue #1732 describes the consequence directly: “Looks like it draws clearance area with same distance in all direction (not too effective), and when I try to place second model, it looks it refuses placing within double-clearance area, I mean clearance to clearance is applied instead of model to model.” Two practical implications fall out of that. First, the keep-out zone is a circle (radius, not per-side), so any keep-out on a printer with a side-mounted obstruction (the X1C’s LIDAR module is the common example, and there’s an open feature request for per-side clearance in Issue #2085) is going to be conservative. Second, two objects must be separated by twice the clearance radius, not just one radius, because each object draws its own circle and the slicer checks clearance-against-clearance.
That last point catches people out. If your extruder_clearance_radius is, say, 40 mm, you’d intuitively assume parts have to be 40 mm apart. They actually have to be 80 mm apart (one radius for each part), or the slicer won’t let you place the second part. That’s why a By Object plate often holds half as many parts as the equivalent By Layer plate, and it’s the reason the mixed-mode feature request (Issue #9894) exists.
The warning is currently a hard block. There’s an open feature request, Issue #12386, asking for a “slice – bypass warning” button, but it hasn’t been merged in the versions I’m running, and the same issue also asks for OrcaSlicer to auto-promote the tallest object to print last (which would prevent most of these warnings in the first place). Neither feature exists today. If the slicer says “Object X too tall,” your options are: rearrange parts so the tall one is the only one on the plate, split the plate into two jobs, or switch to By Layer.
One thing I want to flag carefully because it’s easy to overstate: I don’t know the internal collision-detection geometry beyond what the UI tells me. The three variables exist, the warning text exists, the symmetric-radius behavior is documented. Beyond that, anyone claiming specific algorithm details (the exact swept-volume calculation, the per-printer offsets, the threshold logic) is either reading the source or guessing, and the OrcaSlicer wiki doesn’t publish that. Don’t trust internet posts that give you specific numbers without a source.
Multi-color and AMS: what breaks the moment you flip to By Object
This is the part of By Object that surprised me hardest the first time I hit it. I had a logo-keycap plate, an AMS loaded with the right two colors, and a profile set to By Object because I wanted failure isolation in case the keycap inserts knocked something over. I went to right-click the layer slider to add a filament change at the logo layer, and the option was greyed out. Pause was greyed out. Custom G-code was greyed out.
That’s by design. Issue #3973 describes the current state directly: “These same features are not available (grayed out) in prints sequenced ‘by object’.” The features that get disabled in By Object are filament change at layer, pause at layer, and custom G-code at layer. Issue #7773 has a separate request to enable pause specifically, with the use case being magnet inserts: “if I want to embed a magnet into those same prints I cannot insert a pause at the appropriate time for each object. The option is greyed out.”
I want to be careful about how I describe what this means for AMS users, because there’s a popular but wrong claim floating around that “AMS doesn’t work in By Object.” That’s not what’s verified. AMS itself is a hardware unit that swaps filament according to whatever the slicer asks for. What’s broken in By Object is the layer-injection hooks the slicer uses to insert those swap commands at specific Z heights. So:
- If your multi-color workflow assigns different filaments to different parts of a model (color-by-region using painting tools), and the swap schedule is baked into the model rather than injected at a layer, that part still works in By Object because the swaps are tied to geometry, not to layer numbers.
- If your workflow involves right-clicking the layer slider and adding “Change filament” at layer N to make a logo go from black to white, that workflow is dead in By Object because the menu item is greyed out.
- Same goes for layer-pause for inserts (magnets, captive nuts, etc.). Dead in By Object.
- Same for custom G-code at layer (timelapse triggers, fan tweaks, anything you’d inject between layers). Dead in By Object.
The workaround the user in #3973 suggested for themselves is the simplest one: “put my objects on multiple plates so they don’t need to be sequenced ‘by object’.” If you need per-part failure isolation and per-part color swaps, you can split the parts onto separate plates and print them as separate jobs. Each plate runs in By Layer (so the layer-injection hooks work), and the per-plate split gives you the isolation you wanted from By Object. It’s slower because you’re loading and unloading the bed N times, but it’s the only way to have both.
If you’re running any kind of multi-color workflow (Bambu AMS, multi-material upgrades, or manual swaps), I covered the full schedule-management approach in the OrcaSlicer multi-color guide. The short version for this article: if you’re doing any kind of multi-color, leave Print Sequence on By Layer.
One more honest note. The OrcaSlicer wiki’s own description of By Object specifically mentions “when using different materials per object” as a use case, and that is compatible with By Object as long as the material assignment is done at the object level (different filament per object, not different filament per layer). Each object finishes with its assigned filament, the toolhead swaps once between objects, and you’re good. What breaks is layer-granularity swaps, which is what most people actually do for logos and inlays.
Worked example: four small Benchies
Let’s run two concrete plates through the decision and see how they shake out. First plate: four 1:1 Benchies, arranged in a 2×2 tight cluster on a 256 mm bed, default 0.2 mm layer height, default speeds, single filament.
In By Layer, the toolhead does layer 1 of all four Benchies (about 30 seconds of perimeters per layer with travel between objects in the same neighborhood), then layer 2, then layer 3, and so on for the roughly 240 layers a stock Benchy takes. The travel between objects is small because they’re sitting next to each other, retraction handles most of the stringing, and the total time on a stock CoreXY runs around 1 hour 40 minutes for the plate. Everything finishes at the same moment. If the print fails at any layer above zero, you’ve lost all four Benchies.
In By Object, the toolhead prints Benchy 1 bottom to top (about 25 minutes including the slightly slower first-layer settle), parks, walks to Benchy 2, does the same, then 3, then 4. The walks are short (the parts are clustered) but each walk costs a few seconds of acceleration, parking, and re-priming. Total time runs slightly higher than By Layer, often by something on the order of a few minutes per object, but the exact number depends on your retraction settings and travel speed.
The interesting question isn’t “which one’s faster” (By Layer wins by a small margin), it’s “what do I get for the time penalty.” With four Benchies in By Object, if Benchy 2 fails halfway, Benchies 3 and 4 never started, so you have Benchy 1 complete, Benchy 2 in the bin, and Benchies 3 and 4 still queued in the G-code (you can re-slice with just those two parts and restart). With four Benchies in By Layer, the same failure halfway costs you all four.
For this specific plate, my honest recommendation is By Layer. The cluster is tight enough that travel cost in By Layer is low, stringing is manageable with normal retraction, and the failure-isolation benefit of By Object isn’t worth the extra travel time and the lost ability to inject color changes if you wanted to later. The exception: if you’re testing a new filament you don’t trust and you want one finished Benchy out of four no matter what fails, By Object earns its keep.
One thing I want to verify visually whenever I’m comparing modes on a plate like this: drop the slicer into preview, scrub the time slider, and watch the time-to-completion delta. OrcaSlicer’s time estimate is generally accurate enough to make this call without burning filament. If the delta is under 5%, pick the mode that matches your other priorities (color hooks, failure isolation). If it’s over 15%, that’s a real signal and you should pick the faster mode unless you have a strong reason not to.
Worked example: a tray of 30 dice
Second plate: 30 standard d6 dice (16 mm cubes with pip holes), arranged in a 5×6 grid on the same 256 mm bed, 0.2 mm layers, default speeds. Total print height is roughly 16 mm, which is well under the gantry-clearance threshold on most printer profiles, so the “too tall” warning won’t fire.
In By Layer, the toolhead does layer 1 of all 30 dice. That’s 30 small first-layer cubes with travel between each one inside a single layer. Then layer 2 of all 30. And so on for 80 layers. The travel-per-layer adds up: 30 small perimeters with a hop between each, then back to the start. The total time on this kind of plate often surprises people because the travel between dice within a layer is doing more work than the actual extrusion. Multi-part first layers also tend to ooze and string because the nozzle is doing dozens of short hops at full hotend temperature.
In By Object, the toolhead prints die 1 from layer 1 to layer 80 in about three to four minutes, parks, walks to die 2, prints it, and continues. Each die is its own little print job. There’s no inter-object travel inside a die. Total time can be comparable to By Layer or sometimes a bit lower, because you’ve replaced “30 small travels per layer x 80 layers” (2,400 travels) with “29 inter-object walks” (29 travels). The exact balance depends on travel speed, retraction settings, and how much park-time your firmware adds, but the comparison flips on this kind of plate.
The failure-isolation math is the headline here. If a die fails at minute 90 in By Layer (one bed-adhesion pop on a corner die), you’ve lost the corner die and the spaghetti now wrapping around the nozzle is probably going to take out neighbors over the next few layers. Realistic outcome: lose three to five dice in a cluster, and the rest of the plate may or may not survive depending on how aggressively the spaghetti drags. In By Object at the same minute, if die 12 fails, you’ve finished 11 dice clean, lost one, and dice 13 through 30 are still G-code waiting to print. You can pull the failed die, restart the job from die 13, and end the day with 29 dice.
That’s the plate I started this article with, and it’s why I run dice batches in By Object every time now. The gantry-clearance check doesn’t fire because the dice are short, the per-object travel cost is small because each die is fast, the failure-isolation upside is huge because batches are exactly the workload where one failure shouldn’t kill 29 successes, and there’s no multi-color hook I need access to. It’s the cleanest By Object win in my workflow.
Failure isolation: when “saving 27 of 30 parts” matters
I’ve been hinting at this throughout, but the failure-isolation case is worth its own section because it’s the single best reason to use By Object and it’s also the case where people most often pick the wrong mode and regret it later. Three failure modes worth thinking through:
Bed adhesion failure late in a print. A part pops loose at layer 200 of a 250-layer print and the now-flying part either clips the nozzle, drags the gantry, or just lies there causing the in-progress part to ooze a tangle. In By Layer, that flying part can take out every other part on the plate during the next dozen layers because the nozzle is touching all of them sequentially. In By Object, the only part that can be affected is whichever one is currently printing (the flying part is by definition finished, and the next queued part hasn’t started, so it can’t be ruined yet).
Filament runout mid-print. If you don’t have AMS, runout costs you everything above the runout layer. In By Layer, that’s the top of every part. In By Object, the in-progress part is lost and everything queued is untouched, so a re-slice of the remaining queue gets you back on track. If you do have AMS and the AMS handles the swap automatically, runout is mostly a non-event in either mode, but AMS doesn’t catch every failure (sometimes a swap fails, sometimes the spool is the only one of that color and there’s no fallback), so the failure-isolation argument still applies on the edges.
Nozzle clog mid-print. Clogs are the worst because they often don’t trigger any sensor. The printer keeps moving, the extruder keeps clicking, and you come back to a plate with five layers of air printing on top of half-finished parts. In By Layer, that’s five layers of air on every part. In By Object, the in-progress part is air-printed from the clog onward and the rest of the queue is fine because it hasn’t started. Same logic, same conclusion.
The Slic3r manual’s framing on this is worth quoting because it’s the canonical justification for the entire feature: “When printing several objects at once it can be useful to print each one separately as this will minimise oozing and strings running between the prints.” Stringing was the original 2012-era reason for sequential printing, but failure isolation has become the more compelling argument in 2026 because retraction tuning has gotten so good that stringing is mostly solvable in By Layer anyway. Failure isolation can’t be solved any other way.
There’s a saturation point. If your plate has two large parts that each take six hours, By Object isolates a failure but the failure window is so long that the math gets weird (you might lose four hours of the second part if the first part fails at five hours and the runout drains the spool dry). Failure isolation works best when you have many small parts, because the isolation granularity matches the failure cost. Dice, keycaps, miniatures, dovetail joints: classic By Object workloads. A pair of multi-day prints: probably not worth the gantry-clearance restriction.
Object ordering and the “tallest object last” trap
Here’s the gotcha that will eat your plate if you’re not paying attention. In By Object mode, the object list directly controls finish order: whatever is at the top of the list prints first, whatever is at the bottom prints last. OrcaSlicer does not auto-reorder shortest-to-tallest. Issue #12386 explicitly asks for that auto-reorder behavior as a missing feature: “An Object or assembly that is taller than collision detection maximum allowable height should automatically be printed last when using print by object ordering.” It hasn’t been merged in the versions I’ve tested.
Why does this matter even when the gantry-clearance check passes? Because the gantry-clearance check covers the printing moves, not the park move at the end of the job. Issue #12505 documents a real failure case: a user printed a tall object first and several shorter objects after, all passing the clearance check during slicing. When the print finished, the post-print park sent the toolhead across the bed and “Print head / nozzle slams into object.” The same issue captures the root cause cleanly: “OrcaSlicer should make sure that either, the object printed last must be the tallest object, or that there’s additional Gcode to make sure the nozzle doesn’t hit the tallest object after it’s done printing a smaller one.”
The fix until that’s auto-handled: when you’re in By Object mode, look at your object list, identify the tallest object, and manually drag it to the bottom of the list. Now it prints last, the post-print park happens above its top layer (because there’s nothing taller in the way), and you avoid the slam. This is the most important habit to build for By Object workflows. I do it before every By Object slice now, regardless of whether the gantry check has fired.
The interaction with intra-layer ordering is worth pinning down because people get confused: in By Object, the object list is the print order, no extra setting needed. In By Layer, the object list is mostly ignored unless you set print_order to “As object list.” Two different settings, two different behaviors, same object list panel. Issue #2270 describes the By Layer side of this: “switching print sequence to ‘By object’ and then there is ability to reorder objects… often that does not have any effect on printing object order in the first layer.” That’s the By Layer behavior, and the workaround is the print_order setting we covered earlier.
One more practical tip: if you have an assembly (multiple objects grouped together), OrcaSlicer treats the assembly as a single unit for ordering purposes in By Object mode. The assembly will print in one continuous block (all parts of the assembly rise together as if they were By Layer within the assembly), and the next object in the list starts after the whole assembly finishes. This is sometimes the only way to get a multi-part single object to print correctly in By Object mode.
When to pick By Layer vs By Object: a decision checklist
I’ve been waffling for thousands of words, so let me commit to a checklist. Work down this list and pick the first match.
- Do you need filament change at layer, pause at layer, or custom G-code at layer? Pick By Layer. The hooks are greyed out in By Object and there’s no workaround other than splitting plates.
- Is any object on the plate taller than your printer’s gantry-clearance threshold? Pick By Layer, or move the tall object to its own plate. By Object will refuse to slice with “Object X too tall, and collisions will be caused.”
- Is the plate a tight cluster of similar-height parts where travel between objects in a single layer is short? Pick By Layer. Travel cost in By Layer is low, stringing is solvable with retraction tuning, and the failure-isolation benefit of By Object doesn’t outweigh the time penalty.
- Is the plate a sparse batch of many small identical parts (dice, keycaps, miniatures, dovetails)? Pick By Object. Travel cost per object is low, the gantry-clearance check rarely fires on short parts, and failure isolation matters because batches are exactly where one failure shouldn’t take out everything.
- Is the job long enough that a late-print failure is catastrophic (a 12-hour plate where losing all parts would cost you a full overnight)? Pick By Object if the clearance check permits, even with the travel-time penalty. The peace of mind is worth the extra minutes.
- Are you running a calibration print (PA pattern, flow ratio, retraction tower)? Pick By Layer, and double-check that your profile isn’t carrying a leftover By Object setting from a previous batch job. Issue #8665 documents PA-pattern calibrations failing silently because the profile was on By Object. Most calibrations assume By Layer.
- Do you need different materials assigned per object (object-level material assignment, not layer-level swaps)? By Object is fine for this. The wiki explicitly mentions it as a supported use case.
- None of the above and you’re not sure? Stay on By Layer. It’s the default for a reason, the layer-injection hooks stay available, the gantry-clearance restriction never fires, and you can always switch to By Object on a specific plate when you actually have a reason to.
The decision boils down to two questions: do I need layer-injection hooks (color, pause, custom G-code)? And do I need failure isolation on a batch? Yes to the first means By Layer. Yes to the second with short parts means By Object. Everything else is travel-time optimization that you should let the slicer’s time estimate decide.
Troubleshooting
Five specific failure modes I see asked about constantly, mapped to the actual cause and the actual fix.
“Object too tall” warning won’t let me slice. This is the gantry-clearance check from Issue #6876 firing. The warning is a hard block, there’s no bypass button (the open request for one is in #12386), and the only options are: rearrange the plate so the tall object is the only object, split the plate into two separate jobs, or switch to By Layer. Verify your part spacing is at least twice the extruder_clearance_radius if the parts themselves aren’t taller than the clearance threshold (the symmetric-radius behavior from #1732 doubles the apparent spacing requirement). If you’re hitting this on every By Object plate, your printer profile’s clearance values may need a sanity-check against your actual gantry geometry.
Filament change, pause, or custom G-code is greyed out. This is by design when Print Sequence is By Object. Issues #3973 and #7773 are both open requests to enable these in By Object, but they’re not in the released versions I’ve tested. Switch Print Sequence back to By Layer if you need any of these hooks, or split the plate into separate jobs (one plate per part, each in By Layer with its own injection schedule).
PA pattern calibration only shows a small cube. Documented in Issue #8665: “Narrowed it down to the ‘Print sequence’ set to ‘By object’.” If you ran a batch job in By Object and forgot to switch back, your next calibration will silently fail because the calibration generator assumes By Layer. Open your filament or process profile, set Print Sequence back to By Layer, and re-run the calibration. This is the easiest mistake to make and the easiest to fix once you know to look.
Fill bed with copies overfills the bed. The bed-fill helper ignores the By Object keep-out radius, per Issue #8816. The reproduction is: select By Object, right-click an object, choose fill bed with copies, and the slicer packs more copies onto the bed than the clearance check will actually allow when you go to slice. The workaround is to switch to By Layer before filling the bed, then manually delete copies until you have a count you can fit, then switch back to By Object. Tedious but it works.
Object order in the list is ignored on the first layer. This is the By Layer behavior from Issue #2270. The fix is to set print_order (the intra-layer setting, not the same as Print Sequence) to “As object list” so the object-list order is respected. Find print_order in Process settings; it’s an Advanced setting, so you may need to enable Advanced visibility to see it. If you don’t see it, search for “print order” in the settings search bar. If you specifically need object 1 to finish before object 2 even starts, that’s not what print_order does, and you want By Object instead.
If you’re hitting failures I haven’t covered here, the broader OrcaSlicer troubleshooting master guide has a lot more diagnosis trees for slicing errors, print-quality issues, and profile problems.
FAQ
What’s the default Print Sequence in OrcaSlicer? By Layer. If you’ve never touched the setting, you’re running By Layer. It’s the safer default because the gantry-clearance check never fires and the layer-injection hooks all stay available.
Can I mix By Layer and By Object on the same plate? No, not currently. The setting is plate-wide. Issue #9894 is an open feature request for per-object mode assignment; until that’s merged, you either pick one mode for the whole plate or split into separate plates.
Does By Object support AMS color changes? Partially. AMS hardware itself isn’t blocked, and object-level material assignment (one filament per object, swapped between objects) works fine. What’s broken is layer-level injection: filament change at layer, pause at layer, and custom G-code at layer are all greyed out. If your multi-color workflow depends on layer hooks (which most do, especially for logos and inlays), you need By Layer.
Where exactly is the Print Sequence setting? Process settings, Others tab, Special Mode group. The dropdown is labeled Print Sequence and has two options: By Layer and By Object. The underlying key in your project file is print_sequence.
Does By Object always finish faster than By Layer? No. The OrcaSlicer wiki says By Object “may increase total print time due to more travel moves” and By Layer “can improve overall print speed.” The actual answer depends on the workload: tight clusters of similar-height parts usually favor By Layer, sparse batches of small identical parts can favor By Object. Check the slicer’s time estimate for your specific plate before deciding.
What’s the difference between print_sequence and print_order? Different settings. print_sequence is the big switch (By Layer vs By Object). print_order is an intra-layer tiebreaker that only matters within By Layer mode (Default vs “As object list”). They’re often confused because the names are close, but they do entirely different jobs.
Why won’t OrcaSlicer slice my By Object plate? The gantry-clearance check is firing. One or more objects are taller than the clearance threshold defined by the three extruder_clearance_* variables in your printer profile, and the slicer believes the toolhead body would collide with a finished object on its way to start the next one. The exact warning text is “Object X too tall, and collisions will be caused” per Issue #6876. There’s no bypass; rearrange or split.
Is this the same as PrusaSlicer’s “Complete individual objects”? Yes, same Slic3r-era lineage. PrusaSlicer’s “Complete individual objects” checkbox is the equivalent of OrcaSlicer’s By Object. OrcaSlicer inherited the feature and renamed the toggle to the two-option dropdown. The gantry-clearance logic, the symmetric keep-out radius, and the “tallest object last” recommendation all trace back to Slic3r’s sequential printing manual page.
If you’re working through a bigger settings tour, the natural next stop after Print Sequence is part modification, and OrcaSlicer modifier meshes is the one I’d send you to next because it overlaps with object-list manipulation in a way that pairs well with what you’ve just learned about object ordering. The decision tree I’ve walked through here, especially the “tallest object last” habit and the layer-injection lockout, are the kind of details that turn By Object from “feature I’m afraid of” into “tool I reach for on batch jobs,” and once you’ve broken in the muscle memory, you’ll stop losing 30-dice plates to single clogs. That’s the only metric I really care about.
You can grab the latest OrcaSlicer from the official OrcaSlicer GitHub releases page if you’re not already on a current version. The Print Sequence dropdown is in the same place it’s been since the 2.x series, but the gantry-clearance UI has been improving release by release, so if you’re stuck on an older build, an update is worth doing before you fight the “too tall” warning.
Related OrcaSlicer guides
- OrcaSlicer for Beginners: Your First Print in 15 Minutes
- OrcaSlicer Review 2026: Honest Pros, Cons & Who Should Use It
- How to Connect OrcaSlicer to OctoPrint: IP, API Key, and the Common Errors
- OrcaSlicer Slow Slicing on Complex Models: How to Speed Up
- OrcaSlicer for Creality K1, K1 Max and K2 Plus: Klipper Setup Guide