
I built a custom Voron Trident with a 350×350 bed, fired up OrcaSlicer expecting to see it in the dropdown, and instead got “Generic Voron 2.4 (300mm)” as the closest match. The Custom Printer flow exists for a reason, and it works fine, but the documentation glosses over the gotchas that crash your first print into the bed. Here’s the actual step-by-step.
I’ve done this dance maybe twelve times across DIY CoreXY builds, off-brand Marlin cartesians, a Klipper-converted Ender 5, and a couple of Sovols that the wizard refused to recognize. So this isn’t a regurgitated wiki page. I’m going to walk you through the three real paths to adding a printer that isn’t in OrcaSlicer’s stock list, tell you which one to actually pick (hint: it’s almost never Path A), and give you the exact Start G-code templates for both Marlin and Klipper so you don’t end up copy-pasting from a 2022 forum post that uses placeholder syntax that no longer parses.
By the end you’ll have a working printer profile, you’ll know where OrcaSlicer stashes the JSON file so you can back it up before the next update, and you’ll have a checklist for the five things that always break on the first print after a manual add.
Table of contents
- The three paths at a glance
- Path C: Import a community profile (try this first)
- Path B: Manually add a printer in Printer Settings
- Clone, don’t build from scratch
- Basic Information tab walkthrough
- Bed shape definitions
- Extruder tab settings
- Machine G-code: Marlin and Klipper templates
- Network connection (Device tab)
- Path A: The wizard’s Create Printer option
- Save, find, and share your custom printer
- Common pitfalls (and how I’ve fixed them)
- When to stop fighting the slicer
- FAQ
The three paths at a glance
OrcaSlicer gives you three routes to get an unsupported printer running. I’ve ranked them by what actually works fastest in 2026, not by what the wiki suggests first.
| Path | What it is | Pick this if… | Time to first print |
|---|---|---|---|
| Path C: Import community profile | Download a .orca_printer bundle, File > Import > Import Configs |
Someone else has already done the work (vendor GitHub, Printables, MakerWorld) | 5 minutes |
| Path B: Manual via Printer Settings | Clone the closest existing printer, edit bed/origin/G-code in Printer Settings | Your printer is uncommon, DIY, or a variant of a listed model | 20 to 40 minutes |
| Path A: Wizard Create Printer | File > Configuration Wizard, then the “Create Printer” button | You want a quick stub and you’ll edit it in Printer Settings anyway | 10 minutes (but you’ll redo it in Path B) |
My honest advice: check Path C first because if it exists you’re done in five minutes. Fall back to Path B with a clone of a similar listed printer (the “Save As” trick I’ll cover below). Treat Path A as a wrapper around Path B that saves you maybe two clicks. If you skipped the initial wizard entirely and want to revisit it, see my OrcaSlicer setup wizard walkthrough. If you’re not even sure where the Printer Settings dialog lives in the interface, the OrcaSlicer UI tour shows you every panel.
Path C first: Import a community profile (the fastest path if it exists)
I’ll start with the path that gets most people unstuck in five minutes, because if a community profile exists for your printer, everything else in this article becomes optional reading.
Where to find profiles, ranked by trust
Not all profiles are equal. I’ve burned hours debugging “why is my retraction tower a blob” only to discover the GitHub fork I grabbed was tuned for a different hot end. Use this trust order:
- Vendor official GitHub release. Sovol-OrcaSlicer, ELEGOO Wiki downloads, the Bambu repo, Anycubic and Creality vendor pages. These are tested against real production printers.
- Community profiles with prints shown. Repos like
mjonuschat/OrcaSlicer-ProfilesandDarthPope0327/orca-slicer-profiles(both excellent for Voron and Klipper builds). I trust these when the maintainer posts actual benchy and calibration cube photos. - Printables.com OrcaSlicer profile tag. Search “OrcaSlicer profile [your printer].” Quality varies. Read comments before downloading.
- MakerWorld profile downloads. Skewed toward Bambu but increasingly hosts Voron and Prusa community profiles.
- Random GitHub forks. Last resort. Always verify Start G-code before printing.
The import steps
- Download the
.orca_printerfile. If it arrives as a.zip, extract it first. The importer wants the.orca_printerdirectly, or a folder of.jsonfiles. - In OrcaSlicer: File > Import > Import Configs. Browse to the file, select it, click Open.
- OrcaSlicer will prompt if it would overwrite an existing user preset. Confirm or rename.
- Confirm the printer now appears in the Printer dropdown on the right sidebar. Select it.
- Open Printer Settings (the pencil icon next to the dropdown) and verify Bed shape, Origin, and Start G-code before hitting Slice on a real print.
That last step is the one nobody does and the one that has saved me from at least three failed first layers. Imported profiles can have origin offsets baked in that don’t match your physical printer. Verify before you trust.
For a deeper dive into bundle formats, .orca_filament vs .orca_printer, and round-tripping profiles between machines, see my OrcaSlicer profile import and export guide. There’s also a curated list of vetted community profiles at the OrcaSlicer printer profiles hub.
The first-print verification checklist
Whatever profile you imported, run this five-minute check before slicing anything real:
- Slice a 20x20mm calibration cube. Look at the gcode preview. Does the toolhead start in the corner you expect? If it crashes into Y-min on a center-origin printer, the origin is wrong.
- Check the Start G-code in Printer Settings > Machine G-code. Does it call
G28(Marlin) orPRINT_START(Klipper)? If it’s a Klipper profile dressed up as Marlin, fix it. - Check Max nozzle temperature. Some community profiles cap at 250C even when your hot end is all-metal hardened. Bump it up.
- Run the cube. Watch the first layer. Don’t walk away.
Path B: Manually add a printer in Printer Settings (the canonical method)
This is where you’ll spend most of your time if no community profile exists. It’s also where you have the most control, which is good news and bad news. The bad news is that you can absolutely set a value that crashes the toolhead into a Z-endstop. The good news is that the dialog is well organized and most fields have sane defaults.
Clone, don’t build from scratch
I cannot stress this enough. The Printer Settings dialog has a “Save As” button. Use it. Here’s the workflow that takes you from zero to a working profile in 20 minutes instead of 2 hours:
- Open the Printer dropdown in the right sidebar.
- Pick the closest existing printer. Match on bed size, kinematics (Cartesian vs CoreXY vs delta), and firmware first. Brand doesn’t matter much.
- Click the small pencil/notepad icon to the right of the dropdown. Printer Settings opens.
- Click Save As at the bottom of the dialog. Name it something descriptive, like “MyVoron0.1 0.4 nozzle” or “DIY CoreXY 300×300 Klipper.”
- Now edit only the differences: bed size, origin, Start G-code, nozzle diameter, max temp. That’s usually 5 fields instead of 50.
Here are my go-to clone bases for common DIY situations:
| Your build | Clone from | Edit afterward |
|---|---|---|
| Custom Voron 0.1 build | Generic Voron 0.2 | Bed size, max Z, possibly origin |
| DIY CoreXY 300×300 Klipper | Generic Voron 2.4 300 | Origin if not center, Start G-code |
| Off-brand Marlin cartesian 235×235 | Generic Ender 3 V2 | Bed size, max temp, Start G-code |
| Klipper conversion of an Ender 5 | Generic Klipper printer | Bed size, PRINT_START params |
| Off-brand delta | Generic FLSUN V400 or Anycubic Kossel | Diameter, max Z |
| IDEX DIY build | Snapmaker J1 | Extruder offsets, bed size |
Cloning is faster than from-scratch by an order of magnitude because every Marlin / Klipper / RepRap default value is already correct. Retraction settings, jerk, acceleration, max feedrate, all baked in. Don’t be a hero. Hit Save As.
Basic Information tab walkthrough
The Printer Settings dialog opens on Basic Information by default. The left rail has tabs (Basic Information, Machine G-code, Extruder, Multimaterial, Motion Ability, Cooling). Start here and work down.
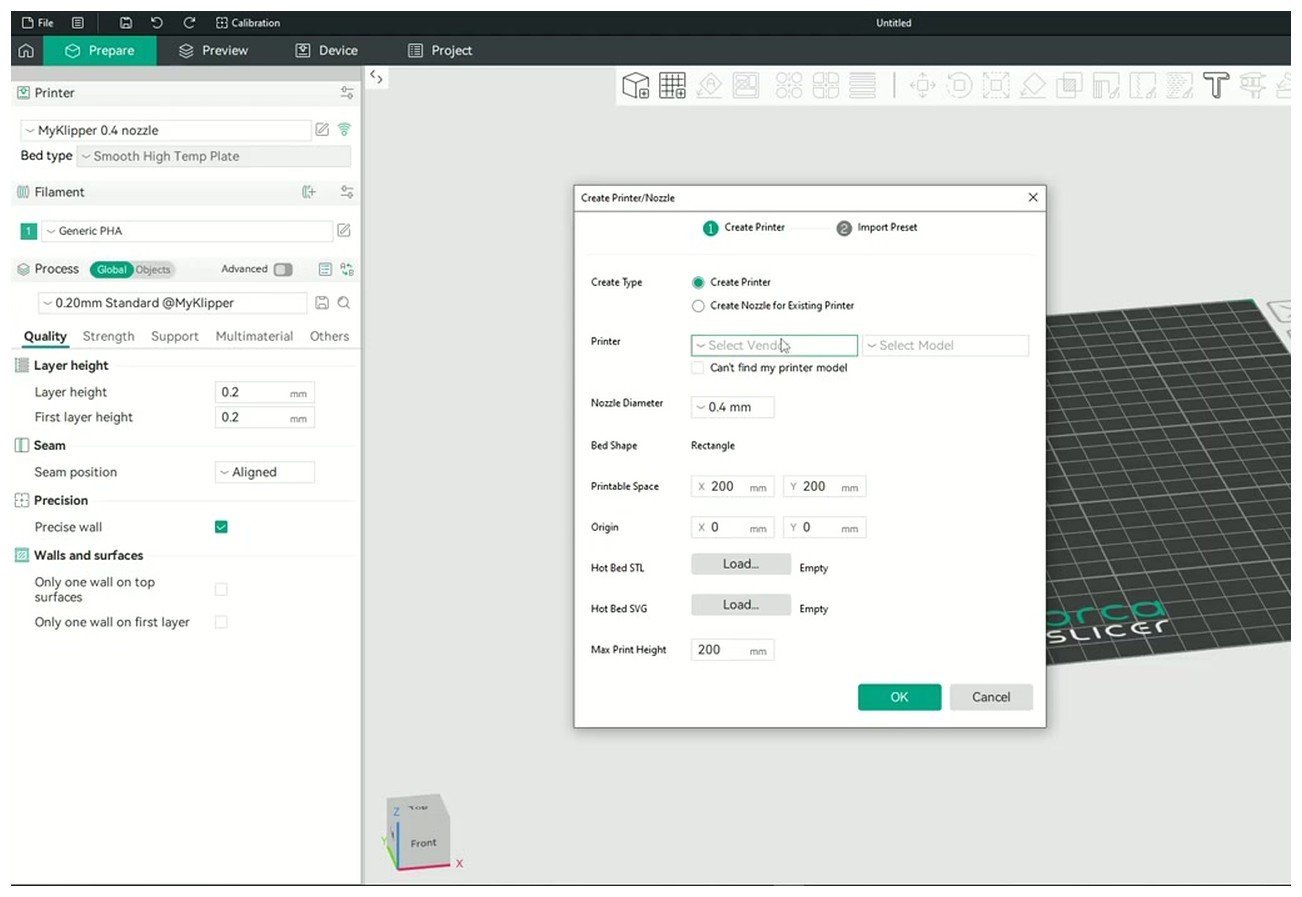
The Create Printer dialog. Bed shape, Printable Space X/Y, Origin, and Max Print Height are the four fields that determine whether your first print succeeds.
Fields you’ll touch in this tab, with what each one actually means:
- Printable Area (bed shape). Rectangular, Circular, or Custom. For 95% of printers, Rectangular is correct. Voron 0.x users sometimes use Custom STL for the chamfered corners. Delta users pick Circular and enter a diameter only.
- Printable Space X / Y (or Width / Depth). In millimeters. Voron 2.4 350: 350 x 350. Ender 3: 235 x 235. FLSUN delta V400: 300 diameter.
- Origin. This is the field that crashes the most nozzles into the front-left corner. Origin is the offset of G-code 0,0 from the front-left of the rectangle. For most Marlin printers, origin is (0,0). For Voron and most CoreXY builds where firmware uses center-bed coordinates, origin is half the bed size: (175,175) on a 350×350, (60,60) on a 120×120 Voron 0.x. If you get the origin wrong, the toolhead will try to print at physical position (0,0) thinking it’s the center, and it’ll slam into the front-left mechanical limit.
- Printable Height (Z). Maximum Z travel in mm. Measure your gantry travel, not the theoretical frame size. My Trident loses 20mm to the cable chain mount.
- Exclude Bed Area. Optional rectangles to subtract from the print area. Use this for a Voron purge bucket region or to clip the corners where your bed clips physically interfere.
- Hot Bed STL / SVG. Cosmetic. Loads a model so the 3D view looks like your actual bed. Skip on first setup.
- Max Print Height. Same as Printable Height (Z) above in newer dialog labels.
Wrong origin is the single most common cause of “nozzle crashes off the front-left corner on first move.” If you remember nothing else from this section, remember that one.
G-code Flavor
Also lives in Basic Information (or sometimes the Advanced sub-tab depending on version). This is critical. Options include:
- Marlin (legacy) for older Marlin 1.x firmware.
- Marlin 2 for everything modern: Ender 3 V2, Neptune, most stock Creality.
- Klipper for Klipper-based machines (Voron, Sonic Pad, Sovol with Klipper, any DIY Klipper convert).
- RepRapFirmware for Duet boards.
- Smoothieware, MakerWare, Sailfish for legacy boards.
Klipper printers added as Marlin are a common pitfall. Adaptive bed mesh won’t work right, object exclusion will emit the wrong commands, and your Start G-code placeholder syntax will be wrong. If you’re on Klipper, pick Klipper here, then double-check your Start G-code in section below. There’s also a known issue, #13101, where even with Klipper flavor selected OrcaSlicer still emits Marlin-style M486 for object exclusion. The team has acknowledged it. Workaround: disable object cancellation per-print until it’s fixed. Don’t blame your profile.
Bed shape definitions in detail
Most users don’t need anything beyond rectangular, but here’s the full breakdown for the edge cases.
| Shape | Fields required | Examples |
|---|---|---|
| Rectangular | Width x Depth (mm), Origin offset | Ender 3 (235×235, origin 0,0), Voron 2.4 350 (350×350, origin 175,175) |
| Circular | Diameter (mm) | FLSUN V400 (300mm), Anycubic Kossel (~180mm) |
| Custom STL | Path to an STL file whose XY footprint defines the bed | Voron 0.2 chamfered corners, irregular DIY beds |
| Custom polygon (advanced) | Comma-separated vertex pairs, e.g., 0x0,200×0,200×200,0x200 | Legacy Slic3r-style, may only be in advanced mode in 2.3.2 |
For IDEX and dual-extruder printers (Snapmaker J1, Bambu H2D, DIY IDEX), set Number of extruders to 2 in the Extruder tab and give each one its own Extruder Offset (X, Y). The offset is critical because each toolhead has its own origin in the firmware. Note: Bambu H2D isn’t in stock OrcaSlicer profiles yet as of mid-2026. You’ll need to import a community profile or wait.
Extruder tab settings
This is where you tell OrcaSlicer about your hot end and your extruder kinematics. Fields:
- Nozzle diameter. 0.2, 0.4, 0.6, 0.8, 1.0 are typical. If your printer ships with multiple, OrcaSlicer 2.x convention is one Printer profile per nozzle (old user profiles get auto-migrated to nozzle-specific variants in 2.3).
- Filament diameter. 1.75mm for almost all consumer printers. 2.85mm for Ultimaker and some legacy machines.
- Max nozzle temperature. 240C for PTFE-lined, 260-280C for all-metal hardened, 300C+ for high-temp tool heads like Rapido or Mosquito Magnum. This caps the slider in Filament settings, so if you can’t push PETG up to 245C it’s because this field is wrong.
- Retraction length. OrcaSlicer doesn’t have an explicit “direct drive vs Bowden” toggle, but defaults differ enormously. Set:
- Direct drive: 0.5 to 1mm retraction, 35-45 mm/s retract speed.
- Bowden: 3 to 6mm retraction, 50-60 mm/s retract speed.
- Retraction Z hop. 0.2 to 0.4mm default; 0 for some Voron setups using Pressure Advance tuning.
If you’re running hardened steel or ruby nozzles you can run abrasive filaments like carbon fiber and glass fiber blends. Bump the max temp and double-check your filament profile compatibility flags before you slice.
Machine G-code: Start, End, Pause, Change filament
This is the section users break most often. Two reasons: bracket-vs-brace placeholder syntax confusion, and Klipper users copying Marlin templates verbatim (or vice versa). Let me show you both templates and you can pick the right one.
| Firmware | Placeholder style | Start G-code approach |
|---|---|---|
| Marlin / Marlin 2 | [bracket] | Full heat / home / purge logic in the slicer |
| Klipper | {brace} | Call PRINT_START macro with params; logic lives in printer.cfg |
| RepRapFirmware | {brace} | Similar to Klipper, calls macros in config.g |
Marlin Start G-code template
M220 S100 ; Set the feed rate to 100%
M221 S100 ; Set the flow rate to 100%
M104 S140 ; Preheat the nozzle to 140C
M190 S[bed_temperature_initial_layer_single] ; Set the bed temperature
G90 ; Use absolute positioning
G28 ; Home all axes (X, Y, Z)
G1 Z10 F300 ; Lift the nozzle to 10mm for clearance
G1 X67.5 Y0 F6000 ; Move to start position for filament priming
G1 Z0 F300 ; Lower nozzle to bed
M109 S[nozzle_temperature_initial_layer] ; Wait until the nozzle reaches the desired temperature
G92 E0 ; Reset the extruder position
G1 X67.5 Y0 Z0.4 F300 ; Move to priming start
G1 X167.5 E30 F400 ; Prime the nozzle by extruding a line of filament
G1 Z0.6 F120 ; Slightly lift the nozzle
G1 X162.5 F3000 ; Move nozzle to the start of the print area
G92 E0 ; Reset the extruder for the actual print
Notes: Marlin uses [bracket] placeholders. The priming line coordinates (X67.5, X167.5) assume a 235mm bed; adjust for your machine. If you have auto bed leveling, add G29 after G28.
Klipper Start G-code template
M220 S100 ; Set the feed speed to 100%
M221 S100 ; Set the flow rate to 100%
PRINT_START EXTRUDER={first_layer_temperature[0]} BED={first_layer_bed_temperature[0]} CHAMBER={chamber_temperature[0]}
That’s it. Three lines. The actual heat/home/purge/bed-mesh logic lives in your printer.cfg as a macro called PRINT_START (sometimes START_PRINT, check yours). The slicer just passes parameters in. For more on wiring this up correctly, my OrcaSlicer Klipper setup guide walks through the macro definition side.
Klipper uses {brace} placeholders for the macro parameters. Some users use [first_layer_temperature_0] instead of {first_layer_temperature[0]} and modern OrcaSlicer parsers accept either, but I’ve found {first_layer_temperature[0]} is the most reliable in 2.3.x.
End G-code (generic Marlin)
M104 S0 ; Turn off hotend
M140 S0 ; Turn off bed
G91 ; Relative positioning
G1 E-2 F2700 ; Retract a bit
G1 E-2 Z0.2 F2400 ; Retract and raise Z
G1 X5 Y5 F3000 ; Wipe out
G1 Z10 ; Raise Z more
G90 ; Absolute positioning
G1 X0 Y200 ; Present print
M106 S0 ; Turn off fan
M84 X Y E ; Disable steppers except Z
For Klipper, End G-code is typically just PRINT_END (defined in printer.cfg). Same idea as Start: keep the logic in the firmware macro.
Layer change, Pause, Change filament
Layer change G-code is usually blank. Advanced users insert M73 P[layer_num] for progress, or per-layer bed mesh adjustments.
Pause G-code default in 2.3.2 is often M601 on Marlin or blank on Klipper. Many printers expect M25 for plain pause. If your printer ignores M601, try M25.
Change filament G-code defaults to M600 for Marlin with advanced pause support. On Klipper you’ll define an M600 macro in your printer.cfg that does the park-and-pause dance. There’s a lot more nuance here than the slicer hints at, and I cover the full flow including macro examples in my M600 manual filament change guide.
Common placeholder variables
| Marlin form | Klipper form | Meaning |
|---|---|---|
[bed_temperature_initial_layer_single] |
{bed_temperature_initial_layer_single} |
First layer bed temp |
[nozzle_temperature_initial_layer] |
{nozzle_temperature_initial_layer} |
First layer nozzle temp |
[first_layer_temperature] |
{first_layer_temperature[0]} |
Per-extruder first layer nozzle temp |
[first_layer_bed_temperature] |
{first_layer_bed_temperature[0]} |
Per-extruder first layer bed temp |
[chamber_temperature] |
{chamber_temperature[0]} |
Chamber heater setpoint |
| n/a | {first_layer_print_min[0]} |
X coord of bottom-left of first-layer bounding box (adaptive purge) |
[layer_num] |
{layer_num} |
Current layer number, for layer change G-code |
Bracket vs brace syntax is the most common source of “my Start G-code doesn’t work” forum posts. The rule of thumb: Marlin uses brackets, Klipper macro params use braces. Inside the slicer’s Start G-code field, modern OrcaSlicer parses both, but be consistent within a single template or you’ll confuse yourself.
Network connection (Device tab)
After you save the printer, click the connection icon next to the printer name to set up network printing. Host Type dropdown options in 2.3.2:
- Octo/Klipper (generic case, covers most Moonraker setups)
- OctoPrint
- Moonraker
- Mainsail
- Fluidd
- PrusaLink / PrusaConnect
- Duet
- Obico
- FlashAir, AstroBox, Repetier, MKS, FlashForge, SimplyPrint
Enter your Hostname / IP / URL, the API key if required, and click Login or Test. USB-only printers skip this entirely. The Octo/Klipper option is the right pick for most generic Moonraker installs; OctoPrint is only for actual OctoPrint instances (different web stack).
Path A: The Configuration Wizard’s “Create Printer” option
If you skipped Path B, here’s the wizard route. I’ll be honest upfront: it’s mostly a wrapper around Path B that saves you two clicks. But it’s the path the official docs push, so let me walk through what it actually does.
Launch OrcaSlicer. If it’s a fresh install, the Configuration Wizard fires automatically. Otherwise: File > Configuration Wizard. On the printer selection screen, scroll the vendor list.
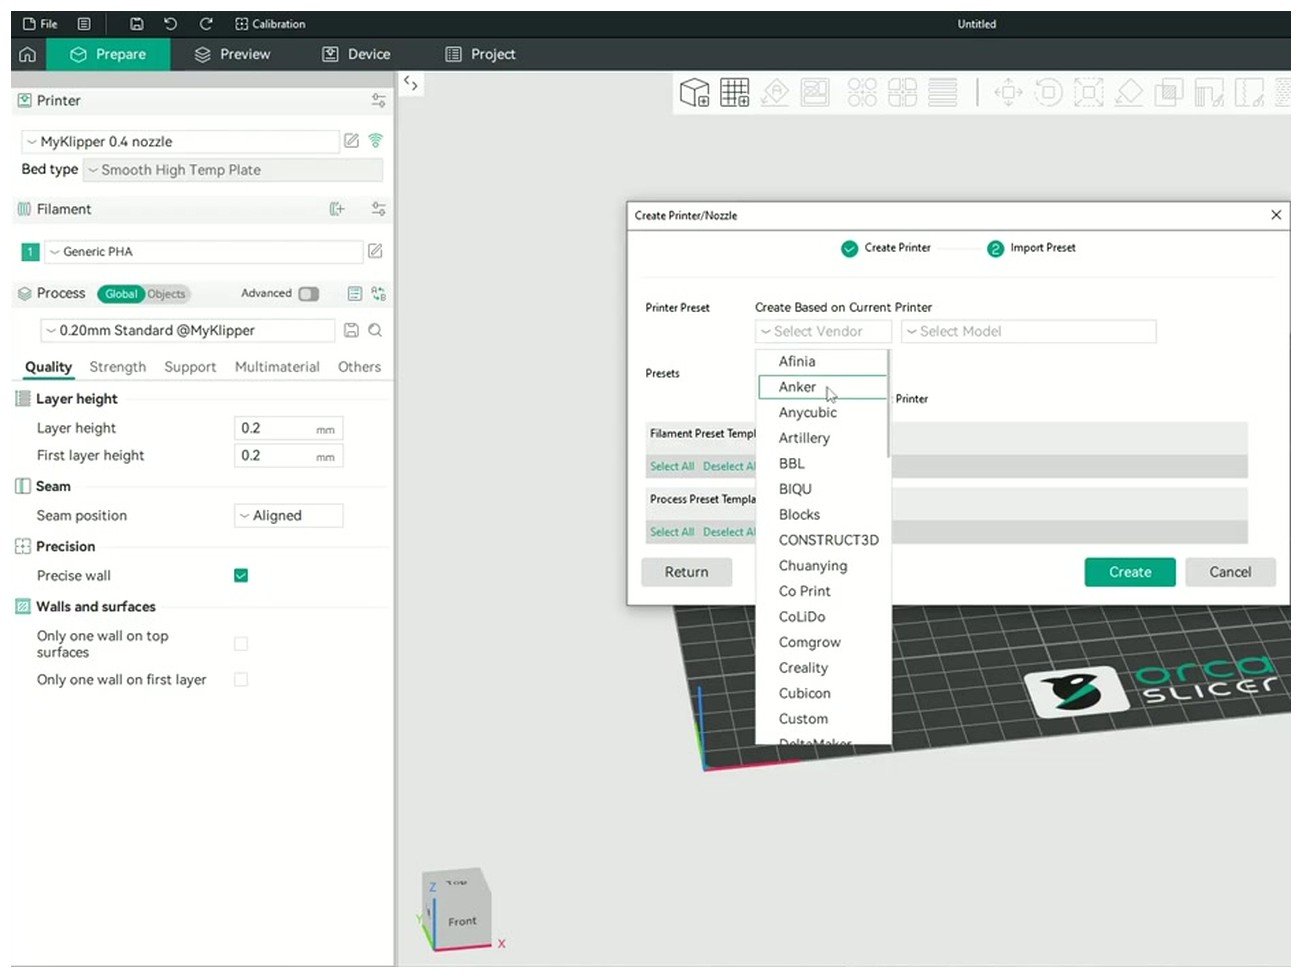
The vendor dropdown. Scroll until you find “Custom” or look for the “Create Printer” button. If your brand is listed but your model isn’t, pick the closest model and edit in Printer Settings afterward.
If yours isn’t there, look for a “Create Printer” or “Create 3D printer” button (also visible from the Printer dropdown in the main UI). The dialog asks for vendor, model (you have to pick a base that’s close), and nozzle diameter. As of 2.3.2 the dialog requires picking a vendor and model first or it errors with “The model was not found, please reselect.” That’s the known issue #11704, which has bitten Sovol SV07 Plus owners on macOS Sequoia particularly hard. If you hit that error, give up on Path A and use Path B or C instead.
Once you click Create, OrcaSlicer creates a User Preset based on that parent. The next step is to open Printer Settings (pencil icon) and edit bed dimensions, G-code, and so on. Which is, of course, Path B. So you’ve taken a long way around.
One more wizard step worth mentioning: after picking a printer, OrcaSlicer offers a “Create from Template” step where you can pull in filament presets and a process template.
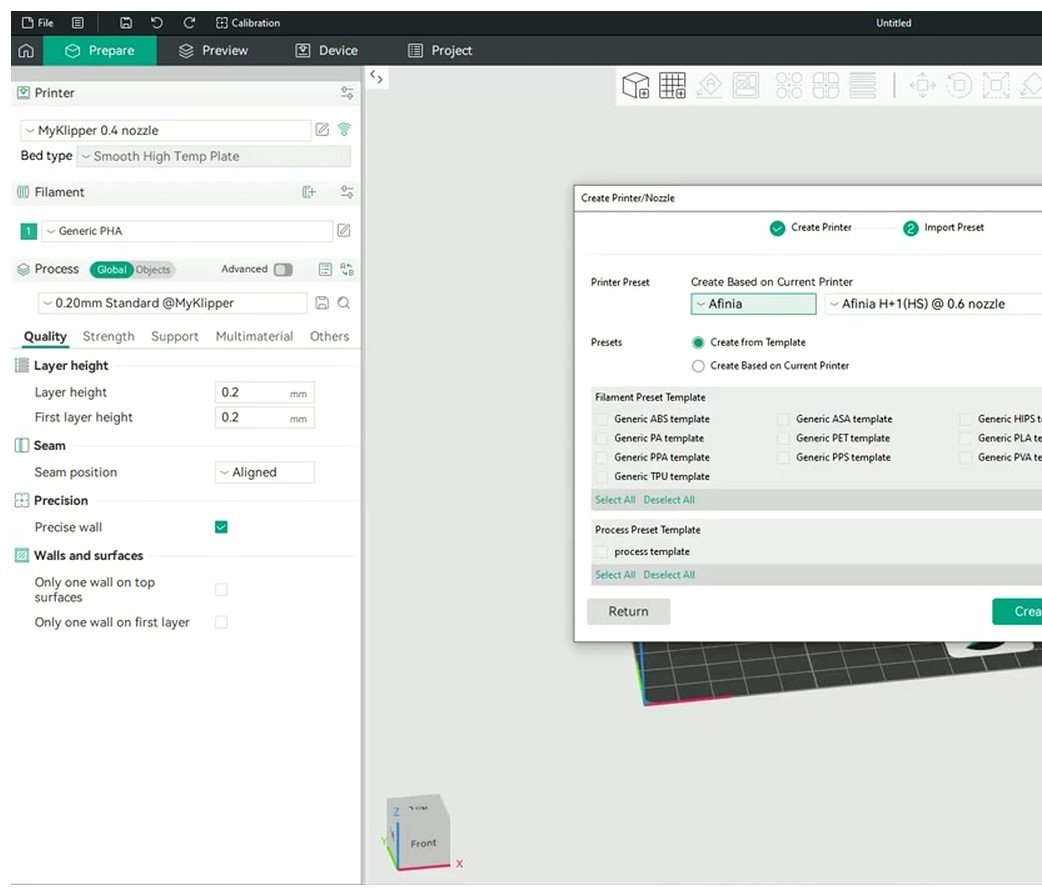
The Create from Template step. Pull in Generic PLA, ABS, ASA filament presets and a process template. This saves you from rebuilding filament profiles from scratch.
This step is genuinely useful even if you went through Path B. Templates pre-populate Generic PLA, ABS, ASA, and a default Process profile, which means you’re not starting your first slice with empty filament settings. Hit Create and you’re good.
Known bug worth flagging: Issue #8094, custom printers disappearing on every other launch. This has been ongoing through 2.1.x and 2.2 on Windows 11. If your custom printer vanishes from the dropdown, this intermittent bug is probably why. Workaround: keep an exported .orca_printer backup and re-import when it disappears. Restarting OrcaSlicer also clears it sometimes.
Save, find, and share your custom printer
OrcaSlicer stores user profiles as JSON files on disk. Knowing where they live makes backup, sharing, and troubleshooting much easier.
| OS | User profiles path |
|---|---|
| Windows | C:\Users\<username>\AppData\Roaming\OrcaSlicer\user\ |
| macOS | ~/Library/Application Support/OrcaSlicer/user/ |
| Linux | ~/.config/OrcaSlicer/user/ |
System defaults live in a parallel system/ folder. Don’t edit those by hand. They get overwritten on every update.
The JSON files use inheritance via inherits keys: a machine variant inherits from a machine_model which inherits from the vendor. This is why cloning works so well: you’re creating a thin override on top of a fully-defined parent. Editing JSON directly is supported but not encouraged unless you’re comfortable reading nested OrcaSlicer schemas.
Exporting to share or back up
Go to File > Export > Export Preset Bundle. Choose what to bundle (printer + filament + process), and save as a .orca_printer file (it’s a ZIP container of JSONs under the hood). This is what you share with friends, post on Printables, or back up before a major OrcaSlicer update.
I keep a folder of .orca_printer exports on my NAS, dated, one per machine. When OrcaSlicer updates and something weird happens to a profile, I import the dated bundle and I’m back to a known good state in 30 seconds. Cheap insurance.
Common pitfalls (and how I’ve actually fixed them)
Every one of these has bitten me at least once. Save yourself the time.
1. Nozzle crashes off the front-left corner on first move
This is almost always wrong Origin. If your printer uses center-bed coordinates (Voron, most CoreXY DIY builds), set Origin to half the bed size, not 0,0. Test by slicing a small print, opening the preview, and watching where the first travel move goes. If it heads off the bed, fix the origin before you print. More fixes for first-layer disasters in my OrcaSlicer troubleshooting master guide.
2. Klipper printer added as Marlin, object exclusion broken
This is Issue #13101. Even with Klipper flavor selected, OrcaSlicer still emits M486 instead of EXCLUDE_OBJECT for object cancellation. Acknowledged bug. Workaround: disable object cancellation per-print until it’s fixed. Also double-check your Start G-code: if you copied a Marlin template into a Klipper profile, replace the homing and heating logic with a single PRINT_START call.
3. BED_MESH_CALIBRATE missing from Klipper Start G-code
If you cloned from a Marlin profile, you missed the Klipper-specific bed mesh call. Bed mesh in Klipper lives inside your PRINT_START macro in printer.cfg, not in the slicer. Don’t add BED_MESH_CALIBRATE directly to the slicer’s Start G-code unless you really mean to recalibrate every print. Use the macro and pass a flag if you want conditional behavior.
4. Importing .orca_printer fails or overwrites existing profile
At the overwrite prompt, rename or cancel. If the import outright fails, extract the .orca_printer as a ZIP and drop the .json files directly into user/default/. Restart OrcaSlicer. Works every time as a last resort.
5. Custom printer disappears on alternating launches
Issue #8094, known intermittent bug on Windows 11. Keep exports. Re-import when it vanishes. There’s no clean fix yet.
6. M601 vs M0 vs M25 pause confusion
Default Pause G-code in OrcaSlicer is sometimes M601, sometimes blank. Many Marlin builds expect M25 for a plain pause and M600 for filament change. If your printer ignores M601 and the print just keeps going on pause, swap to M25. Test with a deliberate pause-on-layer in the slicer GUI before trusting it on a real long print.
7. Wizard only loads printers up to Flashforge
That was Issue #12728, a 2.3.2-rc2 regression. Fixed in stable 2.3.2. If you’re seeing it now, update.
8. “Cannot create new nozzle for existing printer”
Issue #4371. Workaround: clone the printer (Save As), change the nozzle diameter on the clone, save under a new name like “MyVoron 0.6 nozzle.” That’s the 2.x convention anyway: one profile per nozzle.
When to stop fighting the slicer and use a community profile
Honest section. If you have a DIY Voron with a quirky bed shape, a custom hot end, a custom probe, and a custom Klipper config, the slicer is only half the job. The other half is your printer.cfg, and OrcaSlicer can’t help you with that half. If you’ve spent two hours fighting Start G-code parameters and your first layer still won’t lay down, three things to try:
- Check if anyone has posted a profile for your exact build. Search the Voron Discord, the relevant subreddit, or
mjonuschat/OrcaSlicer-Profileson GitHub. Even a partial match is useful as a known-good reference. - Compare your Start G-code to the community version line by line. Differences in placeholder syntax or parameter names jump out fast.
- Post your
.orca_printerand yourprinter.cfgto the OrcaSlicer Discussions tab on GitHub. The maintainers and other DIY users are responsive when you bring both halves of the puzzle.
The OrcaSlicer team has been clear that some custom DIY builds need printer.cfg and slicer profile tuned together. The slicer can’t infer what your firmware will do. If you treat them as one system, debugging gets a lot easier.
FAQ
Can I add a printer without going through the Configuration Wizard?
Yes. The Printer dropdown on the right sidebar has a “Create Printer” entry that opens the same dialog. Or skip the wizard entirely and use Path B: pick a similar listed printer, click the pencil icon, click Save As, and rename.
Does OrcaSlicer support delta printers?
Yes. Pick Circular bed shape and enter a diameter. FLSUN delta presets are in the stock vendor list. For DIY delta builds, clone FLSUN V400 and adjust diameter and max Z.
Will my custom printer survive an OrcaSlicer update?
User presets persist across updates, stored in the user/ folder (Windows: AppData\Roaming, macOS: Application Support, Linux: ~/.config). System presets in the parallel system/ folder do get overwritten. As long as you didn’t edit system files directly, your custom printer is safe. That said, Issue #8094 means custom printers occasionally vanish on Windows; keep an exported bundle as a backup.
Can I add the Bambu H2D?
Not yet from the stock OrcaSlicer profile list as of mid-2026. Bambu Studio supports it first; OrcaSlicer H2D support is being merged. Workaround: import a community .orca_printer if you can find one. The Snapmaker J1, by contrast, has been supported since OrcaSlicer 1.6.2 if you need an IDEX reference.
What if the Klipper flavor seems broken (M486 issue)?
That’s Issue #13101. Acknowledged. Object exclusion may emit Marlin-style M486 even with Klipper flavor selected. Disable object cancellation per-print as a workaround, or wait for the fix in a future release. Your profile is fine; the bug is upstream.
How do I delete a custom printer?
Open the Printer dropdown, select the printer, open Printer Settings (pencil icon), and click the trash/delete button at the bottom of the dialog. Or delete the corresponding JSON file from user/default/ while OrcaSlicer is closed.
Wrap and next steps
You should now have a working custom printer in OrcaSlicer with the right bed shape, the right origin, the right G-code flavor, and Start G-code that actually matches your firmware. If you took Path C, you saved an hour. If you took Path B, you spent twenty minutes but you understand every field, which pays off the next time something breaks. If you took Path A and got the “model not found” error, you now know why and where to go next.
Backup your profile via File > Export > Export Preset Bundle before your next OrcaSlicer update. Keep the .orca_printer somewhere safe. From here, the natural next step is dialing in your first print: head over to my OrcaSlicer beginners first print pillar for the calibration-print sequence that catches most remaining issues. If you’re on Klipper and want to wire up bed mesh and PRINT_START macros properly, the Klipper setup guide is the next read. And if anything weird happens, the troubleshooting master has the symptom-by-symptom checklist.
Related OrcaSlicer guides
- OrcaSlicer Settings Master Guide: Every Setting Explained (2026)
- OrcaSlicer for Sovol SV06 / SV07 / SV08: Setup and Best Settings (2026)
- OrcaSlicer for Qidi X-Plus 3 / X-Max 3 / Q1 Pro: Setup and Best Settings (2026)
- OrcaSlicer Cooling and Fan Curves Explained (2.3.x Guide)
- OrcaSlicer Won’t Find My Printer on the Network: Mac and Windows Fixes