
I’ve added eight printers to OrcaSlicer in two years, and exactly two of them appeared in the dropdown without me hunting down a JSON. The other six required some combination of vendor fork, community profile, or hand-built machine settings, and the difference between a smooth setup and a six-tab nightmare came down to one question: which brand made the printer.
That’s the thing nobody tells you when you switch slicers. OrcaSlicer ships with profiles for more than sixty brands out of the box, but “supported” is a sliding scale. A Bambu X1 Carbon is a ten-second setup. A Snapmaker U1 needs the Snapmaker fork to behave properly. A Prusa MK4 technically works, but the pressure-advance numbers have drifted from PrusaSlicer’s official defaults and you’ll fight ghosting until you recalibrate. A Kobra S1 will print, but the change-filament G-code in upstream Orca is missing pieces that Anycubic Slicer Next gets right.
So this is the master map. I’ll walk through what an OrcaSlicer profile actually contains, where each brand falls on the support spectrum, which vendors maintain their own forks, and how to add a printer manually when yours isn’t in the list. Seven per-printer guides are linked through this article, plus a brand-by-brand matrix you can scan in thirty seconds.
What an OrcaSlicer printer profile actually is
OrcaSlicer doesn’t store “a printer profile” as one thing. A working configuration is four JSON objects stacked on top of each other, and once you understand the stack the brand matrix makes a lot more sense.
The four layers:
- Printer Model (
type: "machine_model"): the family. Brand, family name, default nozzle, default bed STL. Example: “Bambu Lab P1S”. - Printer Variant / Machine (
type: "machine"): a specific hardware combination. Nozzle diameter, tool count, plate type. This is whereprintable_area, retraction, max accelerations, and kinematics live. - Filament (
type: "filament"): temperatures, fan curves, flow ratio, max volumetric speed. Listscompatible_printers, so a “@BBL X1C” PETG-CF profile won’t appear in a Creality dropdown. - Process (
type: "process"): layer height, perimeters, infill, support, speed presets like “0.20mm Standard @BBL X1C 0.4 nozzle”.
All four use the inherits field to chain. A user PETG profile inherits from “Generic PETG @BBL X1C”, which inherits from “fdm_filament_pet”. Edit a parent and every child changes. Delete a parent and the children vanish from the UI, even though the JSON files are still on disk. I’ve hit this personally after pruning what I thought were duplicate presets.
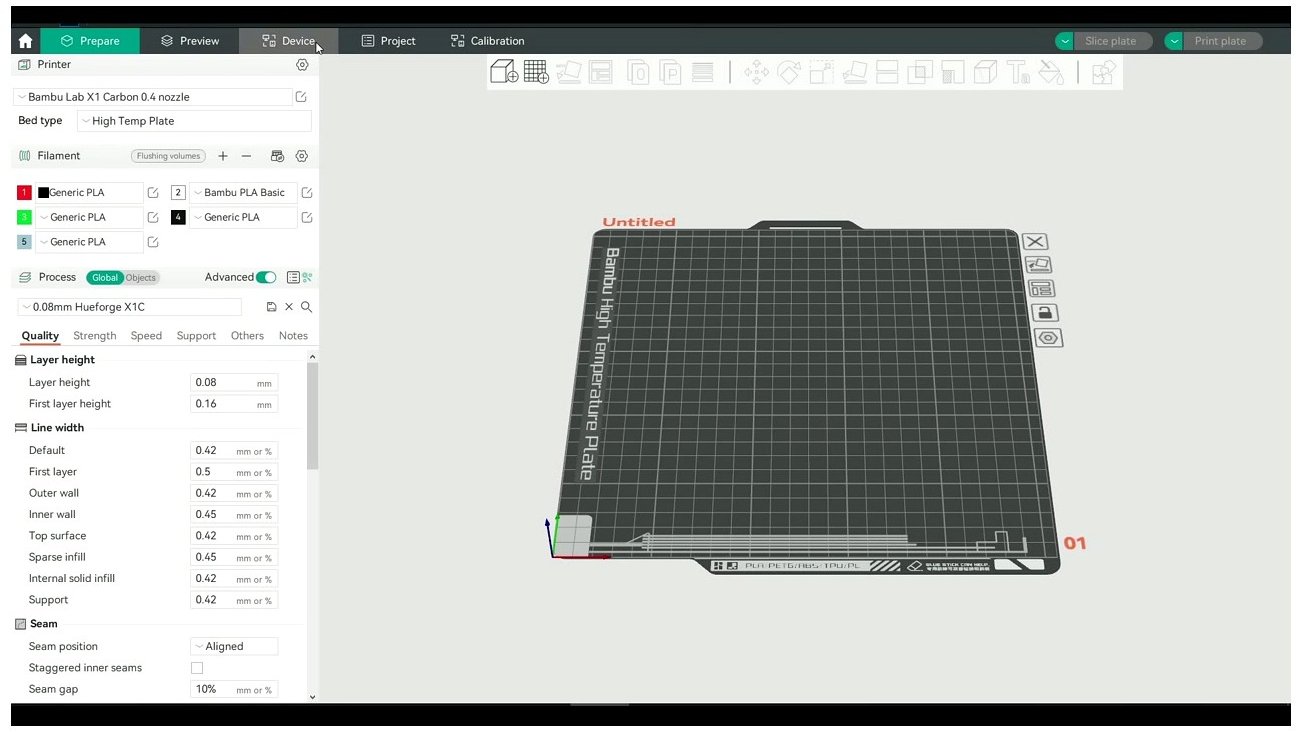
A working setup is the printer profile, filament profiles for each AMS slot, and the process preset on the right. Three layers of the stack, one screen.
System presets ship with the installer and live under resources/profiles/. User presets (anything you create or import) live in the per-OS user data folder; exact paths are in the where-files-live section. You can’t edit a system preset in place; the first change forces a “Save as new user preset” prompt.
Profile bundles export as .orca_printer, .orca_filament, or .orca_process files (zipped JSON). Import via File → Import → Import Configs.
Where printer profiles come from in 2026
Four channels. You’ll use at least two of them in a typical setup, and most of the brand-specific advice below boils down to “which channel should you start with for this brand.”
Channel 1: bundled / official upstream. Anything in resources/profiles/<vendor>/ ships in the installer. The current bundle covers more than sixty vendor folders including Anycubic, BBL (Bambu), Creality, Elegoo, Flashforge, Prusa, Qidi, Raise3D, Snapmaker, Sovol, UltiMaker, Voron, plus the OrcaFilamentLibrary for materials. The list grows monthly, so confirm by opening the wizard and looking.
Channel 2: vendor forks. Three printer makers ship their own customized OrcaSlicer build with deeper integration:
- Snapmaker Orca: a Snapmaker-maintained fork. The U1 tool-changer is first-class here and rough-around-the-edges in upstream Orca. Artisan, 2.0, J1, and J1s support is “in active development” per Snapmaker’s own page. Adds device management and Snapmaker-tuned filament defaults.
- Orca-Flashforge: Flashforge’s fork, optimized for the Adventurer 5M, 5M Pro, AD5X, and Guider 3 Ultra. Adds FlashMaker app integration for wireless print and remote monitoring.
- Anycubic Slicer Next (Orca version): Anycubic’s fork built on the OrcaSlicer codebase. First-class for the Kobra 3 family and Kobra S1. Some printer-specific G-code (filament-change macros, the Kobra 3 model-size fix) was only correct in Anycubic Slicer Next for a while; upstream Orca’s Kobra S1 profile was missing the change-filament G-code until December 2025, when PR #11650 ported it from Anycubic Slicer Next (issue #11632). If you’re on an older build, update before swapping colors mid-print.
I’ll be blunt about this: if you own a U1, a 5M Pro, or a Kobra S1, install the vendor fork. The OrcaSlicer team isn’t trying to lock you out, the vendors just maintain those edge cases better than upstream does.
Channel 3: community. User-uploaded bundles on MakerWorld, Printables, and GitHub. The repos that come up most often in Reddit threads and forum links: mjonuschat/OrcaSlicer-Profiles for Klipper and Voron, shyblower/Shyblowers-OrcaSlicer-Profiles for a multi-printer collection, R3tr0_D’s Printables uploads for the Creality K1 / K1C / K1 Max, MPC561/Anycubic-Kobra-S1-Orcaslicer-Profiles and ditschi/OrcaSlicer-user-profiles for the Kobra S1 Combo, and Ace3DPrints/sv06plus for the Sovol SV06 Plus running Klipper. There’s also ratdoux/OrcaSlicer-FullSpectrum, a niche fork for U1 multi-color tool-changer users that adds layer-blending features beyond the base Snapmaker Orca.
Channel 4: manual import from PrusaSlicer or Bambu Studio. Both are codebase ancestors of OrcaSlicer, so their .ini configs and .zip config bundles can be brought in via File → Import → Import Configs. Filament and process settings transfer almost cleanly. Printer settings need a sanity check on bed shape and start G-code. We cover the practical differences in OrcaSlicer vs PrusaSlicer and OrcaSlicer vs Bambu Studio.
The brand-by-brand support matrix
This is the keystone of the article. Read across to find your brand, the support level, the path I’d take if I were setting it up tomorrow, and the gotchas that bite people most often. The “bundled models” column is what I see in the wizard at the time of writing; vendors add new printers monthly so check the picker on your install before assuming a model is missing.
| Brand | Bundled models (sample) | Support level | Recommended path | Known gotchas |
|---|---|---|---|---|
| Bambu Lab | A1, A1 mini, P1P, P1S, P2S, X1, X1 Carbon, X1E, H2D family, H2S, X2D | Full, first-class | Upstream OrcaSlicer + LAN-only mode + access code | Cloud-bound prints route through Bambu Connect; firmware updates still need Bambu Studio; H2D / H2S profiles are recent |
| Creality (FDM) | CR-10 SE / V2 / V3 / Max, CR-M4, Ender-3 family, Ender-3 V3 (V3 / SE / KE / Plus), Ender-3 S1 line, Ender-5 line, Hi, K1, K1 SE, K1 Max, K1C, K2, K2 Plus, K2 Pro, Sermoon V1 | Full for V3 line and K-series; community-tier for older Ender 3 derivatives | K-series via Klipper / Moonraker; bedslingers via standard wizard | K1 family runs Klipper, connect via Mainsail port 4409 or Fluidd port 4408; leave root-level Klipper settings to the vendor |
| Prusa Research | MINI (standard + IS), MK3S, MK3.5, MK4, MK4S, MK4S HF, CORE One (standard, L, L HF, HF), XL, XL 5T | Full for FFF; MMU3 not present in upstream Prusa folder | OrcaSlicer is fine for single-tool; PrusaSlicer remains official path for MMU3 | Pressure-advance values in OrcaSlicer’s MK4 profile have drifted from PrusaSlicer’s official numbers (issue #5056), recalibrate; Input Shaper requires MK4 firmware 5.0.0 or later |
| Anycubic | Kobra (orig), Kobra Neo, Kobra Plus, Kobra Max, Kobra 2 / 2 Neo / 2 Pro / 2 Plus / 2 Max, Kobra 3 / 3 Max, Kobra S1, Vyper, i3 Mega S, Chiron, Predator, 4Max Pro | Partial; Kobra 3 + S1 cleaner in Anycubic Slicer Next | Kobra 3 / S1: Anycubic Slicer Next, or import the official Anycubic profile into upstream Orca per the Anycubic wiki | Older Orca builds (pre-Dec 2025) shipped the Kobra S1 profile without change-filament G-code (issue #11632, fixed in PR #11650), so update if you swap colors mid-print. Z-offset gets weird if the nozzle cleaner only wipes the top of the nozzle |
| Elegoo | Neptune (1, 2, 2D, 2S, 3, 3 Plus, 3 Pro, 3 Max, 4, 4 Plus, 4 Pro, 4 Max, X), Centauri, Centauri Carbon, Centauri Carbon 2, OrangeStorm Giga | Full for Neptune 4 line; Centauri Carbon profiles are newer | Standard wizard + bundled profile | Neptune 4 series uses Klipper, needs the Moonraker connect step; Centauri Carbon profile updates land per release, check the changelog |
| Voron Design | Voron 0.1, Voron 2.4 (250 / 300 / 350), Voron Trident (250 / 300 / 350), Voron Switchwire 250 | Community-built (no vendor) | Pick the bundled Voron profile matching your build size; supplement with mjonuschat filament + process profiles | Voron 0.2 isn’t bundled (start from Voron 0.1 and adjust bed); older community profiles online may still be PrusaSlicer .ini not Orca .json |
| Sovol | SV01, SV01 Pro, SV02, SV05, SV06, SV06 Plus, SV06 ACE, SV06 Plus ACE, SV07, SV07 Plus, SV08, SV08 MAX, Zero | Full for SV06 + SV07 + SV08 family | Bundled wizard; SV08 owners can also start from a Voron 2.4 350 profile because SV08 is a Voron 2.4 derivative | Direct-drive SV06/07 vs Bowden CR-style retract values are completely different; don’t import a CR-10 profile into an SV06 |
| QIDI Tech | Q1 Pro, Q2, Q2C, X-CF Pro, X-Max, X-Max 3, X-Max 4, X-Plus, X-Plus 3, X-Plus 4, X-Smart 3 | Full; QIDI is an OrcaSlicer sponsor | Bundled wizard; physical-printer connection via Klipper at <printer-ip>:10088 |
Arc fitting is disabled by default for QIDI processes; X-Max 4 only got the 0.4 nozzle profile in the v2.3.2 cycle, other nozzles may need manual setup |
| Flashforge | AD5X, Adventurer 3 / 4 / 5M / 5M Pro, Artemis, Creator 5 / 5 Pro, Guider 2s / 3 Ultra / 4 / 4 Pro | Partial in upstream; better in Orca-Flashforge fork | 5M / 5M Pro / AD5X owners: install Orca-Flashforge instead | Upstream Orca’s 5M profile predates several firmware iterations; Viking3DK community profiles on Printables fill the gap |
| Snapmaker | A250 (8 kit variants), A350 (8 kit variants), Artisan, J1, U1 | Partial in upstream; U1 first-class only in Snapmaker Orca | U1: Snapmaker Orca. Artisan and J1: upstream OrcaSlicer with the bundled profile. J1s users start from the J1 profile. Snapmaker 2.0 users use the matching A250 or A350 kit profile | A250 / A350 multi-kit variants are not interchangeable; pick the kit code that matches your toolhead exactly. U1 multi-color users should look at OrcaSlicer-FullSpectrum |
If your brand isn’t listed above, check the wizard. The bundled list also covers Artillery, Anet, BIQU, FLSun, Geeetech, Kingroon, LulzBot, Peopoly, Raise3D, RatRig, Tronxy, TwoTrees, UltiMaker, Wanhao, and a few dozen smaller brands. The ten brands in the table are the hard cases, which is why they get their own sections next.
Brand notes
Bambu Lab
Bambu is the easiest case. Every current Bambu printer (A1, A1 mini, P1P, P1S, P2S, X1, X1 Carbon, X1E, H2D family, H2S) ships in the upstream wizard with well-tuned defaults. The catch is connectivity: enable LAN-only mode and Developer Mode on the printer touchscreen, then paste the eight-character access code into OrcaSlicer’s printer setup. The code regenerates if you toggle cloud back on, so write it down. Firmware updates are still Bambu Studio’s job. We cover the trade-off in OrcaSlicer vs Bambu Studio and LAN setup in Bambu cloud vs LAN mode.
For the X1 Carbon and P1S specifically, see OrcaSlicer X1C and P1S setup. A1 and A1 Mini owners want A1 and A1 Mini OrcaSlicer guide for AMS lite quirks. Multi-color AMS owners: OrcaSlicer Bambu AMS guide.
Creality
Creality splits into two camps. K-series printers (K1, K1 SE, K1 Max, K1C, K2, K2 Plus, K2 Pro) run Klipper. After picking the bundled profile, head to the Device tab, click Connect, and enter the printer IP plus port 4409 (Mainsail) or 4408 (Fluidd). First connection often fails; click OK and retry. Don’t touch root-level Klipper settings from the slicer side. Full walkthrough: OrcaSlicer for Creality K1, K1 Max, and K2.
The other camp is the Marlin bedslinger family. The Ender-3 V3 line (V3, V3 SE, V3 KE, V3 Plus) has solid bundled profiles and works through the standard wizard. Dedicated guide: Ender 3 V3 SE / KE / Plus walkthrough. Older Ender 3s (V1, Pro, V2, S1) work but the bundled profile is generic; update Marlin first and calibrate before trusting defaults. The Klipper setup guide covers connection details for any Klipper-based Creality.
Prusa Research
Honest take: OrcaSlicer works for single-tool Prusa printers, but PrusaSlicer is still the safer default if you use Prusa Connect or the MMU3. The MMU3 isn’t supported by the upstream OrcaSlicer Prusa folder. If you have an MK4 with the multi-material upgrade, you’re in PrusaSlicer until that changes.
For everything else (MINI, MK3S, MK3.5, MK4, MK4S, CORE One, XL), bundled profiles exist and are complete. The most-cited issue is pressure-advance drift on the MK4 (issue #5056), so don’t trust the imported PA. Run the OrcaSlicer pressure-advance test, write your value into the filament profile. Input Shaper on the MK4 needs firmware 5.0.0 or later. Full guide: Prusa MK4, MK4S, and CORE One in OrcaSlicer. Head-to-head: OrcaSlicer vs PrusaSlicer.
Anycubic
Anycubic is where the vendor-fork conversation matters most. Kobra 3, Kobra 3 Max, and Kobra S1 are best served by Anycubic Slicer Next (Orca version). Upstream OrcaSlicer’s Kobra S1 profile shipped without the change-filament G-code until issue #11632 was fixed by PR #11650 in December 2025, and on older builds the printer stops mid-color-swap. Update Orca and you’re fine.
If you want to stay on upstream Orca, Anycubic publishes a wiki page that walks through importing the official Kobra 3 profile as .orca_printer bundles. The MPC561 community repo also ships an enhanced start G-code with a multi-side wipe macro that fixes the Z-offset weirdness on the Kobra series. Full walkthrough: OrcaSlicer Kobra 3 and S1 profile setup. Older Kobra 2 / Neo / Plus / Max owners can run upstream Orca with the bundled profile and it’ll print fine.
Elegoo
Neptune 4 / Pro / Plus / Max are well-supported in upstream OrcaSlicer. The Neptune 4 line runs Klipper, so you’ll need the Moonraker connect step. Full guide: Neptune 4 Pro / Plus / Max OrcaSlicer guide. Centauri and Centauri Carbon profiles are newer; run a calibration suite before trusting them. Earlier Neptune models all have stable bundled profiles.
Voron
Voron is community territory by design. The bundled profiles for Voron 0.1, 2.4 (250 / 300 / 350), Trident, and Switchwire are community-maintained. Voron 0.2 isn’t bundled; start from Voron 0.1 and adjust bed size. The mjonuschat repo is the most-cited supplement for filament and process profiles. Older community profiles online may still be PrusaSlicer .ini rather than Orca .json; they import fine but recheck start G-code.
Sovol
SV06, SV06 Plus, SV06 ACE, SV07, SV07 Plus, SV08, SV08 MAX, and Zero are all bundled. The SV08 is a Voron 2.4 derivative running Klipper, so for advanced users a Voron 2.4 350 profile is a viable starting point. The retract-value warning is the big one: SV06 and SV07 are direct-drive (~0.5 to 1.0 mm). CR-10 and older Enders are Bowden (4 to 6 mm). Don’t cross-import; you’ll see stringing and blobs that aren’t the slicer’s fault.
QIDI Tech
QIDI is an OrcaSlicer sponsor, so the bundled profiles for Q1 Pro, Q2, Q2C, X-Max 3, X-Plus 3, X-Plus 4, and X-Smart 3 are well-tuned. Physical-printer connection is via Klipper at <printer-ip>:10088. Arc fitting is disabled by default for QIDI processes; leave it that way unless you’ve tested arc support on your firmware.
Flashforge
One of the three “use the vendor fork” cases. Adventurer 5M, 5M Pro, AD5X, and Guider 3 Ultra owners get a much cleaner experience in Orca-Flashforge than in upstream. The fork keeps start G-code in sync with firmware updates and adds FlashMaker app integration. Upstream Orca will slice for these printers, but the bundled profile lags. Older Adventurer 3 / 4 family and Creator 5 line are stable in upstream.
Snapmaker
The U1 tool-changer is first-class in Snapmaker Orca, the official fork. Run the U1 anywhere else and you’ll fight tool-change behavior. Multi-color tool-change users wanting layer-blending should also check ratdoux/OrcaSlicer-FullSpectrum. For Artisan and J1, upstream OrcaSlicer with the bundled profile works today. J1s isn’t a separate upstream profile, so start from the J1 profile and adjust. Snapmaker 2.0 is the A150 / A250 / A350 family, so pick the matching A-series kit profile. Watch the kit variants: A250 and A350 each have eight kit configurations and “A350 Dual” vs “A350 Dual QSKit” are not interchangeable.
The “I have printer X” decision tree
Scroll-scan list. Find your printer, take the path:
- Bambu Lab: upstream OrcaSlicer + LAN-only + access code. Read X1C / P1S setup or A1 / A1 Mini setup.
- Creality K-series (K1, K1 Max, K2): upstream + Klipper / Moonraker (port 4408 Fluidd or 4409 Mainsail). K1 / K1 Max guide.
- Ender 3 V3 SE / KE / Plus: upstream + bundled profile + run calibration. Ender 3 V3 walkthrough.
- Older Ender 3 (V1, Pro, V2, S1): upstream works, profile is generic. Update Marlin first.
- Prusa MK4 / MK4S / Core One: works, but PrusaSlicer is safer for Prusa Connect or MMU3. Prusa MK4 in OrcaSlicer.
- Prusa MK3S+ / Mini+ / XL: bundled profiles exist; recalibrate pressure advance after import.
- Anycubic Kobra 3 / S1 / Max Combo: Anycubic Slicer Next, or import official profile into upstream. Kobra 3 / S1 setup.
- Anycubic Kobra 2 / Neo: upstream + bundled profile + MPC561 start G-code.
- Elegoo Neptune 4 / Pro / Plus / Max: upstream + Klipper / Moonraker. Neptune 4 guide.
- Elegoo Centauri Carbon: upstream, recent profile, calibrate first.
- Voron: upstream for printer, mjonuschat for filament / process.
- Sovol SV06 / SV07: bundled profile is fine; do not reuse CR-10 retract values.
- Sovol SV08: bundled SV08 profile, or a Voron 2.4 350 profile for advanced users.
- QIDI X-Plus 3 / X-Max 3 / Q1 Pro: upstream +
ip:10088. - Flashforge Adventurer 5M / Pro / AD5X: Orca-Flashforge fork.
- Snapmaker U1: Snapmaker Orca. Multi-color: also check OrcaSlicer-FullSpectrum.
- Snapmaker Artisan / J1: upstream + bundled profile. J1s: start from J1 profile. Snapmaker 2.0: pick the matching A250 or A350 kit profile.
- Brand not listed: check the wizard, then add a printer manually.
How to add a printer profile manually
Three paths. Pick the one that matches your skill level.
Path A: the wizard (easiest, for unsupported printers)
- Click the gear icon next to the Printer dropdown.
- In the printer-selection dialog: Custom → Create Custom Printer.
- Step through: brand, model, nozzle diameter, bed size, max print height, firmware flavor (Marlin, Klipper, RepRap), retraction defaults, start / end G-code.
- Save. Your printer appears in the dropdown.
This is the path for any printer not in the bundled list and not covered by a vendor fork. The screenshot below is a custom SecKit SK-Tank (an open-source CoreXY) set up using an imported community profile as a starting point.
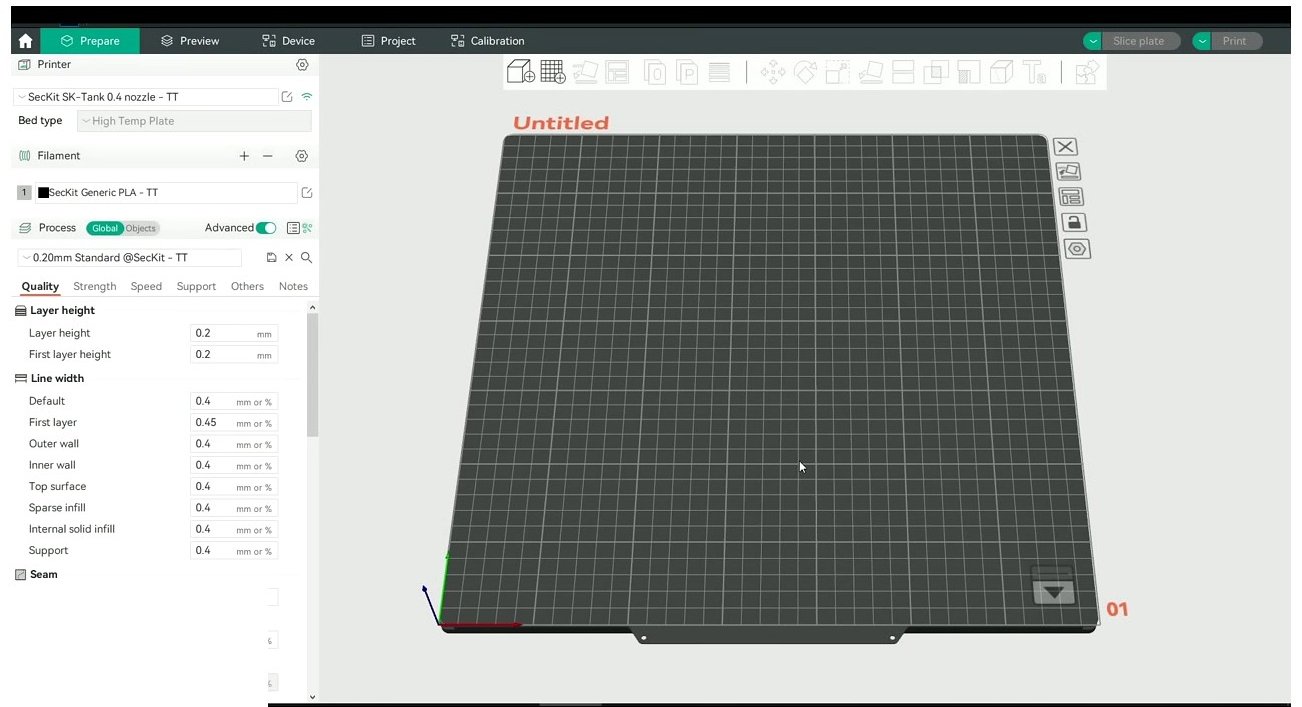
Custom SecKit SK-Tank set up by importing a community profile and editing machine settings to match the hardware.
Path B: import a community bundle
- Download the
.orca_printerfrom MakerWorld, Printables, or a GitHub repo like mjonuschat or shyblower. - File → Import → Import Configs, browse to the file.
- OrcaSlicer prompts to overwrite. Pick “Keep both” to be safe.
This is what most people do for the Sovol SV06 Plus on Klipper, Voron builds, and the Anycubic Kobra S1 Combo.
Path C: drop raw JSON files into the user folder (advanced)
- Navigate to the user data folder (paths in the next section).
- Place machine JSONs in
machine/, filaments infilament/, processes inprocess/. - Restart OrcaSlicer.
Use this when you understand the inheritance chain and want surgical control.
Migrating from PrusaSlicer or Bambu Studio
Export the config bundle from the source slicer, then import via File → Import → Import Configs. Re-verify start / end G-code; vendor-specific macros do not always translate. Filament and process settings come across cleanly.
Per-printer overrides
Once set up, the Others tab in the printer settings dialog holds the niche stuff: flush options for multi-tool, slicing mode, G-code output flavor. Most people never touch it, but this is where you’d enable arc fitting on a profile that disabled it by default.
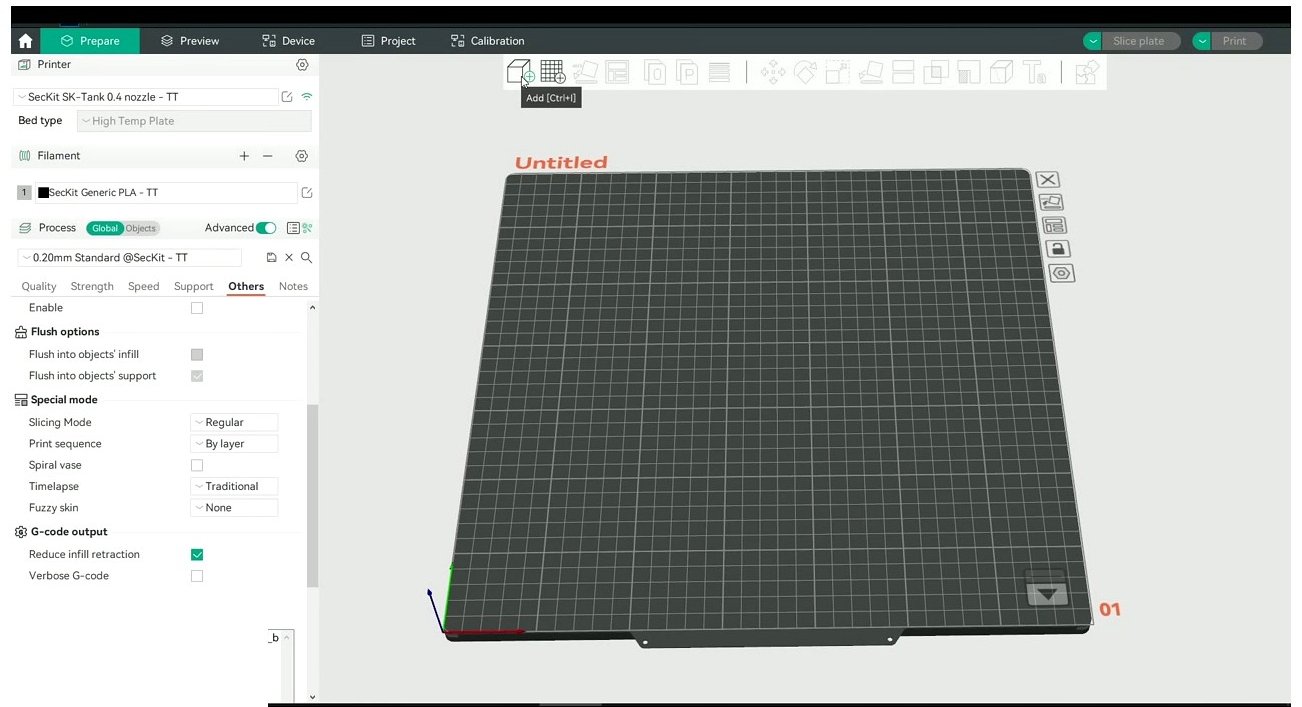
The Others tab on the SecKit profile, exposing flush options, slicing mode, and G-code output flavor.
The Machine G-code tab is where you edit start, end, layer-change, and filament-change macros. You’ll come back here whenever a firmware update breaks the bundled start sequence. The OrcaSlicer settings master guide walks through which lines are safe to touch.
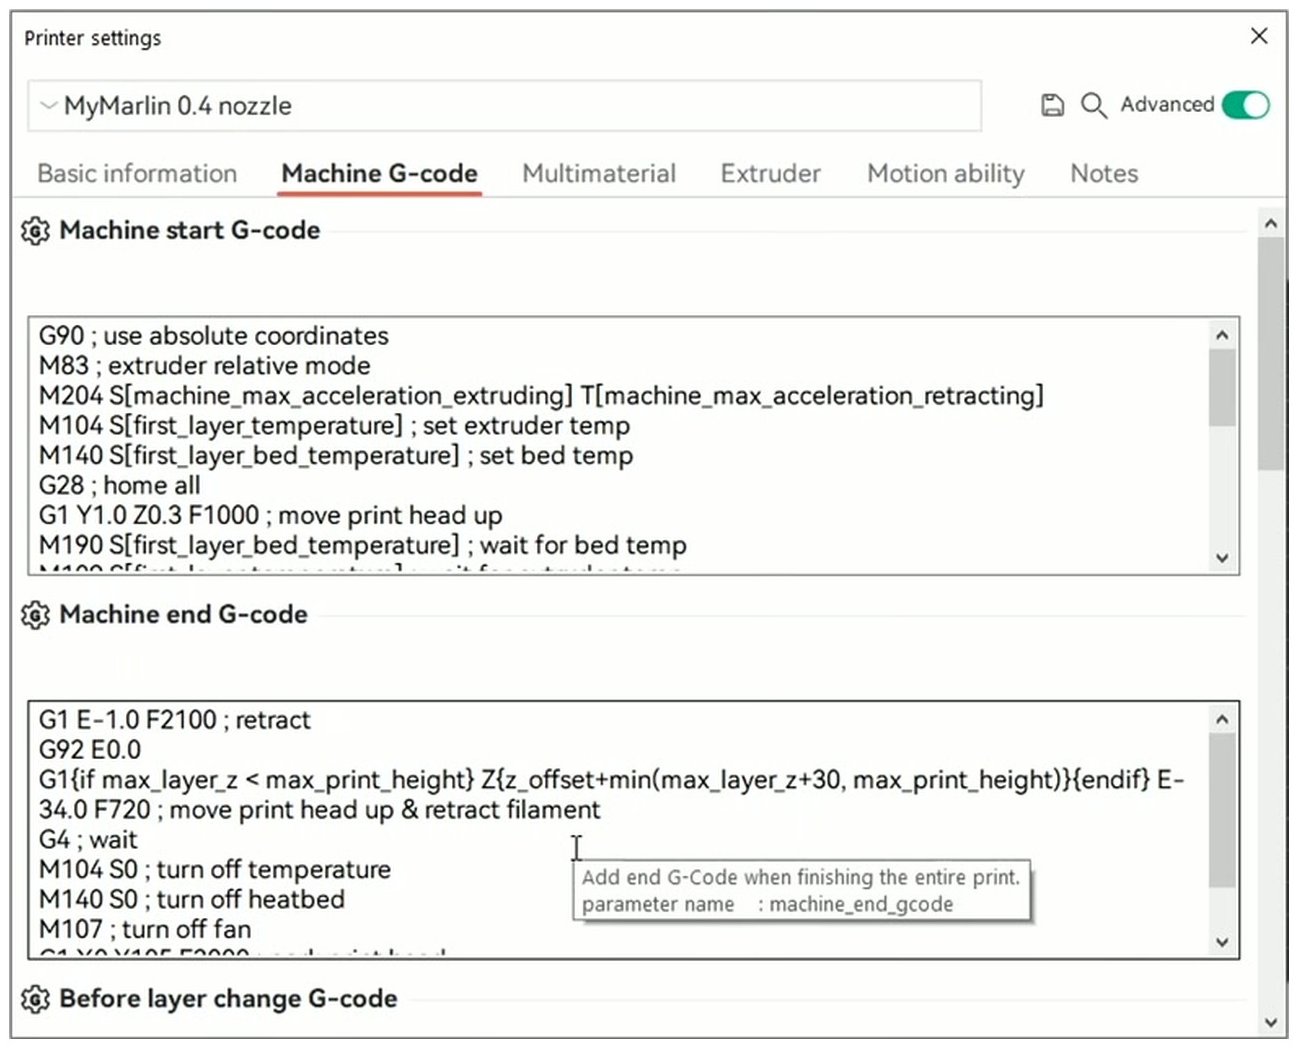
The Machine G-code tab. Start, end, layer-change, and filament-change macros all live here.
Where profile files live and how to back them up
Two locations. System presets ship with the installer at resources/profiles/<vendor>/; don’t edit these, they’re overwritten on every update. User presets live in the per-OS user data folder:
- Windows:
C:\Users\<you>\AppData\Roaming\OrcaSlicer\user\default\ - macOS:
~/Library/Application Support/OrcaSlicer/user/default/ - Linux:
~/.config/OrcaSlicer/user/default/
Inside default you’ll find machine/, filament/, and process/ subfolders, each holding one JSON per preset. To back up, zip the entire user/ folder. To migrate, copy across and unzip into the same path on the new install.
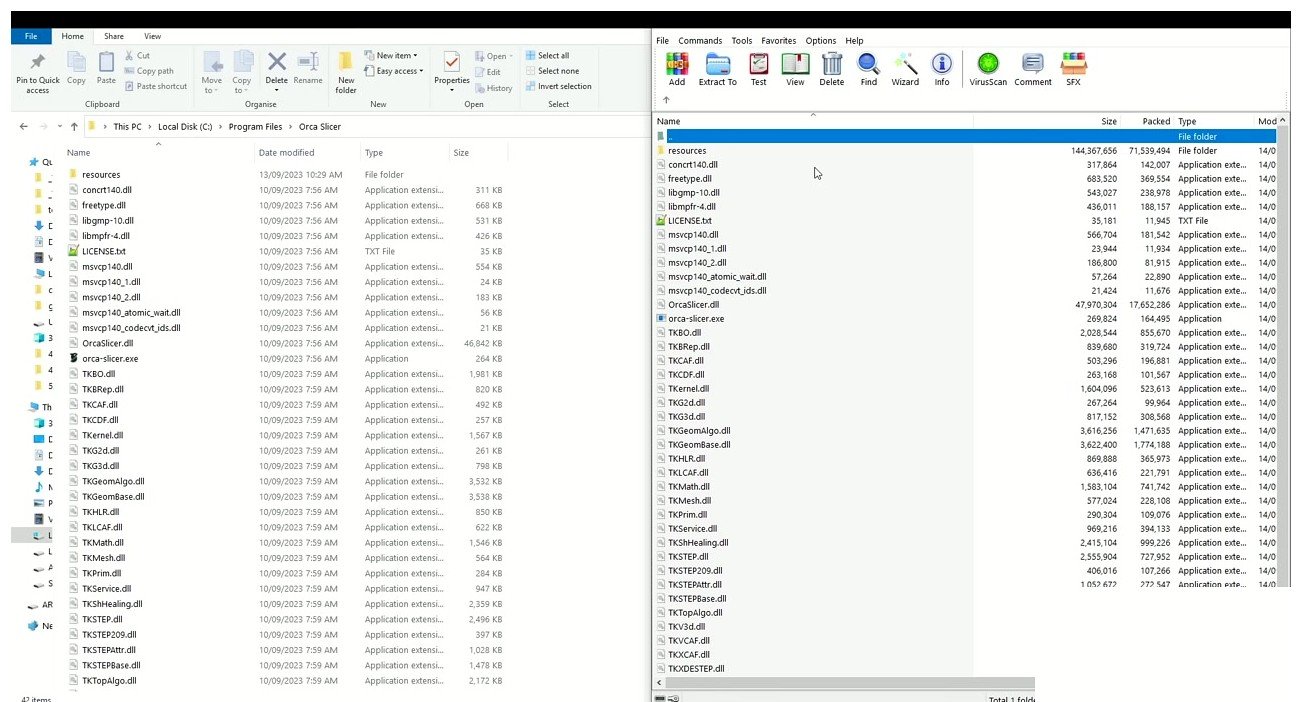
Left: install directory vendor profiles. Right: AppData user folder where custom presets live. Back up the right side.
Two warnings. Deleting a parent profile breaks all children silently. Always export before pruning. And the compatible_printers field on filament profiles is enforced; a vendor-tagged filament won’t appear in another vendor’s dropdown unless you edit the JSON.
Common gotchas across brands
Ten things that bite first-time OrcaSlicer users. I’ve hit at least seven personally.
- Klipper printers need the Moonraker connect step. K1, Voron, SV08, Centauri Carbon, Neptune 4. Device tab, Connect, IP + port 4409 (Mainsail) or 4408 (Fluidd). First connection often fails; click OK and retry.
- Bambu LAN-only access codes don’t auto-persist. Write down the eight-character code. If you toggle cloud back on, it regenerates.
- Prusa MK4 pressure-advance values have drifted from PrusaSlicer’s official numbers (issue #5056). Run the OrcaSlicer test, write your own value.
- Anycubic Kobra Z-offset gets weird when the nozzle cleaner only wipes the top. Use MPC561’s enhanced start G-code. Orca also applies Z-offset to every Z move rather than via M851, so if your offset is too low, Z-hop silently stops working (issue #3108).
- Sovol direct-drive vs Bowden retract values are completely different. SV06 / SV07 = 0.5 to 1.0 mm. CR-10 = 4 to 6 mm. Don’t cross-import.
- Flashforge 5M start G-code drifts across firmware updates on upstream Orca. Orca-Flashforge stays in sync.
- Snapmaker A250 / A350 kit variants are not interchangeable. Read the kit code on your printer.
- Filament
compatible_printersis enforced. Vendor-tagged filament won’t appear in another vendor’s dropdown unless you edit the JSON. - Deleting a parent profile breaks all children silently. Export user presets before pruning.
- OrcaSlicer cannot update Bambu firmware. Keep Bambu Studio installed for that.
Anything not on this list, the OrcaSlicer troubleshooting master guide covers the broader catalog.
After you install the profile: calibrate
Every bundled profile is a starting point. The vendor tunes for an average spool on an average machine; yours is neither. The four calibrations I run on every new printer:
- Temperature tower: find the actual sweet spot (the back-of-spool number is a range, not a setting).
- Flow rate: tune extrusion so a single-wall cube measures the wall thickness you set.
- Pressure advance (Klipper) or linear advance (Marlin): biggest quality win. Fixes corner bulges.
- Max volumetric speed: how fast your hotend can melt before it skips.
OrcaSlicer’s built-in calibration menu runs all four. Full sequence: OrcaSlicer calibration guide.
Multi-color profiles and AMS
Multi-color adds another layer to the stack. Bambu AMS sits on top of the printer profile; slot mappings live per-project. Read OrcaSlicer Bambu AMS guide. Prusa MMU3: still PrusaSlicer territory. Snapmaker U1 multi-color: Snapmaker Orca plus optionally OrcaSlicer-FullSpectrum for layer-blending. For manual color swaps via M600 and single-extruder MMU, the OrcaSlicer multi-color guide covers wipe towers and filament-change G-code.
FAQ
Does OrcaSlicer support my printer?
Probably yes. The bundled list covers more than sixty brands and several hundred models. Open the wizard, scroll the brand sidebar, look for your model. If it’s not there: import a community profile, use a vendor fork if your brand has one, or build a custom printer through the wizard.
Is OrcaSlicer better than Bambu Studio for Bambu printers?
Depends what you value. Orca has more calibration tools and a more active community for tuning. Bambu Studio has tighter cloud integration and is the only slicer that can push firmware. Most Bambu users I know run both. Full breakdown: OrcaSlicer vs Bambu Studio.
Can I use PrusaSlicer profiles in OrcaSlicer?
Yes. Export the bundle from PrusaSlicer, import in OrcaSlicer via File → Import → Import Configs. Filament and process settings come over cleanly. Re-verify start / end G-code. MMU3 won’t transfer because upstream Orca doesn’t model it yet.
Where are OrcaSlicer profiles stored?
System presets: under the install directory at resources/profiles/<vendor>/. Don’t edit these. User presets: %AppData%\OrcaSlicer\user\default\ on Windows, ~/Library/Application Support/OrcaSlicer/user/default/ on macOS, ~/.config/OrcaSlicer/user/default/ on Linux. Back up the user folder.
What’s the difference between OrcaSlicer and the vendor forks?
Snapmaker Orca, Orca-Flashforge, and Anycubic Slicer Next are all forks of the same codebase. They ship deeper integration for their vendor’s printers (custom start G-code, device management, app integration) and fix vendor-specific bugs faster than upstream. Use the fork if you own a Snapmaker U1, Flashforge 5M / 5M Pro / AD5X, or Anycubic Kobra 3 / S1.
How do I update a printer profile when OrcaSlicer releases a new version?
System presets update automatically when you install the new build. User presets stay untouched. If you want to pull in a vendor’s updated process settings, export your user preset first, reinstall OrcaSlicer, then re-import. The inheritance chain merges the new system defaults with your overrides.
Can I share a printer profile with another user?
Yes. Right-click the preset in the dropdown, choose Export. You’ll get a .orca_printer, .orca_filament, or .orca_process bundle. The recipient imports via File → Import → Import Configs.
What if my printer isn’t in the bundled list?
Search MakerWorld, Printables, and GitHub first. If a community bundle exists, import it. If not, check whether your printer is similar to a bundled one (Voron 0.2 is close to Voron 0.1; SV08 is close to Voron 2.4 350) and start there. Last resort: the Custom Printer wizard.
Pulling it together
OrcaSlicer’s vendor support is broader than any other open slicer right now, but “supported” runs on a spectrum. Bambu, the Creality V3 line, QIDI, and the bundled Sovol family are first-class out of the box. Prusa works fine for single-tool but loses to PrusaSlicer for MMU3 and Prusa Connect. Three brands (Snapmaker, Flashforge, Anycubic) have vendor forks that beat upstream for their flagship printers; install those rather than fighting defaults.
Every bundled profile is a starting point. Calibrate before you trust it. For brand-specific behavior, check the per-printer guides: X1C / P1S, A1 / A1 Mini, K1 / K1 Max, Ender 3 V3, Prusa MK4, Kobra 3 / S1, Neptune 4. New to OrcaSlicer? Start at your first OrcaSlicer print. Ready to install? Grab the latest build from the download page or read the 2026 review.
Related OrcaSlicer guides
- OrcaSlicer Settings Master Guide: Every Setting Explained (2026)
- OrcaSlicer Cooling and Fan Curves Explained (2.3.x Guide)
- How to Update OrcaSlicer Without Losing Your Profiles (2026)
- OrcaSlicer for Voron 0.2 / 2.4 / Trident: Configuration Guide
- How to Send G-code Wirelessly From OrcaSlicer: Per-Printer Walkthrough