
Anycubic ships the Kobra 3, Kobra S1, and Kobra 3 Max with a slicer they tell you to use, called Anycubic Slicer Next, and that slicer is OrcaSlicer wearing an Anycubic jacket. The catch is that if you actually want upstream OrcaSlicer (because you’ve got other printers on the bench, or because you want the calibration tests Anycubic strips out, or because you just don’t trust vendor-locked software), you’ll spend a few hours wiring up something the official slicer does in two clicks.
I’ve been through this dance with the Kobra 3 family, and I want to save you the wasted weekend I had. This guide covers what’s verified, what’s missing, and where upstream OrcaSlicer genuinely beats Slicer Next versus where it’s just stubbornness on your part. If you only print single-color PLA and never touch calibration, honestly, stop reading and go install Slicer Next. If you do anything more involved than that, keep going.
Table of contents
- Kobra 3 vs Kobra 3 V2 vs Kobra S1 vs Kobra 3 Max in one table
- Anycubic Slicer Next vs OrcaSlicer: the honest answer
- Does upstream OrcaSlicer actually support the Kobra 3 family?
- Setting up OrcaSlicer for your Kobra
- How OrcaSlicer talks to a Kobra 3 (or doesn’t)
- Best settings to override from the defaults
- Multi-color with ACE Pro in OrcaSlicer
- Calibration order for Kobra 3 + OrcaSlicer
- Common Kobra 3 + OrcaSlicer problems and fixes
- Bottom line: which slicer for which job
- Frequently asked questions
Kobra 3 vs Kobra 3 V2 vs Kobra S1 vs Kobra 3 Max in one table
The Kobra 3 family is wider than people realise. Anycubic has shipped four models that all run the same firmware stack (a customised Klipper variant they call GoKlipper, branded “Kobra OS”), but the kinematics, build volume, and enclosure story diverge in ways that matter for your slicer profile. I’ll spell it out, and then we can talk about what to actually do with it.
| Spec | Kobra 3 / Combo | Kobra 3 V2 / V2 Combo | Kobra S1 / S1 Combo | Kobra 3 Max / Max Combo |
|---|---|---|---|---|
| Build volume | 250 x 250 x 260 mm | 255 x 255 x 260 mm (wider Y rail) | 250 x 250 x 250 mm | 420 x 420 x 500 mm |
| Kinematics | Cartesian bedslinger | Cartesian, 60 mm Y rail, SG15 X bearings | Fully enclosed CoreXY | Cartesian, large format |
| Max print speed | 600 mm/s (300 recommended) | 600 mm/s (300 recommended) | 600 mm/s (300 recommended) | 600 mm/s (300 recommended) |
| Max acceleration | 20,000 mm/s² (10,000 recommended) | 20,000 mm/s² | 20,000 mm/s² | 20,000 mm/s² |
| Hot end | Direct drive, all-metal, 300 °C | Improved nozzle from S1, better airtightness | All-metal 320 °C, hardened option | Direct drive, 300 °C |
| Bed max | 110 °C | 110 °C | 120 °C | 110 °C |
| Auto-leveling | LeviQ 2 | LeviQ 3.0 | LeviQ 3.0 + AI spaghetti detection | LeviQ 3.0 |
| Enclosure | None | None | Yes, with carbon-filtered exhaust | None |
| ACE Pro support | 4 slots in Combo (8 with two units) | 4 in Combo (8 with two) | 4 in S1 Combo (8 with two) | 4 in Max Combo (8 with two) |
| Camera | No or basic | 480p AI spaghetti cam | 480p AI spaghetti cam | Yes |
| Firmware | Kobra OS (GoKlipper) | GoKlipper | GoKlipper | GoKlipper |
| Stock slicer | Anycubic Slicer Next | Anycubic Slicer Next | Anycubic Slicer Next | Anycubic Slicer Next |
Two takeaways. The S1 is the odd one out because of the enclosed CoreXY chassis, and that means slicer profiles for it can lean on chamber temperature and reduced cooling for ABS, ASA, and PA-CF in a way the bedslingers cannot. The Kobra 3 Max is the second odd one out because it’s huge, and “big bedslinger” is a phrase that should make any sensible slicer config drop wall speeds by 10 to 15 percent. We’ll come back to both points.
Anycubic Slicer Next vs OrcaSlicer: the honest answer
Anycubic’s own documentation calls Slicer Next “open-source slicing software developed based on OrcaSlicer, optimized for Anycubic series printers.” Translation: it’s an OrcaSlicer fork. The Anycubic team pulls from upstream Orca, then adds their own tweaks for ACE Pro inventory sync, LAN print, the Anycubic Cloud, and a curated filament library tied to their store. They also strip out or lag behind some of upstream’s calibration suite.
I’ll give you the honest split before the table:
| Concern | Anycubic Slicer Next | Upstream OrcaSlicer |
|---|---|---|
| First-time setup for Kobra 3 / S1 / Max | Auto-detects, profiles ready | Profile present (except Kobra 3 Max), often needs an import |
| ACE Pro multi-color | Native 4-color and 8-color (1.1.1+); live sync from ACE | Works as generic 4-extruder; live ACE sync needs custom firmware |
| LAN print / direct send | Yes, only supported slicer | No on stock firmware; works via Rinkhals |
| Cloud upload + remote monitor | Built in | Not directly; export then upload |
| Camera and AI spaghetti | Live viewer, alerts | Use the printer touchscreen or Anycubic app |
| Calibration tools | Adaptive PA, YOLO Flow Calibration in 1.1.x | Full suite: temp tower, flow rate (one-shot and pattern), PA tester, retraction tower, max volumetric speed |
| Painting / tree supports / advanced multi-color | Lags upstream | Latest features land here first |
| Filament library breadth | Anycubic-curated | Hundreds of community presets |
| Update cadence | Tied to Anycubic releases | OrcaSlicer GitHub stable / nightly, much faster |
| Vendor lock-in | Anycubic Cloud, Anycubic store filaments | None |
| Stability with Kobra 3 G-code | Built and tested for it | Occasional regressions in RC builds (stay on stable) |
I’m not going to pretend Slicer Next is bad. For someone who bought a Kobra 3 Combo and wants to print multi-color models from MakerWorld, click “send” from the slicer to the printer, and never read another forum post, Slicer Next is the right tool. The honest case for upstream OrcaSlicer is when you want one of the things on the right column: real calibration, broader filament profiles, advanced painting and multi-material tools, or independence from a vendor’s release schedule. If you’re running a Kobra 3 alongside a Bambu, a Prusa, or a Voron, you almost certainly want one slicer for everything, and OrcaSlicer is the only one of the three that supports all three families well.
Does upstream OrcaSlicer actually support the Kobra 3 family?
Mostly yes, with one glaring gap. I checked the SoftFever main branch directly under resources/profiles/Anycubic/machine, and here’s the actual state of play:
- Kobra 3: profile present, with 0.2, 0.4, 0.6, and 0.8 mm nozzle variants. This profile covers both the original Kobra 3 and the V2 (there’s no separate V2 entry, which is the open feature request in OrcaSlicer Issue #11552, where users complain the bundled profile prints slower than Anycubic’s own).
- Kobra S1: profile present with a 0.4 mm nozzle variant.
- Kobra Max: profile present with a 0.4 mm nozzle variant. This is the original Kobra Max, not the new Kobra 3 Max, and the build volume difference matters.
- Kobra 3 Max: no upstream profile. Issue #9507 has been open since the printer launched. If you own a Kobra 3 Max, you have to either start from the Kobra 3 profile and override the build volume, or grab a community pack. The MakerWorld listing 1648658 is the cleanest community Kobra 3 Max profile I’ve found, and the Layer3D Creations V2 pack on Printables (model 982339) covers the regular Kobra 3 with extra polish.
There’s nothing in the profile JSONs about the ACE Pro by default. The bundled profile presents the Kobra 3 as a single-extruder machine, and you turn it into a multi-material machine yourself by changing the printer to 4 extruders in the printer settings. We’ll get to that in the multi-color section.
Setting up OrcaSlicer for your Kobra
You’ve got three install paths, and your choice depends on whether you also want to run Slicer Next.
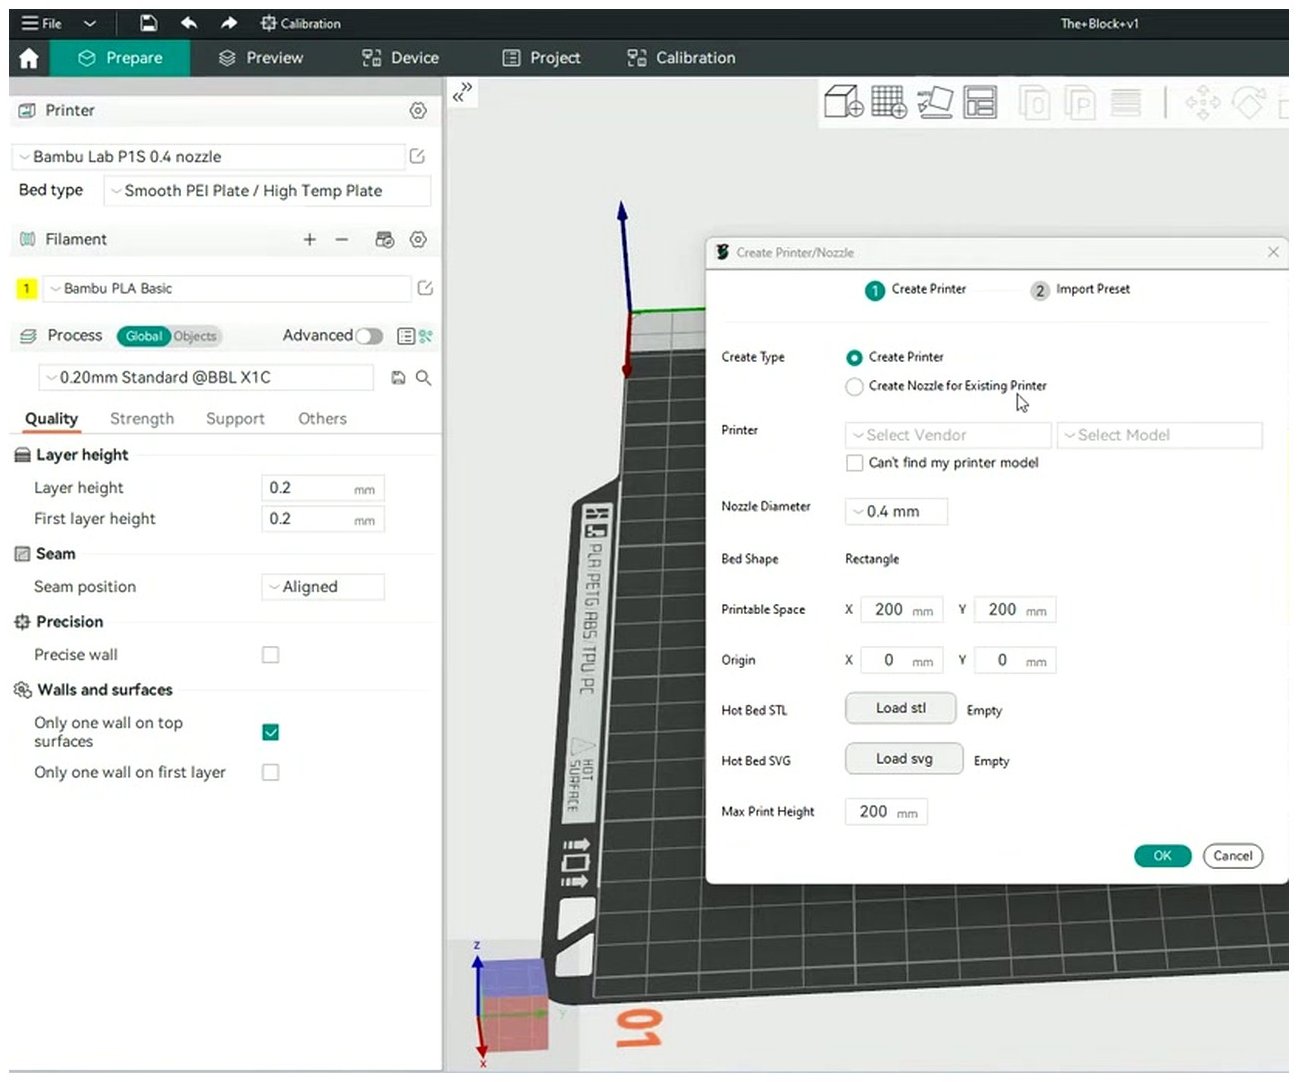
The Create Printer / Nozzle wizard in OrcaSlicer where you pick vendor, model, and nozzle size before the printer appears in your dropdown.
Path A: use the bundled profile (easiest)
- Open OrcaSlicer (latest stable, not RC, not dev; more on that in pain points).
- Run the Configuration Wizard. If it didn’t auto-launch, hit Configuration in the top menu and pick “Configuration Wizard.”
- Scroll to Anycubic in the vendor list. Tick Kobra 3, Kobra S1, or Kobra Max as applicable. The wizard will offer the nozzle variants.
- Pick the nozzle you actually have. Almost everyone is on the stock 0.4 mm.
- Finish the wizard. The printer is now in your dropdown.
If you own a Kobra 3 Max, this path doesn’t work directly. Pick Kobra 3, then go to Printer Settings and override build volume to 420 x 420 x 500. The other settings (acceleration ceiling, retraction, etc.) carry over fine.
Path B: import from Anycubic Slicer Next (recommended for ACE Pro users)
This is Anycubic’s own documented path, and they actually publish wiki steps for it. The advantage is you get a starting point that already knows about your ACE Pro, your filament list, and the exact machine quirks Anycubic has tuned. The disadvantage is you have to install Slicer Next first, which is a chunky download.
- Install Anycubic Slicer Next from anycubic.com and let it run its first-run setup. It’ll detect your Kobra over the network or USB and pull the right profile.
- From Slicer Next, export your printer / filament / process configs to a folder. The export option lives in File or in the printer settings depending on the version.
- Open OrcaSlicer. Use File > Import > Import Configs (or Import Preset, depending on your Orca version). Point at the export.
- In the import dialog, tick the Kobra entries under Machine, Filament, and Process. Confirm.
If anything in the import looks weird (most often, an unfamiliar start G-code section or a filament preset that overrides flow), leave the imported preset as-is and don’t try to merge it manually with the upstream profile. Klipper-based machines are picky about start G-code formatting, and a one-character drift can put your print into the “G-code parse failed” error category.
Path C: community profile pack
If you don’t want Slicer Next on your machine at all, the Layer3D Creations V2 pack on Printables (search “anycubic kobra 3 orca profile v2”) is the most-recommended community drop I’ve seen. It’s a printer profile, four filament presets, one process profile, and a heatbed STL for the printer thumbnail. It’s been updated for OrcaSlicer 2.1.1 and later. For the Kobra 3 Max specifically, the MakerWorld 1648658 listing is the one to grab.
Drop the JSONs into your OrcaSlicer user profile folder (Configuration > Show User Folder, then put files into the right subfolder under user/default/machine, filament, process) and restart Orca. Don’t try to merge community presets on top of the bundled ones; pick one source and stick with it.
How OrcaSlicer talks to a Kobra 3 (or doesn’t)
Here’s where I have to be blunt. Upstream OrcaSlicer cannot send jobs directly to a stock-firmware Kobra 3 over LAN. Anycubic’s wiki spells this out: “LAN Mode” on the Kobra 3 family is supported only by Anycubic Slicer Next. The Kobra firmware doesn’t expose a Moonraker endpoint or an OctoPrint-compatible API to third-party slicers, despite being Klipper underneath.
Your options, ranked by how reasonable they are:
- USB stick. Slice in OrcaSlicer, hit “Export plate sliced file,” save the
.gcodeto a USB stick, walk to the printer, plug in, print. This is what most owners actually do. It’s annoying but it works every time. - Anycubic Cloud. Upload the
.gcodeto your Anycubic account through the web UI or the mobile app, then start the print remotely. Slow upload on big files, ties you to Anycubic’s cloud, but no walking required. - Rinkhals custom firmware. Rinkhals is a community Klipper firmware for the Kobra 3, Kobra 3 V2, Kobra 3 Max, Kobra S1, and Kobra 2 Pro. It exposes a real Moonraker endpoint, which means OrcaSlicer’s “Send G-code” button works the way it does for any normal Klipper machine. Trade-off: warranty considerations, you’re moving away from Anycubic Cloud and the official app, and you’re responsible for keeping the firmware patched yourself. There’s a documented OrcaSlicer integration guide in the Rinkhals docs.
- Don’t bother with OctoPrint via USB. A few brave souls have tried hooking a Pi to the Kobra 3’s USB and running OctoPrint there. It’s flaky because GoKlipper expects exclusive control of the MCU and the touchscreen fights you. In 2026, this isn’t worth the time.
If LAN print is critical to your workflow and you don’t want to run custom firmware, just keep Slicer Next installed for the send step and use OrcaSlicer for slicing. You can run both. Nothing breaks.
Best settings to override from the defaults
The bundled OrcaSlicer Kobra 3 profile is conservative. It’s not bad, but it’s tuned for “no one calls support,” not “make full use of the high-flow direct drive Anycubic shipped.” Issue #11552 is literally users complaining the upstream profile prints slower than Anycubic’s own slicer. Here’s a starting set of overrides for the Kobra 3 / V2 with a 0.4 mm nozzle. Treat these as launch points, not gospel, and run the calibration sequence in the next section before you trust any of them on a real print.
| Setting | Suggested value | Why |
|---|---|---|
| Layer height | 0.20 mm (range 0.08 to 0.28) | The high-flow direct drive handles 0.28 PLA fine |
| First layer height | 0.24 mm | LeviQ 3 squashes nicely at this |
| Outer wall speed | 120 to 150 mm/s | Direct drive can push it; stock OS profile sits around 80 to 100 |
| Inner wall speed | 250 to 300 mm/s | Match Anycubic’s recommended ceiling |
| Infill speed | 300 mm/s | At the recommended ceiling |
| Travel speed | 500 mm/s | Mechanically supported |
| Outer wall acceleration | 5,000 mm/s² | Stay below the 10,000 recommended ceiling for surface finish |
| Default acceleration | 8,000 mm/s² | Within the recommended envelope |
| Pressure Advance | Calibrate per filament. Community PLA values cluster low; PETG higher; TPU higher still. Treat published numbers as starting hints only. | GoKlipper uses PA. Set in the filament preset or via SET_PRESSURE_ADVANCE in start G-code. Run the PA test |
| Retraction length | 0.8 mm | Direct drive, so anything over 1 mm causes more stringing, not less |
| Retraction speed | 35 mm/s | Direct drive standard |
| Z-hop | 0.4 mm Slope or Spiral | Avoids the negative-Z-hop bug in OrcaSlicer Issues #3108 and #12168 |
| Nozzle temp PLA | 215 °C (range 200 to 230) | The high-flow head likes a touch warmer than legacy hot ends |
| Bed temp PLA | 60 °C | LeviQ + textured PEI |
| Cooling fan PLA | 100% from layer 3 | Standard |
| Max volumetric speed | 24 mm³/s PLA, 12 PETG, 5 TPU | Recalibrate with the volumetric speed test in OrcaSlicer |
| Wipe / prime tower | Enable with ACE Pro | See the wipe tower guide |
| Brim type | Auto, 5 mm, only when needed | LeviQ usually makes brim unnecessary |
I want to be specific about the Pressure Advance row. Anycubic doesn’t publish first-party PA numbers per filament, and what circulates on forums is community estimates. Some of those numbers are good. Some of them are wildly wrong because the person who posted them was running a worn nozzle or a weird filament batch. Don’t copy a number from a Reddit thread and ship it. Run the PA test in OrcaSlicer’s Calibration menu, save the value into your filament preset, and move on.
Kobra S1 specific overrides
The S1 is the enclosed CoreXY in the family, so two changes matter. First, you can crank bed temperature higher (it’ll do 120 °C) and run ABS, ASA, and PETG-CF properly inside the carbon-filtered enclosure. Second, drop your part cooling fan to 30 to 50 percent for ABS so the chamber temperature doesn’t get killed by aggressive layer cooling. The all-metal 320 °C hot end handles abrasive composites only with the hardened nozzle option, so confirm you’ve got that before sending PA-CF through it.
Kobra 3 Max specific overrides
The Max is a big bedslinger, and the Y axis is moving a 420 mm bed plus whatever’s printed on it. That’s a lot of mass. Drop your wall speeds 10 to 15 percent from the standard Kobra 3 numbers, especially the outer wall, and watch your first layer carefully because the longer Z-axis means leveling takes longer to converge. Confirm the build volume is set to 420 x 420 x 500 in Printer Settings before slicing anything. The upstream Kobra Max profile (which is the original Max, not the Kobra 3 Max) has different dimensions and you do not want to discover that when the toolhead crashes.
Multi-color with ACE Pro in OrcaSlicer
The ACE Pro is Anycubic’s answer to the Bambu AMS. It’s a 4-slot dryer and feeder box with RFID tag detection on Anycubic-brand spools, dual 200 W PTC heaters, two circulation fans, and the ability to dry continuously even during a print. You can chain two ACE Pros together for 8 colors (Slicer Next 1.1.1+ required for that on stock firmware). For a deeper comparison of how it stacks up against Bambu’s setup, see the ACE Pro vs AMS comparison.
In upstream OrcaSlicer, you treat the ACE Pro as a generic 4-extruder multi-material unit. Here’s what works:
- Painting the model with per-region colors using OrcaSlicer’s color painting tool
- Generating a wipe / prime tower for color transitions (which you absolutely need for clean swaps; see the wipe and prime tower guide)
- Slicing for 4 extruders mapped to ACE Pro slot 1 through 4
- Saving as
.gcodeand printing from USB or Anycubic Cloud (the printer follows the slot indices correctly)
Here’s what doesn’t work cleanly:
- Live “Sync from ACE Pro” filament inventory, where the slicer pulls colors and types from the box’s RFID readings. On stock Anycubic firmware this is a Slicer Next exclusive. On Rinkhals firmware it’s exposed via Moonraker’s lane_data and recent OrcaSlicer builds can read it, but you’re now firmly in custom-firmware territory.
- 8-color (two ACE Pros chained). The upstream Kobra 3 profile is single-AMS-equivalent. You can manually edit the printer to 8 extruders, but the toolchange G-code and the ACE box-to-box handoff aren’t first-class, and you’ll spend time debugging it. Slicer Next handles 8 natively in 1.1.1+.
- Direct LAN print of a multi-color job. Same LAN limitation as everything else.
My pragmatic workflow: do the design, painting, and color-by-height tricks in OrcaSlicer because the tooling there is genuinely better. Slice it. Export the .gcode. Push to the printer via Anycubic Cloud or a USB stick. If you live in multi-color all day every day, the friction is enough that I’d just use Slicer Next and accept the calibration tradeoffs. There’s a longer treatment of color-painting tactics in the multi-color guide.
One side note on purge waste. There’s a frequent claim on forums that OrcaSlicer burns more filament than Slicer Next on multi-color jobs. From the threads I’ve read (the Bambu Lab community thread on Kobra 3 multi-color is a good one), it’s actually the opposite by default. Slicer Next purges more, and OrcaSlicer / Bambu Studio give you finer control over purge volumes per color pair. If you’re new to multi-color, your first few jobs will look wasteful no matter which slicer you use; you tune the purge volumes down once you’ve seen which color transitions actually need a full flush.
Calibration order for Kobra 3 + OrcaSlicer
One of the strongest reasons to use upstream OrcaSlicer with a Kobra 3 is the calibration suite. Slicer Next has Adaptive PA and a YOLO Flow Calibration in the 1.1.x line, but upstream Orca has the full battery: temperature tower, flow rate (one-shot and pattern), Pressure Advance tester (line and pattern), retraction tower, max volumetric speed test, and more. Order matters because each step assumes the previous one is dialed in.
- First-layer squish. Print a one-layer 200 mm square. Baby-step Z on the printer screen. LeviQ 3 is good but not perfect, and you want the squish to look like uniform fused lines, not gaps and not over-extruded ridges. The fine-tune range owners report is around plus or minus 0.05 mm.
- Temperature tower. OrcaSlicer Calibration menu > Temperature. See how to read the tower.
- Flow rate. OrcaSlicer Calibration > Flow Rate, Pass 1 then Pass 2. The flow rate guide walks through reading the result.
- Pressure Advance. Calibration > Pressure Advance, Line method works well with Klipper firmware. Save the value into the filament preset, not the printer. Full procedure in the PA guide.
- Retraction tower. Calibration > Retraction. Direct drive, so start 0.4 mm, end 1.6 mm, 0.1 mm step.
- Max volumetric speed. Calibration > Max Volumetric Speed. Critical with the high-flow Kobra 3 hot end because if you push past what the melt can handle, you’ll see under-extrusion that looks like a flow problem.
- Per-filament tuning. Repeat steps 2 to 6 for every filament brand you actually use. Save each as a custom filament preset and stop relying on generics. The filament settings guide covers what to save where.
For a broader walkthrough of the suite that doesn’t assume Anycubic-specific quirks, the general OrcaSlicer calibration guide is the canonical reference.
Common Kobra 3 + OrcaSlicer problems and fixes
Most of the issues people hit with this combination are documented bugs or expected limitations. Here are the ones I see asked most often. For anything not on this list, the OrcaSlicer troubleshooting master is a wider reference.
| Symptom | What’s actually happening | Fix |
|---|---|---|
| “Error uploading: HTTP 500, the device cannot parse the file” | Recent RC versions of OrcaSlicer broke G-code formatting for Kobra 3 (Issue #12811) | Revert to the latest stable OrcaSlicer release. Stop using RC and dev builds for this printer. |
| G-code stuck in “parsing” on the printer screen | Same family of regressions in 2.3.2-dev (Issue #12444) | Same: stable only. |
| “Too close to exclusion area, there may be collisions” warning even when nothing is close | False positive from a stale exclusion area in the Kobra 3 profile (Issue #10465) | Printer Settings > Basic Information > blank the Excluded bed area field. Save the printer preset. |
| Default Kobra 3 / V2 profile prints noticeably slower than Slicer Next’s profile | Conservative defaults in upstream (Issue #11552) | Apply the speed and acceleration overrides from the settings table above, or import from Slicer Next. |
| OrcaSlicer can’t find the Kobra 3 on the network | By design on stock firmware. Anycubic restricts LAN print to Slicer Next. | Use USB, Anycubic Cloud, or Rinkhals custom firmware. |
| No Kobra 3 Max in the printer list | No upstream profile (Issue #9507 still open) | Use the MakerWorld 1648658 community profile, or pick Kobra 3 and override build volume to 420 x 420 x 500. |
| ACE Pro spools don’t show their colors / types in OrcaSlicer | Live ACE inventory sync isn’t supported by stock firmware in upstream Orca | Either set filaments manually per slot, or run Rinkhals firmware to expose lane_data via Moonraker. |
| Z-banding or salmon skin after a recent slicer update | Z-offset regressions in OrcaSlicer (Issues #3108, #12168, #10985) | Leave Machine Limits Z-offset at 0.00. Use SET_GCODE_OFFSET in start G-code or baby-step on the printer instead. |
| First layer too high or too low after switching filaments | Different filaments have different thermal expansion at first-layer temps | Don’t change the slicer Z-offset. Baby-step on the printer screen during the first layer, save per filament if you must. |
Bottom line: which slicer for which job
I want to give you a decision rule rather than another “it depends.” Here’s how I’d actually split the work between Slicer Next and upstream OrcaSlicer if I owned a Kobra 3 Combo or a Kobra S1 Combo today:
- Daily multi-color prints from MakerWorld, ACE Pro driven, send-to-printer. Use Slicer Next. The friction of the OrcaSlicer workflow (manual ACE setup, USB or Cloud upload, no live inventory) isn’t worth fighting if this is 90% of what you do.
- Single-color prints, you care about quality, you want real calibration. Use OrcaSlicer. Run the full calibration sequence per filament, save your presets, and accept the USB-stick handoff.
- You own a Bambu, a Prusa, a Voron, and a Kobra. Use OrcaSlicer for everything. One profile system, one UI, one mental model. The Kobra 3 entries are good enough out of the box and excellent after the overrides above.
- You want to run abrasive composites on the Kobra S1. Use OrcaSlicer because the volumetric speed and PA test let you tune the high-flow head properly for CF blends. Slicer Next is fine but slower to get there.
- You bought a Kobra 3 Max. You’ll either need a community OrcaSlicer profile or you’ll use Slicer Next. Pick based on whether you want calibration tools.
- You’re on Rinkhals firmware already. Use OrcaSlicer. Send to printer works, ACE inventory works, and you’ve already crossed the “no warranty” bridge.
And honestly, you can run both. They don’t fight. Slice the multi-color job in Slicer Next, send it directly. Slice the calibration tower in OrcaSlicer, USB stick it over. Nothing in the printer cares which slicer made the file.
If you want to dig into how the Kobra 3 family fits among other supported printers, or you’re shopping the wider ecosystem, the OrcaSlicer printer profiles hub is the master index.
Frequently asked questions
Does OrcaSlicer have a Kobra 3 Max profile?
Not as of this writing. Issue #9507 on the OrcaSlicer GitHub is the open feature request. Use the MakerWorld 1648658 community profile, or start from the Kobra 3 profile and override the build volume to 420 x 420 x 500. The acceleration ceilings and retraction values from the Kobra 3 carry over reasonably well, but drop your wall speeds 10 to 15 percent because the Max has more bed mass to fling around.
Can I print to my Kobra 3 over LAN from OrcaSlicer?
Not on stock firmware. Anycubic’s wiki explicitly says LAN Mode is Slicer Next only. You’ve got three real options: export to a USB stick, upload to Anycubic Cloud, or install Rinkhals custom firmware which exposes a Moonraker endpoint that OrcaSlicer can talk to directly.
Why is my upstream Kobra 3 profile slower than Slicer Next?
Because the upstream defaults are conservative, exactly as documented in OrcaSlicer Issue #11552. Apply the speed and acceleration overrides from the settings table in this guide, or import the Slicer Next profile via the Anycubic-documented import flow.
Will OrcaSlicer drive both ACE Pros for 8-color printing?
Not cleanly. The bundled Kobra 3 profile in upstream OrcaSlicer is single-AMS-equivalent (4 extruders). You can hand-edit it to 8 extruders, but the toolchange G-code and the ACE-to-ACE handoff aren’t first-class in upstream, so expect to debug it. Slicer Next 1.1.1 and later support 8 colors natively. If 8-color is your daily workflow, this is the strongest single argument for staying in Slicer Next.
Is Rinkhals firmware safe to install?
It’s a community project, well-maintained at the time of writing, and the install/uninstall path is documented. The trade-offs are real: you’ll lose the official Anycubic Cloud and AI spaghetti detection (Rinkhals replaces parts of the firmware stack), and you’re responsible for keeping it patched. Anycubic warranty status is a question only Anycubic can answer for your jurisdiction. The reward is normal Klipper / Moonraker behaviour, which means OrcaSlicer’s send-to-printer works the way it does for any Klipper machine, and ACE Pro inventory can sync.
Should I leave the slicer Z-offset alone?
Yes. Leave Printer > Machine Limits Z-offset at 0.00 in OrcaSlicer. There’s a recurring family of Z-offset regression bugs (Issues #3108, #12168, #10985) and the safer place to adjust first-layer height is on the printer screen during the print, or via SET_GCODE_OFFSET in your start G-code. If you absolutely must persist a per-filament Z tweak, do it through filament-level start G-code, not the printer Z-offset field.
If you’re new to OrcaSlicer in general (not just on the Kobra family), the calibration cluster is the place I’d send you next. The full calibration guide covers the order of operations across temperature, flow, PA, and volumetric speed in more depth than this Kobra-specific writeup, and it’ll save you a lot of “why does this look like that” forum scrolling.
Related OrcaSlicer guides
- OrcaSlicer Settings Master Guide: Every Setting Explained (2026)
- OrcaSlicer for Elegoo Neptune 4 / Pro / Plus / Max: 2026 Setup Guide
- OrcaSlicer Infill Patterns Compared: Gyroid, Cubic, Honeycomb (2026)
- OrcaSlicer Ironing Settings: Glass-Smooth Top Surfaces (2026)
- OrcaSlicer Slow Slicing on Complex Models: How to Speed Up