
Last updated: May 2026
I plugged my M2 MacBook in, downloaded OrcaSlicer, opened the DMG, dragged it to Applications, double-clicked, and macOS told me the app was damaged and should be moved to Trash. The app isn’t damaged. macOS just doesn’t trust unsigned binaries, and that warning has been the same generic “damaged” message since Catalina. Here’s the actual install path, end to end, for both Apple Silicon and Intel Macs in 2026.
I’ve installed OrcaSlicer on three Macs at this point: an M1 mini I keep on my print bench, an M2 MacBook Air I write on, and an old 2018 Intel MacBook Pro I keep around because it still runs Final Cut faster than I expect it to. The flow is the same on all three, but the dialog macOS throws at you differs slightly between macOS releases, and the gotchas on Intel are different from the ones on Apple Silicon. This guide covers everything I hit and everything readers email me about. If you just want the executive summary: download from the official GitHub releases page, drag to Applications, right-click and choose Open the first time, and if it still says “damaged,” paste one Terminal command. That’s it. The rest of this article is the why and the edge cases.
For the bigger picture on download sources and version differences, see the OrcaSlicer download hub. On Windows? The Windows install guide covers the SmartScreen flow over there.
Table of contents
- Before you install: what you actually need
- Apple Silicon or Intel: which Mac do you have?
- Where to download OrcaSlicer for Mac
- Install OrcaSlicer on Apple Silicon (M1, M2, M3, M4)
- The “damaged and can’t be opened” message: what it really means
- The xattr command and its variants
- Install OrcaSlicer on an Intel Mac
- First-run setup: printers, filament, region
- Common install problems and fixes
- Where OrcaSlicer stores its files on macOS
- How to uninstall OrcaSlicer cleanly
- Is it safe to install OrcaSlicer on Mac?
- FAQs
Before you install: what you actually need
I’ll keep this honest. OrcaSlicer isn’t a heavy app by modern standards. If your Mac can run a current copy of macOS at all, it can probably run OrcaSlicer. But there are three hard requirements worth checking before you waste time on a download that won’t open.
System requirements (the realistic version)
The official DeepWiki page lists macOS 11.3 Big Sur as the floor, 4 GB RAM as the minimum, and OpenGL 2.0 as the GPU baseline. I think those numbers are technically right and practically misleading. Yes, the app will launch on 4 GB. No, you don’t want to slice a 12-plate Voron print on it. Here’s what I actually recommend:
- macOS: 11.3 Big Sur or newer. Monterey, Ventura, Sonoma, Sequoia and macOS 26 all work. If you’re on Catalina 10.15 or Mojave 10.14, you’re stuck. Update macOS first or stay on an old OrcaSlicer release.
- RAM: 4 GB minimum (per the project’s own docs), 8 GB recommended in practice, 16 GB+ if you slice large multi-material plates often.
- Disk: About 1 GB for the install itself, plus another 5 GB free for cached profiles, sliced G-code and STL imports. The app footprint is small. The clutter accumulates.
- GPU: OpenGL 2.0 capable for the bare minimum, OpenGL 3.3+ for the full 3D preview. Every Apple Silicon Mac clears this comfortably. Any Intel Mac from 2015 onward does too.
- Display: 1280×720 minimum, 1920×1080 recommended. You’ll cry trying to use the slicer at 720p, so consider this a real recommendation, not a tick-box.
A note on the source you download from
I’ll repeat this throughout the article because it matters. The only place you should be downloading OrcaSlicer for Mac is the official GitHub releases page at github.com/SoftFever/OrcaSlicer/releases. Some search results push you toward random mirror sites with rebranded installers. Skip them. The official repo moved organisations at one point, so github.com/OrcaSlicer/OrcaSlicer/releases also resolves, but they’re the same source. If you want a deeper breakdown of why this matters, I covered it in is OrcaSlicer safe to install.
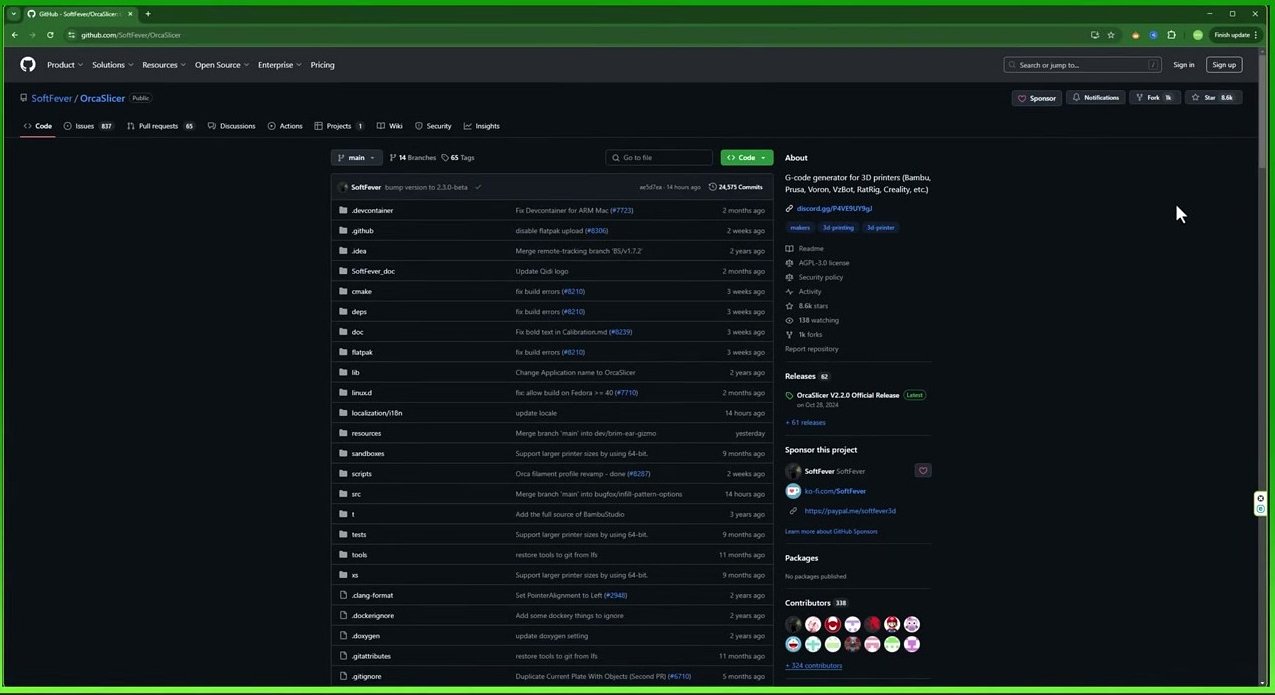
The official OrcaSlicer repo on GitHub. This is where the Releases page lives. Click the Releases link on the right sidebar to get to the DMGs.
Apple Silicon or Intel: which Mac do you have?
I get this question more than any other when people DM me about install issues. Half the time, the person doesn’t know which CPU is in their Mac. That’s fine. Apple stopped making the answer obvious somewhere around 2020. Here’s the 15-second test:
- Click the Apple menu (the apple icon, top-left corner of your screen).
- Choose About This Mac.
- Look for either Chip or Processor in the panel that opens.
If the line says Chip: Apple M1 (or M2, M3, M4, M1 Pro, M2 Max, M3 Ultra, etc.), you have an Apple Silicon Mac. Grab the Apple Silicon build. If it says Processor: 2.6 GHz 6-Core Intel Core i7 (or any Intel Core or Xeon variant), you have an Intel Mac. Grab the Intel build. There is no third option in the current Mac lineup.
| What you see in About This Mac | Chip family | Which DMG to download |
|---|---|---|
| Chip: Apple M1 / M1 Pro / M1 Max / M1 Ultra | Apple Silicon (arm64) | Apple Silicon build |
| Chip: Apple M2 / M2 Pro / M2 Max / M2 Ultra | Apple Silicon (arm64) | Apple Silicon build |
| Chip: Apple M3 / M3 Pro / M3 Max | Apple Silicon (arm64) | Apple Silicon build |
| Chip: Apple M4 / M4 Pro / M4 Max | Apple Silicon (arm64) | Apple Silicon build |
| Processor: Intel Core i5 / i7 / i9 / Xeon | Intel (x86_64) | Intel build |
Apple shipped the first M1 Macs in November 2020. Anything you bought new from late 2020 onward is almost certainly Apple Silicon. The last Intel iMacs trickled into the channel until mid-2021, but most consumer portables and desktops sold after 2020 are on Apple’s own silicon. If you’re not sure when you bought it, just check About This Mac. It’s faster than digging through receipts.
Where to download OrcaSlicer for Mac
Open Safari (or Chrome, or Arc, the browser doesn’t matter) and go to github.com/SoftFever/OrcaSlicer/releases. The latest stable release sits at the top. As of this writing it’s V2.3.2, but you should always grab whatever’s marked as the latest stable. Skip pre-releases and beta builds unless you have a specific reason to test them.
Scroll down to the Assets section under the release notes. This is where the actual download files live. And here’s something worth flagging: the current OrcaSlicer Mac DMG is a single universal binary. The 2.3.2 release ships one file that runs natively on both Apple Silicon and Intel Macs. Older releases (1.x, early 2.x) split this into two separate DMGs labelled “AppleSilicon” and “Intel,” and you’ll still see references to that split in older threads and tutorials. If you’re looking at a screenshot or video from 2023 or 2024 that shows two Mac DMGs in the Assets list, that was true at the time. It isn’t now.

The README’s Important Security Alert section. Read it once. It explains what the ad-hoc signature is and why the install flow involves a Gatekeeper bypass.
Click the DMG link. Safari will start the download. The file’s around 120 MB, so on a decent connection it’s done in well under a minute. Once it’s in your Downloads folder, you’re ready to install.
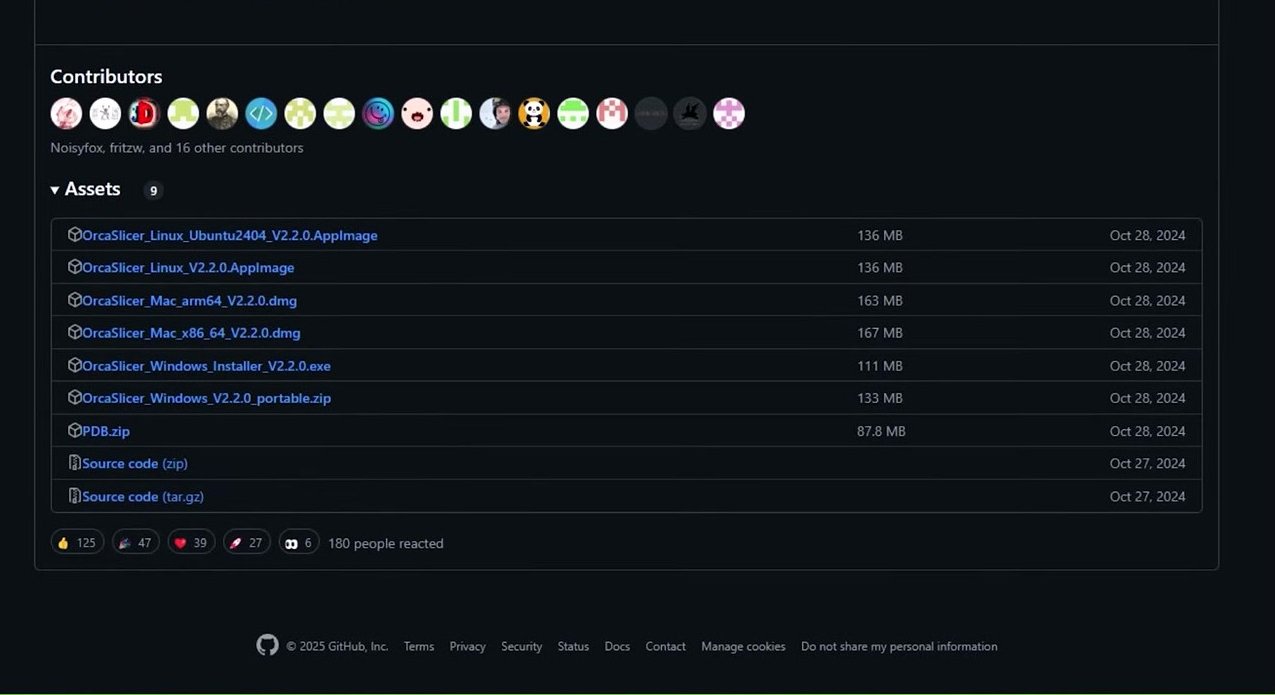
The Assets list on an older OrcaSlicer release page. This screenshot shows the previous split, with separate AppleSilicon and Intel DMGs. The current 2.3.2 release ships one universal DMG instead, but the download position is the same: scroll to Assets, click the DMG link.
What about Homebrew?
If you live in Terminal anyway, you can install OrcaSlicer via Homebrew with one command:
brew install --cask orcaslicerHomebrew handles the download and the move-to-Applications for you. The cask is labelled “Mac_universal,” so it pulls the universal DMG. I use this on my dev machines because it’s faster than clicking through Safari, but it’s not magically better than the manual path. Both end with the same OrcaSlicer.app in the same Applications folder.
Install OrcaSlicer on Apple Silicon (M1, M2, M3, M4)
This is the path 80% of readers are on. The flow is short. Five steps, no Terminal required for most installs.
Step 1: Open the DMG
In Finder, go to your Downloads folder (Cmd+Shift+J is the shortcut). Find the OrcaSlicer DMG you just downloaded. Double-click it. macOS will spend a second or two mounting the disk image, then a Finder window pops open showing the OrcaSlicer app icon next to a shortcut to your Applications folder. That shortcut is literally an alias to /Applications/ placed there for your convenience.
Step 2: Drag to Applications
Click the OrcaSlicer icon in the DMG window. Hold the mouse button (or trackpad), and drag the icon onto the Applications folder shortcut. Release. Finder copies the app into Applications. On an Apple Silicon Mac with a fast SSD, this takes a couple of seconds.
You’ll know it worked when the OrcaSlicer icon appears in your real Applications folder. Hit Cmd+Shift+A in any Finder window to jump to Applications and check.
Step 3: Eject the DMG
This step is easy to skip but worth doing because mounted DMGs eat a little memory and clutter your Finder sidebar. In Finder, look at the sidebar on the left. Under “Locations” you’ll see the OrcaSlicer disk image listed. Click the small eject arrow next to it. Alternatively, drag the disk image icon from your desktop into the Trash. Same thing.
Step 4: Open OrcaSlicer for the first time
Here’s where macOS gets in the way, and it’s the bit that confuses every first-time installer.
Go to Applications. Find OrcaSlicer.app. Double-click it. macOS will pop a dialog at you. Depending on which macOS version you’re on, you’ll see one of three messages:
- Older path (pre-Sequoia): “OrcaSlicer can’t be opened because it is from an unidentified developer.”
- Common path: “OrcaSlicer is damaged and can’t be opened. You should move it to the Trash.”
- Sequoia 15.1+: “Apple could not verify ‘OrcaSlicer’ is free of malware that may harm your Mac or compromise your privacy.”
Don’t click “Move to Trash.” Don’t panic. The app’s fine. Read the next section to understand why this happens, then come back here for the bypass.
Step 5: Right-click and choose Open
Close the dialog. Go back to Applications. Right-click (or Control-click if you’re on a one-button mouse) the OrcaSlicer.app icon. A context menu drops down. Choose Open from that menu.
macOS now shows a different, softer warning. Same content, but with a real Open button alongside Cancel. Click Open. The app launches. macOS remembers the exception, so the next time you double-click, it just opens like any other app.
That’s the install. If you got past this step, skip to the first-run setup. If you’re still stuck on the damaged dialog after right-clicking Open, you need the xattr command. Read on.
The “damaged and can’t be opened” message: what it really means
This section is the one I wish someone had written for me five years ago when I first hit this dialog on a different open-source Mac app. The “damaged” wording is misleading, the fix is trivial, and the explanation matters because it’ll repeat for every open-source Mac tool you install (Audacity, Inkscape, OpenSCAD, Klipper companion apps, Pronterface, you name it).
What’s actually happening under the hood
Every file your browser downloads gets an invisible extended attribute written to its filesystem metadata. The attribute is called com.apple.quarantine. It’s how LaunchServices knows, “Hey, this file came from the internet, be cautious.”
When you double-click a quarantined app for the first time, Gatekeeper runs a check. To pass cleanly, the app needs two things:
- A valid code signature from a developer enrolled in the Apple Developer Program.
- A notarisation ticket from Apple, which means Apple has scanned the binary and approved it.
OrcaSlicer has neither. What it has instead is an ad-hoc signature, which is a self-signed cryptographic signature. The ad-hoc signature proves the binary hasn’t been tampered with since it was built, but it doesn’t prove who built it (no Developer ID), and it doesn’t prove Apple has reviewed it (no notarisation ticket).
Gatekeeper sees the ad-hoc signature, can’t verify the developer or the notarisation, and refuses to open the app. On newer macOS releases (tightened in Sequoia 15.1), the refusal is dressed up as the “damaged” message. The app isn’t actually damaged. macOS just doesn’t have a polite way to say “I don’t recognise this publisher.”
Why OrcaSlicer doesn’t pay for notarisation
I’ll be direct here. The Apple Developer Program costs $99/year. To notarise a build, the developer has to enrol, manage signing certificates, upload each release to Apple’s notarisation service, wait for approval, and rebuild if Apple flags anything. It’s a real ops burden.
OrcaSlicer is a community-maintained open-source project. Asking volunteer maintainers to fund the developer program out of their own pockets, and to babysit Apple’s notarisation pipeline on every release, isn’t realistic. Bambu Studio and PrusaSlicer both notarise their macOS builds because they have companies behind them (Bambu Lab and Prusa Research). OrcaSlicer doesn’t, and most other community open-source Mac software doesn’t either. That’s not a flaw in OrcaSlicer. That’s how the indie open-source Mac ecosystem has worked for over a decade.
Is bypassing Gatekeeper here actually safe?
For OrcaSlicer specifically, yes, with the usual caveat: you’re trusting the developer because Apple hasn’t verified them on your behalf. The OrcaSlicer binary is built by GitHub Actions from public source code in the SoftFever/OrcaSlicer repo. The build process is reproducible. The release page shows file hashes. If you want to verify the download yourself, you can run:
shasum -a 256 ~/Downloads/OrcaSlicer_Mac_V2.3.2.dmgAnd compare the output to the SHA-256 hash listed on the release page. If they match, the file you downloaded is exactly what the maintainers shipped.
One important thing: bypassing Gatekeeper for OrcaSlicer is a per-app exception, not a global change. You are NOT disabling Gatekeeper system-wide. Every other downloaded app on your Mac still goes through the normal check. The exception only applies to the specific binary you just opened.
If you’re not comfortable with that trade-off, the alternative is to stick with notarised slicers (Bambu Studio, PrusaSlicer) and skip OrcaSlicer. That’s a legitimate choice. But the trade-off itself is the same trade-off every open-source Mac user makes whenever they install something that isn’t in the App Store.
The xattr command and its variants
When right-click then Open doesn’t work, or when you keep hitting the “damaged” dialog even after dismissing it once, the quarantine attribute is sitting on a nested file inside the app bundle. Terminal is the cleanest fix.
Open Terminal. The fastest way is Cmd+Space to bring up Spotlight, type “Terminal,” and press Return. You can also navigate to Applications, then Utilities, then Terminal.
The official OrcaSlicer README recommends this exact command:
xattr -dr com.apple.quarantine /Applications/OrcaSlicer.appWhat it does: the -d flag tells xattr to delete an attribute, the -r flag tells it to recurse into every file inside the bundle, and com.apple.quarantine is the specific attribute being removed. The path at the end points at your installed app. Paste it into Terminal, press Return, and you’re done. There’s no output if it succeeds, which trips people up. No news is good news here.
If that doesn’t work, try these variants in order. Each one is slightly more aggressive than the last:
xattr -d com.apple.quarantine /Applications/OrcaSlicer.appStrips quarantine from just the top-level bundle without recursing. Try this if the recursive version errors out for some reason.
sudo xattr -rd com.apple.quarantine /Applications/OrcaSlicer.appSame recursive removal, but with sudo to elevate privileges. Useful if you installed OrcaSlicer as one user and you’re now running Terminal as another, or if the file permissions are weird. You’ll be prompted for your Mac password.
xattr -cr /Applications/OrcaSlicer.appThe nuclear option. The -c flag clears ALL extended attributes, not just quarantine. Use this last. It works, but it’s a sledgehammer and it’ll also remove any other attributes you didn’t mean to touch.
After running any of these, double-click OrcaSlicer in Applications. It should launch like any other app. If it still won’t open, the issue isn’t quarantine anymore. Skip to the common install problems section.
Install OrcaSlicer on an Intel Mac
Intel Macs are still supported as of OrcaSlicer V2.3.2. With the current universal DMG, the install flow is identical to Apple Silicon. Download, drag, eject, right-click and open. The DMG contains a binary that includes both arm64 and x86_64 code, so the same file runs natively on either architecture.
That said, there are a few things Intel Mac users should know going in.
Performance expectations
The Intel build inside the universal DMG is a native x86_64 binary. Rosetta is not involved. There’s nothing being emulated. The app runs at the full speed of your Intel CPU.
I’ll be honest, though: Apple Silicon Macs feel faster than Intel Macs running OrcaSlicer not because OrcaSlicer is optimised differently for ARM. It’s because Apple Silicon chips are newer hardware. An M1 Air slices a complex plate noticeably faster than a 2017 MacBook Pro. That’s a CPU generation gap, not a slicer issue. If you’re on Intel and your slices feel slow, the answer is usually “your CPU is the bottleneck,” not “OrcaSlicer is broken.”
The macOS 11.3 floor
If you’re still running Catalina 10.15 or Mojave 10.14 on an old Intel Mac, OrcaSlicer won’t run. The minimum is macOS 11.3 Big Sur, and that’s not negotiable. You have three options:
- Update macOS, if your Mac is officially supported by Big Sur or newer.
- Install an older OrcaSlicer release (the 1.x line) that supported Catalina, knowing you’ll miss every feature added since 2023.
- Run OrcaSlicer in a virtualised environment, which I don’t recommend for slicing because of GPU performance.
If your Intel Mac is officially supported by Monterey, Ventura or Sonoma, update macOS first, then install OrcaSlicer. That’s the path that actually works.
The 2.3.2 + macOS 15.7.4 crash bug
One specific gotcha worth flagging: GitHub Issue #12903 tracks a crash report on Intel Macs running macOS 15.7.4 with OrcaSlicer 2.3.2. The crash hits the Device tab and shows up after sleep/wake cycles. If you’re on an Intel Mac with that exact combo and you hit it, the workaround until a fix lands is to downgrade to OrcaSlicer 2.3.1 or 2.3.0 from the same Releases page. Both work fine on Intel and don’t have the Device tab issue. It’s not a clean answer, but it’s the current real-world fix.
First-run setup: printers, filament, region
You’re past Gatekeeper, the app’s open, and OrcaSlicer is showing you a setup wizard. This part is short, but it’s worth getting right because you’ll see these screens once and then forget they existed.
Region picker
The first wizard screen asks for your region. Defaults to whatever your Mac’s system region is, which for most readers will be “North America” or “Europe.” You can change it later under Settings, General if you guess wrong. The region setting affects which login server OrcaSlicer talks to if you connect a Bambu account, and it nudges some default unit settings.
Printer profile selection
This is the big one. OrcaSlicer ships with profiles for hundreds of printers, grouped by vendor. You tick the boxes for the printers you actually own and the app pre-loads their print settings, bed shapes and slicing defaults. Major brands you’ll see in the list include:
- Bambu Lab: A1, A1 Mini, P1S, P1P, X1 Carbon, X1E, H2D
- Prusa Research: MK4, MK3.9, MINI+, XL, CORE One
- Creality: K1 series, Ender 3 V3 family, Ender 3 S1 family
- Voron: 0.x, 1.x, 2.4, Trident, V0
- Anycubic, Elegoo, Sovol, FlashForge, Qidi, RatRig, Vzbot and dozens more
Tick every printer you own. You can come back and add more later via Settings, but during the wizard you might as well batch it. If you have a custom printer or a one-off build that isn’t in the list, pick the closest match and tweak the profile after install. The OrcaSlicer printer profiles hub has a deeper walkthrough on this.
Filament selection
Same idea, different page. Tick the filament types you regularly use. Generic PLA, generic PETG, generic ABS will get you through 90% of normal printing. You can import vendor-specific calibrations later when you start chasing perfect prints.

The filament selection page of the setup wizard. Tick the generic filaments first, then add vendor-specific ones later under Settings, Filament.
Optional Bambu account
The last wizard step asks if you want to log into a Bambu Lab account for cloud printing and Makerworld integration. This is fully optional. If you’re not on a Bambu printer or you don’t use Makerworld, skip it. You can always add a login later from the top-right user icon in the main window.
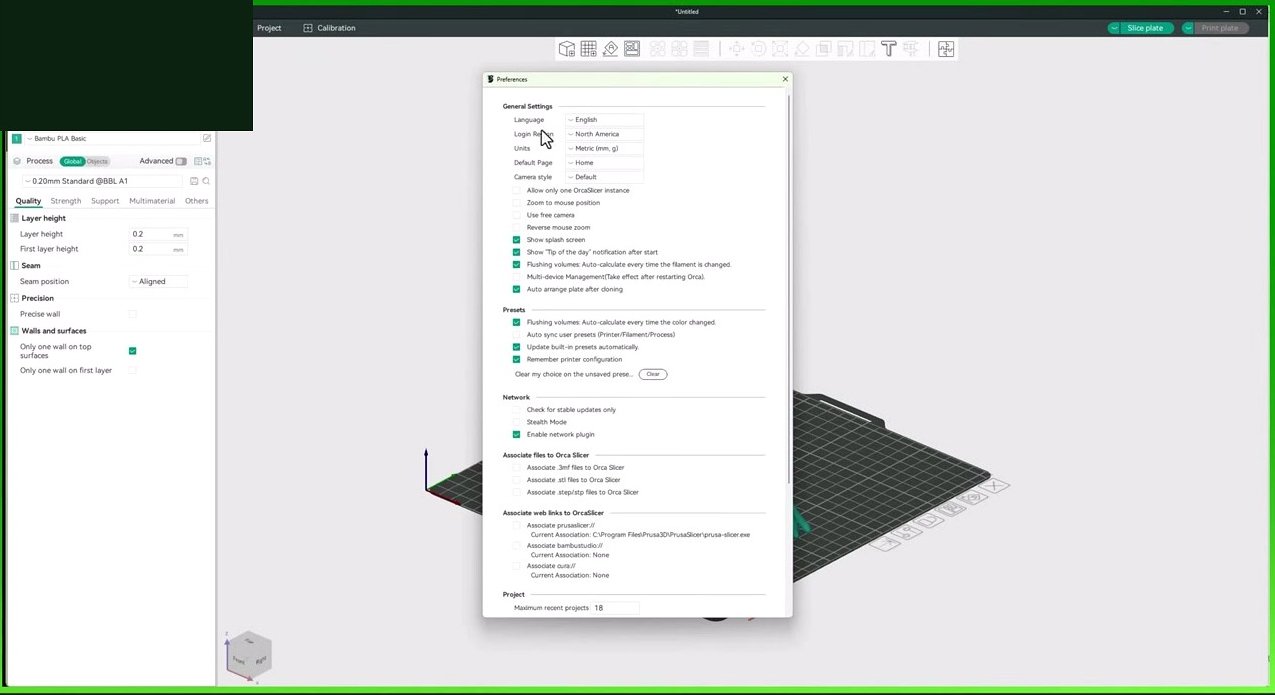
Preferences after install, showing the Login Region setting. If the region defaulted wrong during the wizard, this is where you change it. Settings, General, Login Region.
Once the wizard finishes, the main slicer window opens with a default 256×256 build plate (the X1 Carbon’s default). Pick your real printer from the dropdown in the top-right and the build plate snaps to the right size. From here, the next thing to read is OrcaSlicer beginner’s first print, which walks through importing an STL, slicing, and exporting G-code.
Common install problems and fixes
If you hit something the steps above didn’t cover, this table is the triage list I run through when readers email me. Most install problems on macOS map to one of these.
| Symptom | Likely cause | Fix |
|---|---|---|
| “OrcaSlicer is damaged and can’t be opened” after right-click then Open | Quarantine attribute on a nested binary inside the app bundle | Run xattr -dr com.apple.quarantine /Applications/OrcaSlicer.app in Terminal, then relaunch |
| “App can’t be opened because Apple cannot check it for malicious software” | Same Gatekeeper flow, newer Sequoia wording | Right-click then Open, or System Settings, Privacy and Security, Open Anyway |
| Crashes immediately on launch on M-series Mac running Sequoia 15.0 to 15.2 | Known regression in early Sequoia builds (GitHub Issues #9199, #7673) | Update macOS to 15.3 or newer |
| Crashes on Intel Mac running macOS 15.7.4 on the Device tab or after sleep | Tracked in GitHub Issue #12903 | Downgrade to OrcaSlicer 2.3.1 or 2.3.0 until a fix lands |
| DMG won’t mount, “image not recognised” error | Corrupt or incomplete download | Re-download from GitHub, verify size matches the asset list |
| First launch hangs for 30+ seconds before the window appears | Apple’s Metal layer is compiling shaders for the first time | Wait it out. Subsequent launches are fast. |
| Setup wizard cannot be skipped or stays stuck | Known fresh-install bug on 2.3.0 (Issue #10187) | Pick any one printer and one filament. You can change everything later. |
| App opens but the printer list is empty | Corrupted profile cache from a previous failed install | Delete ~/Library/Application Support/OrcaSlicer/ and relaunch. Wizard reappears. |
| App crashes when logging into Makerworld on an M2 Mac with Sequoia | Tracked in Issue #9199 | Update to latest OrcaSlicer 2.3.2. Skip the login during the wizard. |
| “OrcaSlicer can’t be opened. The application is incompatible with this Mac” | macOS version below 11.3 Big Sur | Update macOS, or use an older OrcaSlicer release |
If your specific issue isn’t in this table, the OrcaSlicer troubleshooting master guide goes deeper into print quality, slicing errors and post-install crashes.
Where OrcaSlicer stores its files on macOS
If you ever need to back up your profiles, migrate to a new Mac, or reset OrcaSlicer to a clean state without uninstalling the app, you need to know where the data lives. These paths are confirmed in GitHub Discussion #1594 and the uninstall guide in Discussion #4323.
~/Library/Application Support/OrcaSlicer/: profiles, presets, cache, machine data. This is the big one. If you back up one folder, back up this one.~/Library/Logs/OrcaSlicer/: log files. Useful when you’re filing a bug report on GitHub. Some installs use~/Library/Application Support/OrcaSlicer/log/instead, so check both if you can’t find what you’re looking for.~/Library/Preferences/com.softfever3d.orca-slicer.plist: user preferences plist. The bundle ID iscom.softfever3d.orca-slicer(note the hyphens).~/Library/Caches/com.softfever3d.orca-slicer/: Metal shader cache and asset cache.
To reset OrcaSlicer to first-run state without uninstalling the app, run these in Terminal:
rm -rf ~/Library/Application\ Support/OrcaSlicer
rm -rf ~/Library/Caches/com.softfever3d.orca-slicer
rm -f ~/Library/Preferences/com.softfever3d.orca-slicer.plist
Then relaunch OrcaSlicer. The setup wizard reappears as if you’d just installed for the first time.
How to uninstall OrcaSlicer cleanly
The simple uninstall is what most people want:
- Quit OrcaSlicer with Cmd+Q.
- Open Applications. Right-click OrcaSlicer.app and choose Move to Trash. Or just drag it to the Trash icon in your Dock.
- Empty Trash.
That removes the app but leaves your profiles, caches and preferences in place, which is what you want if you might reinstall later. If you want a full nuke (every trace removed, ready for a perfectly clean reinstall or just reclaiming disk space), run this in Terminal:
killall OrcaSlicer 2>/dev/null
rm -rf /Applications/OrcaSlicer.app
rm -rf ~/Library/Application\ Support/OrcaSlicer
rm -rf ~/Library/Caches/com.softfever3d.orca-slicer
rm -f ~/Library/Preferences/com.softfever3d.orca-slicer.plist
rm -rf ~/Library/Logs/OrcaSlicer
The first line force-quits any running OrcaSlicer process so the file removals don’t fail. The rest are self-explanatory. After running this, OrcaSlicer is gone from your Mac, and a fresh install will give you the setup wizard from scratch.
Is it safe to install OrcaSlicer on Mac?
Yes, with the caveats already covered. The binary comes from the official SoftFever/OrcaSlicer repo on GitHub, built by GitHub Actions from public source code that anyone can audit. The reason Gatekeeper complains isn’t because OrcaSlicer is dangerous. It’s because the project doesn’t pay Apple for notarisation, which is the same reason Gatekeeper complains about Audacity, Inkscape, OpenSCAD and most other open-source Mac apps.
The trade-off you’re making is: you’re trusting the OrcaSlicer maintainers because Apple hasn’t verified them on your behalf. If that trade-off feels uncomfortable, you can verify the SHA-256 hash of the DMG against the one listed on the release page before installing. The full breakdown lives in is OrcaSlicer safe to download.
FAQs
Why does macOS say OrcaSlicer is damaged when it clearly isn’t?
It’s misleading wording. macOS uses “damaged” as a generic message for any app it can’t verify through its notarisation system. OrcaSlicer ships with an ad-hoc signature instead of an Apple Developer notarised one, so Gatekeeper refuses to open it on first launch. Right-click then Open, or the xattr -dr com.apple.quarantine command, fixes it. The app itself is fine.
Can I run OrcaSlicer on an M1 MacBook Air?
Yes. The current OrcaSlicer release runs natively on every Apple Silicon Mac, including the base M1 Air. Performance is excellent. The 8 GB unified memory in a base M1 Air is enough for typical single-plate slicing, though if you slice large multi-material plates you’ll feel the RAM limit eventually.
Does OrcaSlicer work on macOS 26?
Officially yes, with the usual caveat that any brand-new macOS release has edge cases. Issue #12306 on GitHub tracks one specific load-failure case on macOS 26.3 with the 2.3.2-beta build. The stable 2.3.2 release works fine on macOS 26 in my own testing on an M2.
Should I use the Homebrew cask instead of the DMG?
If you already use Homebrew, the cask is the cleaner path because it handles future updates automatically (brew upgrade orcaslicer). If you don’t use Homebrew, the manual DMG path is just as good and doesn’t require installing Homebrew first. Both end with the same OrcaSlicer.app in your Applications folder.
How big is OrcaSlicer on macOS?
The DMG download is around 120 MB. The installed app sits at roughly 250 to 300 MB in Applications. Add another few hundred MB for the Application Support and Caches folders once you’ve used the app for a while. Plan for about 1 GB total.
Can I install both Bambu Studio and OrcaSlicer on the same Mac?
Yes, they coexist without conflict. They use different bundle IDs (Bambu Studio uses com.bambulab.bambu-studio, OrcaSlicer uses com.softfever3d.orca-slicer) and separate Application Support folders. I run both on my M2 for cross-comparison and they don’t interfere with each other.
Do I need to install Rosetta to run OrcaSlicer on Apple Silicon?
No. The current OrcaSlicer DMG is a universal binary, and the Apple Silicon side of it is a native arm64 build. Rosetta is not involved. You’ll never see the “needs Rosetta” prompt for OrcaSlicer.
Wrapping up
That covers everything I’ve hit installing OrcaSlicer on Macs over the last couple of years. The flow is genuinely short once you understand the Gatekeeper bit. Download from the official GitHub releases page, drag to Applications, right-click and choose Open, and if it complains, paste the xattr command. You’re done. The bigger learning curve isn’t the install itself,it’s tuning the slicer for your specific printer and filament, which is what the first print guide picks up next. If you want the cross-platform context first, the OrcaSlicer download hub covers what’s different between Windows, Mac and Linux builds. Good luck, and welcome to OrcaSlicer.
Related OrcaSlicer guides
- OrcaSlicer for Beginners: Your First Print in 15 Minutes
- OrcaSlicer Slow Slicing on Complex Models: How to Speed Up
- SimplyPrint vs Obico vs OctoEverywhere: OrcaSlicer 2026
- OrcaSlicer Won’t Find My Printer on the Network: Mac and Windows Fixes
- OrcaSlicer for Flashforge Adventurer 5M, 5M Pro and AD5X: Setup