
I told a friend to install OrcaSlicer last week and he hit five different speed bumps before getting it running: SmartScreen blocked it, Defender quarantined the .exe, the installer wanted admin rights he didn’t have on his work laptop, the first-run wizard wouldn’t accept his printer, and the bambu_network plugin offered itself before he understood what it did. That’s a lot for a free slicer. Here’s the version where none of that catches you off-guard.
I’ve installed OrcaSlicer on something like thirty Windows boxes over the last two years, across both 10 and 11, on everything from a five-year-old work Dell to a fresh AMD desktop. The install is genuinely simple, but Windows does its best to make you doubt that. If you just downloaded the installer and Windows yelled at you in big blue text, you’re in the right place. This guide walks through the installer route, the portable route, the SmartScreen panic, the antivirus false positives, the first-run wizard, and how to uninstall cleanly when you’re done experimenting. I’ll flag the spots where I’d actually slow down and double-check, and the spots that look scary but really aren’t.
One quick note before we start. orcaslicer.net doesn’t host the OrcaSlicer binaries. Every download link in this guide points at the official GitHub releases page, because that’s the only place I’d ever pull the installer from. If you haven’t grabbed the file yet, our OrcaSlicer download hub has direct links to the latest stable, beta, and nightly builds along with file sizes and changelogs. On a Mac? Skip this entirely and follow the macOS install guide instead. The flow is similar but the Gatekeeper warning works differently.
Table of contents
- What you’re actually installing
- System requirements for Windows 10 and 11
- Step 1: Download the right file from GitHub
- Verifying the download is genuine
- Installing OrcaSlicer with the .exe installer
- Installing the portable version
- Why Windows shows “unrecognized app” and what it means
- Defender and antivirus false positives
- First-run setup wizard
- Common install problems and fixes
- How to uninstall OrcaSlicer cleanly
- Other install routes (winget, Chocolatey)
- FAQ
What you’re actually installing
OrcaSlicer ships two Windows artifacts in every release. They’re the exact same application. The only difference is plumbing: how it lands on your disk and how Windows knows about it. I’ll get the trade-off out of the way first, because picking the wrong one wastes ten minutes and a small amount of patience.
| Installer (.exe) | Portable (.zip) | |
|---|---|---|
| Filename (v2.3.2) | OrcaSlicer_Windows_Installer_V2.3.2.exe | OrcaSlicer_Windows_V2.3.2_portable.zip |
| Download size | 124.9 MB | 157.7 MB |
| Needs admin rights? | Yes (UAC prompt) | No |
| Default location | C:\Program Files\OrcaSlicer\ | Wherever you extract it |
| Start Menu shortcut? | Yes (automatic) | No |
| Add or Remove Programs entry? | Yes | No |
| .3mf file association? | Optional during install | Not registered |
| User profiles stored at | %APPDATA%\OrcaSlicer\ | %APPDATA%\OrcaSlicer\ (yes, really) |
| Triggers SmartScreen? | Yes | Yes |
Notice that last row. Both versions trigger the same SmartScreen panel because they’re both unsigned executables from a developer Microsoft hasn’t seen before. I’ll get to why that happens in a bit. The other thing to call out: the portable build is not really portable across machines by default. It still reads and writes your profiles to %APPDATA%\OrcaSlicer\ on whatever PC you launch it from, which means if you copy the folder to a USB stick and plug it into a different PC, your settings don’t come along. The fix is a --datadir shortcut flag, and I’ll cover it in the portable section.
Which one should you pick
For 9 out of 10 people, pick the installer. You want OrcaSlicer to feel like a normal Windows program. You want it in your Start Menu. You want to double-click a .3mf and have it open. The installer does all of that.
I’d pick portable only if one of these is true: you’re on a locked-down work laptop where you don’t have admin rights, you want OrcaSlicer running off a USB stick, or you want to test multiple OrcaSlicer versions side by side without them stepping on each other. That last one is genuinely useful if you’re chasing a regression between two releases.
System requirements for Windows 10 and 11
OrcaSlicer is not a heavy app by modern standards, but it does ask for a real GPU. The wiki’s “official” minimums are conservative, and the practical floor is a bit higher. I’ll list both.
| Spec | Minimum | Recommended |
|---|---|---|
| OS | Windows 10 64-bit (build 1809 or later) | Windows 11 |
| CPU | Any 64-bit multi-core with SSE4.2 | Modern 6+ core, AVX2 support |
| RAM | 4 GB | 8 GB (16 GB+ for big models) |
| GPU / OpenGL | OpenGL 2.0 | OpenGL 3.3 or newer (4.5 for smoothest preview) |
| Disk space | 1 GB for the app | 5 GB to allow for project files and profile bundles |
| Display | 1280×720 | 1920×1080 or higher |
About OpenGL. The repo wiki says 2.0 minimum. I’ve watched OrcaSlicer hang on splash on machines that “technically” had OpenGL 2.0, so in practice I’d treat 3.3 as the real floor. Any Intel HD Graphics chip from 2012 or later clears that. Any discrete GPU from the last decade clears 4.5 without thinking. If you’re on a really old laptop with an Intel GMA or first-gen HD, you’re going to have a bad time and you should consider PrusaSlicer instead.
Two runtime dependencies are worth knowing about because they show up as cryptic error messages if missing:
- Microsoft Visual C++ Redistributable 2015 to 2022. This is what supplies VCRUNTIME140.dll, VCRUNTIME140_1.dll, and MSVCP140.dll. Most modern Windows boxes already have it from Steam, Office, or another app. If OrcaSlicer launches with a “VCRUNTIME140.dll not found” pop-up, you don’t have it. Grab vc_redist.x64.exe from aka.ms/vs/17/release/vc_redist.x64.exe and run it.
- Microsoft Edge WebView2 Runtime. Bundled on Windows 11, usually arrives via Windows Update on Windows 10. OrcaSlicer uses it to render the MakerWorld and printer dashboard panels. If it’s missing, those panels are blank instead of crashing the app, so you might not notice immediately.
You also want an internet connection for the first launch. OrcaSlicer pulls vendor profile bundles from GitHub during the first-run wizard. After that, it runs fine offline.
Step 1: Download the right file from GitHub
The official download page is github.com/OrcaSlicer/OrcaSlicer/releases. Type that URL by hand the first time you visit it, then bookmark it. I cannot stress this enough: there are at least three lookalike sites (orca-slicer.com, orcaslicer.com, orcaslicer.uk.com) that are not affiliated with the project, and the first time you Google “orcaslicer download” the ad slot at the top is a coin flip on which random domain shows up. Don’t click ads. Go straight to GitHub.
At time of writing the latest stable is OrcaSlicer v2.3.2, released March 23, 2026. Scroll to the “Assets” section under the latest release. You’ll see something like this:

Click OrcaSlicer_Windows_Installer_V2.3.2.exe for the installer (124.9 MB) or OrcaSlicer_Windows_V2.3.2_portable.zip for the portable build (157.7 MB). Edge or Chrome will probably warn you “this file isn’t commonly downloaded.” That’s the browser’s reputation system, not your antivirus. Click the three-dot menu on the download bar and choose Keep, then Keep anyway. If you skip this step the download gets quarantined into a folder you’ll struggle to find later.
Note that OrcaSlicer mirrors its releases between two GitHub orgs: SoftFever/OrcaSlicer (the original) and OrcaSlicer/OrcaSlicer (the more recent mirror). Both point to the same binaries. Either is fine.
Verifying the download is genuine
Here’s where I have to be honest with you. OrcaSlicer does not officially publish SHA-256 checksums on its release page. The feature was requested back in Issue #7005 and closed as “Not Planned.” That’s a legitimate gap in the project’s release hygiene, and pretending otherwise would be a lie. It’s also the reason your antivirus is more nervous about this download than it would be about, say, Cura.
So how do you verify you’ve got a real OrcaSlicer installer and not something a malicious lookalike site swapped in? I use a three-step stack and I’d recommend you do the same the first time.
Step one: only download from GitHub. Not from a download portal, not from Softonic, not from a “free 3D printing tools” blog that’s trying to rank for the keyword. The canonical URLs are above. If you didn’t click through to github.com, throw the file away and start over.
Step two: scan it on VirusTotal. Go to virustotal.com, upload the EXE, wait about 30 seconds. A clean OrcaSlicer release typically shows 0 to 2 hits out of 70+ engines, and the hits are always the same handful of heuristic engines that flag basically any unsigned installer. If you see 10 or more engines flagging it, you have the wrong file. Walk away.
Step three: compute the SHA-256 hash yourself in PowerShell. Open PowerShell, navigate to your Downloads folder, and run:
Get-FileHash .\OrcaSlicer_Windows_Installer_V2.3.2.exe -Algorithm SHA256You’ll get a 64-character hex string back. Save that string. Compare it against the hash shown for the same release on Chocolatey’s package XML, or on a community mirror like WakeMeOps, or in a release thread on the OrcaSlicer subreddit. If three independent sources all show the same hash for that filename, you’ve got the real thing. If they don’t match, you don’t.
One more check, since people ask. Right-click the EXE, choose Properties, click the Digital Signatures tab. As of v2.3.2 there is no signature. The Digital Signatures tab will either be missing or empty. That’s consistent with the project’s stated policy and matches what’s documented in the GitHub issues. If you suddenly see a signature from an unknown publisher, the file is not from the official project and you should delete it.
This sounds like a lot of work. It’s about three minutes total, you only do it the first time, and it’s worth doing once because every subsequent install you’ll trust without thinking. If you’d rather skip the verification piece entirely, our is OrcaSlicer safe writeup covers the full reasoning and includes verified hashes for each recent release.
Installing OrcaSlicer with the .exe installer
This is the path I recommend for most people. Here’s the actual click-by-click.
Unblock the file first (optional but tidier)
Before you double-click, right-click the downloaded EXE and choose Properties. At the very bottom of the General tab, you might see a small line that says “This file came from another computer and might be blocked.” Tick the Unblock checkbox and click Apply. This removes the Mark-of-the-Web flag and saves you one prompt later. If the checkbox isn’t there, skip this step.
Run the installer
Double-click OrcaSlicer_Windows_Installer_V2.3.2.exe. Windows asks for admin permission via UAC. Click Yes.
And then the blue panel hits you.
Get past the SmartScreen wall
If you just clicked Yes on UAC and you’re staring at a full-screen blue panel that says “Windows protected your PC” with two buttons labeled “Don’t run” and… nothing else, you’ve hit SmartScreen. This is the screenshot that brings most people to articles like this one. Don’t click “Don’t run.” There’s a hidden link.
Look just below the bold “Microsoft Defender SmartScreen prevented an unrecognized app from starting” text. There’s a small, easily-missed line that says More info. Click it. The panel updates and now shows a Run anyway button. Click that.
That’s the whole trick. I’ll explain why this happens further down. For now, just know that every open-source slicer triggers this and the More info link is the answer.
Walk through the installer wizard
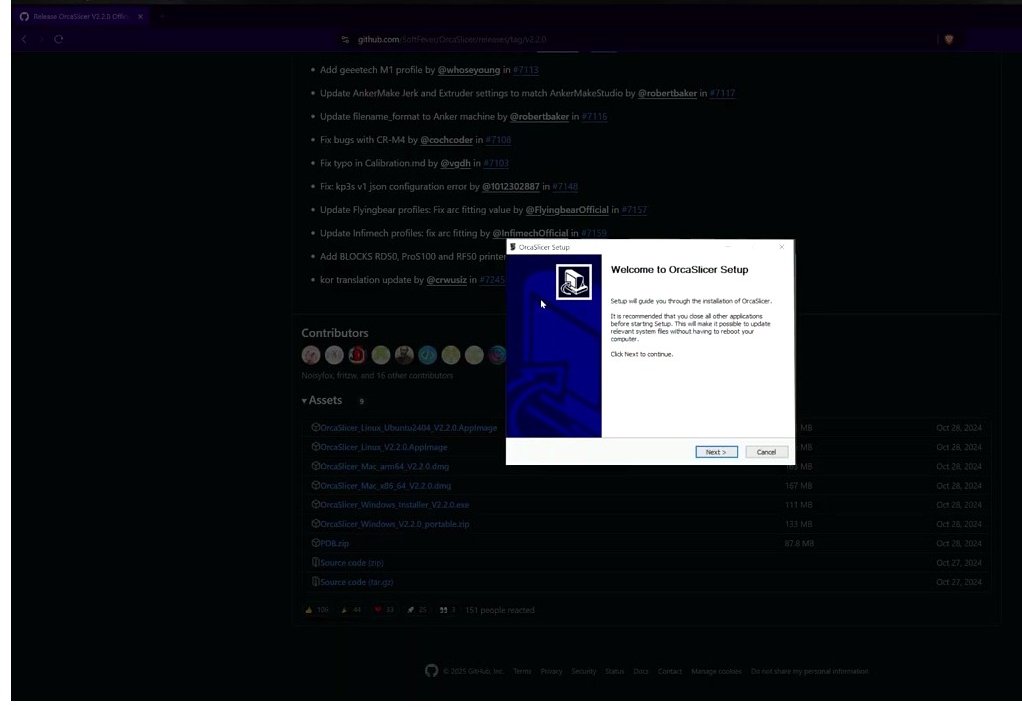
The wizard is short. Here’s what each screen does:
- Welcome screen. Click Next.
- License agreement. OrcaSlicer is licensed under the GNU AGPL v3. If you’re not redistributing the code, this has zero practical impact on you. Click I Agree.
- Install location. Default is
C:\Program Files\OrcaSlicer\. I leave this alone on every install. If your C: drive is genuinely tight on space, you can change it, but understand that this only moves the program files. Your user data (profiles, slicing history, custom printers) lives in%APPDATA%\OrcaSlicer\no matter where the EXE lives, and you can’t change that here. - Shortcuts and file associations. The wizard offers a desktop shortcut checkbox. The Start Menu shortcut is created automatically. There’s also a checkbox to register the .3mf file association so double-clicking a 3MF file opens it in OrcaSlicer. I leave both on.
- Install. Click Install. The progress bar runs for 30 to 90 seconds depending on your disk speed.
- Finish. There’s usually a “Run OrcaSlicer now” checkbox. Tick it if you want to go straight into the first-run wizard.
Windows 10 differences
The flow on Windows 10 is identical. The SmartScreen panel has slightly different border styling, the UAC dialog uses the older blue color scheme, and that’s about it. The More info into Run anyway path works exactly the same way. If you’re on a really old Windows 10 build (older than 1809, which means you haven’t run Windows Update in around five years), some installer dialogs render without proper shadows. Update Windows first and the installer will be happier.
Installing the portable version
The portable build skips the installer wizard entirely. You extract a ZIP and run an EXE. Useful if you’re on a work laptop without admin rights, or if you want OrcaSlicer on a USB stick.
Download and unblock
From the same GitHub releases page, grab OrcaSlicer_Windows_V2.3.2_portable.zip (157.7 MB). Before you extract, right-click the ZIP, choose Properties, and tick the Unblock checkbox at the bottom of the General tab.
I’m going to repeat that because it matters more for the portable build than for the installer: unblock the ZIP before you extract. If you skip this, every single file inside the ZIP inherits the Mark-of-the-Web flag, and Windows will throw the “Couldn’t open file” prompt at you on every launch. Even worse, some DLLs inside the package may refuse to load at all, and OrcaSlicer will crash with no clear error. One checkbox saves you 20 minutes of head-scratching.
Extract
Right-click the ZIP, choose Extract All, and pick a destination. I’d recommend C:\Apps\OrcaSlicer\ or the root of your USB drive. Two locations I’d avoid:
- Anywhere inside Program Files, because you don’t have write permission there without admin, which defeats the purpose of portable.
- Anywhere inside a OneDrive, iCloud Drive, or Dropbox synced folder. The slicer writes to its own files constantly while running, and you’ll create sync conflicts the first time you open a project.
Run
Open the extracted folder. Double-click OrcaSlicer.exe. SmartScreen pops up the same way it does for the installer. Same fix: More info, then Run anyway. The first-run wizard launches.
Making portable actually portable
Here’s the catch I mentioned earlier. By default, the portable build stores your profiles in %APPDATA%\OrcaSlicer\ on whatever machine you launch it from. Copy the folder to a different PC and your settings don’t come along.
To force settings into the portable folder itself (real USB-stick behavior), you launch OrcaSlicer with a --datadir argument pointing at a folder next to the EXE. Create a shortcut to OrcaSlicer.exe, right-click it, choose Properties, and edit the Target field to look like this:
"D:\Apps\OrcaSlicer\OrcaSlicer.exe" --datadir "D:\Apps\OrcaSlicer\data"Make sure you’ve created the data folder first. Launch OrcaSlicer from that shortcut, not from the original EXE. Now your settings live in D:\Apps\OrcaSlicer\data\ and the whole package travels with you. If you forget the flag and double-click the raw EXE, you’ll get a fresh first-run wizard because OrcaSlicer can’t find the settings.
Why Windows shows “unrecognized app” and what it means
This is the section most readers actually came for, so I’m going to give it the space it deserves. The SmartScreen warning IS scary and it IS normal. Both of those things are true at the same time, and the way most articles handle it (“don’t panic, just click Run anyway”) is exactly the kind of dismissive non-answer that makes people more nervous.
Here’s what’s actually happening.
What SmartScreen actually is
Microsoft Defender SmartScreen has been baked into Windows since Windows 8. When you run a downloaded executable, Windows takes a hash of the file and asks Microsoft’s reputation servers a single question: “have you seen this hash before, and do you trust the publisher?” If both answers are yes, the file runs without comment. If either is no, you get the “unrecognized app” panel.
SmartScreen is not a virus scanner. It does not look at the contents of the file. It does not unpack anything. It’s a popularity contest plus a code-signing check. That’s it.
Why OrcaSlicer always loses the popularity contest
Four reasons stack on top of each other:
- OrcaSlicer is open source and the maintainers don’t pay for a code signing certificate. An Extended Validation (EV) Authenticode cert grants immediate SmartScreen trust on day one of a release, and it costs around $300 to $700 USD per year from DigiCert or Sectigo. A regular (non-EV) cert costs less but requires building download reputation before SmartScreen relaxes. The OrcaSlicer team doesn’t carry either. They’ve been asked about it twice and the answer has been no both times.
- Every release is a brand new executable hash. Even if v2.3.0 eventually built up enough downloads to clear SmartScreen, v2.3.1 starts from zero again.
- OrcaSlicer hits a smaller audience than commercial software. The user base is large for an open-source slicer, but tiny compared to whatever Microsoft considers “common.” There aren’t enough installs per week to build a reputation organically.
- This is true for basically every open-source slicer. PrusaSlicer, Cura (sometimes), SuperSlicer, OctoPrint installers, even Bambu Studio early in its life: all of them trigger SmartScreen for the same reason. OrcaSlicer is not unusual. It’s the rule, not the exception.
What the warning does NOT mean
- It is not evidence of malware.
- It does not mean the file was tampered with in transit.
- It does not mean the maintainers are sloppy or careless.
- It does not mean Windows scanned the file and found something suspicious. SmartScreen never opened the file. It just doesn’t recognize the hash.
If you want a deeper breakdown of the “is this slicer safe to install” question, our OrcaSlicer safety analysis goes through the source-code audit, the network behavior, what data the app collects, and the maintainer history. The TL;DR is yes, it’s safe, with one caveat about the Bambu network plugin that I’ll cover in the antivirus section below.
Defender and antivirus false positives
Sometimes SmartScreen isn’t your only problem. Sometimes Defender (or Malwarebytes, or whatever AV you’re running) actively quarantines the file or pops up a “Threat detected” notification. Here’s what’s going on and how to handle it.
The Wacatac thing
The most common detection on the current build, as of March 2026, is Trojan:Win32/Wacatac.H!ml on OrcaSlicer_Windows_Installer_V2.3.2.exe. This is documented in GitHub Issue #12923, and it’s confirmed as a Microsoft Defender machine-learning false positive. The maintainers have flagged the file with Microsoft, but those flags don’t always result in the detection getting removed.
Wacatac is the ML classifier bucket Defender uses for “this looks like a generic installer dropper.” It’s a heuristic, not a specific signature. It catches a lot of legitimate installers across the open-source ecosystem because legitimate installers and malicious droppers do roughly the same thing structurally: they unpack files into Program Files, write to the registry, and set up Start Menu entries. The classifier has trouble telling them apart, and unsigned installers are guilty until proven innocent.
You can verify it’s a false positive yourself by uploading the file to VirusTotal. A real OrcaSlicer 2.3.2 installer scan shows the Wacatac hit from Microsoft, maybe one or two other heuristic engines, and 65+ clean results. A real Wacatac would light up 20+ engines.
The Bambu network plugin story
There’s a second class of false positives worth knowing about. OrcaSlicer loads two DLLs from Bambu Lab to talk to Bambu printers over the cloud: bambu_networking.dll and BambuSource.dll. Both occasionally trip Malwarebytes and a couple of less-mainstream AV engines.
These DLLs are pulled from your Bambu Studio install if you have one, otherwise they’re downloaded from a Bambu-hosted URL the first time you set up a Bambu printer. They handle MQTT cloud-printer traffic. They are not malicious, but they are closed-source binaries that phone home to Bambu’s servers, which is exactly the kind of behavior that makes heuristic engines nervous. If you don’t print on a Bambu, you’ll never trigger the plugin install and you’ll never see this.
How to whitelist OrcaSlicer in Windows Defender
If Defender quarantines the installer or the install folder, you can add an exclusion. I’d only do this AFTER you’ve confirmed the file came from GitHub and ideally after a VirusTotal scan. Whitelisting unknown files is exactly how people get owned, so do the verification step first.
On Windows 11:
- Press Start, type “Windows Security,” open it.
- Click Virus & threat protection.
- Under “Virus & threat protection settings,” click Manage settings.
- Scroll down to Exclusions and click Add or remove exclusions.
- Click Yes on the UAC prompt.
- Click Add an exclusion and choose Folder.
- Pick
C:\Program Files\OrcaSlicer\(or your portable folder). - Optional but useful: add a second folder exclusion for
%APPDATA%\OrcaSlicer\, because some AVs scan profile JSON files for false positives there too.
On Windows 10 the menu path is identical. Settings, Update & Security, Windows Security, Virus & threat protection, Manage settings, Exclusions.
How to whitelist OrcaSlicer in Malwarebytes
Open Malwarebytes, click Settings, then the Allow List tab. Click Add. Choose Add file or folder, and point at your OrcaSlicer install folder. Save. Done.
Restoring a quarantined file
If Defender already grabbed the EXE before you got to it, you can pull it back. Open Windows Security, go to Virus & threat protection, click Protection history, find the OrcaSlicer entry, click Actions, and choose Restore. Add the exclusion above first so it doesn’t get re-quarantined on the next scan.
First-run setup wizard
OrcaSlicer launches into a setup wizard the very first time you run it, and any time you delete %APPDATA%\OrcaSlicer\. It’s four or five screens. None of them are scary, but a couple of them ask questions where the right answer isn’t obvious.
Region picker

Pick the region closest to where you actually live. Asia Pacific, Europe, North America, or Other. This setting affects which MakerWorld region your account links to and which Bambu cloud endpoint OrcaSlicer hits when you upload prints. Pick wrong and your cloud transfers feel slow. It’s not permanent: you can change it later under Preferences.
If you don’t use MakerWorld and don’t print on a Bambu, this setting effectively does nothing to your day. Pick whatever and move on.
Printer profile selection
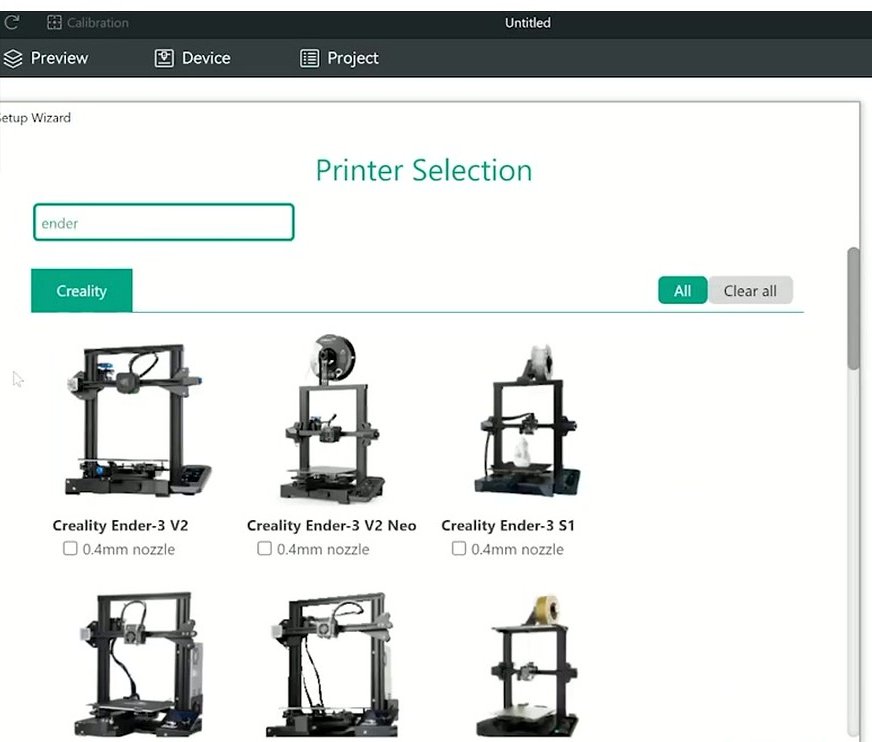
This is the long alphabetical list of prebuilt vendor profiles. Bambu Lab (X1, X1C, P1S, P1P, A1, A1 mini, H2D), Creality (the Ender 3 family, the K1 family, the CR series), Prusa (Mk3, Mk4, Mini, XL, Core ONE), Voron, RatRig, VzBot, Anycubic, Elegoo, Sovol, Anker, FLSUN, Sermoon, Snapmaker, Qidi, and a lot more. There’s a search box at the top so you can filter quickly.
Tick every printer you actually own. If you have an Ender 3 V2 and a Bambu A1, tick both. You can add more later through Add custom printer, including custom Klipper and Marlin profiles. I’d avoid the urge to tick every printer in the list. It clutters the printer dropdown and slows down profile switching.
If your printer isn’t in the list, that’s fine. We cover custom printer setup in our printer profiles guide, which has working profiles for the most common DIY builds.
Filament profile selection

Same idea as the printer step. Bambu PLA Basic, Polymaker PolyTerra, Overture, eSun, Sunlu, Prusament, Hatchbox, the list goes on. Tick the brands you buy. It’s fine to be liberal here because you can hide unused filaments from the dropdown later without uninstalling the profiles.
If you’re brand new and don’t know what filament you’ll be using, just tick Generic PLA for now. You can always come back.
User account (optional)
The wizard offers a login button for Bambu Lab and MakerWorld cloud features. Skip this if you don’t print on a Bambu and don’t use MakerWorld. You can add an account any time later from the top-right user icon in the main app.
What the wizard does NOT do
The wizard does not calibrate your printer. It does not run a first print. It does not auto-tune flow rate, pressure advance, or any of the other things some Google results claim it does. Those are separate workflows. If you’ve never sliced anything before, the beginners’ first print guide walks through loading an STL, picking a profile, slicing, and sending the G-code to your printer. That’s the natural next step from here.
Common install problems and fixes
These are the issues I see come up over and over in the GitHub issues and on Reddit. If you’re stuck on one of these, this table is the fast lookup. The bigger troubleshooting list lives in our OrcaSlicer troubleshooting master guide, which covers about 40 specific error messages and their fixes.
| Symptom | Likely cause | Fix |
|---|---|---|
| “Windows protected your PC” panel with no Run button | You missed the More info link | Click the small More info text below the bold message, then click Run anyway |
| “Couldn’t open file” on first launch of portable build | Mark-of-the-Web on the ZIP propagated to extracted files | Delete the extracted folder. Right-click the ZIP, Properties, tick Unblock, then extract fresh. |
| Installer does nothing when double-clicked | Smart App Control blocking unsigned EXE (Win 11 22H2+), or a leftover registry lock from a previous half-finished install | Try right-click, Run as administrator first. If that doesn’t help, check Windows Security, App & browser control, Smart App Control settings. Note: turning Smart App Control off is one-way without reinstalling Windows. |
| Installer hangs at 99% | VC++ redist sub-step blocked by another running installer | Kill OrcaSlicer_Windows_Installer.exe and vcredist_x64.exe in Task Manager, then re-run the installer. |
| First-run crash with no error window | Missing OpenGL 3.3+ support, or a stale GPU driver | Update your GPU driver from the NVIDIA, AMD, or Intel website, not from Windows Update. Issue #7787 traces a lot of these to old Radeon drivers on AMD 7700X-class machines. |
| “VCRUNTIME140.dll missing” or “MSVCP140.dll missing” | Visual C++ Redistributable 2015-2022 not installed | Download and run vc_redist.x64.exe from aka.ms/vs/17/release/vc_redist.x64.exe |
| Splash screen forever, never opens main window | %APPDATA%\Roaming is redirected to a network share, common on domain-joined PCs (Issue #9732) | Delete %APPDATA%\OrcaSlicer once, relaunch. Expect to re-login to Bambu. There’s no permanent fix from upstream. |
| Crashes after slicing on Win 11 (worked fine on Win 10) | Third-party audio drivers injecting into the process (Nahimic, ASUS Sonic Studio) | Stop the Nahimic service in services.msc, or uninstall it. As a workaround, right-click the OrcaSlicer shortcut, Properties, Compatibility tab, and run in Windows 8 compatibility mode. |
| “Failed to get network plugin” when connecting Bambu printer | BambuSource.dll missing or quarantined by your AV | Whitelist your OrcaSlicer install folder. In OrcaSlicer, go to Help and re-trigger the plugin install. |
How to uninstall OrcaSlicer cleanly
If you’re moving back to PrusaSlicer or Cura, or you suspect your profiles have gone corrupt and you want a fresh first-run wizard, here’s the clean uninstall.
Installer build, normal uninstall
- Start, Settings, Apps, Installed apps.
- Find OrcaSlicer in the list. Click the three-dot menu, then Uninstall.
- Click through the UAC prompt and the OrcaSlicer uninstaller wizard.
- Click Uninstall. Done.
This removes C:\Program Files\OrcaSlicer\ but it intentionally leaves your user data behind. If you reinstall later, your old printer profiles, filament profiles, and slicing history all come back. That’s what you want for an upgrade.
Clean uninstall (start completely fresh)
Do the normal uninstall above, then also:
- Open File Explorer. Paste
%APPDATA%\OrcaSlicerinto the address bar. Delete the whole folder. - Paste
%LOCALAPPDATA%\Temp\orcaslicer_modeland delete if present. - Optionally paste
%LOCALAPPDATA%\OrcaSlicerand delete if present (rare, only on older versions). - Empty the Recycle Bin.
Now OrcaSlicer is fully gone. A fresh install will start with the first-run wizard.
Portable uninstall
Just delete the folder you extracted. If you used the --datadir shortcut flag, your settings die with that folder. If you didn’t, also delete %APPDATA%\OrcaSlicer\.
Other install routes (winget, Chocolatey)
Two more options for power users. Both pull the same official binary; they just automate the download step.
winget. If you’ve got winget configured (it’s built into Windows 11 by default), you can install OrcaSlicer with one command in PowerShell or Terminal:
winget install -e --id SoftFever.OrcaSlicerwinget pulls the same installer EXE from GitHub. SmartScreen still fires the first time. The win here is that on a re-install or a fresh PC, you can have OrcaSlicer running in a single command.
Chocolatey. If you use Chocolatey, the package IDs are orcaslicer (portable variant) and orcaslicer.install (installer variant). Run either:
choco install orcaslicer.installA heads-up: Chocolatey typically lags the GitHub releases by one or two versions. If you need the very latest, go to GitHub directly. If you just want the install command to be one line, Chocolatey is fine.
There’s no official Scoop manifest in the main bucket as of mid-2026, so Scoop users will need to either use a community bucket or just download from GitHub.
FAQ
Is OrcaSlicer safe even with the SmartScreen warning?
Yes. The warning is about reputation and code signing, not about anything in the file itself. The full reasoning, including a look at what the slicer actually does on your network, is in our OrcaSlicer safety breakdown. The short version: it’s open source, the source is on GitHub, the network behavior is documented, and the only closed-source bit is the Bambu network plugin which only loads if you’re talking to a Bambu printer.
Why is there no digital signature on the installer?
The maintainers don’t pay for an Authenticode code signing certificate. They’ve been asked about this and the answer has been a firm no. Code signing certs for an open-source project cost money, need to be renewed annually, and don’t actually make the software safer. They just make Windows less noisy. The trade-off the team has chosen is to keep the project free and accept the SmartScreen pop-up.
Where are my profiles and project files stored?
Everything user-specific lives in %APPDATA%\OrcaSlicer\, which on most PCs resolves to C:\Users\YourName\AppData\Roaming\OrcaSlicer\. Inside that you’ll find a system\ folder with the default vendor presets and a user\ folder with your personal modifications. If you want to back up your customizations, that’s the folder to copy.
Can I run the installer and portable builds side by side?
Technically yes, but they’ll share the same %APPDATA%\OrcaSlicer\ data folder, which means changing settings in one shows up in the other. If you want them genuinely isolated, run the portable build with the --datadir flag pointing somewhere else. That gives you two independent OrcaSlicer environments on the same PC, useful for testing a beta alongside your stable install.
Does OrcaSlicer work on Windows 7 or 8?
The repo wiki says Windows 7 64-bit or newer, but in practice OrcaSlicer 2.x has known bugs on Windows 7 and 8 and the dev team’s QA targets Windows 10 and 11. I wouldn’t try to run 2.3.2 on Windows 7. If you’re stuck on an older OS, the last release that worked reliably was 1.9.x.
Will OrcaSlicer work without an internet connection?
Yes, after the first launch. The first-run wizard pulls vendor profile bundles from GitHub, so that part needs internet. After that, you can run OrcaSlicer entirely offline. You’ll just lose the cloud-printer features (MakerWorld, Bambu cloud sync) and the in-app update check.
How does this compare to installing Bambu Studio?
The install flows are nearly identical because OrcaSlicer is a fork of Bambu Studio. Bambu Studio is signed by Bambu Lab so it doesn’t trigger SmartScreen, but it’s otherwise the same wizard, same first-run flow, same data folder pattern. Our OrcaSlicer vs Bambu Studio comparison goes through what’s actually different between the two slicers once they’re running.
Next steps
Once OrcaSlicer is installed, your printer profile is loaded, and the main window is open, you’re ready to actually slice something. I’d suggest two things from here. First, walk through the beginners’ first print guide. It loads a model, sets a profile, slices it, and gets the G-code to your printer in about 15 minutes. Second, bookmark the troubleshooting master list. You’ll thank me the first time something weird happens mid-print.
If anything in this install guide didn’t work for you, ping the GitHub Issues page for the specific error message you saw. The OrcaSlicer maintainers and community are genuinely responsive there, and most install issues have a fix logged within a day or two of being reported. Good luck, and have fun printing.
Related OrcaSlicer guides
- OrcaSlicer for Beginners: Your First Print in 15 Minutes
- OrcaSlicer Webcam and Live View Setup for Remote Monitoring
- How to Send G-code Wirelessly From OrcaSlicer: Per-Printer Walkthrough
- OrcaSlicer Spiral Vase Mode: Single-Wall Vases Done Right
- OrcaSlicer Keyboard Shortcuts Cheat Sheet (Every Verified Key)