Last winter I had a spool of orange PETG that wouldn’t stop blobbing on the top surface. The temp tower came back clean at 240C, retraction was dialed, but every solid infill cap looked greasy, like wet pavement, with a tiny ridge where the lines met. I’d been running flow ratio 1.0 because that’s what the stock profile said, and I assumed “stock” meant “calibrated.” It didn’t. After a YOLO Recommended run I landed at 0.94, and the next print came off the bed matte and clean. That 6% difference is what flow rate calibration fixes.
If you’ve already done a temperature tower and your prints still aren’t right, flow rate is almost always the next thing to chase. OrcaSlicer gives you four ways: YOLO Recommended, YOLO Perfectionist, legacy Pass 1, and legacy Pass 2. They all answer the same question (how much plastic should the slicer push through the nozzle), but the math, print time, and failure modes are different for each.
This is the long version. If you want the quick win, scroll to the 60-second section. If you want to understand why YOLO landed in PR #6479 in August 2024, why Pass 2 only refines downward, and why your Bambu A1 might silently break the test, keep reading.
Why flow rate matters more than you think
Flow ratio is the multiplier OrcaSlicer applies to every line of plastic it tells your extruder to push. Too high, the nozzle deposits more material than the slicer planned for. Too low, you get gaps. The symptoms get blamed on temperature or speed all the time, which sends people down the wrong rabbit hole.
Three places it shows up. Top surfaces are the loudest tell. A correctly calibrated flow ratio gives a flat, satin-matte top with no line ridges and no over-extruded shine. If the top looks “wet” or has tiny waves, you’re high by a percent or three. If you see daylight through gaps under raking light, you’re low.
Second is dimensional accuracy. A 20mm calibration cube printed at flow ratio 1.05 will measure roughly 20.4mm on the X and Y faces because every perimeter is laying down 5% extra material. People chase this with “horizontal expansion” settings instead, which is a band-aid over the actual problem.
Third is perimeter wall thickness. Slice a part with two perimeters at 0.42mm line width and the wall should measure 0.84mm. If it’s reading 0.92mm, you’re 9% over and your part doesn’t fit the bearing it was designed for. I’ve seen this kill print-in-place hinges over and over.
If you haven’t worked through the rest of the calibration ladder yet, my OrcaSlicer calibration master guide covers the order. Flow comes after temperature and either before or after pressure advance. Both orderings work, just don’t change temperature after you flow-cal.
The 60-second version
For people who just want the answer: open OrcaSlicer, go to the Calibration menu in the top bar, hover Flow Rate, click YOLO Recommended. A new project loads with 11 small blocks. Set your filament, slice it, print it, look at the result under raking light, pick the block whose top surface looks the smoothest. Read off the modifier (something like +0.02 or -0.03), add it to your current flow ratio, save the new value in your filament profile.
Total time on a Bambu P1S with stock PLA Basic is about 18 minutes, closer to 30 on a slower Ender 3. One print, one decision, one number saved. The rest of this article is why that’s enough most of the time, when it isn’t, and what the legacy 2-Pass workflow does differently.
How flow ratio works in OrcaSlicer
Flow ratio is a multiplier on the volume of plastic the slicer plans to extrude per unit of distance. Default is 1.0 for most generic profiles, 0.98 for Bambu-tuned profiles. Useful real-world range is 0.95 to 1.05, with most well-behaved filaments landing between 0.94 and 1.00.
Cross-slicer confusion: PrusaSlicer calls this same setting extrusion multiplier. Cura calls it flow as a percentage, so flow ratio 0.97 in Orca equals 97% in Cura. Marlin firmware exposes it at runtime as M221. They’re the same number, just labeled differently. If you’ve calibrated extrusion multiplier in PrusaSlicer to 0.96 for a specific spool, that translates directly to 0.96 flow ratio in OrcaSlicer.
Bambu Studio’s flow rate calibration is conceptually the same, but Bambu Studio’s print prep also has an on-printer flow cal step that fights OrcaSlicer’s test. My OrcaSlicer vs Bambu Studio comparison covers how these flows differ in practice.
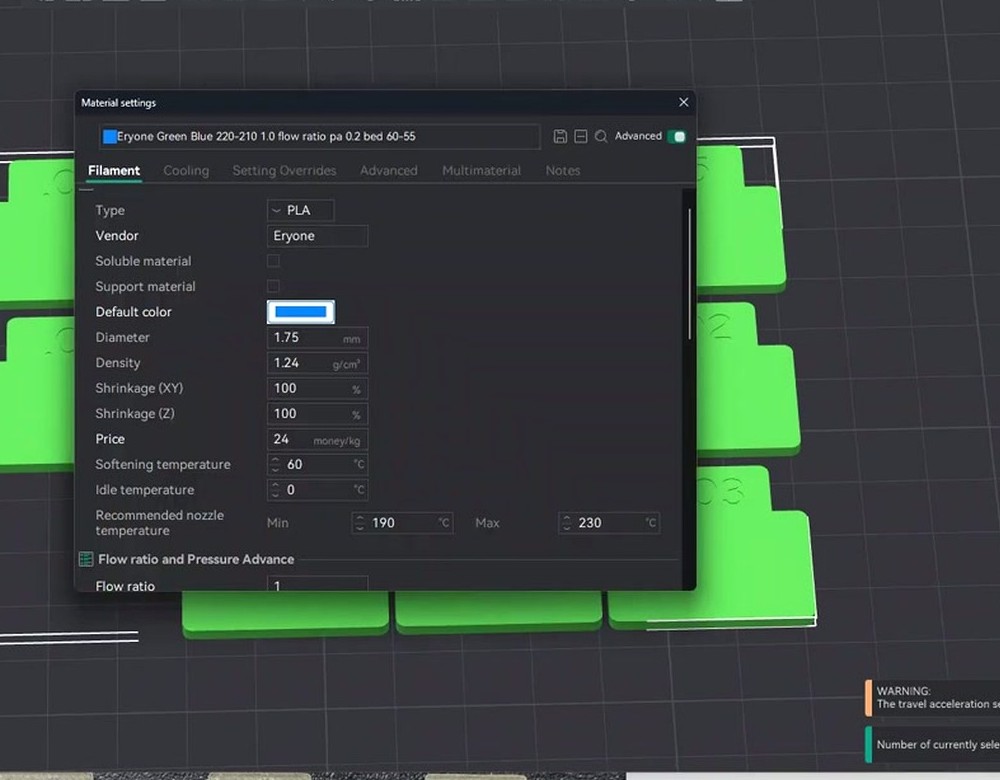
Subtle gotcha: Orca has both print_flow_ratio (print preset) and filament_flow_ratio (filament preset). They multiply at slice time. The cal tool historically wrote to print_flow_ratio while docs said filament_flow_ratio, which is issue #9261. Marked closed, but make sure your saved value lands in the filament profile or you’ll be hunting your own ghost.
The two methods inside Orca
Before I get into YOLO and Pass 1/Pass 2, there’s a more fundamental split: how do you decide which test square is “best”? OrcaSlicer’s built-in tools default to the top-surface method, but the wider 3D printing community is split.
The top-surface method is what Orca builds around. Each test block prints with several top layers (YOLO uses 5 top layers on a 2mm-thick block). The slicer varies the flow ratio across blocks, you look at the tops under raking light and pick whichever looks cleanest. No tools needed. The pattern OrcaSlicer uses is “Archimedean Chords,” meaning the inner spiral prints last, so any over-extrusion shows up as a visible bump where the spiral meets the outer arcs. Clever visual cue once you spot it.
The wall-thickness method works differently. You print a single-wall hollow object (a 30x30x10mm cube with one perimeter, no infill, no top), measure with calipers at multiple points, and compute: new_flow = current_flow * (expected_wall_width / measured_wall_width). If line width is 0.42mm and calipers read 0.45mm at flow ratio 1.0, your new flow ratio is 1.0 * (0.42 / 0.45) = 0.933. Six points averaged, away from the seam, light pressure.
The Ellis Print Tuning Guide is famously skeptical of the wall method on the grounds that wall thickness is affected by pressure dynamics, not just flow. Real argument there. On stringy materials like PETG, though, top-surface gets noisy because filament fuzz hides the gaps. I use top-surface for PLA, wall method for PETG and TPU. Run both on a new printer the first time as a sanity check.
YOLO mode walkthrough
YOLO mode is genuinely named like a meme, because it is one. Stop running a coarse pass plus a fine pass, bet you’re already in the ballpark, run one tight test. SoftFever merged it as PR #6479 on August 22, 2024 with input from igiannakas and jeremytodd1 in the discussion. It’s been the recommended path since 2.2.x.
Two YOLO variants:
- YOLO Recommended: 11 blocks, modifier range -0.05 to +0.05, step size 0.01.
- YOLO Perfectionist: 11 blocks, modifier range -0.04 to +0.035, step size 0.005.
The math is additive, not multiplicative: NewFlowRatio = OldFlowRatio + selected_modifier. Start at 0.98, +0.02 block wins, new flow ratio is 1.00. No rounding errors, no compounding mistakes from a previous pass.
To run it, click Calibration -> Flow Rate -> YOLO Recommended. A dialog opens asking for your starting flow ratio (defaults to whatever your filament profile already has). Confirm, and a new project loads with all 11 blocks laid out.
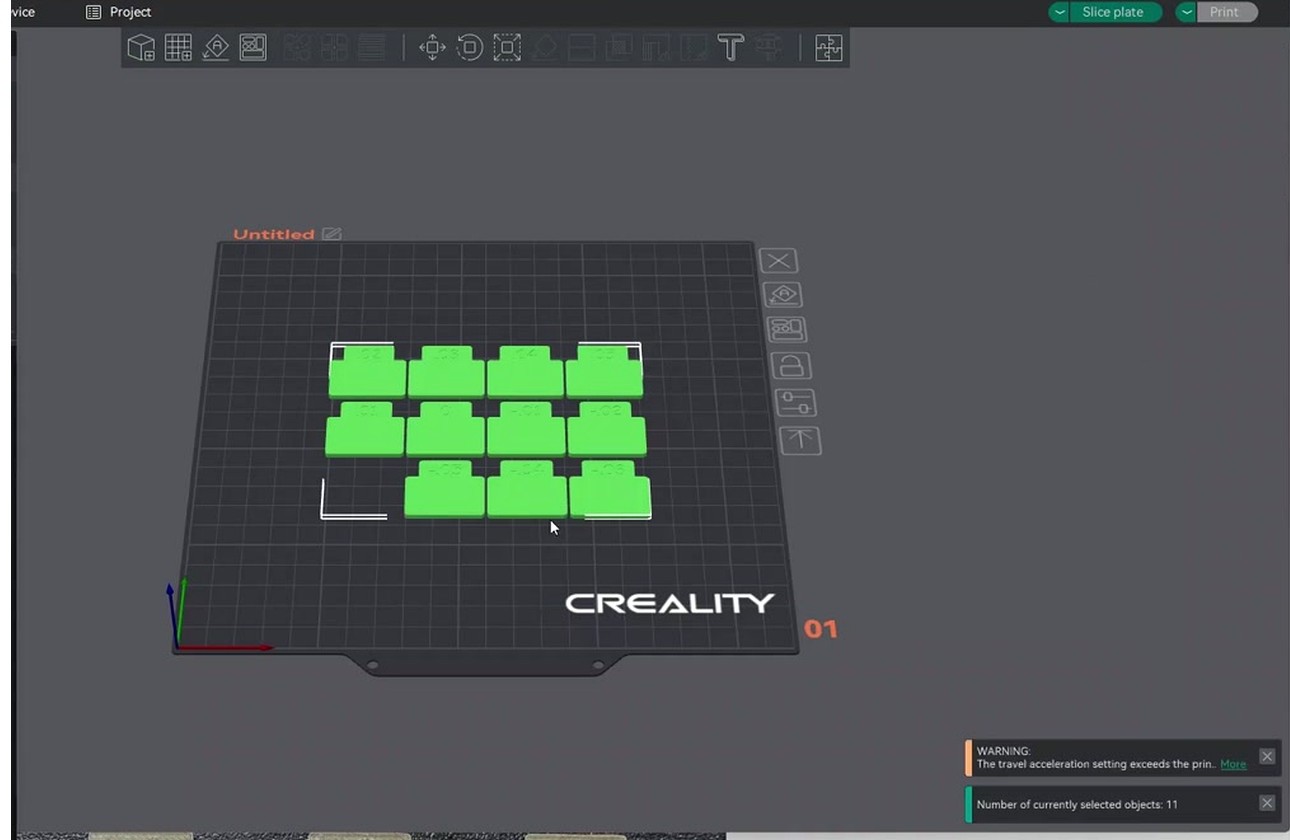
Slice and print. The plate is about 2mm thick: 2 bottom layers, 3 sparse infill at 35% infill, 5 top layers (geometry from PR #6479). Thick internal bridge is intentionally disabled so it doesn’t muddy the visual signal.
When it’s done, look at it under raking light. Find the block where the top is matte-satin (not glassy), no dark gaps between extrusion lines, no raised ridges, corners flat (not blobbed), and the inner spiral meets the outer arcs without a visible seam.
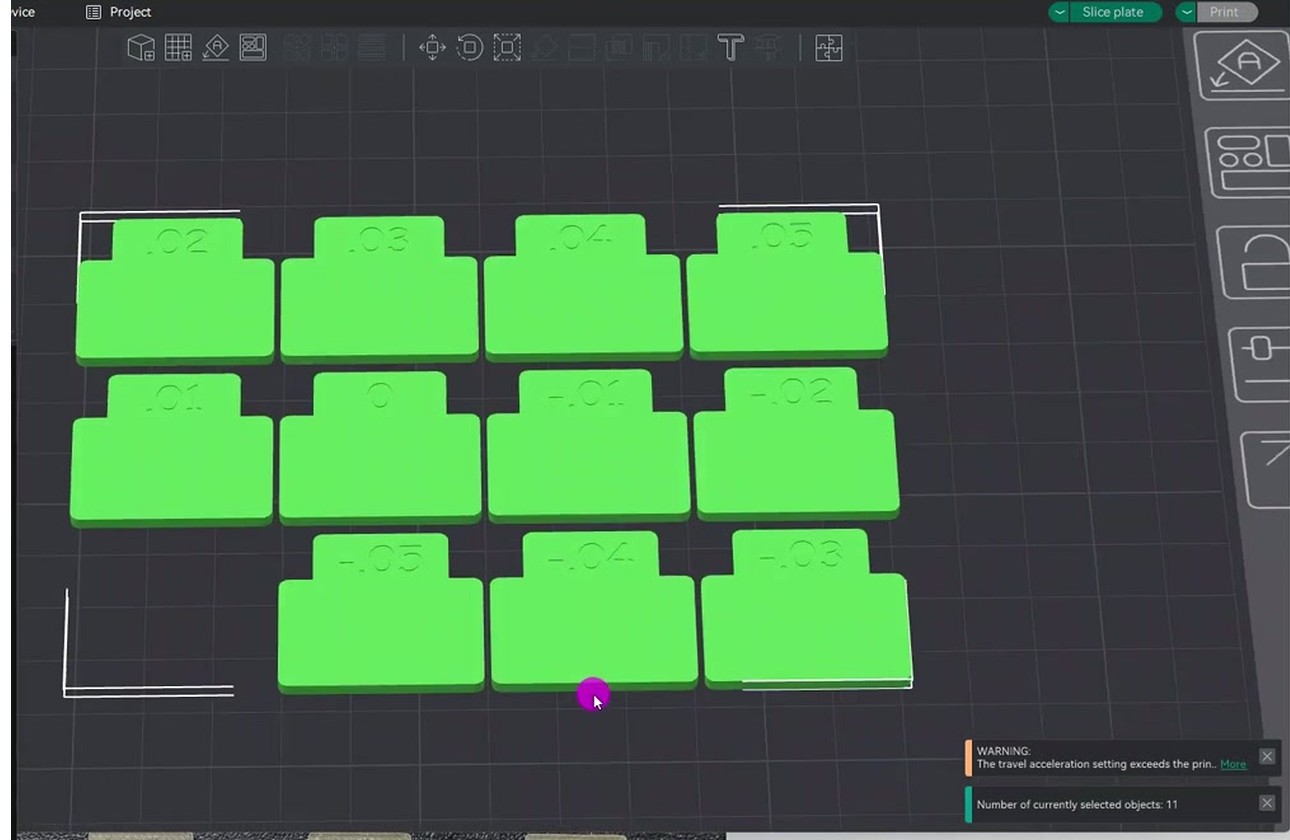
Whatever modifier that block is labeled with, that’s your answer. Add it to your current flow ratio, save in Filament Settings. First time I ran YOLO Recommended on a new spool of Bambu PETG-HF on an X1C, the +0.01 block won. Old flow ratio 0.95, new flow ratio 0.96. Forum threads at forum.bambulab.com show a bunch of users landing in that same 0.94 to 0.96 range.
One catch: YOLO assumes you’re already close. If your starting flow ratio is off by 8 or 10 percent (new printer, untested filament), the +/- 5% range won’t catch the right value. If every block looks bad, run Pass 1 first to get into range, then YOLO to dial in.
2-Pass legacy walkthrough
The legacy method existed before YOLO and is still in the Calibration menu. Two prints instead of one: coarse first pass, finer second pass.
Pass 1 generates 9 blocks, with modifiers spanning roughly -20 to +20 in 5-point increments. The exact spread varies slightly between OrcaSlicer versions, verify against your build before trusting labels. This is a coarse sweep meant to find the rough zone if your starting flow ratio is off by a lot.
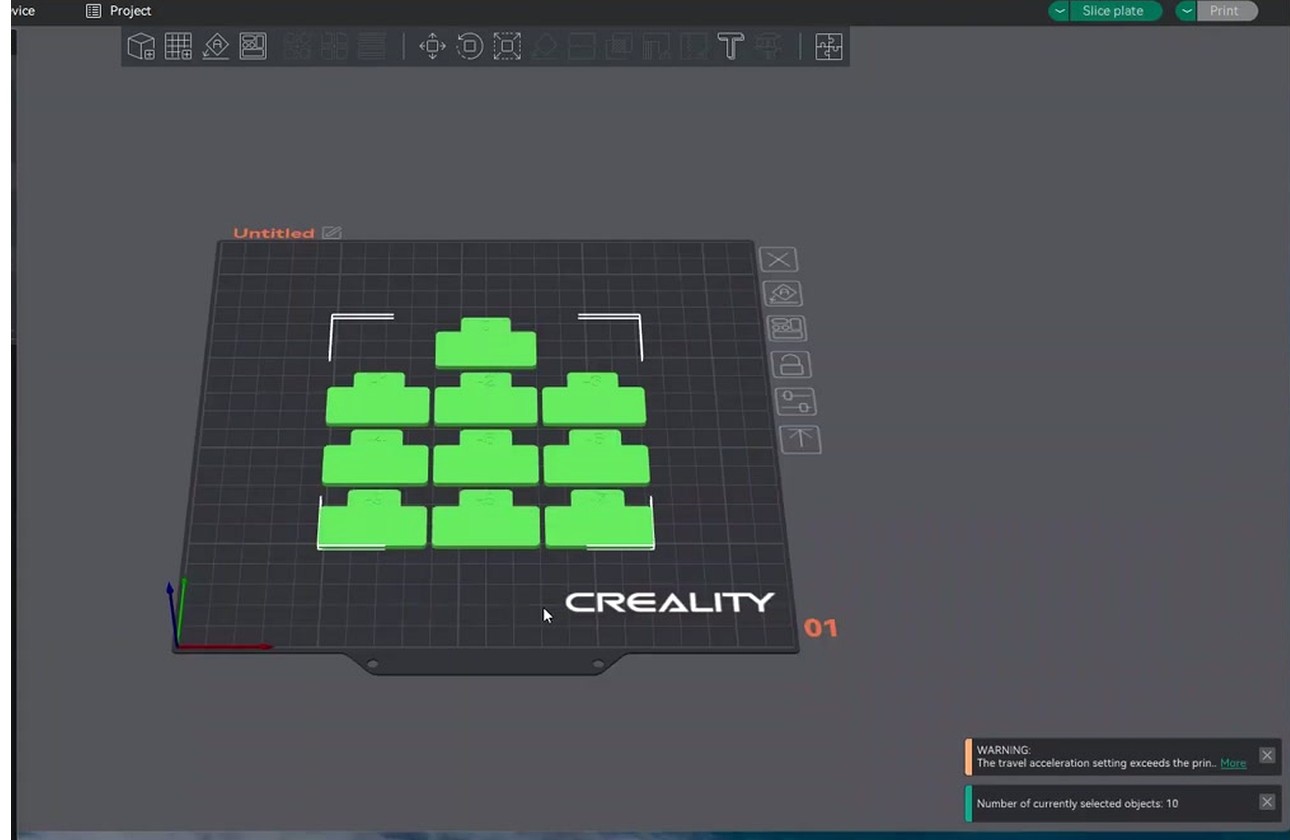
Pass 2 generates 10 blocks with modifiers from -9 to 0 in 1% steps. Note the asymmetry: Pass 2 only refines downward. The thinking was that Pass 1 would land you slightly high (better to over-extrude during the coarse sweep so the top surface reads clearly), and Pass 2 would refine down. In practice, sometimes Pass 1’s winner is already too low and Pass 2 has nothing useful to offer, which is one reason YOLO was invented.
Math for both passes is multiplicative: NewFlowRatio = OldFlowRatio * (100 + modifier) / 100. Pass 1 starts at 0.98, -5 block wins, new ratio is 0.98 * 0.95 = 0.931. Run Pass 2 starting from 0.931, -3 block wins, final ratio is 0.931 * 0.97 = 0.90307, round to 0.903.
This is where rounding errors compound. Each multiplication introduces a tiny error, chaining Pass 1 into Pass 2 stacks two of them. YOLO’s additive math sidesteps this. Not huge in absolute terms (third decimal place), but one more reason most users moved to YOLO.
The full 2-Pass workflow:
- Calibration -> Flow Rate -> Pass 1.
- Confirm starting flow ratio in the dialog.
- Slice and print the 9-block plate. Disable Bambu on-printer Flow calibration in the print prep dialog if you’re on a Bambu.
- Inspect, pick best block, read modifier.
- Compute new flow ratio with the multiplicative formula, save in filament profile.
- Calibration -> Flow Rate -> Pass 2.
- Slice, print the 10-block plate, inspect, pick best, compute again, save the final value.

Honestly I haven’t run a full 2-Pass in months. YOLO is faster, math is cleaner, results on a known-good printer match within rounding. For a brand-new build, though, Pass 1’s wider sweep is still the right tool.
When YOLO wins, when 2-Pass wins
Simple decision framework:
Use YOLO when: recalibrating a filament you’ve used before, batch-testing multiple filaments, hardware is settled (no recent extruder/hotend/nozzle changes), recalibrating after a temperature shift under 10C, or you trust your current flow ratio is within +/- 5% of correct.
Use 2-Pass when: brand-new printer, brand-new filament type (especially exotics like PA-CF or glow), after a major hardware change, after first-time e-step or rotation_distance calibration, or YOLO ran and every block looked bad (starting point is too far off for YOLO’s narrow range).
The Bambu wiki suggests skipping flow cal on stock Bambu profiles since they’re factory-tuned. My results say stock gets you 80% there, YOLO gets the last 20%. Worth 18 minutes.
Per-material defaults and what to expect
Starting points and post-calibration ranges from stock OrcaSlicer profiles and forum reports. Verify in your install since exact stock values shift between releases. Also: a “good” flow ratio for one spool can be wrong for another of the same brand, especially with cheap filament where diameter tolerance is loose.
| Material | Default flow ratio (stock) | Typical post-cal range | Common pitfalls |
|---|---|---|---|
| PLA generic | 0.98 | 0.94 – 1.00 | Translucent or sparkle PLA hides ridges, use raking light from a low angle |
| PLA Bambu Basic | 0.98 | 0.96 – 0.99 | Bambu auto-cal fights OrcaSlicer test, disable on-printer flow cal in prep dialog |
| PETG generic | 0.95 | 0.90 – 0.96 | Stringing on top makes “best square” judgment hard, dry filament first |
| PETG Bambu HF | 0.95 | 0.93 – 0.97 | Forum threads show X1C users landing 0.94 to 0.96 |
| ABS / ABS+ | 0.98 | 0.95 – 1.00 | Print in enclosure or warping ruins the top surface signal |
| ASA | 0.98 | 0.95 – 1.00 | Same as ABS, also dry-sensitive, store with desiccant |
| TPU 95A | 1.00 | 0.95 – 1.05 | Calipers compress walls, perimeter method unreliable, use top-surface only |
| PC (Polycarbonate) | 0.98 | 0.96 – 1.02 | Needs hot chamber, top surface looks frosted normally even when calibrated |
| PA (Nylon) | 0.97 | 0.94 – 1.00 | Hygroscopic, dry to under 0.1% moisture or your results lie |
| PA-CF | 0.94 | 0.90 – 0.98 | Nozzle wear changes flow, recheck monthly with abrasive material |
| ABS-CF | 0.95 | 0.92 – 0.98 | Same nozzle wear concern as PA-CF |
| PETG-CF | 0.95 | 0.92 – 0.98 | Hardened nozzle mandatory or your cal will drift weekly |
Pattern in the data: most materials calibrate slightly low (under 1.0) since stock profiles bias toward 0.98-1.0 for safety. PETG is the most consistent under-extruder at around 0.94-0.95. Carbon-fiber materials need the lowest flow.
Once you’ve got the number, save it in OrcaSlicer’s filament settings on the specific filament profile, not a generic. Make a custom profile for that brand and color, you’ll thank yourself in three months.
Per-printer notes
Bambu A1 / A1 mini: The A1 uses an eddy current sensor on the toolhead, mostly for pressure advance, not static flow ratio. OrcaSlicer’s flow cal works normally. Critical step: in the print prep dialog, uncheck “Flow calibration” or the on-printer cal will overwrite your test. Also watch for issue #12260, where YOLO top-surface flow values appear stuck at 1 on macOS Tahoe with A1.
Bambu P1S / P1P: No on-printer flow calibration at all. OrcaSlicer’s cal is the only game in town. Most reports settle around 0.96 to 0.98 for stock PLA Basic.
Bambu X1C / X1E: Lidar-based on-printer flow cal. Same advice as A1, disable in print prep. Forum threads show X1C PETG-HF users converging on 0.94 to 0.96 after YOLO Recommended.
Creality K1 / K1 Max / K1C: Run extruder rotation_distance calibration first. M83 to relative extrusion, extrude 100mm, measure, recompute. After rotation_distance is locked in within 1%, OrcaSlicer flow cal works normally. Default Orca K1 profile flow ratio is 0.98.
Prusa MK4 / MK4S / Core One: PrusaSlicer’s “extrusion multiplier” and OrcaSlicer’s “flow ratio” are the same number, default 1.0. The MK4’s input shaper sometimes makes the flow cal print look slightly weird (waves where there shouldn’t be), that’s a resonance signature, not flow. Print at lower speed if you want a cleaner signal.
Voron 2.4 / Trident / 0.2: Klipper. Calibrate rotation_distance first, then flow ratio. The Voron community traditionally uses Ellis Print Tuning Guide methodology, YOLO converges to the same answer. Worth running both on a fresh build as a sanity check.
Ender 3 series (V2, S1, Neo): Bowden V2 needs e-step calibration first or your flow ratio will be wildly off. M503 to read, M92 E_value to set, M500 to save. Direct-drive S1 / Neo are usually within 1% from factory and you can go straight to Pass 1 + Pass 2. YOLO works on Ender 3 if you’ve already calibrated once.
Common mistakes
I’ve made most of these. Ones that come up over and over on the GitHub issues, Bambu forum, and r/3Dprinting:
- Doing flow before temperature. Flow ratio shifts with temp. Run a temperature tower first, lock in temp, then flow.
- Doing flow before calibrating extruder steps. Marlin M92, Klipper rotation_distance. If hardware is pushing 10% wrong, no slicer setting saves dimensional accuracy.
- Stacking adjustments. Flow ratio and extrusion multiplier are the same setting. Don’t set flow 0.95 in OrcaSlicer plus M221 S95 in start gcode, you’re now at 0.9025.
- Top-surface method on stringy filament. PETG fluff hides gaps. Dry the filament (50C, 6 hours minimum) or use the perimeter wall method.
- Wrong fan settings. 100% cooling on PLA freezes the top surface before adjacent lines fuse, faking under-extrusion. Use normal fan, not max.
- Calipers placed wrong. Measure on flat sides, not corners or seam. Average 6+ points. Light pressure.
- Worn nozzle. A 0.4mm worn to 0.45mm reads as over-extrusion regardless of flow. Replace if you’ve run 500g+ of CF material through it.
- Skipping Pass 2 after Pass 1. Pass 1 alone gets you within 5%. That’s not calibrated, that’s “less wrong.”
- Not disabling Bambu on-printer flow cal. X1C lidar sees the test, decides flow is off, overwrites your test result. Print prep: uncheck Flow calibration.
- Using YOLO on a brand-new setup. YOLO assumes +/- 5%. New printer plus unknown filament equals Pass 1 first.
- Saving in the wrong place. The cal result dialog applies to the current project. Save into the filament profile manually or it dies when the project closes.
- Calibrating wet filament. Bubbles cause inconsistent extrusion that swamps 1% differences between blocks. Dry first.
If prints still look wrong after a clean flow cal, the problem isn’t usually flow. My OrcaSlicer troubleshooting guide covers what to chase next.
Known bugs to watch for
OrcaSlicer’s flow rate calibration is mature but not bug-free. Three issues worth knowing:
Issue #11275, “YOLO only prints two layers with different rates.” Reported against build 21cfc7e (2.3.2-dev). Layers 1 and 6 vary their flow ratio, layers between them print uniform. Since the YOLO test is 2mm thick with 5 top layers, your top surface signal is partly contaminated. If you’re on a dev build, verify bug status before relying on YOLO.
Issue #12260, “YOLO appears to set all Top Surfaces flow values to 1.” Open bug in 2.3.1 specifically on macOS Tahoe with Bambu A1. Top-surface flow ratio doesn’t vary across YOLO blocks, so visual comparison is meaningless. If every block looks identical on that stack, this is probably why. Use the perimeter wall method until it’s patched.
Issue #9261, “Flow Calibration Tests docs set wrong flow ratio.” Closed, but the gotcha lingers. The cal tool wrote results to print_flow_ratio while docs told users to set filament_flow_ratio. They get multiplied at slice time, and Orca’s speed-capping treats them differently. Marked closed, but if you copied a profile from someone who hit this, check the Flow ratio field manually.
None of these are dealbreakers. Worth knowing exists so you don’t waste an afternoon thinking your printer is broken when it’s a known issue with a tracking number.
After flow rate, what to calibrate next
Once flow ratio is locked in, the next two things to chase depend on what your prints are doing wrong.
If corners look soft or you see bulging on direction changes, run a pressure advance test. PA controls pressure buildup in the nozzle as the head accelerates. Klipper users know it as SET_PRESSURE_ADVANCE, Marlin’s equivalent is Linear Advance.
If you’ve got stringing between travel moves, run a retraction tower. Flow ratio and retraction interact: an over-extruded print strings more because there’s extra molten plastic at the nozzle tip. Flow first means your retraction test isn’t fighting an unrelated problem.
The OrcaSlicer calibration master guide walks through the whole order: temp, flow, PA, max volumetric speed, retraction, tolerance. Each builds on the previous. Skipping flow means everything downstream is calibrated on a wrong baseline.
Frequently asked questions
What is the default flow ratio in OrcaSlicer?
1.0 for most generic profiles. Bambu-tuned profiles ship at 0.98. The useful real-world range after calibration is 0.95 to 1.05, with most well-behaved filaments landing 0.94 to 1.00.
What does YOLO mode do in OrcaSlicer?
YOLO (PR #6479, August 2024) runs 11 test blocks in a single print at 1% increments. Math is additive: NewFlowRatio = OldFlowRatio + selected_modifier. Recommended path if your starting flow ratio is already within +/- 5% of correct.
What’s the difference between Pass 1 and Pass 2?
Pass 1 prints 9 blocks across a wide range (roughly -20% to +20% in 5% steps). Pass 2 prints 10 blocks at fine 1% steps with modifiers from -9 to 0, refining downward only. Both use multiplicative math: NewFlowRatio = OldFlowRatio * (100 + modifier) / 100.
Should I use YOLO or 2-Pass?
YOLO for recalibrating a known filament on a settled printer. 2-Pass for brand-new printers, new filament types, or after major hardware changes where your starting ratio could be off by more than 5%.
Why do all my flow rate test squares look the same?
Three causes. Lighting: you need raking light from a low angle. Bug #12260: YOLO doesn’t vary flow on top surfaces on Bambu A1 macOS. Or your starting flow ratio is already so close that 1% differences are below visual discrimination, in which case you’re calibrated.
Do I need to calibrate flow on a Bambu A1 or X1C?
Not strictly required for stock Bambu filaments since OEM profiles are factory-tuned, but you’ll pick up 1-3% accuracy with a YOLO run. Critical: disable on-printer Flow calibration in the print prep dialog.
Is OrcaSlicer flow ratio the same as PrusaSlicer extrusion multiplier?
Yes, identical setting under different names. Cura calls it “flow %” (percentage instead of decimal). Marlin runtime is M221. Flow ratio 0.97 in Orca equals extrusion multiplier 0.97 in PrusaSlicer equals 97% flow in Cura.
Does flow rate change with temperature?
Slightly. Hotter plastic flows more freely. Rule of thumb: if you change nozzle temperature by more than 10C from your cal point, recheck flow. Inside +/- 10C, the difference is below human visual discrimination.
How often should I recalibrate flow ratio?
Once per filament brand and color. Once after any nozzle change. Monthly if you’re printing carbon-fiber filaments (nozzle wear shifts flow). Otherwise it’s a stable number for a given setup.
What flow ratio should PETG be in OrcaSlicer?
Stock generic PETG ships at 0.95. Most users land between 0.90 and 0.96 after cal. Bambu PETG-HF on X1C converges on 0.94 to 0.96 per forum reports. Always calibrate per spool, PETG diameter tolerance varies more than PLA.
Can I use OrcaSlicer flow calibration on Creality K1?
Yes. Run rotation_distance calibration in Klipper first, then OrcaSlicer flow cal. Default Orca K1 profile flow ratio is 0.98.
Flow rate calibration is where the gap between “approximately right” and “actually calibrated” shows up. Top surfaces, dimensional accuracy, retraction behavior, all of it. YOLO makes the process faster, but the math (additive vs multiplicative, additive wins) and the open bugs (#11275, #12260, #9261) are worth understanding. Calibrate once per spool, save in the filament profile, don’t change temperature without recalibrating. After that, work through the rest of the calibration master guide or grab the latest build from the downloads page if you’re not on 2.3.x or newer.
Related OrcaSlicer guides
- The Complete OrcaSlicer Calibration Guide (Order Matters)
- OrcaSlicer Retraction Test: Solving Stringing in 30 Minutes
- OrcaSlicer Input Shaper Calibration for Klipper (2026 Guide)
- OrcaSlicer Max Volumetric Speed Test: Find Your Hot End Limit (2026)
- Elephant Foot in OrcaSlicer: Compensation Done Right (2026 Guide)