
I lost three prints in a row to PC before I figured out the problem wasn’t my settings, it was my filament sitting open on a shelf for two weeks. The fourth one, after a proper 8-hour dry cycle at 80C and a chamber held near 55C, came off the plate clean, matte-black, and tough enough that I couldn’t snap it across my knee. That’s the polycarbonate experience in a sentence: it punishes laziness and rewards process, and once you’ve dialed it in inside OrcaSlicer it’ll print parts that genuinely outlast anything you’ve made in PLA or PETG.
This guide walks through every setting that matters for PC in OrcaSlicer in 2026, based on the actual values shipped in OrcaSlicer’s source profiles (verified against the BBL fdm_filament_pc.json on the main branch) and cross-referenced with vendor data sheets from Bambu, Polymaker, and Prusa. I’ll show you what works, what fails, and where the bundled profiles are too optimistic for your machine. I’m assuming you’re running OrcaSlicer 2.x on a printer that can actually handle PC, and if you’re not sure whether yours qualifies, there’s an honest list of suited and not-suited machines below.
Table of contents
- What polycarbonate is and why it earns the hassle
- Is your printer actually suited for PC?
- Build plate and bed adhesion
- Drying PC: not optional
- What ships in OrcaSlicer for PC
- Verified defaults from the source profiles
- Recommended starting settings
- Slicing and sending a PC print in Orca
- Calibrating PC in OrcaSlicer
- PC-CF and PC-GF variants
- Failure modes and fixes
- PC vs the alternatives
- Printer-specific notes
- Wrap-up
What polycarbonate is and why it earns the hassle
Polycarbonate is an amorphous thermoplastic built from bisphenol-A (BPA) carbonate ester chains. The amorphous structure is what makes it so impact-resistant: instead of cleaving along crystal planes the way nylon or PLA can, the chains absorb energy and yield. Three numbers matter when you’re slicing it.
- Glass transition (Tg): about 145 to 150C for neat PC. Polymaker quotes 150C for PolyMax PC, 3DXTech quotes 147C for CarbonX PC+CF, and OrcaSlicer’s BBL base profile uses a conservative
temperature_vitrificationof 120C. The Tg matters because it’s the rough ceiling for what your part can do before it goes soft. - Heat deflection temperature (HDT): roughly 115 to 130C depending on filler and load. Compare that to PLA at about 55C and you can see why people use PC for parts that live near motors, in sunny cars, or anywhere hot air collects.
- Notched Izod impact: Polymaker publishes 65 kJ/m² for PolyMax PC. Bambu’s
@baseprofile records animpact_strength_zof 9.0 kJ/m² for Z. ABS sits around 20 to 25 kJ/m² unnotched and shatters at -20C. PC stays tough even cold.
What PC is actually good for: drone arms, RC parts, motor mounts, tool handles, jigs, automotive interior brackets, anything that has to take repeated impact or live somewhere hot. What it’s bad for: anything cosmetic (it tends to dull and yellow under UV), anything with critical surface finish, and anything you need fast or cheap.
The downside that lives in every PC print: because PC is amorphous, it shrinks more or less linearly across the entire glass transition range as it cools. That continuous shrinkage is exactly why corners pop off the plate, why mid-print layer cracks sound like a gunshot, and why the brim tears the skin off your bed if you’re not careful. The cure is to slow that cooling down, which is what the enclosure is for. We’ll come back to that.
Is your printer actually suited for PC?
I want to get this out of the way before anyone wastes a spool. PC needs three things from your printer: a hot end that can sit at 280C for hours without a soft throat, a heated bed that holds 100 to 110C, and a chamber that stays warm enough to keep the print from cooling unevenly. If any of those three is missing, you’re going to fail prints.
Here’s Bambu’s own compatibility table for PC across the X1C, P1S, A1, and AMS combinations:
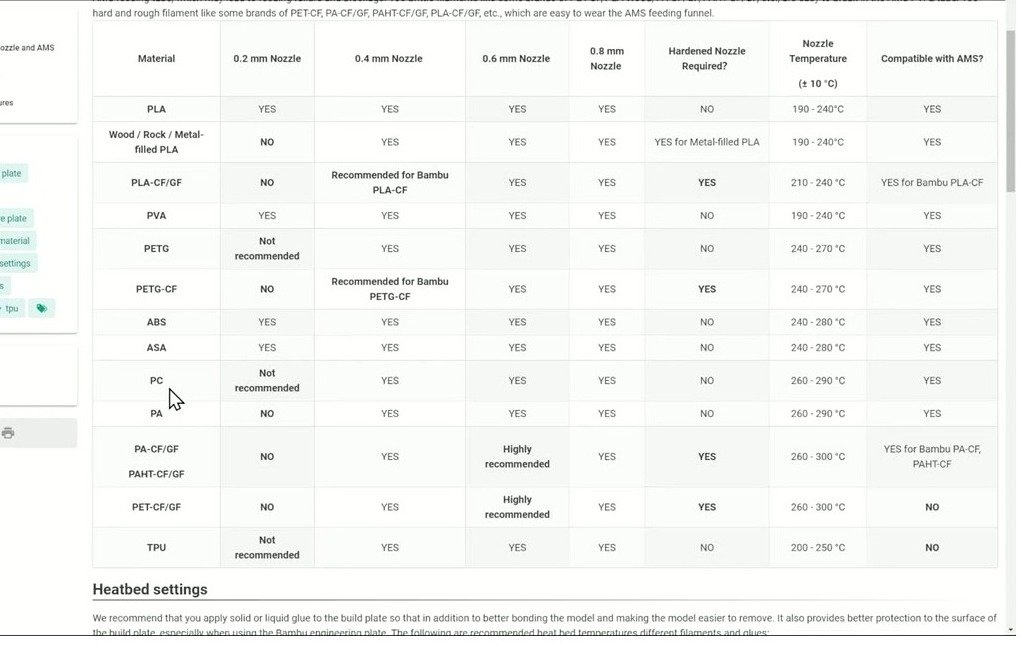
Notice that Bambu’s nozzle range for their own PC is 260 to 290C, which lines up exactly with the nozzle_temperature_range_low/high values in fdm_filament_pc.json. Notice also that PC is rated for 0.4, 0.6, and 0.8mm nozzles, but with a stainless or hardened insert. Brass works for neat PC, but you do not want to feed PC-CF through a brass nozzle for more than a few hundred grams.
Suited machines (honest list)
| Printer | Enclosure | Chamber strategy | Notes |
|---|---|---|---|
| Bambu X1C | Passive | Reaches 45 to 55C with bed at 110C | Workhorse for hobbyist PC. AMS works. |
| Bambu X1E | Active heater | 60C set point default | Purpose-built for engineering filaments. |
| Bambu P1S | Passive | Similar to X1C, slightly cooler | OK for small/medium parts. Big tall PC is borderline. |
| Bambu H2D, H2S, P2S | Passive | Similar envelope to X1C | Turn off aux fans for PC. |
| Qidi X-Plus 3, X-Max 3, Plus 4 | Active heater | Up to 65C | Strongest non-Bambu option for PC. |
| Voron 2.4 / Trident | Full panels + heater or Nevermore | 50 to 70C achievable | Excellent if you’ve already done the chamber work. |
| Prusa CORE One | Passive enclosure | Reaches 40 to 45C | Decent for PC-CF, marginal for neat PC. |
| Creality K1C / K2 Plus | Passive | 40 to 50C | Works for small parts. Stock hot end is rated. |
Not suited (the honest answer is: don’t)
If you’re on an Ender 3, an Anycubic Kobra 2 or 3, an Elegoo Neptune 4, a stock Bambu A1 or A1 mini, a Prusa MK4S or MK3S+ without the enclosure, or a stock Bambu P1P, you will not get reliable PC results. The bed slingers especially are a no-go: PC needs a still warm chamber, and a Y-axis bed flinging around generates a thermal turbulence that wrecks layer adhesion. The honest recommendation is to use PETG-CF, PETG-HF, or Polymaker’s PolyMax PC-FR (which has a much lower shrinkage rate than neat PC) instead. Or, if you’ve got a P1P, fit the official side panels and you’ve basically got a P1S, and you can come back to this guide.
Hot end and nozzle requirements
All-metal hot end, rated for 300C continuous. PTFE-lined throats melt at PC temperatures, and once they melt they wick filament backward and clog. For neat PC, a brass nozzle is fine short-term but a plated copper or hardened steel nozzle is the safer call. For PC-CF and PC-GF (and any reinforced PC), hardened steel, ruby, or tungsten carbide is mandatory. I’ve watched a brass nozzle round out from a sharp 0.4 to a sloppy 0.45 in under 800g of PC-CF, and the print quality drops well before that.
High-flow hot ends (Bambu’s CHT clone, E3D Revo HF, Phaetus Rapido HF) help PC because the longer melt zone lets you push more material at a lower nozzle temperature, which cuts down on oozing and stringing. The full Bambu X1C and P1S OrcaSlicer setup guide covers the X1C and P1S thermal envelopes in more detail.
Build plate and bed adhesion
Bambu’s heatbed temperature table makes the bed strategy easy: PC sits at 100 to 120C with a glue stick or PVP-based adhesion aid.
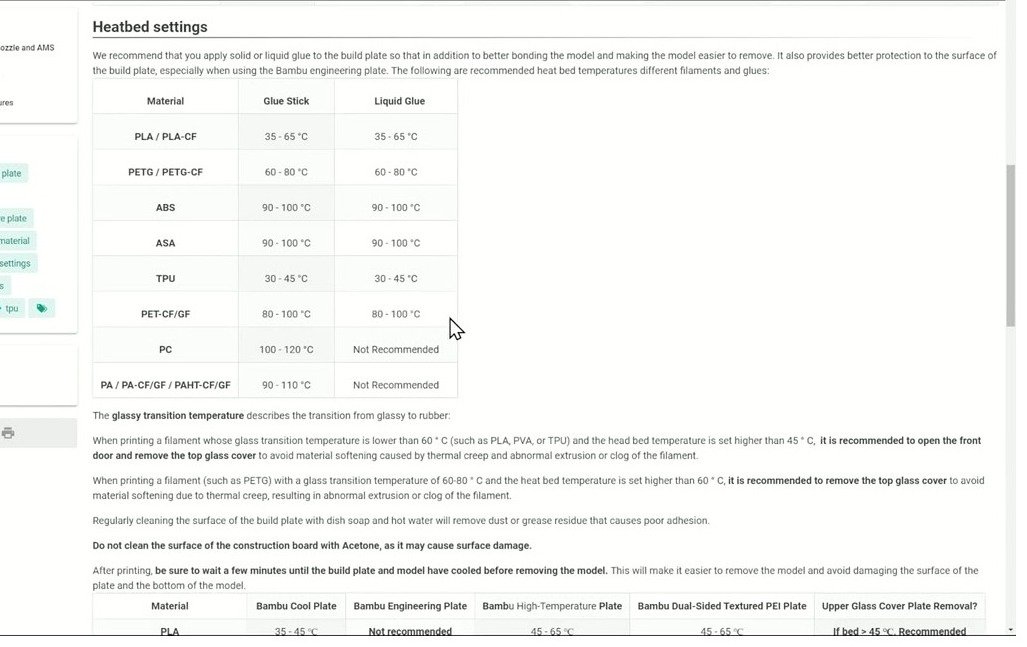
The OrcaSlicer BBL base profile sets hot_plate_temp, hot_plate_temp_initial_layer, eng_plate_temp, and textured_plate_temp all to 110C, with cool_plate_temp and supertack_plate_temp disabled (0). That tells you everything you need to know: PC wants the engineering plate or the textured PEI plate, period. Cool plate isn’t rated for 110C and Super Tack doesn’t survive the temperature either.
- Bambu Engineering Plate: the go-to. A thin smear of glue stick (Bambu’s own, or a generic Elmer’s, or Magigoo PC) and PC sticks like it’s bolted on. Cools down before you try to release the part.
- Textured PEI: works without adhesive if it’s clean, but Magigoo PC makes the experience much more forgiving on tall or thin-walled parts.
- Garolite (G10/FR4): a community favourite for PC and nylon. Almost zero warp because Garolite stays dimensionally stable at 120C. Downside: you can’t easily swap to other materials.
- Smooth PEI: works for small parts only. Anything taller than a credit card warps off.
Brim strategy: PC essentially requires a brim. Set 5 to 10mm in OrcaSlicer’s Other tab, and use mouse-ear brims on the corners of rectangular parts. The Orca community rule is “always brim” for PC, and I think it’s the right call. The first layer height should be 0.24mm on a 0.4 nozzle (thicker than your default 0.20 for more wall contact), and first layer line width at 110% gives you the extra squish that PC needs to commit to the plate.
Drying PC: not optional
I’ve made every drying mistake. I’ve printed a spool that had been open on a shelf for two weeks, got a part that looked like it had been pulled from a swamp, and told myself “next time.” I’ve also opened a sealed bag, printed three perfect parts, then come back a week later, printed the fourth, and watched it foam. PC absorbs water fast. Polymaker’s wiki specifies drying at 70 to 80C for 6 to 8 hours. Bambu’s filament drying recommendation table says 80C for 8 hours. Prusa’s knowledge base says 80 to 90C for 6 to 12 hours.
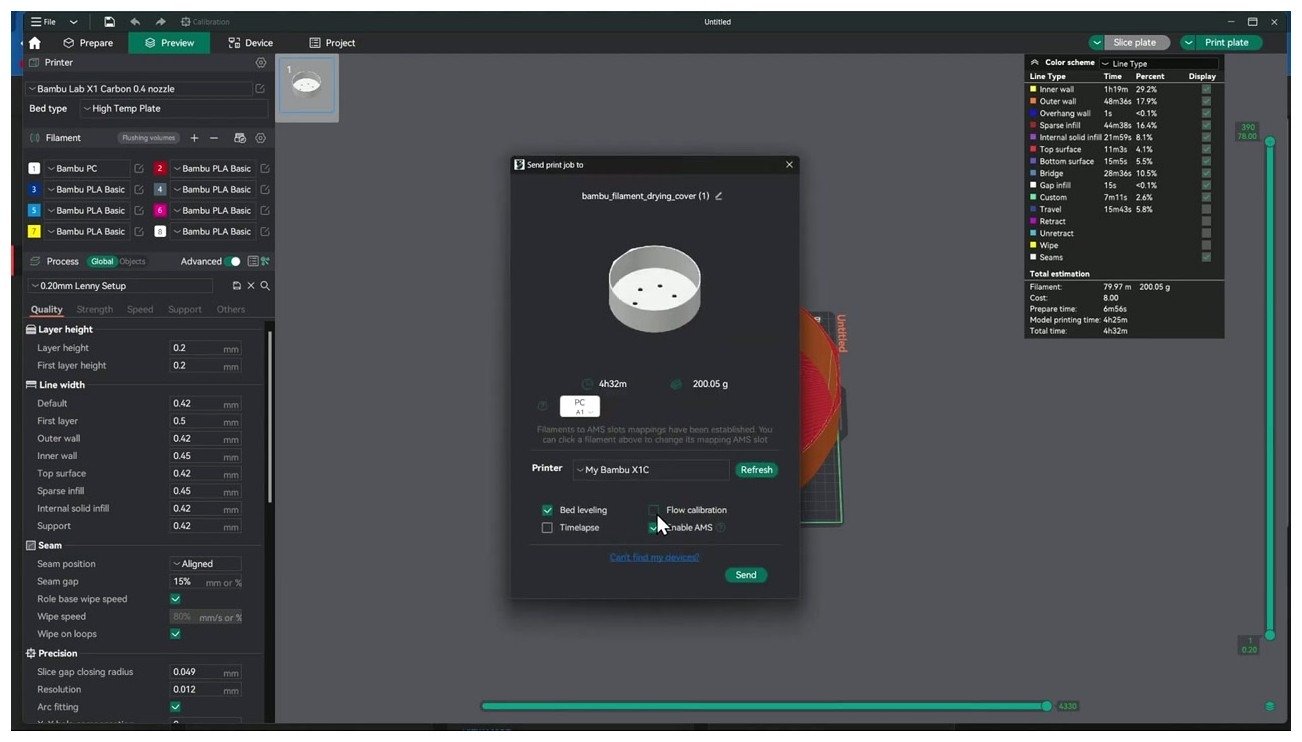
Take the community consensus: 80C for 8 hours, then keep the spool in a dry box or a sealed bag with desiccant. If you’re using a Bambu AMS HT or an X1E that can dry while feeding, you can run that 80C dry cycle in the background while you sleep. OrcaSlicer’s send-print dialog will show the dryer cover graphic when the AMS HT is configured, which is a nice visual confirmation.
| Source | Temperature | Duration |
|---|---|---|
| Polymaker wiki (PC) | 70 to 80C | 6 to 8 hours |
| Polymaker PolyMax PC TDS V5.4 | 70 to 80C | 6 to 8 hours |
| Polymaker PolyLite PC product page | 75C | 12 hours (if moisture-loaded) |
| Bambu Lab drying table | 80C | 8 hours |
| Prusa knowledge base | 80 to 90C | 6 to 12 hours |
| Practical default | 80C | 8 hours |
An Eibos Polyphemus, Sunlu S4, or Polymaker PolyDryer will hold 80C reliably. A consumer oven will work but most overshoot at the low end of the dial, and 95 to 100C will deform the spool flange. Use a separate oven thermometer if you go the oven route. Storage after drying matters too: PC re-absorbs moisture within hours at 50% humidity. Vacuum bag, sealed dry box with active desiccant, or an AMS HT with the dry cycle on standby. Wet PC isn’t just printing badly; the carbonate ester linkage hydrolyses with moisture and heat, which actually breaks the polymer chain. Wet PC sitting around isn’t just hard to print, it’s degrading.
What ships in OrcaSlicer for PC
OrcaSlicer 2.x bundles a fairly complete set of PC profiles. The hierarchy is:
- Generic / fallback: Generic PC per printer per nozzle size. Inherits from Generic PC
@base, which inherits fromfdm_filament_pc. Generic PCTG is a separate material (not covered here). - Bambu Lab: Bambu PC
@BBLfor X1C, X1E, P1S, P2S, H2D, H2DP, H2S, X2D, and A1 (with 0.2, 0.6, and 0.8mm nozzle variants for each printer). There’s also Bambu PC FR (flame-retardant) across the same printer set. - Prusa: Prusament PC Blend and Prusament PC-CF for CORE One, MK4S, and XL (single and 5-tool).
- Anker, Anycubic, Artillery: their own Generic PC profiles inheriting from the same family base.
- Polymaker PolyMax PC and PolyLite PC: not bundled. As of 2026-05-13, the Polymaker subfolder in OrcaSlicer’s profiles ships Fiberon CF and GF nylons (PA6-CF, PA6-GF, PA12-CF, PA612-CF, PET-CF) plus PolyLite PLA/PETG/ASA/ABS, but no PolyMax PC or PolyLite PC. If you want a Polymaker PC profile, you’ll need to clone Generic PC and dial it in from the Polymaker TDS. I’ll show the specific overrides below.
The reason this profile inheritance matters is that every Bambu and Generic PC profile inherits the same temperature, fan, and bed values from fdm_filament_pc.json. The differences between, say, “Bambu PC @BBL X1C” and “Generic PC @BBL X1C” are the flow ratio (0.94 for both), the MVS cap (18 vs 16), and the cost field. Everything else flows up from the base.
If you want a deeper walkthrough of how OrcaSlicer’s filament inheritance works, the parent guide on OrcaSlicer filament settings covers the system end to end.
Verified defaults from the source profiles
These are the values I pulled from the OrcaSlicer GitHub source on 2026-05-13. They’re the starting point for every PC variant in the slicer.
| Setting | fdm_filament_pc (base) | Bambu PC @BBL X1C | Generic PC @base | Prusament PC-CF @CORE One |
|---|---|---|---|---|
| filament_type | PC | PC | PC | PC-CF |
| nozzle_temperature (main) | 280C | 280C | 280C | 285C |
| nozzle_temperature_initial_layer | 270C | 270C | 270C | 285C |
| nozzle_temperature_range_low | 260C | 260C | 260C | 275C |
| nozzle_temperature_range_high | 290C | 290C | 290C | 295C |
| hot_plate_temp | 110C | 110C | 110C | 115C |
| hot_plate_temp_initial_layer | 110C | 110C | 110C | 110C |
| eng_plate_temp | 110C | 110C | 110C | 115C |
| textured_plate_temp | 110C | 110C | 110C | 115C |
| cool_plate_temp | 0 (disabled) | 0 | 0 | 0 |
| temperature_vitrification | 120C | 120C | 120C | 120C |
| fan_min_speed | 10% | 10% | 10% | 15% |
| fan_max_speed | 60% | 40% | 60% | 30% |
| overhang_fan_speed | 60% | 60% | 60% | 60% |
| overhang_fan_threshold | 25% | 25% | 25% | 25% |
| fan_cooling_layer_time | 30 s | 30 s | 30 s | 30 s |
| slow_down_min_speed | 20 mm/s | 20 | 20 | 20 |
| filament_density | 1.04 g/cm³ | 1.04 | 1.04 | 1.22 |
| filament_max_volumetric_speed | 18 mm³/s | 18 | 16 | 9 |
| filament_flow_ratio | 1.0 | 0.94 | 0.94 | 1.04 |
| chamber_temperature | not set | not set (printer-managed) | not set | 40C |
Two things worth flagging. First, the MVS of 18 in the Bambu X1C profile is optimistic. It’s the upper bound that the high-flow Bambu hot end can hit on a perfect day; you should run an MVS calibration before trusting it. The Generic PC’s 16 mm³/s is a more honest mid-range and Prusament PC-CF’s 9 mm³/s reflects what a 0.4 standard hot end can actually do with chopped fibre. Second, BBL’s base profile doesn’t set a chamber temperature; that’s managed by the printer profile (the X1E will hold 60C, the X1C and P1S are passive and will sit wherever the bed pushes them).
Recommended starting settings
If you’re on a suitable machine (X1C, X1E, P1S, H2D, Qidi Plus 4, Voron with a chamber heater) and you’ve dried your filament, these are the values I’d start with for neat PC. Then run the calibration suite to fine-tune.
| Parameter | Starting value | Why |
|---|---|---|
| Nozzle (main) | 275 to 285C | Orca default 280C is the safe middle of Bambu’s range. Polymaker PolyMax sits a touch cooler at 250 to 270. |
| Nozzle (first layer) | 270C | Matches Orca default. Hot enough to flow, not so hot it sags. |
| Bed (main) | 105 to 110C | 110C is the Orca default. 105 is the floor before adhesion suffers. |
| Bed (first layer) | 110C | Don’t drop below the main bed temp on the first layer. |
| Chamber | 55 to 60C (passive: X1C, P1S, Voron) or 60 to 90C (active: X1E, Qidi Plus 4) | Bambu’s wiki says 60C is the default for PC. Higher = stronger Z bonds, but watch for plastic chamber components on consumer machines. |
| Part cooling fan (min) | 0 to 10% | Orca default is 10%. Polymaker says 0%. Start at 0, only raise it for small overhangs. |
| Part cooling fan (max) | 30 to 40% | The X1C profile caps it at 40%. Anything above splits layers. |
| Overhang fan | 60% above 25% overhang | Matches Orca default; OK because overhangs are localised. |
| MVS (neat PC) | 8 to 12 mm³/s | The 16 to 18 mm³/s in the bundled profiles is the upper bound, not the target. |
| MVS (PC-CF) | 9 to 10 mm³/s | Matches Prusament PC-CF profile. |
| Print speed (walls / infill) | 50 to 100 mm/s | Capped by MVS anyway. |
| Retraction (direct drive) | 0.8mm at 30 mm/s | Matches Bambu’s default. |
| Retraction (Bowden) | 2 to 4mm at 40 to 50 mm/s | Per Polymaker’s indirect-drive guide. |
| Z-hop | 0.2mm | Matches Prusament PC-CF profile. Useful given how readily PC strings. |
| Flow ratio | 0.94 (Bambu/Generic) or 1.04 (Prusament PC-CF) | Run flow rate calibration after a few prints. |
| First layer height | 0.24mm (0.4 nozzle) | Thicker first layer = more wall contact = better grip. |
| First layer line width | 110% | Extra squish helps PC commit. |
| Brim | 5 to 10mm minimum, mouse-ear on corners | “Always brim” is the community rule. |
| Build plate | Engineering / textured PEI / Garolite | Cool plate and Super Tack aren’t rated for 110C bed. |
| Adhesion aid | Magigoo PC, glue stick, or hairspray | Textured PEI alone holds but is easier with help. |
If you’re cloning Generic PC for Polymaker PolyMax PC
Since OrcaSlicer doesn’t ship a Polymaker PolyMax PC profile, the path is: right-click “Generic PC”, duplicate, rename to “PolyMax PC (custom)”, then change:
- Nozzle main: 260 to 270C (Polymaker spec is 250 to 270; 265C is a good start)
- Nozzle first layer: 260C
- Bed: 100C (Polymaker says 90 to 105)
- Fan max: keep at 30 to 40%
- MVS: start at 10 mm³/s then calibrate up
- Flow ratio: keep 0.94, then run flow rate calibration
- Drying note in the description field: 70 to 80C / 6 to 8h per Polymaker TDS V5.4
Slicing and sending a PC print in Orca
The workflow inside OrcaSlicer is the same as any other filament, with two extra steps: picking the right filament slot and confirming the chamber and bed strategy. Here’s the Prepare view with Bambu PC loaded into AMS slot 1, sitting on the X1C engineering plate.
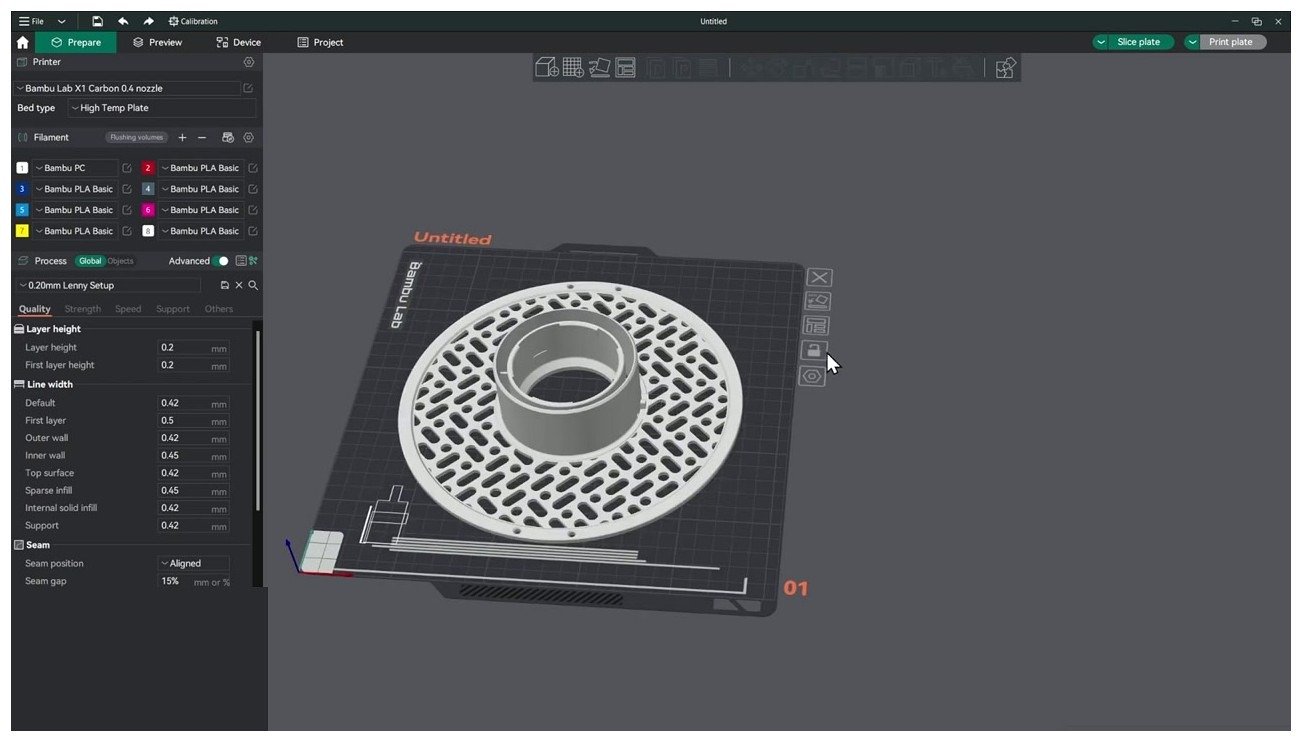
A few things I always check before I hit slice:
- Filament dropdown reads “Bambu PC
@BBL X1C” (or your printer), not “Generic PC@System” if I’m running actual Bambu PC. The flow ratios are identical (0.94) but the MVS cap and the cost field differ. - Printer profile reads “Bambu Lab X1 Carbon 0.4 nozzle hardened steel” if I’m running PC-CF or PC-GF. The standard 0.4 hardened steel/plated copper Bambu nozzle is fine for neat PC but I want OrcaSlicer to know I’m using the right hardware so it caps speed appropriately.
- Process profile is “0.20mm Strength” or a custom variant where I’ve raised wall count to 4 and reduced infill density to 25 to 30%. Strength infill (gyroid or cubic) holds up well in PC; honeycomb works too but slows down the print.
- Brim is on (5 to 10mm, mouse-ear).
- Cooling overrides per layer if I’m printing something with a thin neck or tall overhang.
Then slice it. The Preview view with the line-type colour scheme is where I spot problems. Here’s a 3h18m PC print sliced and previewed in Orca, with the line-type colour scheme showing walls, infill, brim, and overhangs in distinct colours.
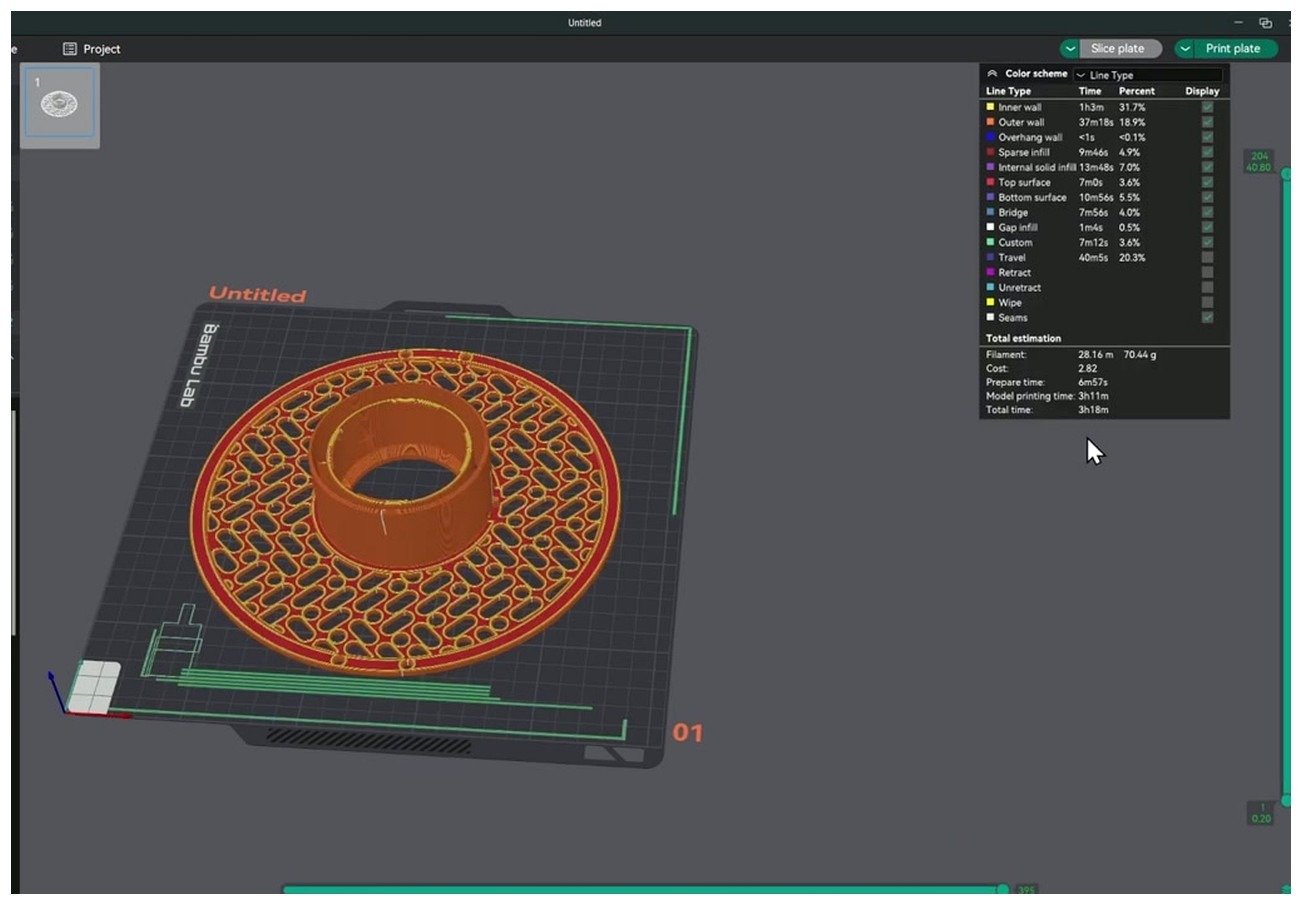
What I’m looking for in Preview: brim continuous around the perimeter, walls (perimeter) lines clean and not crossing themselves, no orphan islands floating in mid-air, overhang regions flagged correctly so the overhang fan actually kicks in. If anything looks off, fix it before you send. Restarting a 3-hour PC print because the brim didn’t generate properly is a bad day.
Calibrating PC in OrcaSlicer
OrcaSlicer’s calibration menu is one of the reasons the slicer is worth using for engineering filaments. PC benefits from all four core calibrations, in this order:
- Temperature tower: sweep 260 to 300C in 5C bands. You’re looking for the band with the cleanest layer lines, no stringing, no over-extrusion blobs, and decent layer adhesion when you scratch it. For neat PC this is usually 275 to 285. Walkthrough: OrcaSlicer temperature tower guide.
- Flow rate calibration: the two-pass test (coarse then fine). Bambu and Generic PC profiles start at 0.94 flow ratio. PolyMax PC tends to sit closer to 0.96 to 0.98 in my experience. Flow rate calibration in OrcaSlicer walks through the exact steps.
- Pressure advance: the line method or the pattern method, depending on whether you’re on Klipper or Marlin/RRF. PC at higher temperatures needs less PA than PETG because the melt is closer to a true liquid. Pressure advance in OrcaSlicer has the full sequence.
- Max volumetric speed: the OrcaSlicer MVS tower. Don’t trust the 18 mm³/s in the bundled profile; measure it yourself. I usually find 12 to 14 mm³/s is the honest sweet spot on an X1C with the stock hot end, more with the CHT.
Run them in that order because each subsequent test depends on the previous one. There’s no point calibrating pressure advance against a wrong nozzle temperature, and there’s no point setting MVS until your flow ratio is honest.
PC-CF and PC-GF variants
PC-CF (about 10 to 20% short carbon fibre) and PC-GF (glass fibre) are where PC gets really interesting for functional parts. The fibre changes the material’s behaviour in three important ways:
- Shrinkage drops by half or more. The fibre acts as a tiny internal rebar, constraining the matrix as it cools. PC-CF parts warp dramatically less than neat PC.
- Stiffness goes up, impact strength goes down. Carbon fibres create stress concentrators, so notched impact strength suffers. The material gets stiffer in tension but more brittle in shock.
- Surface finish goes matte. PC-CF parts have a distinctive grainy, satin black look that hides layer lines well.
| Setting | Neat PC | PC-CF | PC-GF |
|---|---|---|---|
| Nozzle | 275 to 290C | 285 to 305C | 280 to 300C |
| Bed | 105 to 110C | 110 to 115C | 105 to 115C |
| Chamber | 55 to 60C ideal | 40 to 60C (lower because less shrinkage) | 40 to 60C |
| Fan max | 30 to 40% | 15 to 30% | 15 to 30% |
| MVS | 8 to 12 mm³/s | 8 to 10 mm³/s | 8 to 10 mm³/s |
| Nozzle material | brass OK short-term, hardened preferred | hardened steel / ruby / TC mandatory | hardened steel mandatory |
| Flow ratio | 0.94 to 0.96 | 1.02 to 1.04 | 0.98 to 1.00 |
| Density | 1.04 g/cm³ | 1.22 g/cm³ | 1.30 g/cm³ |
| Drying | 80C / 8h | 80C / 8h | 80C / 8h |
Verified data points: Prusament PC-CF on the CORE One ships with 285C nozzle (both initial and main), 115C bed (110 first layer), MVS 9 mm³/s, fan max 30%, chamber 40C, flow ratio 1.04, density 1.22 g/cm³, idle temperature 130C, Z-hop 0.2mm. 3DXTech’s CarbonX PC+CF TDS specifies 260 to 280C extruder, 80 to 120C bed, hardened steel mandatory, Tg 147C. Bambu PC-CF doesn’t have a separate Orca profile in the same way as Prusament’s does, so most Bambu PC-CF users adapt the Bambu PC profile and swap to a hardened nozzle.
For more on running fibre-reinforced filaments in OrcaSlicer (PA-CF, PET-CF, PEEK-CF), the deeper guide is carbon fibre filaments in OrcaSlicer. It covers nozzle replacement frequency, what wear looks like, and how to spot fibre clumping mid-print.
Failure modes and fixes
PC has a small set of recurring failure modes, and almost every fix lands on temperature, chamber, fan, or moisture. Here’s the troubleshooting matrix I keep next to my desk.
| Symptom | Likely cause | Fix |
|---|---|---|
| Corner warping (corner lifts off bed) | Chamber too cool, bed cool, no brim, draft | Close door, raise chamber, raise bed to 115C, add 8mm mouse-ear brim, kill aux fan, glue stick on plate |
| Mid-print crack (audible “pop”, layer split) | Differential cooling, fan too high, chamber dropped | Drop fan to 0% on walls, raise chamber, slow down to 60 mm/s, add brim, reduce infill density |
| Print delaminates / pulls apart by hand | Wet filament + low nozzle temp | Dry 80C / 8h, raise nozzle 10C, check chamber temperature |
| Brittle finished part | Wet filament, hydrolysis damage | Dry filament, store in dry box, anneal print at 90C / 2h to recover impact strength |
| Stringing between travels | High temp + insufficient retraction | Lower nozzle 5 to 10C, raise retract to 1mm DD or 5mm Bowden, enable wipe, slight Z-hop |
| First layer won’t stick | Bed too cool, plate dirty, no adhesion aid, gap too high | Bed 110C, clean with IPA then dish soap, Magigoo PC, lower first layer by 0.02mm |
| Foaming / steam in extrudate | Very wet filament | Stop, dry the spool, do not just keep printing |
| Brim tears the part skin off bed | Brim too aggressive, no mouse ears, smooth plate | Switch to engineering or textured plate, use mouse-ear brim, reduce brim outer width |
| PC-CF clogs nozzle mid-print | Too cold for fibre + low MVS | Raise to 295 to 305C, MVS 9 mm³/s, ensure hardened nozzle, purge before printing |
| Z banding on tall PC parts | Print head dragging, fan oscillating | Z-hop 0.2mm, set fan_min = fan_max to prevent oscillation |
For anything not on this list, the full OrcaSlicer troubleshooting master guide covers the broader symptom set. The two PC-specific patterns I see most on Bambu’s forum are “warping with PC on P1S” (P1S is borderline thermally for tall parts; solution is brim plus engineering plate plus dropping the bed to 105 to slow first-layer shrink) and “polycarbonate warping issue on X1C” (almost always smooth-PEI users; solution is engineering plate or Magigoo PC).
PC vs the alternatives
Honest comparison: PC is the right pick for a narrow set of parts. For most “tough” use cases, you’ve got easier options.
| Material | vs PC | When to choose it instead |
|---|---|---|
| PETG | Lower impact, much easier, no enclosure needed | Anything that doesn’t need PC’s heat resistance. See OrcaSlicer PETG settings. |
| ABS / ASA | Lower HDT than PC (about 95 to 100C), similar enclosure requirement, easier to print, much weaker impact | Cosmetic outdoor parts (ASA), automotive interior under 90C. See OrcaSlicer ABS/ASA settings. |
| Nylon (PA6, PA12) | Higher impact than PC, lower stiffness, more hygroscopic, similar print difficulty | Gears, living hinges, anything that needs to flex and recover. See OrcaSlicer nylon/PA settings. |
| TPU | Completely different use case (flexible parts) | Gaskets, grips, vibration mounts. See OrcaSlicer TPU settings. |
| PLA | Much easier, vastly weaker, low HDT (55C) | Anything cosmetic or non-load-bearing. See OrcaSlicer PLA settings. |
| PC-blend (PolyMax PC-FR, eSun ePC) | Lower shrinkage than neat PC, easier to print, almost as tough | If you want most of PC’s properties without the warping headache. Strong recommendation if you’re on a marginal-enclosure printer like a P1S or a stock CORE One. |
If you’re sitting at the keyboard reading this and thinking “I really want PC’s heat resistance and impact, but I don’t want to fight warping,” buy a PC-blend like PolyMax PC-FR. The flame-retardant additive also drops the shrinkage rate, and the material prints almost like a tough PETG.
Printer-specific notes
Bambu X1C (passive enclosure, AMS)
The default Bambu PC @BBL X1C profile (280C nozzle, 110C bed, MVS 18, fan max 40%) is honestly close to optimal. The two changes I always make: drop MVS to 12 to 14 until I’ve run the calibration tower, and set fan max to 30 to prevent the 40% peak on a thin-walled feature from triggering a layer split. Engineering plate, glue stick, 8mm mouse-ear brim, AMS HT or dry-stored spool. The X1C’s passive enclosure tops out around 50 to 55C with the bed at 110, which is fine for parts under about 150mm tall. For taller parts, the X1E or a Qidi Plus 4 with a chamber heater is more reliable.
Bambu P1S (passive enclosure, no LiDAR)
P1S can print PC, but it’s borderline for big parts. The chamber sits 5 to 10C cooler than the X1C because of slightly less insulation, and the lack of LiDAR means you can’t lean on flow auto-calibration. Same profile as X1C, but drop bed to 105C if you’re getting brim peel, and add 1mm to first-layer line width. Anything taller than about 120mm in PC on a stock P1S, I’d recommend you switch to PolyMax PC-FR or move the print to an X1E.
Bambu X1E (active chamber heater)
X1E is what PC was made for. The 60C chamber default holds rock-steady for the whole print, and the upgraded hot end and motion components let you push MVS higher. Honestly the bundled X1E PC profile is dialed in close to ideal. Run the MVS tower to find your actual ceiling and you’re done.
Qidi X-Max 3 / X-Plus 3 / Plus 4 (active chamber heater)
Qidi’s active chamber heater puts these printers in the same league as the X1E for PC. Default Qidi PC profile in OrcaSlicer (or the Qidi-shipped equivalent) is similar to the BBL base: 275 to 290 nozzle, 100 to 110 bed, fan max 40. The Plus 4’s reinforced motion system handles MVS 14 to 16 mm³/s comfortably. The deeper printer-specific notes live in the Qidi X-series OrcaSlicer setup guide.
Voron 2.4 / Trident (community-built)
Voron with full panels and either a chamber heater or a Nevermore + bed-fan strategy can hit 50 to 70C chamber, which puts it on par with the X1E. The catch: you’re tuning a custom machine, and OrcaSlicer’s Voron profile is generic. Clone the Generic PC profile, set MVS based on your specific hot end (Rapido, Dragon, Revo HF all behave differently), and run the full calibration suite. Voron users tend to know all of this already, but the reminder is: the slicer doesn’t know how good your machine is, so it can’t pick aggressive defaults for you.
Prusa CORE One
The CORE One’s enclosure is passive but well-sealed. The bundled Prusament PC and PC-CF profiles are well-tuned for the printer (PC-CF at 285C / 115C / MVS 9 / chamber 40C). For neat PC, the profile sits at 280C / 105C with a slightly lower MVS than the Bambu equivalent. Run the calibration suite and you’re set. For tall parts, consider rotating the model to minimise the tall-axis dimension since the chamber gets cooler at the top of the build volume.
Wrap-up
If I had to compress this whole guide into a checklist for someone about to print their first PC part in OrcaSlicer, here’s what I’d hand them:
- Confirm your printer has an enclosure, a 300C-rated all-metal hot end, and a bed that holds 110C. If any of those is missing, use PETG-CF or PolyMax PC-FR instead.
- Dry the filament. 80C for 8 hours. Don’t skip this. Store it sealed.
- Pick the right profile. “Bambu PC
@BBL X1C” or your printer equivalent for Bambu PC. Clone Generic PC for Polymaker or no-name spools. - Use the engineering plate or textured PEI with Magigoo PC or a glue stick. 5 to 10mm mouse-ear brim on every part.
- Start with 280C nozzle, 110C bed, MVS 10 to 12, fan max 30 to 40%, chamber set point 60C if you have a heater. Run the calibration suite in the standard order: temperature tower, flow ratio, pressure advance, MVS.
- Slice it in Orca, check the Preview line-type view, send the print to a heated chamber, and walk away.
PC isn’t a beginner filament and the slicer’s bundled profiles are a starting point, not a finish line. The reward is parts that genuinely outperform anything in your PLA bin. Hard impact, high heat, real strength. Once you’ve got the workflow down, it stops being scary and starts being just another tool in the rack. For the broader filament picture (PLA through PEEK), the parent OrcaSlicer filament settings guide covers the full material stack, and the sibling guides for nylon and carbon fibre reinforced filaments are worth a read once you’ve got PC dialed in. Good luck.
Related OrcaSlicer guides
- Best OrcaSlicer Filament Settings: All Materials Cheatsheet
- OrcaSlicer Wood-Filled PLA Settings and Nozzle Choice Guide
- OrcaSlicer Glow and Sparkle PLA: Print Speed and Nozzle Wear
- OrcaSlicer PVA and BVOH Soluble Support Settings
- OrcaSlicer PA Line vs PA Pattern vs PA Tower: Which Pressure Advance Test (2026)