
I bought my first spool of PLA-CF expecting it to make my drone arms unbreakable. They snapped on the first crash, cleaner and faster than the cheap PLA+ arms they replaced. That was the moment I learned what “carbon fiber” actually means on a 1 kg spool, and what it absolutely does not mean. It’s a lesson the marketing doesn’t go out of its way to teach you.
I’ve since printed PLA-CF, PETG-CF, PA-CF, and PC-CF across a Bambu X1C, a P1S, a Voron 2.4, and one stubborn old Ender 3 that should never have been asked. Every blend has its own gotchas, its own hardware tax, and its own honest answer to the question “is this actually worth it.” This guide gives you the per-blend OrcaSlicer settings, the real cost of the hardware you need before you press print, and the truth about where CF wins and where plain nylon quietly beats it.
Table of contents
- CF reality check (read this before you buy a spool)
- What CF blends actually are
- The four CF blends at a glance
- Hardware you need before printing CF
- Hardened nozzle costs, ranked honestly
- OrcaSlicer’s built-in CF profiles
- PLA-CF settings in OrcaSlicer
- PETG-CF settings in OrcaSlicer
- PA-CF settings (the big one)
- PC-CF settings (boss tier)
- CF blends vs continuous carbon fiber composites
- Aesthetic vs structural, the honest section
- Common CF print failures and fixes
- Calibration order for any new CF spool
- FAQ
CF reality check (read this before you buy a spool)
If you bought carbon fiber filament because the name sounds strong, you bought it for the wrong reason. CF blends are mostly about stiffness, dimensional stability, and that matte graphite aesthetic. Real impact resistance still belongs to plain nylon. Real strength-per-dollar usually belongs to a good PLA+ blend. I’m going to repeat that several times in this guide because it’s the single thing that resets a buyer’s expectations correctly.
Here’s the short version of what’s coming. Every CF filament wears brass nozzles down in roughly 3 to 5 hours of printing, so a hardened steel nozzle is non-negotiable before you press print. PLA-CF tunes like PLA with a wider fan and a slower max volumetric speed. PETG-CF wants less cooling than its plain counterpart. PA-CF and PC-CF demand a heated chamber, aggressive drying, and patience. And the speckled finish you’re going to see on every print isn’t a defect. It’s the carbon fiber.
This guide sits under the OrcaSlicer filament settings pillar, so if you came in cold and need the general filament workflow first, start there. Otherwise, let’s get into what those chopped fibers actually do once they’re in the melt.
What CF blends actually are
Carbon-fiber filament is not a carbon-fiber composite in the way the aerospace industry uses that phrase. The spool you buy is a base thermoplastic (PLA, PETG, PA, or PC) that’s been compounded with roughly 5 to 20 percent chopped carbon-fiber strands. The fibers are short, typically 100 to 300 microns long, and they’re randomly oriented inside the polymer matrix. They don’t form a continuous reinforcement network. They sit in the plastic like very small rebar chunks suspended in concrete, except they’re not aligned and they don’t span the full length of the part.
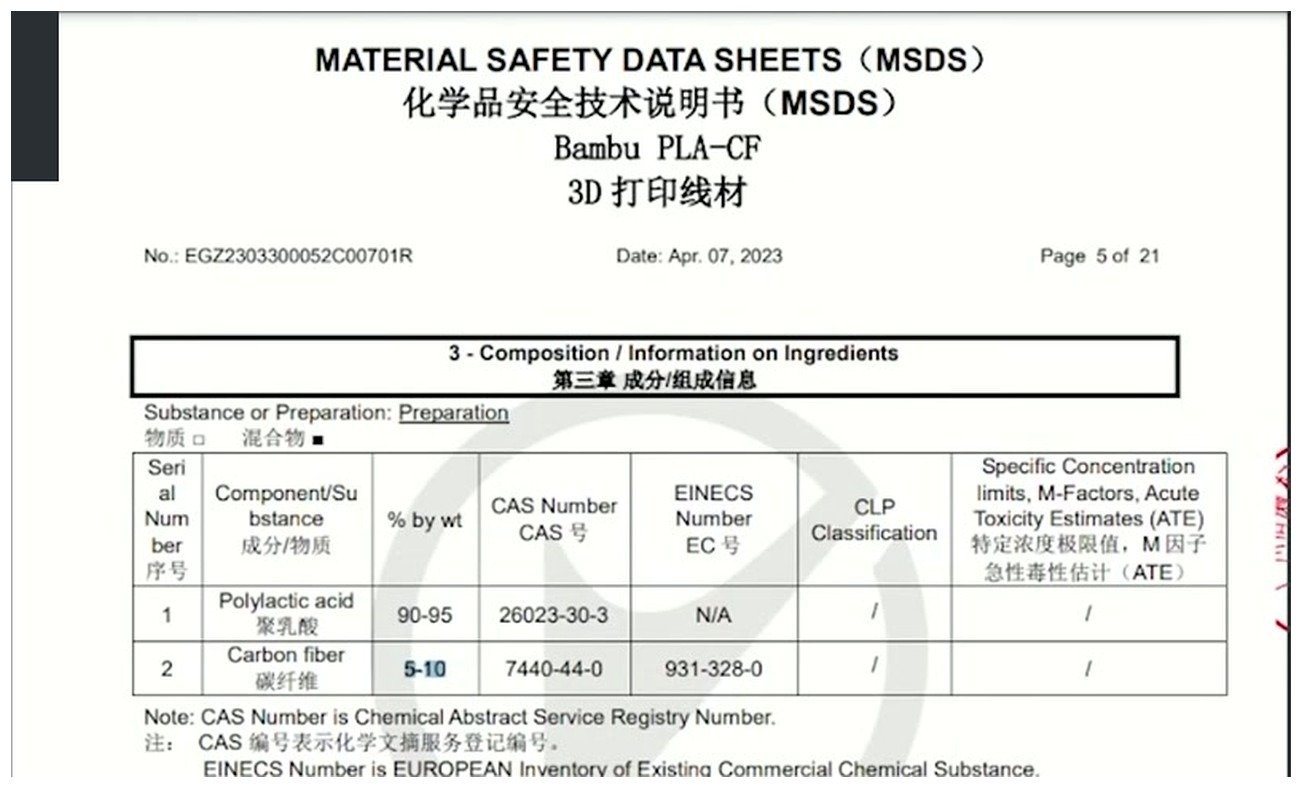
Bambu PLA-CF MSDS composition. The actual carbon fiber content is 5 to 10 percent. The other 90 to 95 percent is plain PLA. When you buy “carbon fiber” filament, this is what you’re actually buying.
The MSDS above is the honest answer to “how much carbon fiber is in carbon fiber filament.” For Bambu’s PLA-CF the answer is 5 to 10 percent. That’s not unusual. Most hobby CF blends sit in the 10 to 15 percent range. Engineering-grade PA-CF can hit 20 percent, occasionally higher. The rest is the base polymer, which is going to dominate the mechanical behavior of the finished part more than the fibers do.
What the fibers buy you:
- Higher stiffness, also called modulus. A PA-CF tensile bar resists bending more than a plain PA bar at the same wall count.
- Better dimensional stability. The fibers reduce shrinkage during cooling, which is why nylon CF blends warp less than plain nylon.
- A dark matte aesthetic. The chopped fibers scatter light and give that gritty graphite finish that’s honestly half the reason people buy CF in the first place.
- Slightly higher continuous-use temperature for the polyamide and polycarbonate variants.
What they don’t buy you:
- Higher impact strength. In most lab tests, CF lowers impact resistance compared to the base polymer. Plain nylon takes a hammer better than PA-CF. Plain PLA bends further before snapping than PLA-CF.
- Strength in the Formula 1 sense. People hear “carbon fiber” and picture a monocoque chassis. Chopped short fibers in FDM filament add stiffness, not the tensile strength a continuous-weave laminate provides.
- Magic durability. PLA-CF is still PLA underneath. It still creeps under load and softens around 55 to 60 C.
The cost premium is real. Plain PLA runs around 18 to 25 USD per kg. PLA-CF runs roughly 25 to 35 USD per kg. PETG-CF jumps to 45 to 65 USD per kg. PA-CF lands between 60 and 100 USD per kg for hobby brands, and 120 to 200 USD per kg for engineering grades like Polymaker Fiberon, Bambu PAHT-CF, or 3DXTech CarbonX. (Prices flagged VERIFY at publish time.)
The four CF blends at a glance
| Blend | Base polymer | Difficulty | Enclosure needed | Best for |
|---|---|---|---|---|
| PLA-CF | PLA | Easy | No | Aesthetic prints, jigs, stiff cosmetic parts |
| PETG-CF | PETG | Medium | Helpful, not required | Outdoor parts, chemical resistance |
| PA-CF | Nylon (PA6 or PA12) | Hard | Yes | Drone frames, gripper jaws, brackets that see load |
| PC-CF | Polycarbonate | Hardest | Yes, actively heated | High-temp, high-load engineering applications |
PLA-CF is the gateway. If you’ve never run a CF filament, this is where you start. It tunes like PLA, prints with the part cooling fan blasting, and doesn’t need a sealed chamber. It’s the CF blend an A1 Mini or a Prusa MK4 can run without complaint, assuming you’ve swapped the brass nozzle out.
PETG-CF is a marginal upgrade over plain PETG. It’s harder, occasionally less stringy, and a bit more rigid. The trade-off: it loses the “bend before break” character that makes plain PETG forgiving. I’ve snapped PETG-CF brackets that plain PETG would have flexed through.
PA-CF is where carbon fiber starts to pull its weight. Nylon CF blends are what people mean when they say “engineering grade.” This is the material for drone frames, gripper jaws, jigs, and brackets that see real mechanical load over time. It’s also the material that turns most non-enclosed printers into expensive paperweights.
PC-CF is the top tier for amateurs. Brutal print temperatures, mandatory chamber heating, and the filament dries faster than it prints if you leave it out overnight. Save it for parts that actually need a 110 C-plus continuous service temperature. For most people, that’s never.
Hardware you need before printing CF
There are four hardware rules that apply to every CF blend on this page. No exceptions, no “I’ll just try it once.”
1. Hardened steel nozzle is mandatory. Brass nozzles wear out in roughly 100 to 250 g of CF filament. Visible orifice rounding and length shortening show up in as little as 3 to 5 hours of printing. Hardened tool steel runs orders of magnitude longer than brass on CF blends per community testing. The fibers themselves are harder than brass, that’s the whole problem. There’s no “I’ll be careful” workaround.
2. 0.4 mm minimum, 0.6 mm recommended. Chopped fibers occasionally clump in the melt. A 0.4 mm orifice is the bare minimum and will clog more often than a 0.6 mm setup. Bambu’s own filament guide for PA-CF and PA6-CF recommends 0.6 mm hardened steel as the default. For drone frames and load-bearing parts, 0.6 mm is faster anyway because the wider extrusion stiffens the geometry further.
3. Direct drive is strongly preferred. Bowden tubes add friction and lag that work against stiff, slightly abrasive CF filament. Direct-drive extruders give cleaner retractions and fewer feed issues. Bambu X1C and P1S are direct drive. Older Ender-style Bowden setups can technically print PLA-CF but expect more stringing and inconsistent extrusion.
4. Hardened heat break helps, isn’t critical. A stainless-steel or titanium heat break resists wear better than copper alloy where the molten filament drags fibers across it. Bambu’s stock heat break works fine for hundreds of hours. Aftermarket bimetal heat breaks from Phaetus or Slice Engineering start to matter only if you’re running more than 5 kg of CF per month.
For the printer side of things, the X1C and P1S are the standard hobby choice for CF work. The full breakdown of why these two printers are over-represented in CF discussions is in the Bambu X1C and P1S OrcaSlicer guide. The other realistic CF-capable hobby printers are the QIDI X-Max 3, X-Plus 3, and X-CF Pro, all of which ship with hardened hot ends and chamber heating from the factory. The QIDI X-series OrcaSlicer guide covers profile differences if you’re running one of those.
Hardened nozzle costs, ranked honestly
This is the line item that catches new buyers off guard. You spend 80 USD on a spool of PA-CF, then print it through a 5 USD brass nozzle, then wonder why your parts look like dried oatmeal after 2 hours. Here’s what the hardware actually costs (VERIFY current pricing at retailer pages):
| Nozzle / hot end | Approximate price (USD) | CF lifespan | Honest note |
|---|---|---|---|
| Stock brass (0.4 mm) | $2 to $5 | 3 to 5 hours on CF | Do not use with CF. Period. |
| Generic hardened steel (MK8 / V6 form factor) | $10 to $30 | Hundreds of hours | Fine for most hobby CF use. Counterfeits are common on Amazon. |
| Bambu Lab hardened steel hotend (X1C / P1S) | ~$50 assembly | Hundreds of hours | The default upgrade for Bambu users running any CF blend. |
| E3D hardened steel V6 | ~$25 | Hundreds of hours | Standard upgrade for non-Bambu hobby printers. |
| E3D ObXidian / Revo ObXidian | $50 to $90 | Tens of kg, effectively lifetime | DLC-coated tool steel. Worth it if you run more than 5 kg CF per month. |
| Slice Engineering Mosquito (with hardened or ruby nozzle) | $110 to $200 | Tens of kg with ruby tip | Production-grade. Overkill for hobbyists. |
| Tungsten carbide | $100 to $200 | Effectively lifetime | Niche. Heat transfer is worse than steel. |
The honest take: for hobby use, a 25 USD hardened steel nozzle from a reputable vendor handles every CF blend on this page. ObXidian and ruby-tipped nozzles are for users running 10+ kg of CF monthly or for small production environments. The DLC coating on ObXidian gives non-stick properties that help with PC-CF and PA-CF stringing, but it isn’t necessary if your budget is tight.
One warning: hardened steel nozzles on Amazon are an absolute counterfeit minefield. I’ve measured a “hardened” nozzle that wore down at the same rate as brass. Buy from Bambu, E3D, Slice, or a known reseller, and your wallet will thank you on the third spool.
OrcaSlicer’s built-in CF profiles
OrcaSlicer ships with built-in filament profiles under three primary brand trees: Generic, Bambu Lab, and Polymaker. Depending on slicer version you’ll also see profiles from eSun, Overture, Polylite, Inland, and SUNLU. The CF-relevant profiles you should see in OrcaSlicer 2.x (VERIFY against your installed slicer):
- Generic PLA-CF
- Generic PETG-CF
- Generic PA-CF and Generic PA6-CF
- Generic PC-CF
- Bambu PLA-CF
- Bambu PETG-CF
- Bambu PA-CF / PAHT-CF / PA6-CF
- Bambu PC-CF
- Polymaker PolyMide PA6-CF (now sometimes branded Fiberon PA6-CF20) and PA12-CF
- Polymaker PolyLite PLA-CF
Picking the right profile matters because CF blends have wildly different MVS limits between brands. Bambu’s own PA-CF profile sets a higher max volumetric speed than Generic PA-CF because the slicer assumes a heated chamber and a Bambu hardened hot end. Loading a Bambu profile onto a non-enclosed open-frame printer will warp things badly and shred the first layer.
If you can’t find a profile for your specific filament, the workflow is:
- Duplicate the Generic profile for that polymer family
- Rename it (something like “SUNLU PLA-CF tuned” so you don’t lose it)
- Override the temps from the manufacturer’s TDS sheet
- Run flow ratio and pressure advance before any real print
The first three calibrations to run on a new CF spool are a temperature tower, a flow rate calibration, and pressure advance. Then, because CF blends are MVS-limited, the max volumetric speed test is the one that matters most for print quality at speed. Don’t skip it. CF batches vary more than plain filament, and the MVS you tuned on the last spool may not match the new one.
PLA-CF settings in OrcaSlicer
PLA-CF prints almost like plain PLA, with three adjustments: hotter nozzle, lower MVS, and the part cooling fan pinned high. Here are the starting ranges (VERIFY against your loaded profile):
| Parameter | PLA-CF range |
|---|---|
| Nozzle temperature | 220 to 240 C, first layer 5 to 10 C higher |
| Bed temperature | 55 to 65 C |
| Part cooling fan | 80 to 100 percent |
| Chamber | Open, no heated chamber |
| Max volumetric speed (MVS) | 8 to 15 mm³/s (Bambu PLA-CF ~12, Generic ~10) |
| Print speed | 100 to 200 mm/s on Bambu, 40 to 80 on older printers |
| Retraction (direct drive) | 0.8 mm at 30 to 40 mm/s |
| Bed surface | Smooth or textured PEI, glue stick optional |
I run PLA-CF at 230 C on a textured PEI plate with the fan pinned at 100 percent. That’s the boring baseline that works almost everywhere. The two settings I always override from plain PLA defaults are the fan (PLA-CF wants more cooling, not less, because the fibers help heat dissipate) and the MVS (down by 30 to 40 percent from plain PLA). If you run PLA-CF at the same MVS as plain PLA, you’ll see under-extrusion that looks exactly like a partially clogged nozzle. Compare your numbers against the plain PLA settings guide if you’re not sure what your baseline should be.
Keep ironing off. The matte speckled finish is the whole reason you bought PLA-CF, and ironing flattens it into something that looks like sad gray plastic. For structural prints, run a minimum of 3 walls and bump infill to 25 to 40 percent. PLA-CF fails brittle, so wall count matters more than infill density for impact resistance.
The most common PLA-CF complaint on forums is stringing. The fix is almost always one of two things: dry the filament (60 minutes at 50 C is enough for PLA-CF) or raise retraction speed by 10 mm/s. PLA-CF is less hygroscopic than PETG-CF or PA-CF, but it’s not immune.
PETG-CF settings in OrcaSlicer
PETG-CF wants the opposite of PLA-CF on one critical setting: cooling. PETG-CF layer bonds are stronger when the layers stay hot longer, so the fan goes down, not up. Starting ranges (VERIFY):
| Parameter | PETG-CF range |
|---|---|
| Nozzle temperature | 240 to 260 C, some blends 255 to 270 C |
| Bed temperature | 70 to 85 C |
| Part cooling fan | 30 to 50 percent, off for maximum layer strength |
| Chamber | Helpful at 35 to 40 C, not required |
| Max volumetric speed (MVS) | 8 to 12 mm³/s |
| Print speed | 80 to 150 mm/s |
| Retraction (direct drive) | 0.8 to 1.2 mm at 30 mm/s |
| Bed surface | Textured PEI, very light glue stick to prevent over-adhesion |
PETG-CF over-adheres to smooth PEI the same way plain PETG does. A light coat of glue stick acts as a release agent and stops you from ripping chunks out of the build plate when you pry the print off. I’ve lost two prints and a small square of PEI to this mistake. It’s avoidable.
The big trade-off with PETG-CF: you lose the ductility that makes plain PETG forgiving. Plain PETG bends a long way before it snaps. PETG-CF snaps. If you’re printing a bracket or clip that needs to flex, PETG-CF isn’t the upgrade you think it is. Check the plain PETG settings page for the comparison.
PETG-CF is hygroscopic. Dry the spool at 60 to 65 C for 6 to 8 hours before printing. Wet PETG-CF pops and hisses at the nozzle and gives you fuzzy, weak parts. If you can keep the spool in a dry box while printing, do it. Bambu’s filament dryer or a cheap PrintDry Pro both work.
PA-CF settings (the big one)
This is where things get serious. PA-CF is the blend where CF starts to genuinely earn its price tag, but it’s also the blend where every shortcut bites you. Drying is non-negotiable. A heated chamber is non-negotiable. Bed adhesion is its own dark art. Let’s go through it.
| Parameter | PA-CF range |
|---|---|
| Nozzle temperature | 260 to 290 C, PA6-CF higher, PA12-CF lower |
| Bed temperature | 80 to 100 C |
| Chamber temperature | 50 to 70 C target, 40 C minimum |
| Part cooling fan | 0 to 20 percent |
| Max volumetric speed (MVS) | 6 to 10 mm³/s |
| Print speed | 60 to 120 mm/s |
| Retraction (direct drive) | 1.0 to 2.0 mm at 30 to 40 mm/s |
| Bed surface | Smooth PEI or engineering plate, glue stick mandatory |
| Drying | 80 C for 8 to 12 hours pre-print, dry-box during print |
| Enclosure | Required |
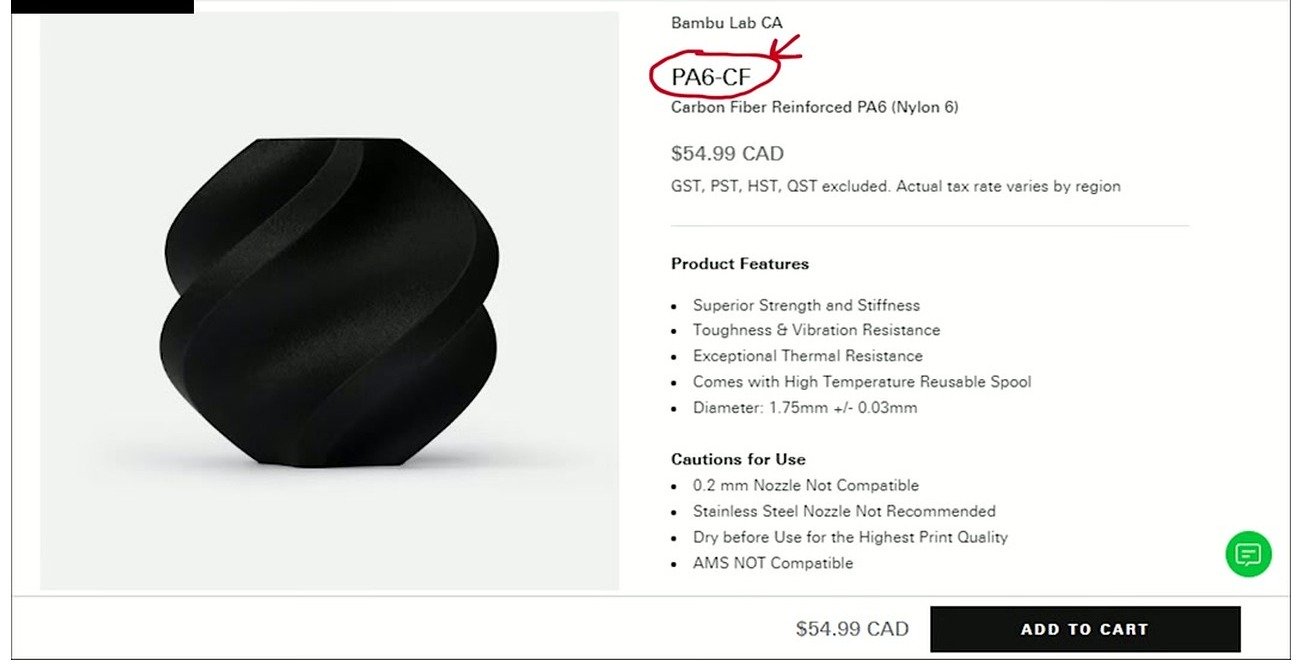
Bambu’s PA6-CF product page warnings. Note the four hard cautions: 0.2 mm nozzle not compatible, stainless steel hot ends not recommended, dry before use, and AMS not compatible. The last one catches new Bambu owners constantly.
Drying matters more than slicer settings. I’ll repeat that. Bambu’s TDS for PA6-CF specifies 80 C for 8 hours minimum, and I’d push that to 12 hours to be safe. PA-CF will pull moisture out of the air in under 30 minutes once a dry spool is exposed. Print straight from a dry-box (AMS with desiccant if you’re on Bambu hardware, or a filament dryer that runs during the print). If you pull a spool out of a sealed bag and start printing immediately, you’ll still get a good print. If you let that same spool sit on the bench for an afternoon, you’ll get popping, fuzz, weak layers, and one very expensive paperweight.
Bed adhesion is the second pain point. PA-CF does not stick to bare PEI well, no matter how clean the plate is. The standard fix is glue stick on textured PEI, with the bed at 90 C and the chamber at 50 C minimum, pre-heated for 15 minutes before the print starts. Brim 8 to 10 mm wide on the first layer. Skip the brim and your tall PA-CF print will detach at hour 4. I’ve watched it happen, and so has everyone on the Bambu forum at some point. The brim, raft, and skirt guide covers the OrcaSlicer settings if you’ve never set a wide brim before.
The AMS warning on that product page is real. Bambu officially lists PA6-CF as not AMS-compatible because the stiff filament catches on the AMS internal guides and the heat from the chamber re-wets it inside the AMS box. Use an external spool fed through a dry-box. PAHT-CF is sometimes listed as AMS-compatible-with-caveats, but the safer move is always external feeding for any PA-CF blend.
Chamber temperature control inside OrcaSlicer is straightforward: there’s a “chamber temperature” field in the filament profile and a “target chamber temp” in the print start g-code on Bambu printers. The X1C has a heater. The P1S doesn’t, so chamber temperature on a P1S is whatever the bed and hot end bleed into the enclosed volume, typically 40 to 45 C with the door closed. That’s enough for most PA-CF blends, not enough for PC-CF.
For comparison with plain nylon, the nylon and PA settings page walks through the base polymer separately. The big honest takeaway: plain nylon often beats PA-CF on impact resistance. PA-CF wins on stiffness and warping. If your part needs to absorb a hammer blow, plain nylon is the better material.
PC-CF settings (boss tier)
PC-CF runs at the upper edge of what an X1C or P1S can sustain. The Bambu stock hot end reliably tops out around 300 C, and PC-CF wants 290 to 300 C continuous for clean layer bonds. If your nozzle is brass, worn hardened steel, or just slightly clogged, you’ll get under-extrusion that looks exactly like the hot end can’t keep up (because it can’t). VERIFY ranges:
| Parameter | PC-CF range |
|---|---|
| Nozzle temperature | 280 to 310 C |
| Bed temperature | 100 to 120 C |
| Chamber temperature | 60 to 80 C target |
| Part cooling fan | 0 to 10 percent, typically off |
| Max volumetric speed (MVS) | 6 to 10 mm³/s |
| Print speed | 60 to 100 mm/s |
| Retraction (direct drive) | 1.0 to 1.5 mm at 30 mm/s |
| Bed surface | Bambu Engineering Plate or smooth PEI + Magigoo PC |
| Drying | 80 C for 12 hours |
| Enclosure | Required, actively heated preferred |
Most adhesion failures on PC-CF are caused by chamber temperature being below 55 C or the build plate not pre-heated long enough. PC is a high-temperature material with significant thermal contraction, and a cold corner of the plate or a draft from a half-open enclosure door will lift the print at hour 3. Pre-heat the bed for 20 minutes, not 5. Close every chamber opening. If you’re on a P1S with no active chamber heater, your PC-CF options are limited. The plain PC settings page goes deeper on the print-bed prep for polycarbonate generally.
Honest take on PC-CF: most hobbyists do not need it. PC-CF exists for parts that see continuous mechanical load above 100 C, like motor mounts in hot engine bays, jigs near industrial machines, or brackets in environments where ABS would creep. If your part lives at room temperature on a desk, PLA-CF or PA-CF is the right answer, and PC-CF is just a more expensive way to fail prints.
CF blends vs continuous carbon fiber composites
This is the section where the name “carbon fiber filament” gets corrected. There’s a meaningful difference between chopped-fiber FDM filament (what this guide covers) and continuous-fiber composites (what people picture when they hear “carbon fiber”).
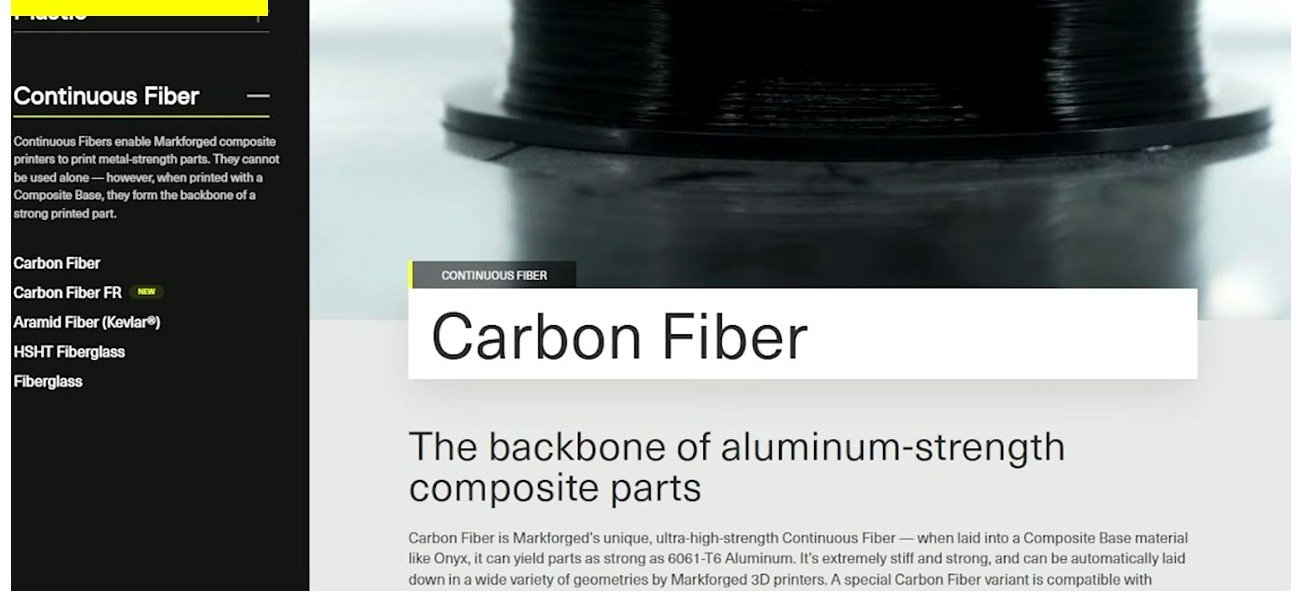
Markforged’s Continuous Carbon Fiber product page. This is the technology people picture when they hear “carbon fiber 3D printing.” Continuous strands run the full length of a part. Hobby FDM CF filament does not work this way.
Markforged printers lay down a separate continuous carbon fiber strand alongside the polymer matrix, building up real composite parts with fiber alignment that runs the length of the load path. That’s the technology that gives you actual aerospace-grade strength. It’s also a 20,000-USD-plus printer category with consumables priced accordingly. A continuous-fiber Markforged X7 part can be ten times stronger than a chopped-fiber PA-CF part of the same geometry, because the fibers actually span the part.
Chopped-fiber filament cannot do this. The fibers in your spool are 100 to 300 microns long. They get further chopped and randomized by the extruder gear and the nozzle melt zone. They’re stiffeners, not structural members. When marketing calls a 30 USD spool of PLA-CF “carbon fiber reinforced,” that’s technically true in the sense that there are carbon fibers in there, but the structural implication isn’t comparable to a Markforged part.
This isn’t a criticism of chopped CF filament. It’s a calibration of expectations. A PA-CF drone arm is stiffer than a plain PA drone arm. It is not stronger than a Markforged carbon-fiber drone arm, and pretending otherwise gets people into trouble when they design parts at the edge of what chopped CF can actually take.
Aesthetic vs structural, the honest section
Most people buying CF filament are buying the look. There’s no shame in this. The matte graphite finish hides layer lines, photographs well, and makes a printed part look like an industrial component instead of a plastic prototype. For cosmetic prints, jigs, lamp shades, and desk accessories, PLA-CF is excellent and PETG-CF is overkill.
The structural truth is messier:
- Plain nylon often outperforms PA-CF in impact resistance. CNC Kitchen’s testing showed plain PA bars absorbed more energy before fracture than PA-CF bars. CF wins on stiffness (modulus). PA wins on toughness (energy absorbed before failure). Pick the metric your application actually needs.
- PLA-CF is not stronger than plain PLA in every metric. PLA-CF is stiffer, yes. But plain PLA bends further before yielding, and quality PLA+ blends (Polymaker PolyMax, Prusament PLA, Inland Tough) often beat PLA-CF on impact tests. For drone arms that take crashes, a quality PLA+ frequently outlasts PLA-CF.
- PETG-CF loses PETG’s ductility. Plain PETG bends a long way before breaking. PETG-CF snaps. That trade-off is rarely worth it for general-purpose brackets.
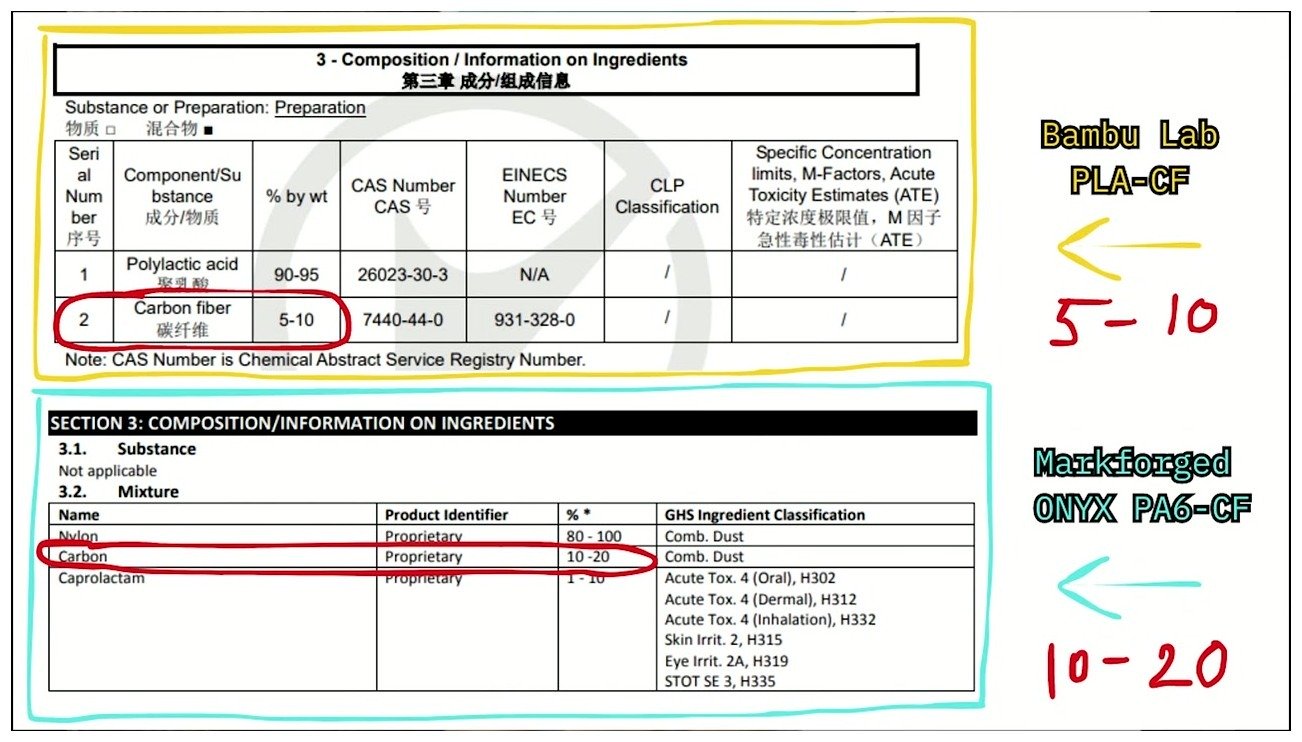
Side-by-side fiber content. Bambu PLA-CF is 5 to 10 percent fiber by mass. Markforged Onyx (chopped-fiber PA6) sits at 10 to 20 percent. Both are dwarfed by continuous-fiber composites, where the strand runs the full part length.
The fiber content matters because mechanical properties roughly scale with it, but the relationship is non-linear. Doubling the fiber from 5 to 10 percent doesn’t double the stiffness. There’s a sweet spot around 10 to 15 percent where the fiber-to-matrix bond is good and the fibers actually transfer load. Above 20 percent the matrix has trouble wetting the fibers and you start getting voids that hurt strength. Engineering blends like Bambu PAHT-CF and Polymaker Fiberon target that 10 to 20 percent range deliberately.
Bottom line for honest buyers: tell yourself up front that CF is mostly about stiffness and looks. If your part needs impact resistance, plain nylon is the better answer. If your part needs high-temp engineering performance, PA-CF and PC-CF earn their price tag. If you want pretty matte parts, PLA-CF at 25 USD/kg is fine and you should skip the 150 USD/kg PA-CF.
PA chemistry and fiber compatibility (a quick aside)
One thing that doesn’t get talked about enough is that the base polymer’s chemistry interacts with how well the fibers bond into the matrix. Polyamide is particularly sensitive here.
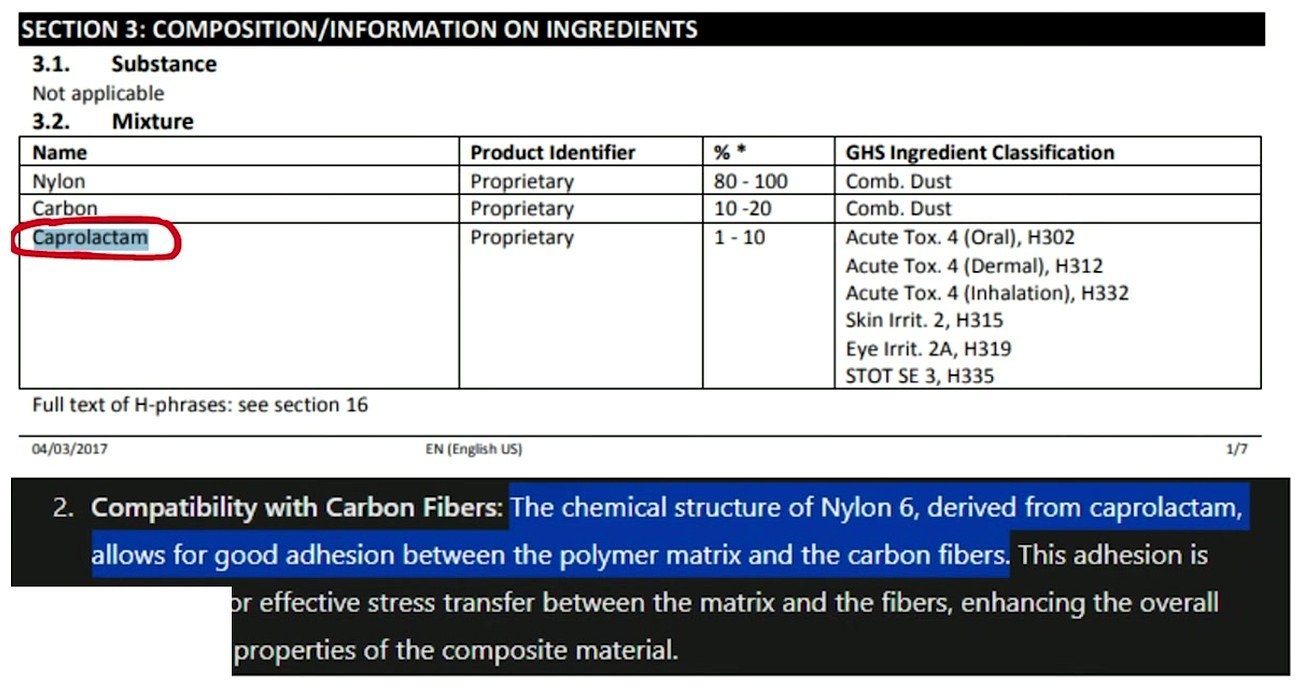
Annotated MSDS for a PA6-CF filament. Caprolactam is the monomer base for PA6, and the “Compatibility with Carbon Fibers” callout matters because PA6 chemistry bonds to chopped fiber better than PA12. That’s why PA6-CF tensile bars hit higher numbers than PA12-CF at the same fiber percentage.
The practical takeaway: PA6-CF runs hotter (280 to 290 C) and is mechanically stronger than PA12-CF (260 to 275 C), but PA6 absorbs more moisture. So PA6-CF wants a longer dry cycle and a stricter dry-box habit. PA12-CF is slightly weaker but more dimensionally stable in humid environments. For drone frames in dry climates, PA6-CF wins. For outdoor brackets in Florida summers, PA12-CF is the smarter pick. Both want the same chamber temperature and the same hardened nozzle.
Common CF print failures and fixes
| Symptom | Likely cause | Fix |
|---|---|---|
| Stringing on PLA-CF or PETG-CF | Wet filament or under-retraction | Dry spool 6 to 8 hours, raise retraction speed by 10 mm/s |
| Weak layer adhesion | Fan too high, temp too low | Raise nozzle temp 5 to 10 C, drop fan to 0 to 20 percent |
| Repeated clogs on 0.4 mm | Fiber clumps in the melt zone | Move to 0.6 mm hardened steel nozzle |
| Brittle parts snapping | Inherent to CF, not a defect | Run 4+ walls, 30 to 50 percent infill |
| Patchy or inconsistent extrusion | Worn nozzle (almost always) | Inspect with flashlight, replace if rounded |
| Warping on PA-CF or PC-CF | Chamber too cold, filament too wet | Pre-heat chamber 15 to 20 minutes, dry filament longer |
| Speckled surface texture | Normal, this is the carbon fiber | Do not try to iron it out, that’s the look you paid for |
| Under-extrusion at PC-CF temps | Hot end can’t sustain 290 to 300 C | Check hot end max rating, consider hot-end upgrade |
| PA-CF won’t stick to bed | Bare PEI, bed too cold, no glue stick | Glue stick, 90 C bed, 8 to 10 mm brim |
| AMS jamming with CF | Stiff filament catching in feed path | External spool with dry-box, bypass AMS entirely |
The single most common diagnostic mistake on CF is blaming the slicer for what is actually a hardware problem. Patchy extrusion at the start of a print is almost always a worn nozzle, not a flow ratio issue. Layer separation on PA-CF is almost always wet filament, not a temperature problem. If you find yourself tweaking the same slicer setting three times with no improvement, walk away from OrcaSlicer for ten minutes and inspect the nozzle, the spool moisture, and the chamber temperature in that order. The OrcaSlicer troubleshooting master guide walks through the general diagnostic flow if you want a broader checklist.
Calibration order for any new CF spool
Every new CF spool deserves the same four-step calibration sequence. Skip a step and you’ll spend more time chasing print quality than calibrating would have taken in the first place.
- Temperature tower. CF blends shift temperature optima by brand and batch. The OrcaSlicer temperature tower test covers the slicer setup. Test in 5 C steps across the manufacturer’s published range.
- Flow rate calibration. CF batches vary in actual fiber loading, which changes the effective flow. Use the flow rate calibration workflow before the first real print. Expect to be 0.96 to 0.98 multiplier on a fresh PA-CF spool.
- Pressure advance. The fibers stiffen the filament, which means pressure builds and releases differently than plain polymer. Re-run pressure advance calibration for every CF spool. The number will be higher than plain PLA, typically 0.030 to 0.045 for PLA-CF on Bambu hardware.
- Max volumetric speed. The most important calibration for CF. Use the MVS test to find the actual flow ceiling. Print quality at speed collapses sharply once you exceed the real MVS, and CF batches vary enough that the value on the box is a starting point, not a number you should trust.
For brands not in the OrcaSlicer default profile list, you’ll need to clone the Generic profile for that polymer and tune from there. The custom filament profile guide walks through the OrcaSlicer profile cloning and saving workflow if you’ve never done it.
FAQ
Is PLA-CF stronger than PLA+?
Stiffer, yes. Stronger in the impact sense, usually no. Quality PLA+ blends like Polymaker PolyMax, Prusament PLA, and Inland Tough beat PLA-CF on impact tests in most published comparisons. For drone arms that take repeated crashes, PLA+ is often the better choice. For brackets and jigs where stiffness matters more than impact, PLA-CF wins.
Do I need a heated chamber for PLA-CF?
No. PLA-CF prints on open-frame printers without issue. The fan should be high (80 to 100 percent), and you should have a hardened steel nozzle, but the chamber doesn’t need to be sealed or heated. A1, A1 Mini, Ender 3 (with direct drive), and Prusa MK4 all print PLA-CF cleanly.
How long does a hardened steel nozzle actually last on CF?
2 to 5 kg of CF before noticeable degradation. That’s hundreds of hours of printing. ObXidian and ruby-tipped nozzles can hit tens of kg, which is effectively a lifetime for most hobbyists. Brass nozzles, by comparison, show wear in 3 to 5 hours on CF. The cost-per-hour math heavily favors hardened steel even at the higher upfront price.
Can I run CF in a Bowden setup?
Technically yes for PLA-CF and PETG-CF, practically no for PA-CF and PC-CF. Bowden tubes add friction that fights the stiff filament, and the CF abrasion will wear the inside of the PTFE tube over time. If you have an Ender 3 with a Bowden setup, you can print PLA-CF after swapping to a hardened nozzle, but expect more stringing and inconsistent extrusion than a direct-drive setup would give you.
Is PA-CF AMS-compatible on Bambu?
No, not in the auto-feed sense. Bambu officially lists PA6-CF as not AMS compatible. The stiff filament catches on AMS internal guides, and the chamber heat re-wets the filament inside the AMS box. The standard workaround is external spool through a dry-box, fed directly into the toolhead inlet. PAHT-CF is sometimes listed as AMS-compatible-with-caveats, but external feeding is always the safer move for any PA-CF blend.
What’s the difference between PA6-CF and PA12-CF?
PA6-CF is mechanically stronger (higher tensile strength, higher modulus) but absorbs more moisture from the air. PA12-CF is slightly weaker but more dimensionally stable in humid environments. For dry climates and indoor parts, PA6-CF. For outdoor parts or humid environments, PA12-CF. Both want hardened steel nozzles, heated chambers, and aggressive drying.
Why does my PA-CF print look fuzzy?
Wet filament, almost always. Even “dry” PA-CF straight from a sealed bag can be moisture-saturated if it sat in a warehouse for months. Dry at 80 C for 12 hours, print straight from a dry-box, and the fuzz disappears. If the fuzz persists after drying, check that your nozzle isn’t worn (a rounded orifice deposits filament unevenly) and that your part cooling fan is below 20 percent.
Is “carbon fiber” filament the same as Markforged carbon fiber?
No. Hobby FDM filament uses chopped fibers 100 to 300 microns long, randomly oriented. Markforged uses continuous fibers that span the full length of the printed part. The mechanical difference is roughly 10x in tensile strength for continuous-fiber composites. The price difference is roughly 100x in printer cost. They’re different technologies that share a marketing term.
Do I need to dry PLA-CF before printing?
Not always, but it helps. PLA-CF is less hygroscopic than PETG-CF or PA-CF, so a fresh spool from a sealed bag usually prints fine. If your PLA-CF is stringy, fuzzy, or makes popping sounds at the nozzle, dry it for 60 minutes at 50 C and try again. That fixes 80 percent of PLA-CF print quality complaints.
What infill and wall count should I use for CF parts?
Walls matter more than infill for CF blends. Run 4+ walls for structural prints, and 25 to 40 percent infill (gyroid or cubic) is usually enough. CF blends fail brittle, so distributing load across more wall lines is more effective than packing more infill into the middle. For drone arms specifically, 5 to 6 walls and 30 percent gyroid infill is the community-standard setup.
Final take
Carbon fiber filament gets you stiffness and a great matte finish. It doesn’t get you impact strength, and it doesn’t get you Markforged-style composite performance. Plain nylon often beats PA-CF on toughness. Quality PLA+ often beats PLA-CF on impact. PLA-CF is excellent for cosmetic and jig prints. PA-CF earns its price for stiffness-critical engineering parts. PC-CF is overkill for almost every hobbyist. And before you spend a dollar on any of it, get a hardened steel nozzle and a filament dryer that can hold 80 C overnight.
That’s the whole guide in three sentences. The rest is execution. If you have the hardware, the patience, and the honest expectations, CF is one of the more rewarding filament categories to print. If you came in expecting magic, you came in for the wrong reason, and a spool of Polymaker PolyMax PLA is going to make you happier and save you 100 USD.
Related OrcaSlicer guides
- Best OrcaSlicer Filament Settings: All Materials Cheatsheet
- OrcaSlicer Silk PLA Settings for That Glossy, Satin Finish
- OrcaSlicer Wood-Filled PLA Settings and Nozzle Choice Guide
- OrcaSlicer Glow and Sparkle PLA: Print Speed and Nozzle Wear
- OrcaSlicer Tolerance & Fit Test: Functional Parts (2026 Guide)