
Last week I bought a no-name silk PLA spool off Amazon for nine bucks, the kind with a hand-applied paper sticker and zero recommended print settings. I opened OrcaSlicer, stared at the filament dropdown, and realized I needed to either clone a profile, import one from a stranger on Printables, or build a fresh one from scratch. This guide walks through all three options the way I actually do them at my own bench, with the menu paths, the file extensions, and the gotchas that have bitten me on real prints.
I’m going to be honest up front: cloning is faster than starting from scratch, and importing a community profile is faster than cloning, but none of those three options skip calibration. If you want a profile that prints clean parts at the speed your machine can actually handle, you’ll run a temp tower, a flow rate test, and a pressure advance test no matter which path you pick. The click sequence is the easy part. The tuning is the work. For the big-picture context on how filament settings fit together, the complete OrcaSlicer filament settings guide is the pillar I keep coming back to, and this article is the practical “how do I get a new profile into the dropdown” companion.
Table of contents
- The two ways to add a custom filament profile
- Path A: clone an existing profile in seven clicks
- Path B: import a community .orca_filament profile
- Settings every custom profile needs to set
- The calibration sequence that turns a clone into a profile
- Clone a brand profile or clone Generic? A decision rule
- Where OrcaSlicer stores your profile on disk
- Sharing your custom profile with Export Preset Bundle
- Keep your profiles tidy
- Common pitfalls and how to avoid each
- Frequently asked questions
- Where to go next
The two ways to add a custom filament profile
OrcaSlicer gives you two real paths to a custom filament profile, plus one half-supported drag-and-drop trick I’ll mention in passing because it works for 3MFs only.
Path A clones a profile that’s already in your slicer. You pick the closest match in the dropdown, click the pencil icon to open Filament Settings, change the values you know are different, then save it as a new user preset. This is what I do for any spool I’ve physically unboxed myself, because I’d rather start from a tuned profile and adjust two numbers than start from Generic and adjust twelve.
Path B imports a community profile that someone else already built. You download a .orca_filament file (or a .zip of .json files, or a full .orca_printer bundle), go to File > Import > Import Configs, and load it. This is faster if a trustworthy source has already done the tuning for your exact spool. It’s slower in the long run if the profile they uploaded was tuned on a different machine, which most are.
Here’s the side-by-side I use when I’m deciding which one to pick.
| Decision factor | Path A: clone existing | Path B: import community |
|---|---|---|
| Time to first print | 5 minutes | 2 minutes |
| Best for | Any new spool, branded or no-name | Exact spool match on Printables / GitHub |
| Calibration still required | Yes | Yes, every time |
| Reliability of starting values | High if cloning a brand profile, medium if cloning Generic | Varies wildly with uploader |
| Inheritance preserved | Yes, clone inherits from parent | Depends on bundle |
| File extension involved | None, all in-app | .orca_filament, .orca_printer, or .zip |
Before either path makes sense, you need to know where you’re starting from. Here’s my Prepare view with a Bambu Lab P1S, the 0.4 mm nozzle, Textured PEI plate, Bambu ABS in the filament slot, and a process preset I’d already cloned and renamed.
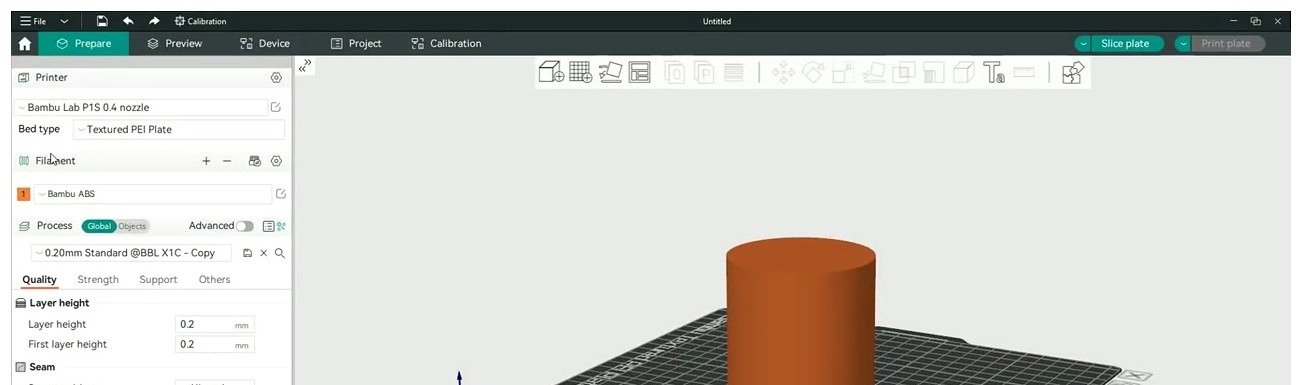
My current setup before adding a custom filament profile. The Filament dropdown on the right is where Path A starts. The process preset is already a clone, which is why it has the “- Copy” suffix.
Path A: clone an existing profile in seven clicks
This is the path I recommend for almost everyone, especially anyone with a single no-name spool they want to print today. Cloning preserves the inheritance chain, which means any value you don’t change is still tied to the parent profile. That’s useful because Orca’s defaults aren’t random, they’re the result of a lot of work the maintainers and the community have already done.
Step 1: pick the closest base profile
Open OrcaSlicer, stay on the Prepare tab, and click the Filament dropdown on the right panel. Don’t pick “Generic PLA” reflexively. Scroll the list. If your spool is Polymaker PolyLite PLA, pick that. If it’s Overture PETG, pick that. If you have a cheap unbranded silk PLA that smells suspiciously like Sunlu, pick the Sunlu silk variant. The closer your base profile is to the spool you actually own, the fewer numbers you’ll have to change in step 3.
If the dropdown is overwhelming, I sort by clicking through System Filaments and using the filament-type and vendor filters. Here’s that dialog with both filters visible.
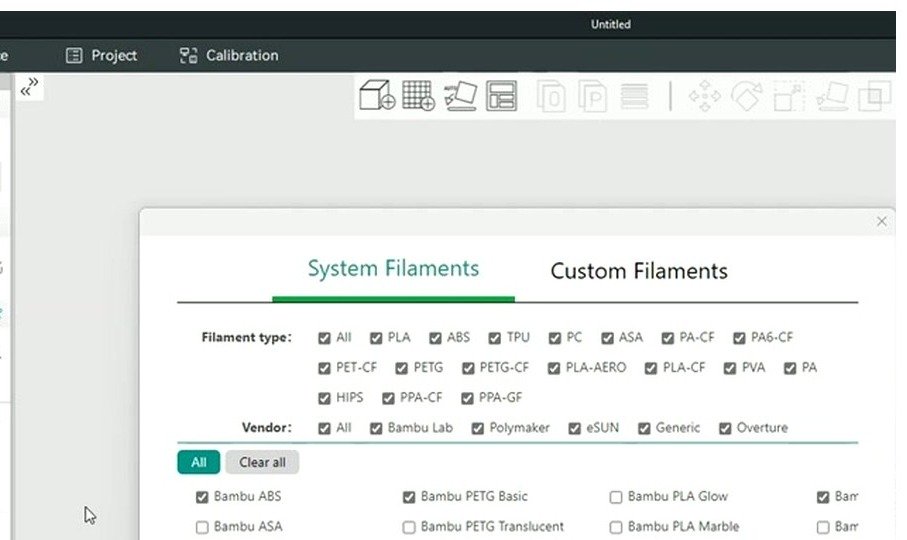
The filament-type and vendor filters on the Filaments dialog. I use vendor first, then narrow by type. This is also where you’d come back later to tick “Compatible Printers” if a custom profile doesn’t show up in your Prepare dropdown.
Step 2: open Filament Settings via the pencil icon
Once your closest base profile is selected in the dropdown, look for the small pencil icon right next to the filament name. Clicking it opens the Filament Settings dialog. This is where every editable property of the profile lives, organized into Filament, Cooling, Setting Overrides, Multimaterial, Notes, and a few other tabs depending on your version.
Quick note on what not to click: there’s a separate save button that just writes back to the current profile. If you hit that while the parent is a system preset, it’ll either silently fail or behave unpredictably depending on your Orca version. We’re going to use a different save flow in step 4.
Step 3: edit your starting values
Don’t try to change everything at once. The values worth editing before your first test print are:
- Filament diameter. Measure your spool with calipers in three spots. If you get 1.71 to 1.76, use the average. Don’t assume 1.75.
- Nozzle temperature, first layer and other layers. Pull from the spool sticker if there is one, otherwise use the middle of the type’s range (210 C for PLA, 235 C for PETG, 250 C for ABS).
- Bed temperature. Same logic.
- Flow ratio. Leave at 1.0 for now, you’ll tune this with the calibration sequence later.
- Max volumetric speed. Drop it to a conservative number (10 mm3/s for PLA, 8 for PETG, 6 for TPU) until you’ve run the MVS test.
Everything else (pressure advance, retraction tweaks, cooling curve) gets dialed in during calibration. Don’t waste an hour adjusting numbers you’ll overwrite tomorrow.
Step 4: Save as new user preset (the floppy disk dropdown)
At the top of the Filament Settings dialog, there’s a floppy disk icon. Click it. The important option is Save as new user preset. Pick that, not the plain save. This explicit “Save as” creates a new file in your user folder and points its inherits key at the parent profile you cloned from, which is exactly what you want.
If you skip “Save as new user preset” and just hit the regular save, behavior depends on whether the parent is a system or user preset. For a system parent, Orca should refuse the write but some builds have been reported to silently lose the edit. Issue #4995 in the OrcaSlicer repo is a long-running thread about exactly this confusion. Use the explicit save flow and you avoid the whole class of problems.
Step 5: name your profile cleanly
I use the pattern [Vendor]-[Material]-[Color]-[Variant] @[Printer]-[Nozzle]. Example: Sunlu-PLAplus-Black @P1S-0.4. For true no-names where there’s no vendor, I drop in the Amazon order date as a pseudo-vendor: Amazon20260308-Silk-Red @Ender3V2-0.4. It looks ugly, but a month later when I’m staring at thirty user profiles in a dropdown, I can tell exactly which roll the profile belongs to.
Avoid special characters (slashes, colons, asterisks). Some Orca versions choke on them when writing the JSON filename.
Step 6: confirm it appears in the dropdown
Close the dialog, click the Filament dropdown on the Prepare tab, and verify your new profile is there with a “user” tag next to it. If it’s not, you almost certainly hit the “Compatible Printers” trap, where a user filament with no printers assigned vanishes from the dropdown entirely. Go back into Filament Settings, jump to Setting Overrides > Compatible Printers, and tick at least one printer.
Step 7: do a small test print before trusting it
A 20 mm calibration cube or the standard 3DBenchy is non-negotiable. Run the test before you load any 14-hour print on the new profile. You’re looking for clean overhangs, no layer splitting, a flat top, and reasonable stringing. If the test print fails, you have a starting point for what to adjust during calibration in the next major section.
Path B: import a community .orca_filament profile
If a community profile already exists for your exact spool, Path B is faster than Path A. The catch is that community profiles vary wildly in quality. Some Printables uploads are tuned by professional makers running enclosed printers in climate-controlled rooms. Others are uploaded by someone in their first week with a slicer who hit save once and assumed it worked. Treat every community profile as a starting point, not gospel.
Where to find good community profiles
- Printables. Search “OrcaSlicer profile [vendor] [material]”. Sort by likes and downloads. Read the comments before downloading. Adam L’s tuned X1C print profiles are an example of the well-documented kind.
- Vendor wikis. Polymaker, Bambu Lab, Prusament, eSun, and a few others publish official OrcaSlicer profiles on their own sites. These are the safest imports because they were tested by the manufacturer.
- GitHub. Search “OrcaSlicer-Profiles” on GitHub. The mjonuschat repo and a few others maintain version-controlled profile collections. Easier to trust because you can see the commit history.
- Reddit and Discord. r/OrcaSlicer and the OrcaSlicer Discord. Anecdotal, but the linked profiles are usually attached to a specific machine and a specific problem someone solved.
File > Import > Import Configs
Once you’ve downloaded the file, save it locally somewhere you’ll remember. If it’s a .zip of .json files, unzip it first. If it’s a .orca_filament or .orca_printer, leave it as-is.
In OrcaSlicer, go to File > Import > Import Configs. Browse to the file, select it, click Open. The slicer reads the file, looks at every preset inside, and either imports them silently or prompts you on overwrites. For deeper context on the import side and the export side together, I’ve got a separate deep dive on importing and exporting profiles that covers the edge cases.
When to overwrite vs skip on import
If the import prompts you to overwrite an existing user profile, pause. Skip overwrites for any profile you’ve manually tuned. Replacing a tuned profile with a stranger’s untuned one is the fastest way to ruin a Sunday afternoon. Overwriting is safe only when the imported profile is the newer, better version of one you haven’t touched.
Loading a 3MF that bundles profiles
Some Printables creators package profiles inside a 3MF model file. Open the 3MF via File > Open or drag and drop it into the slicer window, then save the embedded filament and process presets to your user folder when the slicer prompts. This is the only “drag and drop” filament-profile pathway that’s officially supported. Drag-and-drop for raw .orca_filament bundles isn’t documented and behavior varies by build, so don’t rely on it.
Honest note: community profiles are starting points
I import community profiles often, and I always re-run the temp tower and the flow rate test on my own machine before trusting one for a long print. Someone else’s “perfect” profile was perfect for their hotend, their plate, their ambient temperature, and their humidity. Yours is different. Calibrate every imported profile as if it were a clone you just made yourself. Yes, every time.
Settings every custom profile needs to set
Whether you cloned in Path A or imported in Path B, the same handful of settings need to be reviewed before your first real print. This table is my pre-flight checklist for PLA-first values, with notes for the other common materials.
| Setting | Tab | Typical PLA value | Notes for other materials |
|---|---|---|---|
| Filament type | Filament | PLA | Determines slicer assumptions for cooling, retraction, ironing |
| Vendor | Filament | Generic or your brand | Tick “Can’t find vendor I want” if no-name |
| Diameter | Filament | 1.75 mm | Measure your spool, often 1.71 to 1.76 |
| Nozzle temp, layer 1 | Filament | 215 to 220 C | 5 to 10 C hotter than other layers for bed grip |
| Nozzle temp, other layers | Filament | 205 to 215 C | Refine with the temp tower |
| Bed temp, layer 1 | Filament | 60 C | PETG 70 to 80, ABS 95 to 110, TPU 40 to 50 |
| Bed temp, other layers | Filament | 55 to 60 C | Match material |
| Flow ratio | Filament | 0.98 to 1.00 | Tune with Orca’s Flow Rate calibration |
| Pressure advance | Filament | 0.02 to 0.04 (Klipper) or 0.02 to 0.06 (Marlin LA) | Tune with the PA calibration |
| Max volumetric speed | Filament | 12 to 18 mm3/s for PLA | Run MVS test, drop 10 to 20 percent from peak |
| Cooling fan, layer 1 | Cooling | 0 percent | First layer adhesion |
| Cooling fan, layer 2+ | Cooling | 100 percent PLA, 40 to 60 percent PETG, 0 to 30 percent ABS/ASA | Material dependent |
| Retraction length | Setting Overrides | 0.5 to 1 mm direct drive, 3 to 6 mm Bowden | Extruder dependent |
| Retraction speed | Setting Overrides | 30 to 45 mm/s | Adjust length first, leave speed |
For the deeper material-specific tuning that this table only hints at, I keep separate child guides per material. The ones I lean on most: PLA-specific settings, PETG temperature and cooling, ABS/ASA enclosure and bed temp, TPU retraction and speed, polycarbonate profile basics, nylon and PA drying and temperature, and the carbon fiber filament considerations piece.
The calibration sequence that turns a clone into a profile
If you stop reading here and start printing, you have a guess, not a profile. Calibration is the part that makes the difference between “prints work most of the time” and “prints work the first time every time.” Order matters because each test depends on the previous one being settled.
| Step | What it tunes | Orca menu path | Time per material |
|---|---|---|---|
| 1. Temperature tower | Best print temperature | Calibration > Temperature | 30 to 45 min |
| 2. Flow rate (coarse + fine) | Extrusion accuracy | Calibration > Flow rate | 45 to 60 min |
| 3. Pressure advance | Corner sharpness, seam quality | Calibration > Pressure Advance | 15 to 30 min |
| 4. Max volumetric speed | Maximum reliable print speed | Calibration > Max Volumetric speed | 20 to 30 min |
| 5. Retraction (optional) | Stringing | Calibration > Retraction | 15 to 20 min |
Temp tower first
Print at 5 C steps across the manufacturer’s recommended range. Pick the lowest temperature with no layer splitting, clean overhangs, and minimal stringing. Update the profile, then move on. I’ve got a full temperature tower walkthrough if you want the band-reading details.
Flow rate (coarse, then fine)
Two-pass test. The coarse pass narrows you to a 0.05 range, the fine pass nails the actual value. Apply the resulting flow ratio to the profile. Skipping the fine pass is the most common mistake I see, and it’s the difference between “walls look fine” and “walls measure exactly right.” The flow rate calibration in two passes guide has the visual cues.
Pressure advance
Choose Line method for Marlin and Klipper, Pattern method for Bambu native firmware. Record the K value (or PA value, depending on firmware) and update the profile. The full pressure advance calibration guide covers both methods.
Max volumetric speed
Default test runs 5 to 20 mm3/s in 0.5 mm3/s steps. Watch for under-extrusion bands. The first band that shows visible thinning is your hotend’s limit. Drop the final value by 10 to 20 percent for safety margin. This single number caps how fast Orca will let you print regardless of how aggressive your speed profile is.
Retraction last, only if you see stringing
Don’t run the retraction test unless you’ve got stringing on the test print. Adjust length first, leave speed where it is. Over-retracting causes its own problems (jams, heat creep, grinding) so don’t go past 1.5 mm on direct drive or 7 mm on Bowden without a clear reason.
Documenting your values
Write the values somewhere outside the slicer. I use the Notes tab inside Filament Settings for the per-profile values, and a plain text file in OneDrive for the global summary. When Orca eventually loses a profile (it has happened across multiple major versions) you’ll thank yourself for the backup.
Clone a brand profile or clone Generic? A decision rule
This decision trips up almost everyone the first time. Here’s the simple rule I follow.
- Known brand, ships in Orca: clone the brand profile. Polymaker, Overture, Hatchbox, Sunlu, eSun, Bambu, Prusament, and several others have OEM presets in Orca’s library. The vendor has already done temp and flow work for you. Run the calibration sequence to verify, but expect most values to land close.
- Similar brand (cheap PLA+ that smells like a known one): clone the close match. Run only the temp tower and flow rate to verify. Skip pressure advance unless you see ringing on the test print.
- True no-name (Amazon Basics, off-brand silk, factory-second roll with a paper sticker): clone Generic PLA (or Generic PETG, Generic ABS, etc.). The Generic profile is intentionally conservative, so it’ll print but slowly. Run the full calibration sequence.
Brand presets are pre-tuned. Generic presets are pre-conservative. Never edit Generic in place, because that writes to the system preset territory and gets overwritten on the next update. Always clone first.
If you find that Orca doesn’t have your spool’s vendor in the dropdown when you go to create a new filament, you can add it as a custom vendor. Here’s that dialog with the Vendor dropdown open, showing the major third-party vendors Orca already knows about.
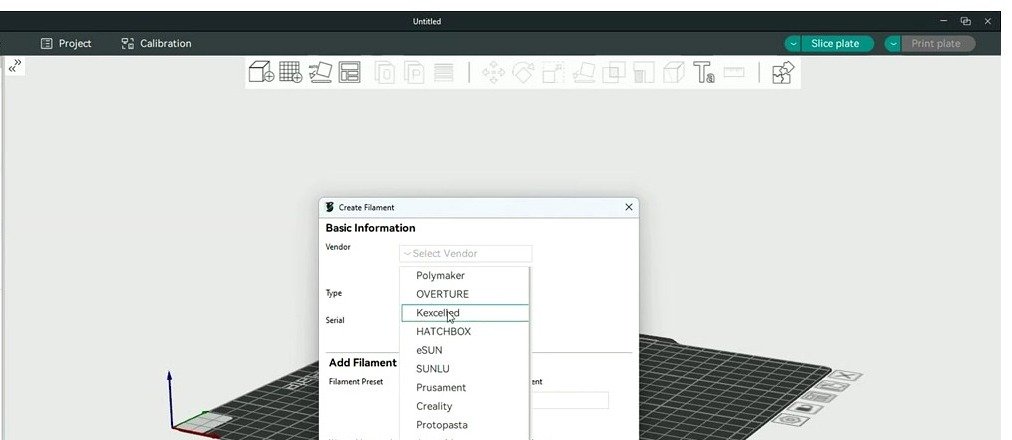
The Create Filament dialog with the Vendor dropdown expanded. Notice Polymaker, OVERTURE, Kexcelled, HATCHBOX, eSUN, SUNLU, Prusament, Creality, Protopasta, Anycubic, BASF, ELEGOO, INLAND, FLASHFORGE, and AMOLEN are all preset options. If your brand isn’t there, tick “Can’t find vendor I want” and type it in.
Where OrcaSlicer stores your profile on disk
Your custom profile gets saved as a .json file in your user folder. The naming convention the slicer uses is filament_vendor_name + filament_name + " @" + vendor_name + printer_name + .json, which is how you’d find Sunlu PLA+ @P1S 0.4 nozzle.json on disk.
| OS | User filament folder path |
|---|---|
| Windows | %APPDATA%\OrcaSlicer\user\default\filament\ (expands to C:\Users\<you>\AppData\Roaming\OrcaSlicer\user\default\filament\) |
| macOS | ~/Library/Application Support/OrcaSlicer/user/default/filament/ |
| Linux (deb / AppImage) | ~/.config/OrcaSlicer/user/default/filament/ |
| Linux (Flatpak) | ~/.var/app/io.github.softfever.OrcaSlicer/config/OrcaSlicer/user/default/filament/ |
Open one of those .json files in any text editor. You’ll see standard JSON with an inherits key pointing at the parent profile. Editing by hand works for small fixes, but if you break the inheritance chain (rename a parent, delete a referenced base profile, mistype a key), every child profile that depends on it will hide from the dropdown. Back up before any manual edit.
System profiles (the ones that ship with OrcaSlicer) live in the install directory under resources/profiles/<vendor>/filament/. Never edit those. They get overwritten by every update, and any change you make there will vanish.
Sharing your custom profile with Export Preset Bundle
Once you’ve tuned a profile, you might want to share it. Or you might just want a backup. Both use the same export flow.
- Go to File > Export > Export Preset Bundle.
- Tick the user filament(s) you want to bundle. You can include process and printer presets too if you want a full setup bundle.
- Choose your format:
.orca_filamentfor a filament bundle, the recommended share format..zipof.jsonfiles for raw backup or programmatic use..orca_printerfor the complete bundle including the printer profile and its associated filaments and processes.
- Save the file and share it via Discord, Reddit, GitHub, Printables, or email.
The recipient imports via File > Import > Import Configs, exactly the same way as in Path B above.
For full backup of every user profile (printer plus filament plus process), .orca_printer is the way. It’s a complete snapshot. I export one before every Orca update because the slicer has lost profiles on major version jumps in the past, and recovering from a fresh .orca_printer takes 30 seconds versus rebuilding from scratch which takes hours.
If you also want to share or back up the printer side of your setup, the add a custom printer profile guide walks through the parallel workflow for printer presets.
Keep your profiles tidy
This is the section nobody reads until they have 47 user profiles and can’t find the one they printed with last week.
- Naming convention.
[Vendor]-[Material]-[Color]-[Variant] @[Printer]. Stick to it. Future you will be grateful. - Avoid special characters. Slashes, colons, asterisks, quotes. They break filenames on at least one OS.
- Suffix experiments. If you’re testing a new temperature, save it as
Sunlu-PLAplus-Black @P1S-test-v2so the calibrated version stays untouched. - Delete unused profiles regularly. Stale presets are the most common reason “everything disappeared after an update” actually means “I can’t find the right one in the dropdown.”
- Back up before every Orca update. Copy your
\user\default\filament\folder to OneDrive, Google Drive, or a Git repo. Better yet, export an.orca_printerbundle.
Common pitfalls and how to avoid each
- Editing Generic directly. Writes to system preset territory, gets overwritten by the next update. Always clone first.
- Not clicking “Save as new user preset.” The basic save button can overwrite silently or fail to register depending on parent type and Orca version. Use the dropdown option explicitly.
- Cloning, calibrating, then re-cloning. Each clone breaks the inheritance chain. Tune first, save once, leave it alone.
- Skipping the test print. A 20 mm cube or 3DBenchy is non-negotiable before trusting the profile on a 14-hour print.
- Forgetting to assign Compatible Printers. A user filament with no printers attached vanishes from the dropdown.
- Saving with an identical name to an existing profile. Some Orca versions silently refuse the save and you think it worked when it didn’t.
- Not disabling Auto Sync before a major update. The cloud sync has been the documented cause of vanishing presets in multiple GitHub issues. Turn it off in Preferences before any Orca update.
- Editing the JSON by hand without backing up. A broken
inheritsfield hides every child profile that depends on it. - Treating community profiles as plug-and-play. They’re tuned for someone else’s printer, plate, and ambient temperature. Re-run flow rate and PA on your machine after import.
- Saving over the wrong filament after a session. Always confirm which preset is active before clicking save.
If any of these turn into actual prints-gone-wrong, the master troubleshooting guide covers the symptom-to-cause mapping in detail.
Frequently asked questions
Can I edit Generic PLA directly?
No, don’t. Generic profiles are system presets, which means they live in the install directory and get overwritten by every Orca update. Any edit you make to Generic PLA in place will disappear. Clone Generic PLA first, then edit the clone. That clone lives in your user folder and survives updates.
Why did my custom profile disappear after the update?
Three common causes. One: Auto Sync was enabled and the cloud sync overwrote your local. Two: the profile was a clone whose parent profile got renamed or deleted, breaking the inheritance chain. Three: you saved to system preset territory by accident and the update wiped it. Restore from your .orca_printer backup. If you don’t have one, check %APPDATA%\OrcaSlicer\user\default\filament\ directly because the .json file may still be on disk even if the slicer doesn’t show it in the dropdown.
Is the extension .orca_filament or .orca_filaments?
It’s .orca_filament, singular. The GitHub wiki has a typo that reads .orca_filaments with an “s”, but the actual extension the slicer exports and imports is singular. The legacy .orca_preset extension you might see in old tutorials isn’t current either. Use .orca_filament.
Can I drag and drop a profile file into OrcaSlicer?
Officially, drag and drop is supported for STL and 3MF model files. It’s not officially documented for .orca_filament bundles, and behavior varies by build. The reliable path is File > Import > Import Configs. If you have a 3MF that bundles profiles inside it, dragging the 3MF in works, and the slicer will prompt you to save the embedded presets.
Do I have to re-calibrate every new color of the same brand?
Same brand, same material family, same diameter: usually no, the previous calibration carries over. The big exceptions are silk and metallic variants (different flow behavior), wood and CF blends (different abrasion and temperature requirements), and any color change that moves you across a chemistry boundary (PLA to PLA+ for example). When in doubt, run just the flow rate test. It takes 30 minutes and rules out 80 percent of color-related variance.
How do I move profiles between PCs?
Two options. The clean way: File > Export > Export Preset Bundle as .orca_printer on the source machine, then File > Import > Import Configs on the destination. The manual way: copy the entire user\default\ folder from your source machine’s OrcaSlicer config directory to the destination. The export route is safer because it handles inheritance and version differences automatically.
What’s the difference between cloning via the floppy icon and creating via the Custom Filaments tab?
Both end up as user presets. The floppy “Save as new user preset” route creates a flat clone that inherits from whatever profile you had open. The Custom Filaments tab “Create New” route lets you pick a Base Profile explicitly and supports a more deliberate parent-child inheritance setup. For one-off rolls, the floppy route is faster. For a vendor where you’ll have many filaments (multiple Polymaker variants, multiple Sunlu colors), the Custom Filaments tab gives you cleaner organization.
Where to go next
If you’re done here, the natural next steps depend on what you came in for.
- If you want the big picture on filament tuning, the complete OrcaSlicer filament settings guide is the parent of this article.
- If you’ve added the profile and want to run the calibration sequence, start with the temperature tower walkthrough, then move to flow rate calibration, then pressure advance.
- If you’re working with a specific material and want the focused tuning notes, jump to PLA, PETG, ABS/ASA, TPU, PC, nylon and PA, or carbon fiber blends.
- If you’re sharing profiles or moving between machines, the import and export deep dive goes further than this article does on edge cases.
- If something printed wrong with the new profile, head to the master troubleshooting guide.
The nine-dollar Amazon spool I mentioned at the top of this article? It’s running its third 8-hour print this week on a cloned Sunlu PLA+ profile with a flow ratio of 0.97, max volumetric speed dropped to 14 mm3/s, and a pressure advance of 0.035. Took me 90 minutes of calibration to get there. Worth every second.