
I tried to print NinjaFlex 85A on a Bowden Ender 3 about two years ago and the filament just buckled in the extruder, wrapping around the gear like spaghetti. Twenty minutes of disassembly later I learned the rule: soft TPU is a direct-drive-only material. The Shore hardness on the spool matters more than the brand, and OrcaSlicer’s Generic TPU defaults assume 95A. Here’s what each hardness actually wants.
I’ve since printed TPU at 60A, 85A, 95A, 98A, and 63D across a Voron, a Bambu X1C, an A1 Mini, and that same Ender 3 (after I converted it to direct drive). Every Shore band has its own personality, and the slicer settings that nail one will jam the next. This guide hands you per-hardness numbers, the real story on Bambu AMS compatibility (it’s not what you think), and the two OrcaSlicer bugs that actively fight you during calibration.
Table of contents
- TPU in 60 seconds (why it’s different)
- Shore hardness explained
- The AMS-TPU compatibility myth (read this first)
- OrcaSlicer’s built-in TPU profile (what’s actually in it)
- TPU 95A starting settings (the baseline)
- Per-Shore-hardness settings
- Extruder reality check: direct drive vs Bowden vs AMS
- Bed adhesion and first layer for TPU
- Stringing, oozing, and Z-hop for TPU
- Common TPU failures and fixes
- Brand notes (what’s different about popular TPUs)
- Calibration order for TPU
- FAQ
TPU in 60 seconds (why it’s different)
TPU stands for thermoplastic polyurethane. It’s an elastomer, so it acts like soft plastic when cool and a sticky, taffy-like melt when hot. It doesn’t warp like ABS, which means you don’t need an enclosure. It is, however, hygroscopic. Wet TPU pops, hisses, prints fuzzy, and produces weak layers. Dry the spool at 65 to 70 C for 8 to 12 hours before you print anything serious.
The thing that makes TPU genuinely different from PLA or PETG isn’t temperature. It’s that the filament itself is springy. Your extruder gear can push faster than the filament can transmit force down the path to the melt zone. The filament compresses, then buckles, then kinks, then jams. That’s the entire physics of every TPU failure I’ve ever had. The slicer setting that controls this is max volumetric speed, and for soft TPU it’s by far the most important number on the panel. If you only learn one TPU lesson from this guide, learn that the max volumetric speed setting is what stops your filament from buckling.
The second rule is the extruder. Direct drive minimizes the distance between the gear and the melt. Bowden setups put a long PTFE tube in between, and inside that tube is exactly where soft TPU buckles. I’ll cover this in detail below, but the short version: anything 90A or softer needs direct drive, full stop.
Shore hardness explained
Shore A measures soft, rubbery materials. Shore D measures harder, plastic-leaning materials. The scales overlap at the firm end (roughly 95A equals about 45D, and 63D equals something past 100A). The number on the spool tells you how the filament behaves both in your hand and in your extruder.
Here’s the honest version of the scale, with what each band is good for and what it’ll do to your printer.
| Shore band | Feel | Typical use cases | Print difficulty |
|---|---|---|---|
| 60A to 70A | Squishy, almost gummy | Vibration dampers, soft prosthetic liners, foam-like cosplay | Very high. Direct drive only. Loose idler tension required. |
| 75A to 85A | True flexible, bends easily | Shoes, watch bands, soft phone cases, gaskets | High. NinjaFlex 85A sits here. Direct drive mandatory. |
| 90A to 95A | Medium-firm, the “default” TPU | Protective cases, drone feet, belts, plugs | Medium. Direct drive preferred. Bowden possible at 95A with tuning. |
| 98A | Very firm, rubbery rebound | Bumpers, gears, semi-rigid clips | Low. Bowden compatible. Easiest TPU to print. |
| 63D (Shore D) | Semi-rigid, still has flex | Industrial parts, rigid tread wheels, hinges | Low. Prints more like soft PETG. |
The single thing I wish someone had told me earlier: temperature that’s perfect at 95A will buckle and jam at 70A. Shore hardness changes everything about how TPU prints, not just how it feels in your fingers.
The AMS-TPU compatibility myth (read this first)
This is the section I’d want pinned to the top of every Bambu forum thread, so I’m putting it before the slicer settings. The common belief is that AMS Lite handles flexible TPU because it has a shorter path than standard AMS. That’s wrong. No Bambu AMS variant auto-feeds flexible TPU. Not AMS, not AMS Lite, not AMS 2 Pro, not AMS HT.
“Bambu TPU for AMS” exists, and it’s the source of the confusion. It is not the same as TPU 95A. Bambu reformulated it at roughly Shore 68D, which is significantly harder than 95A and closer to a tough, rubbery PETG. They made it firm on purpose so it could survive the AMS feed path without buckling. If you’re shopping for soft, bendy TPU and you grab a roll of “Bambu TPU for AMS” thinking it’s the same as the rest, you’ll end up with a near-rigid filament you can’t bend in your hand.
Here is the actual compatibility story across every Bambu AMS variant. I’ve checked this against Bambu’s own filament guide table, multiple forum confirmations, and the OrcaSlicer source profile for “Bambu TPU for AMS” which lists the filament type as TPU-AMS rather than just TPU.
| AMS variant | Flexible TPU (95A or softer) | “Bambu TPU for AMS” (~68D) | Workaround for soft TPU |
|---|---|---|---|
| AMS (standard, X1C/P1S) | Not supported. TPU 95A HF officially blocked from auto-feed. | Works (this is what it’s designed for). | External spool, fed directly into the toolhead. |
| AMS Lite (A1 / A1 mini) | Not supported. The longest filament path of any Bambu setup. | Works. | External spool holder, route directly to the feeder. |
| AMS 2 Pro | Not supported for true flexible TPU. | Works. | External spool. |
| AMS HT | Functions as a sealed dry box only when printing TPU. Manual feed through the dedicated back outlet. | Works through standard feed. | The back-outlet manual feed is the workaround. |
I know this is unwelcome news if you bought an A1 expecting AMS Lite to feed you NinjaFlex. The reality is Bambu’s official recommendation for any TPU below 95A on the A1 series is to bypass the AMS Lite entirely and use the external spool holder routed directly into the toolhead’s PTFE inlet. There’s more context on what each AMS variant can and can’t do in the Bambu AMS compatibility guide.
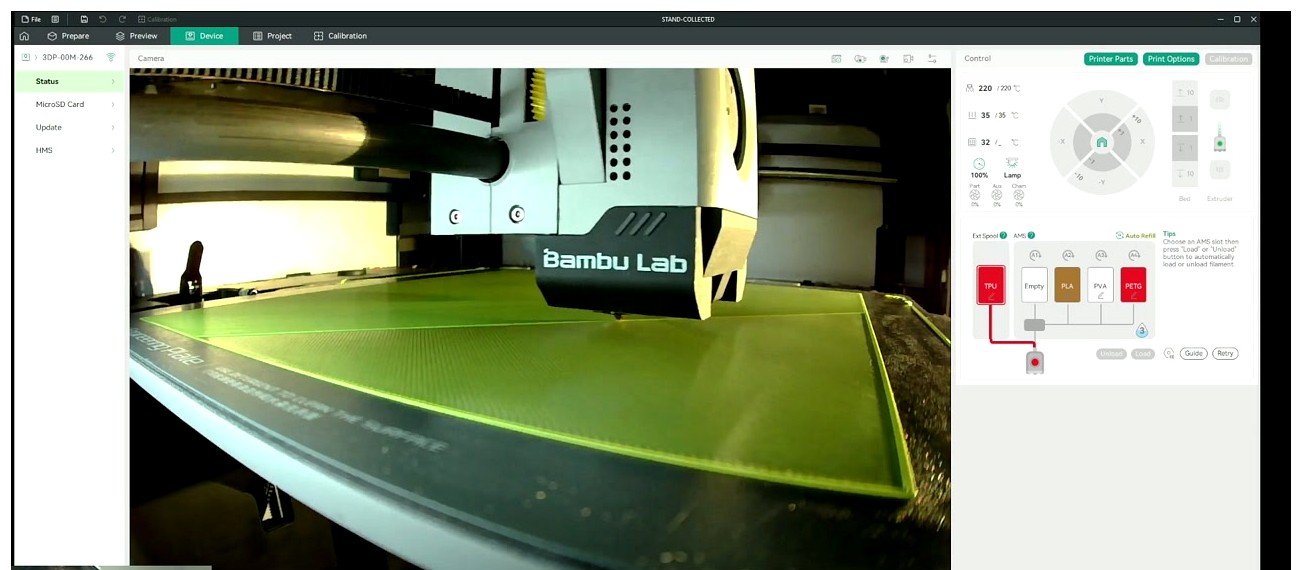
Red TPU loaded on a Bambu printer via the Device tab. Notice the filament path: when you’re running flexible TPU, this is the only routing you should trust, no matter which AMS sits on top of your printer.
OrcaSlicer’s built-in TPU profile (what’s actually in it)
OrcaSlicer ships a “Generic TPU @System” profile that inherits from a base file called fdm_filament_tpu.json in the OrcaFilamentLibrary. I pulled the actual values from the source so you know exactly what the slicer is doing when you pick that dropdown option.
| Setting | OrcaSlicer Generic TPU default | Honest note |
|---|---|---|
| Nozzle temperature | 240 C | High. Most 95A brands publish 220 to 235 C. Dial down to 225 to 230 once you have a working baseline. |
| Nozzle initial layer | 240 C | Same. |
| Nozzle range (low/high) | 200 / 250 C | The legal window. |
| Textured plate temp | 35 C | Correct. Don’t go above 60 C or TPU will slip on the plate. |
| Cool plate temp | 30 C | Use with glue stick as release agent. |
| Max volumetric speed (MVS) | 3.2 mm³/s | Low on purpose. Generic PLA is 15. Don’t raise this for soft TPU. |
| Retraction length | 0.4 mm | Way lower than PLA’s 0.8 to 1 mm. Correct. More retraction equals more jam risk on TPU. |
| Fan min speed | 100% | Aggressive cooling. Drop to 50 to 70% if you see layer separation. |
| Close fan first X layers | 1 | Fan off for layer 1 only. Fine. |
| Filament density | 1.24 g/cm³ | Standard for TPU. |
I want to flag the 240 C number specifically. It’s high compared to what Polymaker, Overture, Siraya Tech, and NinjaTek publish for their TPU lines. OrcaSlicer biases hot on purpose because lower-viscosity melt extrudes more easily, which reduces jam risk more than it hurts surface quality on TPU. Once you’ve printed a calibration cube successfully, run a temperature tower and find the lowest temp that still extrudes cleanly. Usually that’s 225 to 230 for 95A.
One more important thing about the “Bambu TPU for AMS” profile that ships with OrcaSlicer. Its values look very different: 230 C nozzle, 18 mm³/s MVS, 2 mm retraction. That’s because it’s a firmer 68D filament, not a flexible TPU. Don’t load that profile thinking it’s a generic preset. If you’re printing NinjaFlex or Polymaker PolyFlex, start with “Generic TPU @System” and tune from there.
TPU 95A starting settings (the baseline)
If you’ve never printed TPU before, start with 95A. It’s the most forgiving, the most widely available, and the one almost every brand sells. Once 95A works reliably, you can branch out to softer or harder variants with confidence. Below are the settings I run as my default starting point on a 0.4 mm nozzle direct-drive printer for any 95A spool I haven’t characterized yet.
| Setting | Value | Why |
|---|---|---|
| Nozzle temperature | 225 C (range 220 to 235) | OrcaSlicer’s 240 default is high; 225 is the brand consensus midpoint. |
| Bed temperature | 40 C (range 35 to 50) | Hot enough to tack, cool enough not to slip. |
| Outer wall speed | 20 to 30 mm/s | Quality boundary on TPU. Above 30 you’ll see ringing. |
| Inner wall / infill speed | 30 to 40 mm/s | Can push slightly faster on internal geometry. |
| Travel speed | 100 to 150 mm/s | NOT 200+. TPU is sticky; fast travel pulls strings. |
| First layer speed | 15 to 20 mm/s | Slow. TPU needs time to bond. |
| Max volumetric speed | 5 to 8 mm³/s | Higher than the 3.2 default. Most 95A spools handle this. |
| Retraction | 0.5 to 1 mm at 20 to 25 mm/s | Short. More causes jams. |
| Z-hop | 0.1 to 0.2 mm spiral | Spiral works better than normal Z-hop for TPU per community testing. |
| Pressure advance / k-factor | 0.03 to 0.05 | Higher than PLA. Run the test, don’t copy values. |
| Flow ratio | 1.00 to 1.05 | Slight overflow helps fill on springy filament. |
| Cooling fan | 50 to 80% after layer 1 | Less than PLA. Too much cooling weakens layer bond. |
| Wall loops | 3 (for parts that flex) | Two walls leave thin TPU prone to splitting at hinges. |
I’d recommend running these three calibrations in order before you print anything functional: temperature tower, pressure advance test, then retraction calibration. With TPU the values change more between brands than they do between, say, PLA brands. A spool of Polymaker PolyFlex won’t have the same sweet spot as a spool of eSUN eTPU.
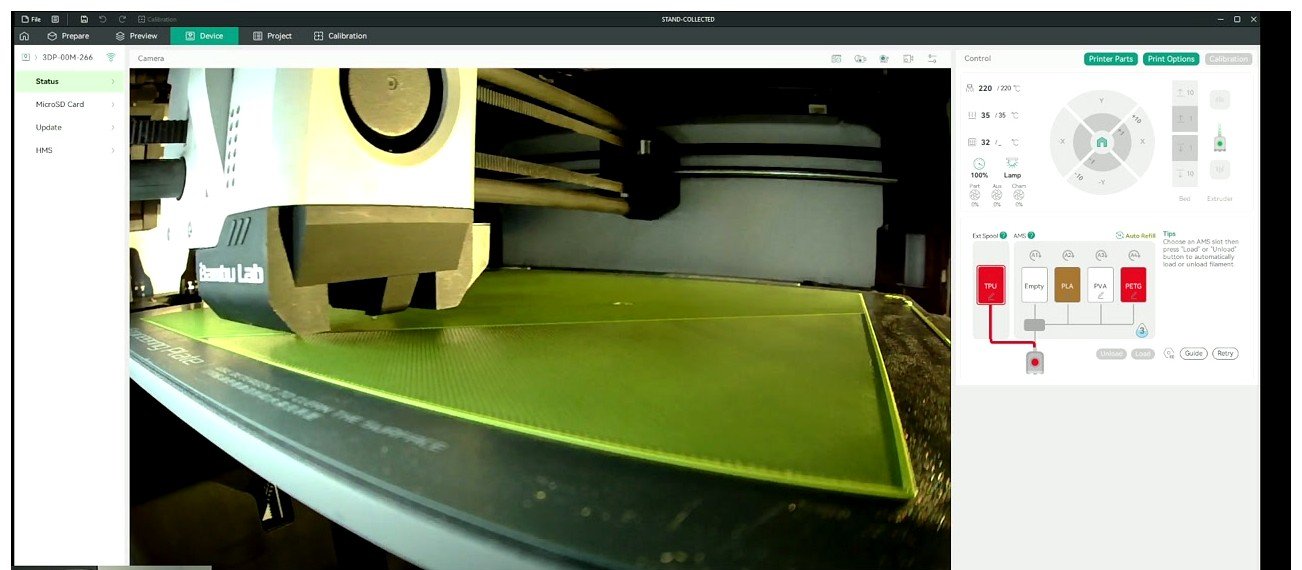
The toolhead in mid-print. When TPU is running well, you should hear nothing unusual from the extruder, no clicking, no grinding. Any audible variation means the gear is slipping or the filament is buckling somewhere upstream.
Per-Shore-hardness settings
This is the part of the guide I use myself when I open a new spool. Each Shore band has its own settings table. The pattern is consistent: softer equals slower, lower MVS, less retraction, slightly higher temperature to drop viscosity.
Shore 60A to 70A (super soft)
These are gummy filaments. COEX TPU 60A is a typical example. They’re squishy in your hand and they’ll wrap themselves around your extruder gear at the first sign of resistance. I print these only on a Voron with a Stealthburner or a Bambu with the external spool, and I keep speeds below 15 mm/s.
| Setting | Value |
|---|---|
| Outer wall speed | 10 to 15 mm/s |
| Overall print speed | 15 to 20 mm/s |
| Nozzle temp | 225 to 240 C (higher helps viscosity) |
| MVS | 2 to 4 mm³/s |
| Retraction | 0 to 0.2 mm (essentially off) |
| Z-hop | 0 mm or 0.1 mm spiral |
| Pressure advance | 0.05 to 0.08 |
| Fan | 50 to 60% |
| Bed temp | 40 to 50 C |
| Bowden | Do not try. It will jam. |
| AMS / AMS Lite | Not supported. Use external spool. |
Loosen your extruder idler tension before printing 60A. A spring set for PLA will deform the soft filament into a sausage shape and cause it to wrap around the gear instead of advancing. I learned this the hard way on a Mosquito hotend; the gear was perfectly fine, the tension was just too high for the material.
Shore 75A to 85A (soft to medium, NinjaFlex 85A)
NinjaFlex 85A is the classic here. It’s soft enough to make watch bands and shoe insoles, firm enough that you can actually push it through a well-tuned direct drive at moderate speeds. NinjaTek’s own TDS publishes 10 to 20 mm/s for top and bottom layers, 15 to 35 mm/s for infill, and a temperature window of 225 to 250 C. I run mine at 230 C.
| Setting | Value |
|---|---|
| Outer wall speed | 15 to 20 mm/s |
| Overall print speed | 15 to 25 mm/s |
| Nozzle temp | 220 to 235 C (NinjaFlex: 225 to 250) |
| MVS | 3 to 6 mm³/s |
| Retraction | 0.2 to 0.8 mm at 20 to 25 mm/s |
| Z-hop | 0.1 mm spiral |
| Pressure advance | 0.04 to 0.06 |
| Fan | 50 to 70% |
| Bed temp | Room temp to 50 C |
| Bowden | Marginal. Very short rigid Bowden only, retraction off. |
| AMS / AMS Lite | Not supported. External spool only. |
Shore 90A to 95A (firm, the default TPU)
This is the band most “TPU” filaments live in. Polymaker PolyFlex TPU95, Bambu TPU 95A HF, eSUN eTPU-95A, Sunlu TPU, Overture TPU 95A, Siraya Tech Flex 95A. If you say “TPU” without specifying, this is what people assume you mean. It’s the easiest place to start.
| Setting | Value |
|---|---|
| Outer wall speed | 20 to 30 mm/s |
| Inner wall / infill | 30 to 40 mm/s |
| Nozzle temp | 220 to 235 C, start 225 C |
| MVS | 5 to 8 mm³/s (HF variants can run higher) |
| Retraction | 0.5 to 1 mm at 25 mm/s |
| Z-hop | 0.1 to 0.2 mm spiral |
| Pressure advance | 0.03 to 0.05 |
| Fan | 50 to 80% |
| Bed temp | 30 to 50 C |
| Bowden | Possible. Short rigid Bowden at 15 to 20 mm/s, reduce retraction to 1 to 2 mm. |
| AMS / AMS Lite | Not officially supported. Use external spool. |
Shore 98A (very firm, Fillamentum Flexfill 98A)
98A is the easiest TPU to print. It bends but it feels almost rigid in your hand. Bowden setups handle it without complaint. I’ve run Flexfill 98A on a stock Ender 3 Bowden at 30 mm/s with no jams.
| Setting | Value |
|---|---|
| Outer wall speed | 25 to 35 mm/s |
| Overall print speed | 30 to 50 mm/s |
| Nozzle temp | 225 to 245 C |
| MVS | 6 to 10 mm³/s |
| Retraction | 1 to 1.5 mm |
| Bowden | Works. |
| Bed temp | 50 to 60 C |
Shore 63D (semi-rigid, Fiberlogy 40D territory)
63D is past Shore A entirely. It’s semi-rigid, has the slight rubbery rebound of TPU but prints more like a soft PETG. If you’ve printed PETG successfully you can print 63D.
| Setting | Value |
|---|---|
| Outer wall speed | 30 to 40 mm/s |
| Overall print speed | 30 to 50 mm/s |
| Nozzle temp | 225 to 235 C |
| MVS | 6 to 10 mm³/s |
| Retraction | 1 to 2 mm (treat like PETG) |
| Bowden | Works fine. |
| Bed temp | 50 to 60 C |
Compared against the PETG settings guide, 63D TPU looks almost identical except the bed is cooler and the part flexes slightly when you bend it. If you’re testing how a part will perform with light flex, 63D is the gentlest place to start.
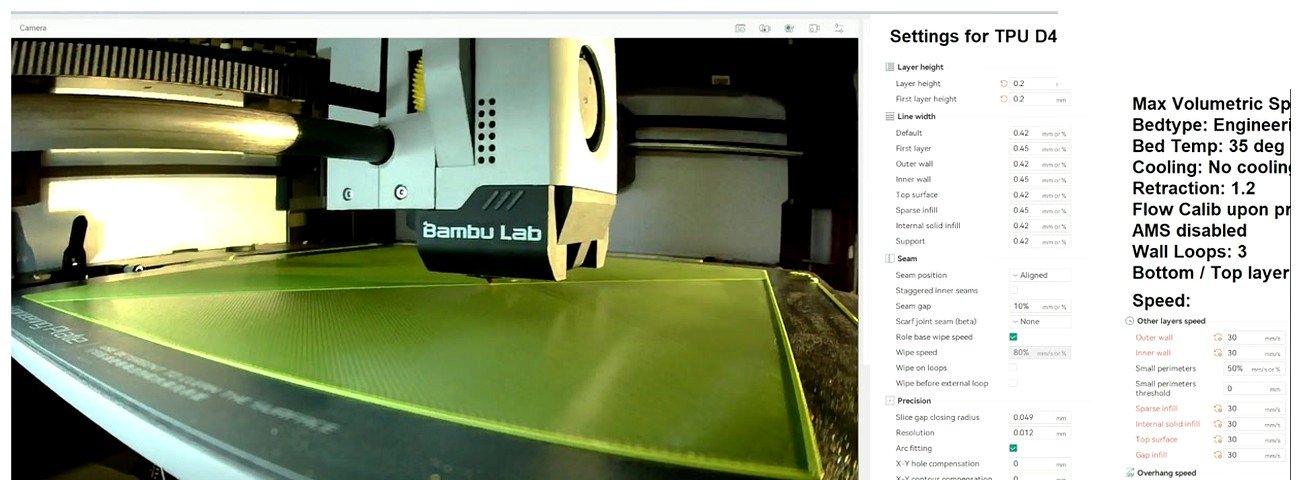
OrcaSlicer settings for a TPU D4 hard variant: retraction 1.2 mm, AMS disabled (because the filament path is the external spool), wall loops 3, bed 35 C. Notice how different these values are from the Generic TPU defaults. Harder TPU tolerates more retraction; softer TPU does not.
Extruder reality check: direct drive vs Bowden vs AMS
The extruder is the single most important hardware variable for TPU. Slicer settings can only do so much; if your hardware geometry is fighting the filament, no amount of MVS tuning will save the print.
| Extruder type | 60A to 70A | 75A to 85A | 90A to 95A | 98A and 63D |
|---|---|---|---|---|
| Direct drive (BMG, Bondtech LGX, Stealthburner, Mosquito) | Works with loose tension and 10 mm/s | Works at 15 to 25 mm/s | Works at 20 to 30 mm/s | Works at 30 to 50 mm/s |
| Short Bowden (Ender 3-class, ~500 mm PTFE) | No. Will jam. | No, except very brief tests. | Marginal. Retraction off, 15 to 20 mm/s. | Works fine. |
| Long Bowden (CoreXY with remote extruder) | No. | No. | Difficult. Not recommended. | Works. |
| Bambu AMS (standard, X1C/P1S) | No. External spool required. | No. External spool required. | No (official). External spool. | Officially unsupported; some users succeed at own risk. |
| Bambu AMS Lite (A1, A1 Mini) | No. External spool required. | No. External spool required. | No (official). External spool. | Officially unsupported; some users succeed at own risk. |
| Bambu AMS HT | Sealed dry box only. Manual back-outlet feed. | Sealed dry box only. | Sealed dry box only. | Sealed dry box only. |
| External spool (Bambu official workaround) | Yes | Yes | Yes | Yes |
Why Bowden physics fights soft TPU: inside a long PTFE tube, the soft filament can compress along its length faster than the extruder can push the leading edge into the hotend. Once it compresses past about 8 to 10 percent, it kinks and the kink jams. Direct drive removes that compression zone almost entirely, which is why every soft-TPU success story uses direct drive.
Why “Bambu TPU for AMS” gets through AMS: it’s reformulated at 68D Shore. At that hardness, it doesn’t compress meaningfully along the long AMS Lite path, so the extruder gear can move it just like a slightly-stretchy PETG. The trade-off is you lose the flex. If you want a phone case that bounces when you drop it, “Bambu TPU for AMS” won’t deliver. If you want a rigid grommet with a bit of give, it’s perfect.
Bed adhesion and first layer for TPU
TPU bonds aggressively to smooth PEI and glass. That sounds great until you try to remove a part and rip the PEI coating off the spring-steel plate. The single most counterintuitive thing about TPU first layers: glue stick is a release agent, not an adhesion promoter.
| Build surface | Adhesion | Recommendation |
|---|---|---|
| Textured PEI | Excellent, releases cleanly when cool | Ideal. No glue needed. |
| Smooth PEI | Too aggressive; pulls coating | Use glue stick as release agent. |
| Glass | Poor cold, sticks hot | Glue stick or hairspray. |
| Magnetic spring-steel mat | Good | 55 C with thin glue film. |
| Garolite | Good | No adhesive needed. |
Other first-layer rules I follow:
- First layer speed 15 to 20 mm/s. Slower than PLA. TPU needs time to bond.
- First layer line width 110 to 120% of nozzle. A wider first layer is tackier and grips better.
- First layer flow 105 to 110%. Slight over-extrusion to squish into the texture.
- Bed temperature 35 to 50 C. Above 60 C, TPU softens and slips. This is a common failure mode that looks like the part is sliding around mid-print.
- Clean the plate with isopropyl alcohol before TPU. Skin oils ruin adhesion.
Stringing, oozing, and Z-hop for TPU
TPU strings less than PETG but more than dry PLA. The stringing always comes from one of three places: wet filament, fast travel moves, or a slicer profile that treats TPU like PLA and cranks retraction.
The PLA-instinct fix is to crank retraction. Don’t do this on TPU. More retraction equals more compression along the filament path equals more jam risk. The right move is the opposite: shorter retraction (0.5 mm direct drive, off entirely on Bowden), spiral Z-hop at 0.1 to 0.2 mm, and slower travel speeds.
Spiral Z-hop is the OrcaSlicer setting I always reach for on TPU. Regular Z-hop causes a pressure change at the nozzle that produces a bad combination of stringing and under-extrusion. Spiral Z-hop ramps the Z axis along a helix during travel, which keeps melt-zone pressure stable. Some community users go further and set retraction to 0.01 mm just to enable Z-hop travel without actually retracting any filament.
Travel speed is the other big lever. PLA setups at 200 mm/s travel work fine. TPU at 200 mm/s travel pulls fine strings because the molten filament is sticky and the toolhead is whipping past it. Drop travel to 100 to 150 mm/s and watch the strings disappear.
Slow deretraction (5 to 10 mm/s for the un-retract) helps avoid pressure spikes that produce blobs right at the end of a travel move. The default deretract speed matches retract speed; for TPU I bias it slower than the retract.
If you’ve never run the retraction calibration and the pressure advance test on TPU specifically, do those before you blame stringing on hardware. The right calibrated values matter more than any general setting.
Common TPU failures and fixes
Here’s the troubleshooting matrix I work through when a TPU print goes sideways. Almost every failure I’ve ever had falls into one of these buckets.
| Symptom | Probable cause | Fix |
|---|---|---|
| Filament wraps around the extruder gear (classic TPU spaghetti) | Print speed too high; filament can’t transmit force | Drop speed to 20 mm/s; verify MVS at 3 to 5 mm³/s; loosen extruder idler tension |
| Layer separation, delamination | Nozzle temp too low or fan too aggressive | Raise nozzle 5 to 10 C; drop fan to 50% or lower |
| Stringy print | Wet filament or aggressive retraction | Dry 65 C for 12 hours; if dry, enable spiral Z-hop, drop travel speed |
| Blobs at end of travels | Pressure release on deretract | Lower deretract speed to 5 to 10 mm/s; reduce retraction distance |
| Hairy, fuzzy surface | Moisture in filament | Dry 65 to 70 C for 12 hours minimum |
| Print stuck to bed; can’t remove without damage | Bonded too hard to smooth PEI | Cool bed fully; apply glue stick as release for next print; switch to textured plate |
| First layer not adhering | Bed too hot (TPU melts back from plate) or contaminated | Try 50 C; clean with isopropyl alcohol; slow first layer to 15 mm/s |
| Under-extrusion, gaps in walls | Wet filament or extruder slipping | Dry; clean extruder gear teeth; bump flow to 1.05 |
| TPU jams during MVS calibration print | OrcaSlicer issue #1888: max flowrate test caps at 200 mm³/s by default, which is wildly too high for TPU | Manually set MVS calibration range to 1 to 4 mm³/s with 0.2 step before running the test |
| Temp tower defaults to 280 to 320 C | OrcaSlicer issue #7323: temp tower TPU defaults were copied from PA-CF by mistake | Manually override temp tower range to 200 to 230 C |
The two OrcaSlicer bugs deserve a closer look because they will both crash a TPU calibration print if you don’t know about them.
Issue #7323 mis-populates the temperature tower defaults for the Generic TPU profile with values copied from a PA-CF (carbon fiber polyamide) profile, somewhere around 280 to 320 C. If you click “Calibration -> Temperature Tower” with Generic TPU loaded and don’t change the range, your printer will try to heat to 320 C with TPU in the nozzle. At those temperatures the filament carbonizes inside the hotend and you get a hard jam that requires a cold pull. Manually override the range to 200 to 230 C before you press print.
Issue #1888 affects the max volumetric speed calibration. The default cap is 200 mm³/s which is reasonable for PLA and absurd for TPU. The first segments of the test will push 50, 80, 120 mm³/s of TPU through a 0.4 nozzle and the extruder gear will eat the filament. Override the test range to 1 to 4 mm³/s with 0.2 mm³/s step for soft TPU, or 1 to 8 for 95A.
If you’re seeing failures that don’t fit this matrix, the general troubleshooting guide and the flow rate calibration page cover the symptoms that aren’t TPU-specific.
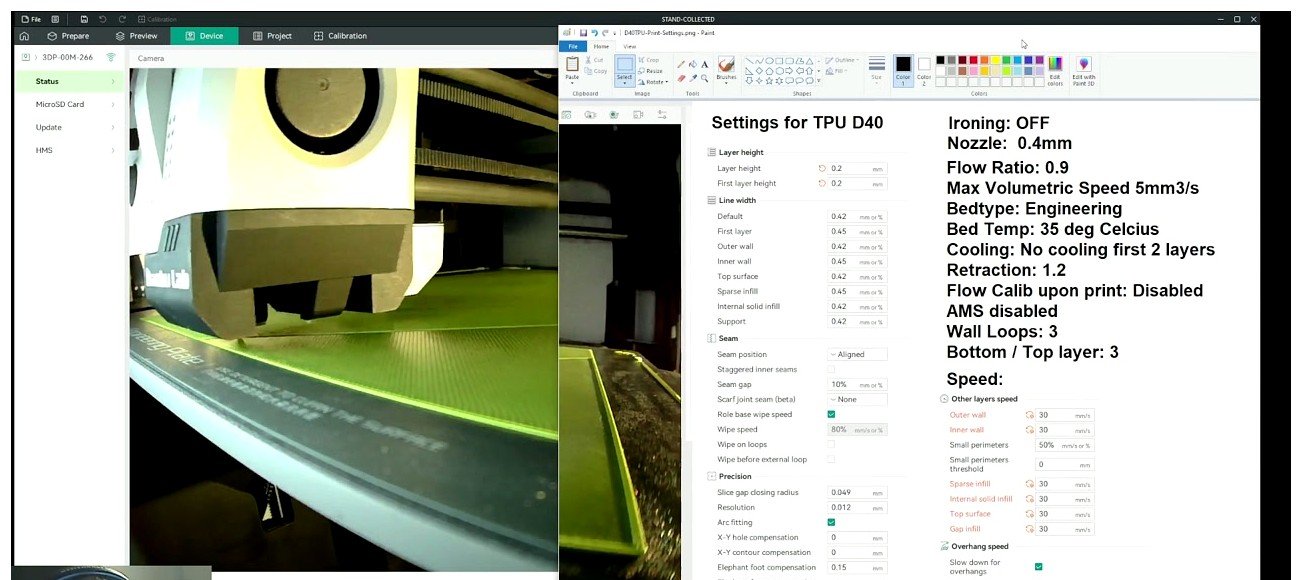
Settings for a TPU D40 mid-firm variant: MVS 5 mm³/s, bed 35 C, no cooling for the first two layers. The bed temp matches OrcaSlicer’s textured-plate default; the “no cooling first two layers” trick gives the first layer extra time to bond before the fan kicks in.
Brand notes (what’s different about popular TPUs)
Brand matters more on TPU than on PLA. The reason is the formulation: different brands target different Shore values and use different plasticizer ratios, which changes both the temperature window and the MVS ceiling. Here’s a quick reference for the most common spools.
| Brand & product | Shore | Nozzle temp | Bed temp | Notes |
|---|---|---|---|---|
| NinjaTek NinjaFlex 85A | 85A | 225 to 250 C | up to 50 C | 660% elongation. Direct drive only. Top/bottom 10 to 20 mm/s. |
| NinjaTek NinjaFlex Cheetah | 95A | 225 to 245 C | up to 50 C | Faster-printing firm variant. |
| Polymaker PolyFlex TPU95 | 95A | 210 to 230 C | 25 to 60 C | 20 to 40 mm/s. Dry 65 C for 8h. |
| Polymaker PolyFlex TPU95-HF | 95A | 210 to 230 C | 25 to 60 C | Higher MVS variant. |
| Bambu TPU 95A HF | 95A | 220 to 240 C | 30 to 35 C | NOT AMS compatible. External spool only. |
| Bambu TPU for AMS | ~68D | 230 C | 35 C | Firmer than 95A. The only Bambu TPU that feeds standard AMS. 18 mm³/s MVS. |
| Bambu TPU 90A | 90A | 225 C | 30 to 35 C | Designed for A-series with external spool. |
| eSUN eTPU-95A | 95A | 220 to 230 C | 30 to 50 C | Budget standard. |
| Sunlu TPU | 95A | 210 to 230 C | 30 to 50 C | Popular budget option. |
| Overture TPU 95A | 95A | 210 to 240 C | 25 to 60 C | 20 to 30 mm/s, 0.5 to 1.5 mm retraction. |
| Siraya Tech Flex 95A | 95A | 220 to 240 C | 30 to 40 C | 1 to 2 mm retraction, fan 50 to 70%. |
| Fillamentum Flexfill 98A | 98A | 225 to 245 C | 50 to 60 C | Firm. Bowden compatible. |
| Fiberlogy 40D | 40D | 225 to 235 C | 50 to 60 C | Semi-rigid. Prints like soft PETG. |
| COEX TPU 60A | 60A | 225 to 240 C | 40 to 50 C | Specialty super-soft. |
| ColorFabb VarioShore | ~70A (foamed) | 200 to 250 C | 40 to 50 C | Variable density. Foaming intensity is temperature-controlled. |
The two I want to flag specifically are Bambu TPU 95A HF and Bambu TPU for AMS. They have similar names and they’re sold by the same brand, but they are wildly different filaments. The 95A HF is true flexible TPU that requires an external spool on every Bambu printer. The “for AMS” version is 68D and feeds through standard AMS Lite slots. If you’ve been confused by which Bambu TPU does what, you’re not alone: there’s an entire forum thread titled “Bambu Lab TPU 95A HF is not supported by AMS” because so many users assumed the AMS-friendly version was the same filament.
Calibration order for TPU
If you’re starting from scratch on a new TPU spool, run these in order. Skipping any one of them will make the later steps unreliable.
- Dry the spool. 65 to 70 C for 8 to 12 hours. This is not optional. Wet TPU breaks every other calibration.
- Temperature tower. Override the default range (which OrcaSlicer wrongly defaults to 280 to 320 due to issue #7323) to 200 to 230 C. Find the lowest temp that still produces clean extrusion without layer separation.
- Max volumetric speed. Override the default range (issue #1888 leaves it at 1 to 200, way too high) to 1 to 4 mm³/s for soft TPU, or 1 to 8 for 95A. Watch for the segment where lines first start under-extruding; back off 20%.
- Pressure advance test. Expect 0.03 to 0.05 for 95A, higher (0.05 to 0.08) for soft TPU. Do not copy PLA values.
- Retraction test. Start at 0.2 mm and step up. Stop the moment retraction starts producing the wrap-around-gear failure. Direct drive typically lands at 0.5 to 1 mm; Bowden lands at 0 to 0.5 mm.
- Flow rate calibration. Should be last because the other calibrations affect apparent flow. Expect 1.00 to 1.05 for direct drive, slightly higher on Bowden.
The pillar OrcaSlicer filament settings guide covers the calibration flow across all materials and is worth bookmarking. For comparison points across materials, the PLA settings, PETG settings, and ABS/ASA settings articles walk through the same calibrations with different starting values.
FAQ
Can I print TPU on a Bowden printer? Yes, but only if your TPU is 95A or harder. Below 90A, the filament buckles inside the PTFE tube faster than the extruder can push it. I’ve successfully run 98A on a stock Ender 3 Bowden. I’ve never had a clean 85A print on the same setup.
Why does my TPU jam even though I set the right temperature? Temperature is rarely the cause of TPU jams. The cause is usually max volumetric speed too high, retraction too long, or extruder idler tension too tight. If you’re at the right temperature and still jamming, drop MVS to 3 mm³/s, retraction to 0.4 mm, and loosen the extruder spring by half a turn.
Will AMS Lite ever support flexible TPU? Probably not. The AMS Lite filament path is the longest of any consumer system, and that geometry is fundamentally bad for soft filament. Bambu’s official recommendation for any TPU below 95A on the A1 series is the external spool holder. If you need flexible TPU on a Bambu, plan around the external spool from the start.
Is “Bambu TPU for AMS” the same as TPU 95A? No. “Bambu TPU for AMS” is approximately Shore 68D, which translates to harder than 95A. Bambu reformulated it firmer specifically so it could feed through the AMS path. If you want true flexible TPU, do not buy this product expecting it to behave like 95A.
What’s the softest TPU I can print on a Bambu A1? With the AMS Lite, only “Bambu TPU for AMS” (68D) feeds reliably. With the external spool holder, you can print all the way down to 60A. The hardware limit is the toolhead geometry; the official compatibility limit is the AMS Lite path.
Should I use Z-hop for TPU? Yes, but spiral Z-hop at 0.1 to 0.2 mm rather than normal Z-hop. Normal Z-hop causes pressure changes at the nozzle that produce a bad combination of stringing and under-extrusion. Spiral keeps melt pressure stable.
How much does drying TPU actually matter? A lot. Wet TPU prints fuzzy, pops audibly, strings badly, and produces weak layer adhesion. I’ve seen “broken extruder” forum posts that were just wet filament. Dry every TPU spool that’s been open more than a couple of days, and store it with desiccant.
Why is OrcaSlicer’s default TPU temp 240 C when most brands say 220 to 230? Lower-viscosity melt extrudes more easily, which reduces jam risk on a springy filament. OrcaSlicer biases high on purpose. Once your prints are working, dial down by 5 C at a time and watch for layer separation. Most 95A spools settle at 225 to 230.
Closing notes
Three things to remember. Shore hardness is the single fact that determines whether your TPU print succeeds or jams. Start every new TPU spool at 95A on a direct drive printer; once that’s working, expand into softer or harder variants from a baseline of confidence. And don’t load “Bambu TPU for AMS” thinking it’s the same as TPU 95A, because it isn’t. It’s a 68D reformulation that happens to share part of a name.
If you take one thing from this guide, it’s that the slicer settings are downstream of the hardware and the moisture content. Dry your filament. Run direct drive for anything 90A or softer. Set max volumetric speed conservatively (3 to 5 mm³/s for soft, 5 to 8 for 95A). Override OrcaSlicer’s two buggy calibration defaults before you run the temp tower or the MVS test. Once those four things are in place, the per-Shore tables above will get you a clean first print on almost any TPU you put through them.
Related OrcaSlicer guides
- Best OrcaSlicer Filament Settings: All Materials Cheatsheet
- How to Use Bambu Lab AMS Filaments with OrcaSlicer (2026 Guide)
- OrcaSlicer Filament Drying Guide: When and How to Dry It
- OrcaSlicer Silk PLA Settings for That Glossy, Satin Finish
- How Often Should You Recalibrate OrcaSlicer? 2026 Maintenance Schedule